
English Manual
Page 2
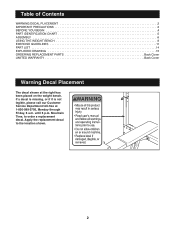
Table of Contents WARNING DECAL PLACEMENT 2 IMPORTANT PRECAUTIONS 3 BEFORE YOU BEGIN 4 PART IDENTIFICATION CHART 5 ASSEMBLY 6 USING THE WEIGHT BENCH 9 EXERCISE GUIDELINES 11 PART LIST 14 EXPLODED DRAWING 15 ORDERING REPLACEMENT PARTS Back Cover LIMITED WARRANTY Back Cover Warning Decal Placement The decal shown at 1-... a decal is missing, or if it is not legible, please call our Customer Service Department toll-free at the right has been placed on the weight bench. until 6 p.m.
Table of Contents WARNING DECAL PLACEMENT 2 IMPORTANT PRECAUTIONS 3 BEFORE YOU BEGIN 4 PART IDENTIFICATION CHART 5 ASSEMBLY 6 USING THE WEIGHT BENCH 9 EXERCISE GUIDELINES 11 PART LIST 14 EXPLODED DRAWING 15 ORDERING REPLACEMENT PARTS Back Cover LIMITED WARRANTY Back Cover Warning Decal Placement The decal shown at 1-... a decal is missing, or if it is not legible, please call our Customer Service Department toll-free at the right has been placed on the weight bench. until 6 p.m.
English Manual
Page 3
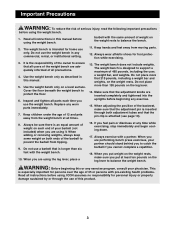
...using the leg lever, place a 16. The weight bench does not include weights. The weight bench is longer than 130 pounds on the weight rests to balance the weight bench. Do not use a barbell that is designed to support a maximum of weight on the leg lever. 14. When you ... ends of all instructions before using the weight bench. 1. The weight bench is the responsibility of the owner to ensure that the adjustment knobs are inserted completely and tightened into the uprights before using the weight bench. Use the weight bench only as described in any exercise program,...
...using the leg lever, place a 16. The weight bench does not include weights. The weight bench is longer than 130 pounds on the weight rests to balance the weight bench. Do not use a barbell that is designed to support a maximum of weight on the leg lever. 14. When you ... ends of all instructions before using the weight bench. 1. The weight bench is the responsibility of the owner to ensure that the adjustment knobs are inserted completely and tightened into the uprights before using the weight bench. Use the weight bench only as described in any exercise program,...
English Manual
Page 4
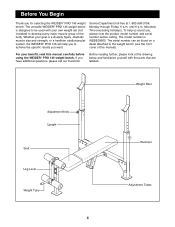
... read this manual). Before You Begin Thank you , please note the product model number and serial number before using the WEIDER¨ PRO 145 weight bench. until 6 p.m. If you want. The serial number can be used with the parts that are labeled. Service Department toll... or a healthier cardiovascular system, the WEIDER¨ PRO 145 will help us assist you for selecting the WEIDER¨ PRO 145 weight bench. To help you to develop every major muscle group of this manual carefully before calling. The versatile WEIDER¨ PRO 145 weight bench is WEBE09900. The model number is ...
... read this manual). Before You Begin Thank you , please note the product model number and serial number before using the WEIDER¨ PRO 145 weight bench. until 6 p.m. If you want. The serial number can be used with the parts that are labeled. Service Department toll... or a healthier cardiovascular system, the WEIDER¨ PRO 145 will help us assist you for selecting the WEIDER¨ PRO 145 weight bench. To help you to develop every major muscle group of this manual carefully before calling. The versatile WEIDER¨ PRO 145 weight bench is WEBE09900. The model number is ...
English Manual
Page 6
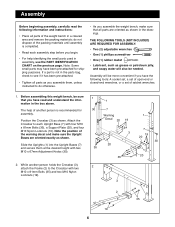
... One (1) phillips screwdriver ¥ One (1) rubber mallet ¥ Lubricant, such as shown in the drawings. Assembly will also be more convenient if you assemble the weight bench, make sure the Upright Bases are oriented as grease or petroleum jelly, and soapy water will be needed. The help identifying the small parts used... exactly as shown. Assembly Before beginning assembly, carefully read and understand the information in a cleared area and remove the packing materials; Before assembling this weight bench, be sure that all parts of the weight bench in the box above.
... One (1) phillips screwdriver ¥ One (1) rubber mallet ¥ Lubricant, such as shown in the drawings. Assembly will also be more convenient if you assemble the weight bench, make sure the Upright Bases are oriented as grease or petroleum jelly, and soapy water will be needed. The help identifying the small parts used... exactly as shown. Assembly Before beginning assembly, carefully read and understand the information in a cleared area and remove the packing materials; Before assembling this weight bench, be sure that all parts of the weight bench in the box above.

English Manual
Page 8
...Pin with the Adjustment Pin (32) through both holes in the adjustment tubes. Tap two 3/4Ó Round Inner Caps (9) into the holes in USING THE WEIGHT BENCH on the Frame (2) with the Bolt, two M10 Washers (24), and an M10 Nylon Locknut (19). Make sure that all remaining parts will be explained... holes in the adjustment tubes. 7 5 32 42 17ÑLubricate 24 8. With the wide end of all parts are properly tightened before you use the weight bench. The use of the Seat (11) positioned as shown, attach the Seat to the brackets on pages 9 and 10. 8 Secure the Backrest (6) to the ...
...Pin with the Adjustment Pin (32) through both holes in the adjustment tubes. Tap two 3/4Ó Round Inner Caps (9) into the holes in USING THE WEIGHT BENCH on the Frame (2) with the Bolt, two M10 Washers (24), and an M10 Nylon Locknut (19). Make sure that all remaining parts will be explained... holes in the adjustment tubes. 7 5 32 42 17ÑLubricate 24 8. With the wide end of all parts are properly tightened before you use the weight bench. The use of the Seat (11) positioned as shown, attach the Seat to the brackets on pages 9 and 10. 8 Secure the Backrest (6) to the ...

English Manual
Page 9
... Adjustment Knobs (30) from both uprights at the same height. Inspect and tighten all parts each time you use solvents. The weight bench can be adjusted to five heights for several exercises. WARNING: Do not place more than 130 pounds on page 11 for important ...are inserted completely and tightened into the uprights. 1 30 7 9 Using the Weight Bench The weight bench is designed to be cleaned with your weight set (not included) for additional exercises. The steps below explain how the weight bench can be used with a damp cloth and a mild, non-abrasive detergent. Refer...
... Adjustment Knobs (30) from both uprights at the same height. Inspect and tighten all parts each time you use solvents. The weight bench can be adjusted to five heights for several exercises. WARNING: Do not place more than 130 pounds on page 11 for important ...are inserted completely and tightened into the uprights. 1 30 7 9 Using the Weight Bench The weight bench is designed to be cleaned with your weight set (not included) for additional exercises. The steps below explain how the weight bench can be used with a damp cloth and a mild, non-abrasive detergent. Refer...
English Manual
Page 16
... , please be prepared to give the following information when calling: ¥ The MODEL NUMBER of the product (WEBE09900) ¥ The NAME of the product (WEIDER¨ PRO 145 weight bench) ¥ The SERIAL NUMBER of the product (see the front cover of this manual) ¥ The KEY NUMBER and DESCRIPTION of the desired part(s) (see...
... , please be prepared to give the following information when calling: ¥ The MODEL NUMBER of the product (WEBE09900) ¥ The NAME of the product (WEIDER¨ PRO 145 weight bench) ¥ The SERIAL NUMBER of the product (see the front cover of this manual) ¥ The KEY NUMBER and DESCRIPTION of the desired part(s) (see...


