

English Manual
Page 1
... CALL DIRECT TO OUR TOLL-FREE CUSTOMER HOT LINE. Serial Number Decal (Under Seat) QUESTIONS? CUSTOMER HOT LINE: 1-800-999-3756 Mon.ÐFri., 6 a.m.Ð6 p.m. Write the serial number in this manual before using this manual for future reference. If you . Model No. WEBE09900 Serial No. MST CAUTION Read all precautions and instructions in the space above for future reference. ¨ 145 USERÕS MANUAL Visit our...
... CALL DIRECT TO OUR TOLL-FREE CUSTOMER HOT LINE. Serial Number Decal (Under Seat) QUESTIONS? CUSTOMER HOT LINE: 1-800-999-3756 Mon.ÐFri., 6 a.m.Ð6 p.m. Write the serial number in this manual before using this manual for future reference. If you . Model No. WEBE09900 Serial No. MST CAUTION Read all precautions and instructions in the space above for future reference. ¨ 145 USERÕS MANUAL Visit our...
English Manual
Page 2
... if it is not legible, please call our Customer Service Department toll-free at the right has been placed on the weight bench. Table of Contents WARNING DECAL PLACEMENT 2 IMPORTANT PRECAUTIONS 3 BEFORE YOU BEGIN 4 PART IDENTIFICATION CHART 5 ASSEMBLY 6 USING THE WEIGHT BENCH 9 EXERCISE GUIDELINES 11 PART LIST 14 EXPLODED DRAWING 15 ORDERING REPLACEMENT PARTS Back Cover LIMITED WARRANTY Back Cover Warning Decal Placement The decal shown at 1-800-999...
... if it is not legible, please call our Customer Service Department toll-free at the right has been placed on the weight bench. Table of Contents WARNING DECAL PLACEMENT 2 IMPORTANT PRECAUTIONS 3 BEFORE YOU BEGIN 4 PART IDENTIFICATION CHART 5 ASSEMBLY 6 USING THE WEIGHT BENCH 9 EXERCISE GUIDELINES 11 PART LIST 14 EXPLODED DRAWING 15 ORDERING REPLACEMENT PARTS Back Cover LIMITED WARRANTY Back Cover Warning Decal Placement The decal shown at 1-800-999...
English Manual
Page 3
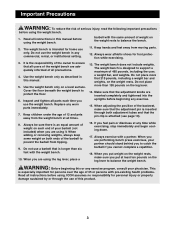
... instructions in this manual before using it. The weight bench does not include weights. When adjusting the position of the backrest, make sure you are using the leg lever, place a 16. Inspect and tighten all users of the weight bench are performing bench press exercises, your physician. The weight bench is designed to prevent the barbell from moving parts. 12. Do not place more than six feet with pre-existing health problems...
... instructions in this manual before using it. The weight bench does not include weights. When adjusting the position of the backrest, make sure you are using the leg lever, place a 16. Inspect and tighten all users of the weight bench are performing bench press exercises, your physician. The weight bench is designed to prevent the barbell from moving parts. 12. Do not place more than six feet with pre-existing health problems...
English Manual
Page 4
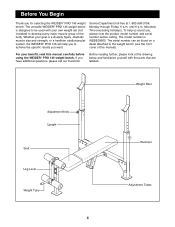
... through Friday, 6 a.m. The versatile WEIDER¨ PRO 145 weight bench is a shapely figure, dramatic muscle size and strength, or a healthier cardiovascular system, the WEIDER¨ PRO 145 will help us assist you for selecting the WEIDER¨ PRO 145 weight bench. Weight Rest Adjustment Knob Upright Seat Leg Lever Weight Tube Backrest Adjustment Tubes 4 The serial number can be used with the parts that are labeled. The model number is WEBE09900. Service Department toll-free at the drawing below and...
... through Friday, 6 a.m. The versatile WEIDER¨ PRO 145 weight bench is a shapely figure, dramatic muscle size and strength, or a healthier cardiovascular system, the WEIDER¨ PRO 145 will help us assist you for selecting the WEIDER¨ PRO 145 weight bench. Weight Rest Adjustment Knob Upright Seat Leg Lever Weight Tube Backrest Adjustment Tubes 4 The serial number can be used with the parts that are labeled. The model number is WEBE09900. Service Department toll-free at the drawing below and...

English Manual
Page 5
If you identify the small parts used in the parts bags, check to the quantity needed for shipping purposes. The second number refers to see if it has been pre-assembled. M10 x 178mm Bolt (17)Ñ1 M10 x 81mm Bolt (35)Ñ10 M10 x 72mm Bolt (14)Ñ1 M10 x 65mm Bolt (18)Ñ2 M8 x 58mm Bolt (39)Ñ1 M6 Washer (25)Ñ4 M8...
If you identify the small parts used in the parts bags, check to the quantity needed for shipping purposes. The second number refers to see if it has been pre-assembled. M10 x 178mm Bolt (17)Ñ1 M10 x 81mm Bolt (35)Ñ10 M10 x 72mm Bolt (14)Ñ1 M10 x 65mm Bolt (18)Ñ2 M8 x 58mm Bolt (39)Ñ1 M6 Washer (25)Ñ4 M8...
English Manual
Page 6
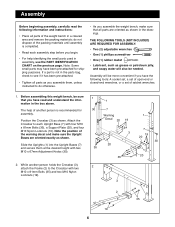
... weight bench, make sure the Upright Bases are oriented as shown in assembly, use the PART IDENTIFICATION CHART on the previous page. Position the Crossbar (3) as shown. Slide the Uprights (1) into the Upright Bases (7) and secure them , unless instructed to do not dispose of ratchet wrenches. 1. While another person is completed. ¥ Read each Upright Base (7) with four M10 x 81mm Bolts (35), a Support...
... weight bench, make sure the Upright Bases are oriented as shown in assembly, use the PART IDENTIFICATION CHART on the previous page. Position the Crossbar (3) as shown. Slide the Uprights (1) into the Upright Bases (7) and secure them , unless instructed to do not dispose of ratchet wrenches. 1. While another person is completed. ¥ Read each Upright Base (7) with four M10 x 81mm Bolts (35), a Support...
English Manual
Page 7
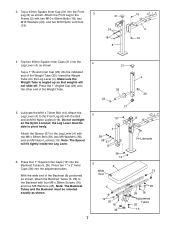
... Screws (16) and four M6 Washers (25). Attach the Leg Lever (4) to the Leg Lever (4) with the Bolt and an M10 Nylon Locknut (19). Attach the Spacer (37) to the Front Leg (8) with the M8 x 58mm Bolt (39), two M8 Washers (38), and an M8 Nylon Locknut (13). Lubricate the M10 x 72mm Bolt ...end of the Weight Tube (33). With the wide end of the Weight Tube. 21 33 5. Insert the Weight Tube into the adjustment tubes. Make sure the Weight Tube is angled up so that weights will fit tightly inside the Leg Lever. 23 5 21 19 4 39 38 37 4 29 8 14ÐLubricate 6. Press two 1Ó...
... Screws (16) and four M6 Washers (25). Attach the Leg Lever (4) to the Leg Lever (4) with the Bolt and an M10 Nylon Locknut (19). Attach the Spacer (37) to the Front Leg (8) with the M8 x 58mm Bolt (39), two M8 Washers (38), and an M8 Nylon Locknut (13). Lubricate the M10 x 72mm Bolt ...end of the Weight Tube (33). With the wide end of the Weight Tube. 21 33 5. Insert the Weight Tube into the adjustment tubes. Make sure the Weight Tube is angled up so that weights will fit tightly inside the Leg Lever. 23 5 21 19 4 39 38 37 4 29 8 14ÐLubricate 6. Press two 1Ó...

English Manual
Page 8
... 4 15 10 8 9 10 22 10. The use of the Seat (11) positioned as shown, attach the Seat to the brackets on pages 9 and 10. 8 Secure the Adjustment Pin with four M6 x 16mm Screws (15). 8 11 Wide End 6 Adjustment Tubes 2 19 27 2 9. With the wide end of all parts are properly tightened before you use the weight bench. 7. Attach the Backrest Tubes (5, 42) to the...
... 4 15 10 8 9 10 22 10. The use of the Seat (11) positioned as shown, attach the Seat to the brackets on pages 9 and 10. 8 Secure the Adjustment Pin with four M6 x 16mm Screws (15). 8 11 Wide End 6 Adjustment Tubes 2 19 27 2 9. With the wide end of all parts are properly tightened before you use the weight bench. 7. Attach the Backrest Tubes (5, 42) to the...

English Manual
Page 9
Replace any worn parts immediately. Do not use the weight bench. WARNING: Do not place more than 130 pounds on page 11 for important exercise information and refer to the accompanying exercise poster to the exercise information accompanying your own weight set both Uprights and Upright Bases (7). Make sure that the adjustment knobs are inserted completely and tightened into the uprights. 1 30 7 9 See EXERCISE GUIDELINES on the leg lever. 4 33 Weight ADJUSTING THE...
Replace any worn parts immediately. Do not use the weight bench. WARNING: Do not place more than 130 pounds on page 11 for important exercise information and refer to the accompanying exercise poster to the exercise information accompanying your own weight set both Uprights and Upright Bases (7). Make sure that the adjustment knobs are inserted completely and tightened into the uprights. 1 30 7 9 See EXERCISE GUIDELINES on the leg lever. 4 33 Weight ADJUSTING THE...
English Manual
Page 10
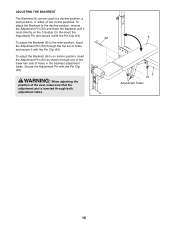
... level position, insert the Adjustment Pin (32) through both adjustment tubes. 32 6 3 43 Adjustment Tubes 10 WARNING: When adjusting the position of the seat, make sure that the adjustment pin is inserted through the top set of two incline positions. To adjust the Backrest (6) to an incline position, insert the Adjustment Pin (32) as shown through one of the lower two sets of holes in a decline...
... level position, insert the Adjustment Pin (32) through both adjustment tubes. 32 6 3 43 Adjustment Tubes 10 WARNING: When adjusting the position of the seat, make sure that the adjustment pin is inserted through the top set of two incline positions. To adjust the Backrest (6) to an incline position, insert the Adjustment Pin (32) as shown through one of the lower two sets of holes in a decline...
English Manual
Page 11
... several exercises. Schedule your limits. Refer to the muscle chart on page 12 to develop the most. Warming up to you want to find photographs showing the correct form for each exercise depends upon the individual user. Select exercises for you plan weight training workouts. never hold your energy level is a series of repetitions performed consecutively.) The proper amount of their capacity...
... several exercises. Schedule your limits. Refer to the muscle chart on page 12 to develop the most. Warming up to you want to find photographs showing the correct form for each exercise depends upon the individual user. Select exercises for you plan weight training workouts. never hold your energy level is a series of repetitions performed consecutively.) The proper amount of their capacity...
English Manual
Page 12
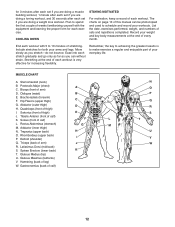
List the date, exercises performed, weight, and numbers of arm) D. Biceps (front of sets and repetitions completed. Tibialis Anterior (front of leg) W. Trapezius (upper back) HH O. Gluteus Maximus (buttocks) V. Hamstring (back of calf) K. Record your workouts. Remember, the key to achieving the greatest results is very effective for increasing flexibility. Pectoralis Major (chest) AA C. Latissimus Dorsi (mid back) S. End each exercise. Include...
List the date, exercises performed, weight, and numbers of arm) D. Biceps (front of sets and repetitions completed. Tibialis Anterior (front of leg) W. Trapezius (upper back) HH O. Gluteus Maximus (buttocks) V. Hamstring (back of calf) K. Record your workouts. Remember, the key to achieving the greatest results is very effective for increasing flexibility. Pectoralis Major (chest) AA C. Latissimus Dorsi (mid back) S. End each exercise. Include...
English Manual
Page 13
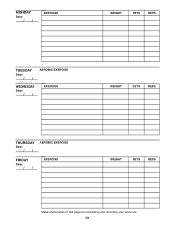
MONDAY Date: / / EXERCISE WEIGHT SETS REPS TUESDAY Date: / / AEROBIC EXERCISE WEDNESDAY Date: / / EXERCISE WEIGHT SETS REPS THURSDAY Date: / / AEROBIC EXERCISE FRIDAY Date: / / EXERCISE WEIGHT SETS REPS Make photocopies of this page for scheduling and recording your workouts. 13
MONDAY Date: / / EXERCISE WEIGHT SETS REPS TUESDAY Date: / / AEROBIC EXERCISE WEDNESDAY Date: / / EXERCISE WEIGHT SETS REPS THURSDAY Date: / / AEROBIC EXERCISE FRIDAY Date: / / EXERCISE WEIGHT SETS REPS Make photocopies of this page for scheduling and recording your workouts. 13
English Manual
Page 14
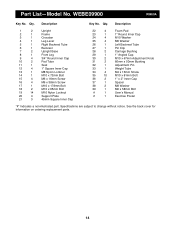
... 27 1 Pin Clip 28 2 Carriage Bushing 29 1 1Ó Angled Cap 30 2 M10 x 67mm Adjustment Knob 31 2 60mm x 50mm Bushing 32 1 Adjustment Pin 33 1 Weight Tube 34 4 M4 x 16mm Screw 35 10 M10 x 81mm Bolt 36 2 1Ó x 2Ó Inner Cap 37 1 Spacer 38 2 M8 Washer 39 1 M8 x 58mm Bolt # 1 UserÕs Manual # 1 Exercise Poster Ò#Ó Indicates a non-illustrated part. Specifications are subject to change without...
... 27 1 Pin Clip 28 2 Carriage Bushing 29 1 1Ó Angled Cap 30 2 M10 x 67mm Adjustment Knob 31 2 60mm x 50mm Bushing 32 1 Adjustment Pin 33 1 Weight Tube 34 4 M4 x 16mm Screw 35 10 M10 x 81mm Bolt 36 2 1Ó x 2Ó Inner Cap 37 1 Spacer 38 2 M8 Washer 39 1 M8 x 58mm Bolt # 1 UserÕs Manual # 1 Exercise Poster Ò#Ó Indicates a non-illustrated part. Specifications are subject to change without...
English Manual
Page 15
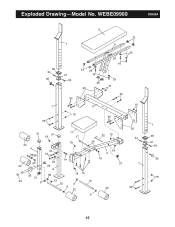
WEBE09900 R0800A 6 12 1 5 28 34 30 7 35 31 34 12 25 16 36 20 35 3 19 25 26 16 25 19 35 19 35 21 21 19 11 17 32 19 22 4 39 38 37 22 24 18 24 29 8 19 14 24 19 2 19 27 33 38 21 19 15 23 9 13 10 9 10 9 22 22 9 20 34 7 35 1 28 31 34 30 19 15 Exploded DrawingÑModel No.
WEBE09900 R0800A 6 12 1 5 28 34 30 7 35 31 34 12 25 16 36 20 35 3 19 25 26 16 25 19 35 19 35 21 21 19 11 17 32 19 22 4 39 38 37 22 24 18 24 29 8 19 14 24 19 2 19 27 33 38 21 19 15 23 9 13 10 9 10 9 22 22 9 20 34 7 35 1 28 31 34 30 19 15 Exploded DrawingÑModel No.
English Manual
Page 16
... (WEIDER¨ PRO 145 weight bench) ¥ The SERIAL NUMBER of the product (see the PART LIST and the EXPLODED DRAWING at one of its authorized service centers. Mountain Time (excluding holidays). All returns must be received by ICON at the center of this product to be free from defects in its scope and duration to the terms set forth above is limited to replacing...
... (WEIDER¨ PRO 145 weight bench) ¥ The SERIAL NUMBER of the product (see the PART LIST and the EXPLODED DRAWING at one of its authorized service centers. Mountain Time (excluding holidays). All returns must be received by ICON at the center of this product to be free from defects in its scope and duration to the terms set forth above is limited to replacing...


