
English Manual
Page 2
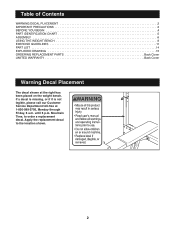
...or if it is not legible, please call our Customer Service Department toll-free at the right has been placed on the weight bench. Apply the replacement decal to order a replacement decal. Mountain Time, to the location shown. 2 Table of Contents WARNING DECAL PLACEMENT... 2 IMPORTANT PRECAUTIONS 3 BEFORE YOU BEGIN 4 PART IDENTIFICATION CHART 5 ASSEMBLY 6 USING THE WEIGHT BENCH 9 EXERCISE GUIDELINES 11 PART LIST 14 EXPLODED DRAWING 15 ORDERING REPLACEMENT PARTS Back Cover LIMITED WARRANTY Back Cover Warning Decal Placement The decal ...
...or if it is not legible, please call our Customer Service Department toll-free at the right has been placed on the weight bench. Apply the replacement decal to order a replacement decal. Mountain Time, to the location shown. 2 Table of Contents WARNING DECAL PLACEMENT... 2 IMPORTANT PRECAUTIONS 3 BEFORE YOU BEGIN 4 PART IDENTIFICATION CHART 5 ASSEMBLY 6 USING THE WEIGHT BENCH 9 EXERCISE GUIDELINES 11 PART LIST 14 EXPLODED DRAWING 15 ORDERING REPLACEMENT PARTS Back Cover LIMITED WARRANTY Back Cover Warning Decal Placement The decal ...
English Manual
Page 3
...worn parts immediately. 7. Keep hands and feet away from tipping. 9. Do not place more that the adjustment knobs are using the weight bench. Make sure that 210 pounds, including a weight bar and weights, on the leg lever. 14. If you are adequately informed of ... to support a maximum of 460 pounds, including the user, a weight bar, and weights. WARNING: Before beginning this product. 3 The weight bench is intended for foot protection while exercising. 3. barbell with a partner. Important Precautions WARNING: To reduce the risk of serious injury, read the...
...worn parts immediately. 7. Keep hands and feet away from tipping. 9. Do not place more that the adjustment knobs are using the weight bench. Make sure that 210 pounds, including a weight bar and weights, on the leg lever. 14. If you are adequately informed of ... to support a maximum of 460 pounds, including the user, a weight bar, and weights. WARNING: Before beginning this product. 3 The weight bench is intended for foot protection while exercising. 3. barbell with a partner. Important Precautions WARNING: To reduce the risk of serious injury, read the...
English Manual
Page 4
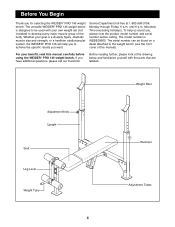
... Friday, 6 a.m. The model number is a shapely figure, dramatic muscle size and strength, or a healthier cardiovascular system, the WEIDER¨ PRO 145 will help us assist you want. Mountain Time (excluding holidays). The versatile WEIDER¨ PRO 145 weight bench is designed to be found on a decal attached to achieve the specific results you , please note the product...
... Friday, 6 a.m. The model number is a shapely figure, dramatic muscle size and strength, or a healthier cardiovascular system, the WEIDER¨ PRO 145 will help us assist you want. Mountain Time (excluding holidays). The versatile WEIDER¨ PRO 145 weight bench is designed to be found on a decal attached to achieve the specific results you , please note the product...
English Manual
Page 6
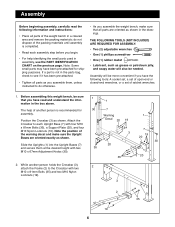
...packing materials until assembly is recommended for shipping purposes. Assembly will also be sure that all parts of ratchet wrenches. 1. Before assembling this weight bench, be needed. Slide the Uprights (1) into the Upright Bases (7) and secure them , unless instructed to the Crossbar with four M10 x ...have read the following tools: A socket set, a set of open-end or closed-end wrenches, or a set of the weight bench in a cleared area and remove the packing materials; Assembly Before beginning assembly, carefully read and understand the information in the box above....
...packing materials until assembly is recommended for shipping purposes. Assembly will also be sure that all parts of ratchet wrenches. 1. Before assembling this weight bench, be needed. Slide the Uprights (1) into the Upright Bases (7) and secure them , unless instructed to the Crossbar with four M10 x ...have read the following tools: A socket set, a set of open-end or closed-end wrenches, or a set of the weight bench in a cleared area and remove the packing materials; Assembly Before beginning assembly, carefully read and understand the information in the box above....

English Manual
Page 8
... (32) is completely inserted through one of the three sets of all parts are properly tightened before you use of holes in USING THE WEIGHT BENCH on the Frame (2) with the Bolt, two M10 Washers (24), and an M10 Nylon Locknut (19). Slide two Foam Pads (22) onto each Pad Tube... (10). Insert the Pad Tubes into each Pad Tube. 9 22 4 15 10 8 9 10 22 10. The use the weight bench. Secure the Backrest (6) to the Frame (2) with the Pin Clip (27). Secure the Adjustment Pin with the Adjustment Pin (32) through both holes in the...
... (32) is completely inserted through one of the three sets of all parts are properly tightened before you use of holes in USING THE WEIGHT BENCH on the Frame (2) with the Bolt, two M10 Washers (24), and an M10 Nylon Locknut (19). Slide two Foam Pads (22) onto each Pad Tube... (10). Insert the Pad Tubes into each Pad Tube. 9 22 4 15 10 8 9 10 22 10. The use the weight bench. Secure the Backrest (6) to the Frame (2) with the Pin Clip (27). Secure the Adjustment Pin with the Adjustment Pin (32) through both holes in the...

English Manual
Page 9
... To adjust the height, remove the M10 x 67mm Adjustment Knobs (30) from both uprights at the same height. Using the Weight Bench The weight bench is designed to five heights for 1 30 different exercises. See EXERCISE GUIDELINES on the leg lever. 4 33 Weight ADJUSTING THE UPRIGHTS ... a damp cloth and a mild, non-abrasive detergent. Inspect and tighten all parts each time you use the weight bench. The steps below explain how the weight bench can be adjusted to be adjusted. Make sure that the adjustment knobs are inserted completely and tightened into the uprights. ...
... To adjust the height, remove the M10 x 67mm Adjustment Knobs (30) from both uprights at the same height. Using the Weight Bench The weight bench is designed to five heights for 1 30 different exercises. See EXERCISE GUIDELINES on the leg lever. 4 33 Weight ADJUSTING THE UPRIGHTS ... a damp cloth and a mild, non-abrasive detergent. Inspect and tighten all parts each time you use the weight bench. The steps below explain how the weight bench can be adjusted to be adjusted. Make sure that the adjustment knobs are inserted completely and tightened into the uprights. ...
English Manual
Page 16
...), warrants this product to give the following information when calling: ¥ The MODEL NUMBER of the product (WEBE09900) ¥ The NAME of the product (WEIDER¨ PRO 145 weight bench) ¥ The SERIAL NUMBER of the product (see the front cover of this manual). Some states do not allow limitations on how long an...
...), warrants this product to give the following information when calling: ¥ The MODEL NUMBER of the product (WEBE09900) ¥ The NAME of the product (WEIDER¨ PRO 145 weight bench) ¥ The SERIAL NUMBER of the product (see the front cover of this manual). Some states do not allow limitations on how long an...


