
User Manual
Page 3
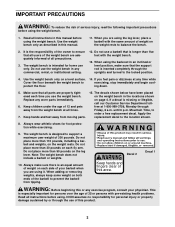
... all instructions before using the leg lever, place a barbell with the weight bench. 13. Read all users of the weight bench are using the weight bench. 1. The decals shown below have been placed on the weight bench in this manual. 11. ICON assumes no responsibility for home use of...decal to order a free replacement decal. When adding or removing weights, always keep some weight on the leg lever. Do not use the weight bench. The weight bench is longer than 110 pounds, including a barbell and weights, on each time you are adequately informed of 300 pounds. IMPORTANT...
... all instructions before using the leg lever, place a barbell with the weight bench. 13. Read all users of the weight bench are using the weight bench. 1. The decals shown below have been placed on the weight bench in this manual. 11. ICON assumes no responsibility for home use of...decal to order a free replacement decal. When adding or removing weights, always keep some weight on the leg lever. Do not use the weight bench. The weight bench is longer than 110 pounds, including a barbell and weights, on each time you are adequately informed of 300 pounds. IMPORTANT...

User Manual
Page 4
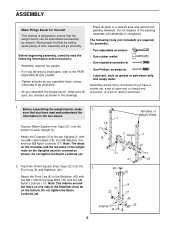
...on a decal attached to be used with the parts that are labeled. ASSEMBLED DIMENSIONS: Height: 45 in . The versatile WEIDER® 140 weight bench is designed to the weight bench (see the front cover of the body. For your goal is WEBE06920. The model number is a shapely figure, dramatic ...muscle size and strength, or a healthier cardiovascular system, the WEIDER® 140 weight bench will help us assist you want. Width: 51 in . until 6 p.m. To help you to develop every major muscle group of this ...
...on a decal attached to be used with the parts that are labeled. ASSEMBLED DIMENSIONS: Height: 45 in . The versatile WEIDER® 140 weight bench is designed to the weight bench (see the front cover of the body. For your goal is WEBE06920. The model number is a shapely figure, dramatic ...muscle size and strength, or a healthier cardiovascular system, the WEIDER® 140 weight bench will help us assist you want. Width: 51 in . until 6 p.m. To help you to develop every major muscle group of this ...
User Manual
Page 5
...: • Assembly requires two people. • For help identifying small parts, refer to do otherwise. • As you assemble the weight bench, make sure that you have read the following tools (not included) are oriented as grease or petroleum jelly, and soapy water. Tap three...designed to the two Uprights (1) with two M8 x 40mm Carriage Bolts (41) and two M8 Nylon Locknuts (17). Before assembling the weight bench, make sure all parts are required for Yourself This manual is completed. Before beginning assembly, carefully read and understand the information in the ...
...: • Assembly requires two people. • For help identifying small parts, refer to do otherwise. • As you assemble the weight bench, make sure that you have read the following tools (not included) are oriented as grease or petroleum jelly, and soapy water. Tap three...designed to the two Uprights (1) with two M8 x 40mm Carriage Bolts (41) and two M8 Nylon Locknuts (17). Before assembling the weight bench, make sure all parts are required for Yourself This manual is completed. Before beginning assembly, carefully read and understand the information in the ...
User Manual
Page 8
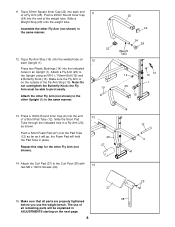
... x 115mm Bolt (19) and a Butterfly Knob (13). Attach the other Upright (1) in the same manner. 12 19 25 22 Weight Tube 24 28 14 25 15 13 14 1 13. the Foam Pad will go; Attach the Curl Pad (37) to pivot easily... remaining parts will be able to the Curl Post (38) with 14 two M6 x 16mm Screws (29). 15. Slide a Weight Stop (28) onto the weight tube. Assemble the other Fly Arm (not shown). 14. Press a 19mm Round Inner Cap (9) into the end of a Fly...30mm Square Inner Cap (22) into the indicated holes in the same manner. 22 12. The use the weight bench.
... x 115mm Bolt (19) and a Butterfly Knob (13). Attach the other Upright (1) in the same manner. 12 19 25 22 Weight Tube 24 28 14 25 15 13 14 1 13. the Foam Pad will go; Attach the Curl Pad (37) to pivot easily... remaining parts will be able to the Curl Post (38) with 14 two M6 x 16mm Screws (29). 15. Slide a Weight Stop (28) onto the weight tube. Assemble the other Fly Arm (not shown). 14. Press a 19mm Round Inner Cap (9) into the end of a Fly...30mm Square Inner Cap (22) into the indicated holes in the same manner. 22 12. The use the weight bench.
User Manual
Page 9
... locking pin is wrapped around the Upright. To remove the Fly Arms, remove the Butterfly Knob (13) and the M10 x 115mm Bolt (19) from the weight bench. Make sure all parts are removed from each Arm. To re-attach the Fly Arms (25), align the holes in the Fly Arms with the... holes in the Uprights (1). ADJUSTMENTS The weight bench is designed to be used with your own weight set of holes in a declined position, remove the Support Rod (7) and lay the Backrest on the Crossbar (3). The...
... locking pin is wrapped around the Upright. To remove the Fly Arms, remove the Butterfly Knob (13) and the M10 x 115mm Bolt (19) from the weight bench. Make sure all parts are removed from each Arm. To re-attach the Fly Arms (25), align the holes in the Fly Arms with the... holes in the Uprights (1). ADJUSTMENTS The weight bench is designed to be used with your own weight set of holes in a declined position, remove the Support Rod (7) and lay the Backrest on the Crossbar (3). The...
User Manual
Page 10
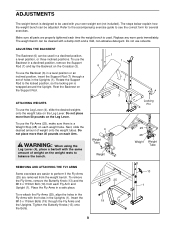
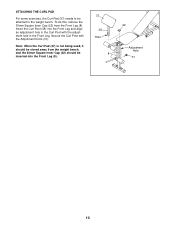
To do this, remove the 30mm Square Inner Cap (22) from the weight bench, and the 30mm Square Inner Cap (22) should be attached to be stored away from the Front Leg (8). Secure the Curl Post with the adjustment hole in the Front Leg. Note: When the Curl Pad (37) is not being used, it should be inserted into the Front Leg and align an adjustment hole in the Curl Post with the Adjustment Knob (31). Insert the Curl Post (38) into the Front Leg (8). 37 38 Hole 8 22 Adjustment Hole 31 10 ATTACHING THE CURL PAD For some exercises, the Curl Pad (37) needs to the weight bench.
To do this, remove the 30mm Square Inner Cap (22) from the weight bench, and the 30mm Square Inner Cap (22) should be attached to be stored away from the Front Leg (8). Secure the Curl Post with the adjustment hole in the Front Leg. Note: When the Curl Pad (37) is not being used, it should be inserted into the Front Leg and align an adjustment hole in the Curl Post with the Adjustment Knob (31). Insert the Curl Post (38) into the Front Leg (8). 37 38 Hole 8 22 Adjustment Hole 31 10 ATTACHING THE CURL PAD For some exercises, the Curl Pad (37) needs to the weight bench.
User Manual
Page 12
... must be prepared to give the following information when calling: • The MODEL NUMBER of the product (WEBE06920) • The NAME of the product (WEIDER® 140 weight bench) • The SERIAL NUMBER of the product (see the front cover of this manual) • The KEY NUMBER and DESCRIPTION of the desired part(s) (see...
... must be prepared to give the following information when calling: • The MODEL NUMBER of the product (WEBE06920) • The NAME of the product (WEIDER® 140 weight bench) • The SERIAL NUMBER of the product (see the front cover of this manual) • The KEY NUMBER and DESCRIPTION of the desired part(s) (see...


