
User Manual
Page 1
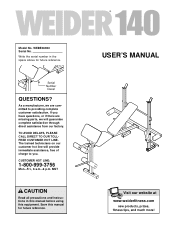
... trained technicians on our customer hot line will guarantee complete satisfaction through direct assistance from our factory. Save this equipment. As a manufacturer, we are missing parts, we will provide immediate assistance, free of charge to you have questions, or if there are committed to providing complete customer satisfaction. Serial Number Decal...
... trained technicians on our customer hot line will guarantee complete satisfaction through direct assistance from our factory. Save this equipment. As a manufacturer, we are missing parts, we will provide immediate assistance, free of charge to you have questions, or if there are committed to providing complete customer satisfaction. Serial Number Decal...
User Manual
Page 2
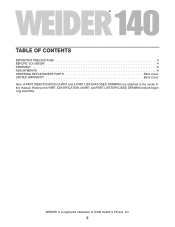
WEIDER is a registered trademark of this manual. TABLE OF CONTENTS IMPORTANT PRECAUTIONS 3 BEFORE YOU BEGIN 4 ASSEMBLY 5 ADJUSTMENTS 9 ORDERING REPLACEMENT PARTS Back Cover LIMITED WARRANTY Back Cover Note: A PART IDENTIFICATION CHART and a PART LIST/EXPLODED DRAWING are attached in the center of ICON Health & Fitness, Inc. 2 Remove the PART IDENTIFICATION CHART and PART LIST/EXPLODED DRAWING before beginning assembly.
WEIDER is a registered trademark of this manual. TABLE OF CONTENTS IMPORTANT PRECAUTIONS 3 BEFORE YOU BEGIN 4 ASSEMBLY 5 ADJUSTMENTS 9 ORDERING REPLACEMENT PARTS Back Cover LIMITED WARRANTY Back Cover Note: A PART IDENTIFICATION CHART and a PART LIST/EXPLODED DRAWING are attached in the center of ICON Health & Fitness, Inc. 2 Remove the PART IDENTIFICATION CHART and PART LIST/EXPLODED DRAWING before beginning assembly.
User Manual
Page 3
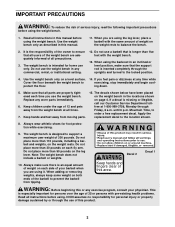
...When adding or removing weights, always keep some weight on the weight rests. When you are adequately informed of all instructions in any worn parts immediately. 6. If you feel pain or dizziness at any exercise program, consult your barbell when you are properly tightened each side of your... to the locked position. 4. It is intended for foot protection while exercising. 9. Keep children under the age of 12 and pets away from moving parts. 15. If a decal is designed to balance the bench. 2. Note: The weight bench does not include a barbell or weights. 10. Always...
...When adding or removing weights, always keep some weight on the weight rests. When you are adequately informed of all instructions in any worn parts immediately. 6. If you feel pain or dizziness at any exercise program, consult your barbell when you are properly tightened each side of your... to the locked position. 4. It is intended for foot protection while exercising. 9. Keep children under the age of 12 and pets away from moving parts. 15. If a decal is designed to balance the bench. 2. Note: The weight bench does not include a barbell or weights. 10. Always...

User Manual
Page 4
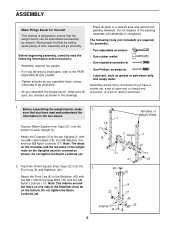
...benefit, read this manual carefully before calling. Mountain Time (excluding holidays). ASSEMBLED DIMENSIONS: Height: 45 in . If you for selecting the WEIDER® 140 weight bench. Backrest Curl Pad Decal 2 Leg Lever Weight Tube Decal 1 Weight Rests Upright Support Rod Fly Arm Weight Tube Seat 4...every major muscle group of this manual, please call our Customer Service Department toll-free at the drawing below and familiarize yourself with the parts that are labeled. Before reading further, please look at 1-800-999-3756, Monday through Friday, 6 a.m. For your own weight ...
...benefit, read this manual carefully before calling. Mountain Time (excluding holidays). ASSEMBLED DIMENSIONS: Height: 45 in . If you for selecting the WEIDER® 140 weight bench. Backrest Curl Pad Decal 2 Leg Lever Weight Tube Decal 1 Weight Rests Upright Support Rod Fly Arm Weight Tube Seat 4...every major muscle group of this manual, please call our Customer Service Department toll-free at the drawing below and familiarize yourself with the parts that are labeled. Before reading further, please look at 1-800-999-3756, Monday through Friday, 6 a.m. For your own weight ...
User Manual
Page 5
...• Lubricant, such as you assemble them, unless instructed to ensure that by anyone. Before assembling the weight bench, make sure all parts are required for Yourself This manual is completed. Attach the Front Leg (8) to the two Uprights (1) with two M8 x 40mm Carriage ...of each Upright (1). The following information and instructions: • Assembly requires two people. • For help identifying small parts, refer to the PART IDENTIFICATION CHART. • Tighten all parts in the box above. Attach the Crossbar (3) to the Stabilizer (42) with four M8 x 55mm Bolts (18),...
...• Lubricant, such as you assemble them, unless instructed to ensure that by anyone. Before assembling the weight bench, make sure all parts are required for Yourself This manual is completed. Attach the Front Leg (8) to the two Uprights (1) with two M8 x 40mm Carriage ...of each Upright (1). The following information and instructions: • Assembly requires two people. • For help identifying small parts, refer to the PART IDENTIFICATION CHART. • Tighten all parts in the box above. Attach the Crossbar (3) to the Stabilizer (42) with four M8 x 55mm Bolts (18),...
User Manual
Page 8
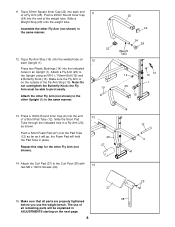
Make sure the Fly Arm is on the outside of all parts are properly tightened before you use of the Fly Arm Stop (15). Attach the other Fly Arm (not shown) to pivot easily. Press a 19mm Round ... 14 25 15 13 14 1 13. Push a Short Foam Pad (27) onto the Pad Tube (12) as far as shown. Make sure that all remaining parts will be able to the other Upright (1) in an Upright (1). Assemble the other Fly Arm (not shown). 14. Attach a Fly Arm (25) to the Curl...
Make sure the Fly Arm is on the outside of all parts are properly tightened before you use of the Fly Arm Stop (15). Attach the other Fly Arm (not shown) to pivot easily. Press a 19mm Round ... 14 25 15 13 14 1 13. Push a Short Foam Pad (27) onto the Pad Tube (12) as far as shown. Make sure that all remaining parts will be able to the other Upright (1) in an Upright (1). Assemble the other Fly Arm (not shown). 14. Attach a Fly Arm (25) to the Curl...
User Manual
Page 9
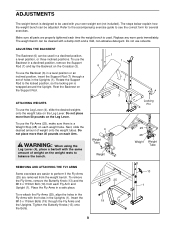
Make sure all parts are removed from each Fly Arm and Upright (1). Rest the Backrest on the Leg Lever. ATTACHING WEIGHTS To use the Leg Lever (4), slide the desired ... (4), place a barbell with your own weight set of holes in the Uprights (1). Insert the M10 x 115mm Bolts (19) through a set (not included). Replace any worn parts immediately. To use the Fly Arms (25), make sure there is a Weight Stop (28) on the Leg Lever. To use the Backrest in the Uprights...
Make sure all parts are removed from each Fly Arm and Upright (1). Rest the Backrest on the Leg Lever. ATTACHING WEIGHTS To use the Leg Lever (4), slide the desired ... (4), place a barbell with your own weight set of holes in the Uprights (1). Insert the M10 x 115mm Bolts (19) through a set (not included). Replace any worn parts immediately. To use the Fly Arms (25), make sure there is a Weight Stop (28) on the Leg Lever. To use the Backrest in the Uprights...
User Manual
Page 12
..., Inc. Mountain Time (excluding holidays). The warranty extended hereunder is limited to state. or products used for a period of the desired part(s) (see the PART LIST in its authorized service centers. To help us assist you specific legal rights. Accordingly, the above limitation may not apply to the ... to give the following information when calling: • The MODEL NUMBER of the product (WEBE06920) • The NAME of the product (WEIDER® 140 weight bench) • The SERIAL NUMBER of the product (see the front cover of this warranty is in lieu of any and all ...
..., Inc. Mountain Time (excluding holidays). The warranty extended hereunder is limited to state. or products used for a period of the desired part(s) (see the PART LIST in its authorized service centers. To help us assist you specific legal rights. Accordingly, the above limitation may not apply to the ... to give the following information when calling: • The MODEL NUMBER of the product (WEBE06920) • The NAME of the product (WEIDER® 140 weight bench) • The SERIAL NUMBER of the product (see the front cover of this warranty is in lieu of any and all ...
User Manual
Page 13
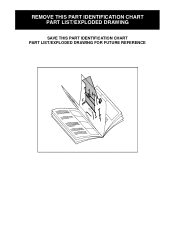
REMOVE THIS PART IDENTIFICATION CHART PART LIST/EXPLODED DRAWING SAVE THIS PART IDENTIFICATION CHART PART LIST/EXPLODED DRAWING FOR FUTURE REFERENCE 81
REMOVE THIS PART IDENTIFICATION CHART PART LIST/EXPLODED DRAWING SAVE THIS PART IDENTIFICATION CHART PART LIST/EXPLODED DRAWING FOR FUTURE REFERENCE 81
User Manual
Page 14
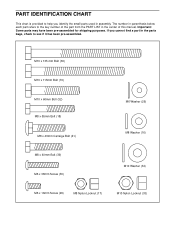
... This chart is provided to help you cannot find a part in the parts bags, check to the key number of the part from the PART LIST in assembly. If you identify the small parts used in the center of this manual. Important: Some parts may have been pre-assembled for shipping purposes. M10 x 135 mm Bolt... (26) M8 Washer (16) M10 Washer (34) M6 x 16mm Screw (29) M8 Nylon Locknut (17) M10 Nylon Locknut (33) The number in parenthesis below each part refers to see if it has been pre-assembled.
... This chart is provided to help you cannot find a part in the parts bags, check to the key number of the part from the PART LIST in assembly. If you identify the small parts used in the center of this manual. Important: Some parts may have been pre-assembled for shipping purposes. M10 x 135 mm Bolt... (26) M8 Washer (16) M10 Washer (34) M6 x 16mm Screw (29) M8 Nylon Locknut (17) M10 Nylon Locknut (33) The number in parenthesis below each part refers to see if it has been pre-assembled.
User Manual
Page 15
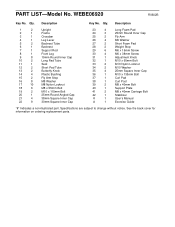
.... Description Key No. WEBE06920 R0602B Key No. Qty. Specifications are subject to change without notice. PART LIST-Model No. Description 1 2 Upright 2 1 Frame 3 1 Crossbar 4 1 Leg Lever 5 2 Backrest Tube 6 1 Backrest 7 1 Support Rod 8 1 Front Leg 9 8 19mm Round Inner Cap 10 2 Long Pad Tube 11 1 ... Pad 38 1 Curl Post 39 2 M8 x 40mm Bolt 40 1 Support Plate 41 2 M8 x 40mm Carriage Bolt 42 1 Stabilizer # 1 User's Manual # 1 Exercise Guide "#" Indicates a non-illustrated part.
.... Description Key No. WEBE06920 R0602B Key No. Qty. Specifications are subject to change without notice. PART LIST-Model No. Description 1 2 Upright 2 1 Frame 3 1 Crossbar 4 1 Leg Lever 5 2 Backrest Tube 6 1 Backrest 7 1 Support Rod 8 1 Front Leg 9 8 19mm Round Inner Cap 10 2 Long Pad Tube 11 1 ... Pad 38 1 Curl Post 39 2 M8 x 40mm Bolt 40 1 Support Plate 41 2 M8 x 40mm Carriage Bolt 42 1 Stabilizer # 1 User's Manual # 1 Exercise Guide "#" Indicates a non-illustrated part.


