Operating Instructions
Page 3
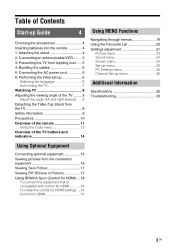
... remote 11 Using the Tools menu 13 Overview of the TV buttons and indicators 14 15 Using Optional Equipment 19 Using MENU Functions Navigating through menus 19 Using the Favourite List 20 Settings adjustment 21 Picture menu 23 Sound menu 24 Screen menu 25 Set-up menu 26 PC Settings menu 28 Channel Set-up menu 30 32 Additional Information Specifications 32 Troubleshooting 33 Connecting optional equipment 15 Viewing pictures from the connected equipment 16 Viewing Twin Picture 17 Viewing PIP (Picture in Picture 17 Using BRAVIA Sync (Control for HDMI) ... 18 To connect...
... remote 11 Using the Tools menu 13 Overview of the TV buttons and indicators 14 15 Using Optional Equipment 19 Using MENU Functions Navigating through menus 19 Using the Favourite List 20 Settings adjustment 21 Picture menu 23 Sound menu 24 Screen menu 25 Set-up menu 26 PC Settings menu 28 Channel Set-up menu 30 32 Additional Information Specifications 32 Troubleshooting 33 Connecting optional equipment 15 Viewing pictures from the connected equipment 16 Viewing Twin Picture 17 Viewing PIP (Picture in Picture 17 Using BRAVIA Sync (Control for HDMI) ... 18 To connect...
Operating Instructions
Page 4
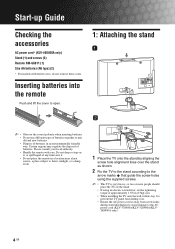
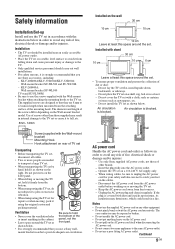
... using an electric screwdriver, set the tightening torque at approximately 1.5N·m (15kgf·cm). • When installing the TV onto the wall, follow step 1 to prevent the TV panel from falling over. • Ensure the AC power cord is away from screw holes during stand installation to avoid damage to the AC power cord (KLV-37S400A/KLV-32S400A/KLV26S400A only). 4 GB Inserting batteries into the remote Push...
... using an electric screwdriver, set the tightening torque at approximately 1.5N·m (15kgf·cm). • When installing the TV onto the wall, follow step 1 to prevent the TV panel from falling over. • Ensure the AC power cord is away from screw holes during stand installation to avoid damage to the AC power cord (KLV-37S400A/KLV-32S400A/KLV26S400A only). 4 GB Inserting batteries into the remote Push...
Operating Instructions
Page 6
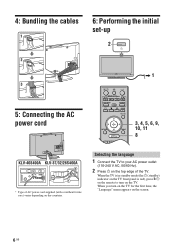
... standby mode (the 1 (standby) indicator on the TV front panel is red), press "/1 on the remote to your AC power outlet (110-240 V AC, 50/60 Hz). 2 Press 1 on the TV. 4: Bundling the cables 6: Performing the initial set-up , 1 5: Connecting the AC power cord BRAVIA Sync SYNC MENU THEATRE AUDIO 3, 4, 5, 6, 9, RETURN TOOLS 10, 11 8 KLV-40S400A KLV-37/32/26S400A * Type of the TV. When you turn on the top edge of AC power cord supplied...
... standby mode (the 1 (standby) indicator on the TV front panel is red), press "/1 on the remote to your AC power outlet (110-240 V AC, 50/60 Hz). 2 Press 1 on the TV. 4: Bundling the cables 6: Performing the initial set-up , 1 5: Connecting the AC power cord BRAVIA Sync SYNC MENU THEATRE AUDIO 3, 4, 5, 6, 9, RETURN TOOLS 10, 11 8 KLV-40S400A KLV-37/32/26S400A * Type of the TV. When you turn on the top edge of AC power cord supplied...

Operating Instructions
Page 8
... use the Wall-Mount Bracket model designed for withstanding the TV's weight. Sufficient expertise is required in installing this TV, especially to the instruction guide provided by the Wall-Mount Bracket model for any reason other than to select a TV channel. 3 Press 2 +/- to turn on the top edge of your TV. Watching TV 1 Press 1 on the TV. 2 Press the number buttons or PROG +/- to wall-mount the TV. Do not remove the Table-Top Stand for your TV should be adjusted...
... use the Wall-Mount Bracket model designed for withstanding the TV's weight. Sufficient expertise is required in installing this TV, especially to the instruction guide provided by the Wall-Mount Bracket model for any reason other than to select a TV channel. 3 Press 2 +/- to turn on the top edge of your TV. Watching TV 1 Press 1 on the TV. 2 Press the number buttons or PROG +/- to wall-mount the TV. Do not remove the Table-Top Stand for your TV should be adjusted...
Operating Instructions
Page 9
... down , backwards, or sideways. - The supplied screws are designed so that you use the TV set on the AC power cord itself when disconnecting the AC power cord. • Do not connect too many appliances to avoid any risk of the screws differ depending on the Wall-mount bracket model. Do not lay the TV set as newspapers, etc. - Do not install the TV set flat, install upside down and cause personal...
... down , backwards, or sideways. - The supplied screws are designed so that you use the TV set on the AC power cord itself when disconnecting the AC power cord. • Do not connect too many appliances to avoid any risk of the screws differ depending on the Wall-mount bracket model. Do not lay the TV set as newspapers, etc. - Do not install the TV set flat, install upside down and cause personal...
Operating Instructions
Page 10
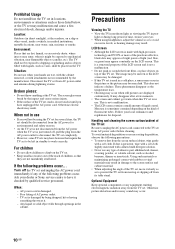
... cabinet material. • When adjusting the angle of time, strains your local ordinances and regulations for environmental and safety reasons. • As the TV set is not disconnected from the AC power when the TV set is just turned off, pull the plug from its table stand. Precautions Viewing the TV • View the TV in moderate light, as viewing the TV in poor light or during lightning storms...
... cabinet material. • When adjusting the angle of time, strains your local ordinances and regulations for environmental and safety reasons. • As the TV set is not disconnected from the AC power when the TV set is just turned off, pull the plug from its table stand. Precautions Viewing the TV • View the TV in moderate light, as viewing the TV in poor light or during lightning storms...
Operating Instructions
Page 11
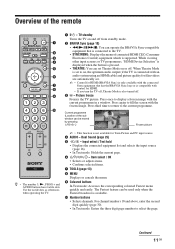
... control for HDMI (BRAVIA Sync) is only available with the connected Sony equipment that is set . ~ • Control for HDMI. • If you turn the TV off, Theatre Mode is available. 0 Number buttons • Selects channels. TV standby Turns the TV on or off . 3 - Item select / OK • Selects or adjusts items. • Confirms selected items. 7 TOOLS (page 13) 8 MENU Displays or cancels the menu. 9 Coloured buttons In Text mode: Accesses the corresponding coloured Fastext menu quickly...
... control for HDMI (BRAVIA Sync) is only available with the connected Sony equipment that is set . ~ • Control for HDMI. • If you turn the TV off, Theatre Mode is available. 0 Number buttons • Selects channels. TV standby Turns the TV on or off . 3 - Item select / OK • Selects or adjusts items. • Confirms selected items. 7 TOOLS (page 13) 8 MENU Displays or cancels the menu. 9 Coloured buttons In Text mode: Accesses the corresponding coloured Fastext menu quickly...
Operating Instructions
Page 14
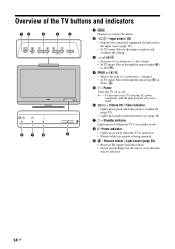
Power Turns the TV on . • Flashes while the remote is turned on or off (page 28). • Lights up ( ) or down ( ). 5 1 - Power indicator • Lights up in green when the picture is set (page 28). 7 1 - Remote sensor / Light sensor (page 28) • Receives IR signals from the AC power outlet. 6 / - Picture Off / Timer indicator • Lights up in green when the TV is being operated. 9 - Input select / OK • Displays the connected equipment list and selects the input source (page 16...
Power Turns the TV on . • Flashes while the remote is turned on or off (page 28). • Lights up ( ) or down ( ). 5 1 - Power indicator • Lights up in green when the picture is set (page 28). 7 1 - Remote sensor / Light sensor (page 28) • Receives IR signals from the AC power outlet. 6 / - Picture Off / Timer indicator • Lights up in green when the TV is being operated. 9 - Input select / OK • Displays the connected equipment list and selects the input source (page 16...
Operating Instructions
Page 16
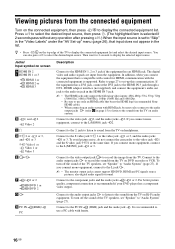
... Sony HDMI cable). • When connecting an audio system with HDMI jack, be sure to also connect to the audio output jacks (refer G in the list. To turn off the sound of the TV speakers, set to use a PC cable with the connected equipment is compatible with control for HDMI, communication with ferrite. 16 GB Connect to the video jack 2, and the audio jacks 2. To turn off the sound of the TV to display the selected input source. Press F/f to set "Speaker...
... Sony HDMI cable). • When connecting an audio system with HDMI jack, be sure to also connect to the audio output jacks (refer G in the list. To turn off the sound of the TV speakers, set to use a PC cable with the connected equipment is compatible with control for HDMI, communication with ferrite. 16 GB Connect to the video jack 2, and the audio jacks 2. To turn off the sound of the TV to display the selected input source. Press F/f to set "Speaker...
Operating Instructions
Page 17
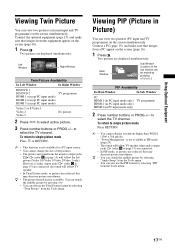
... audio output jacks (refer G in page 15) are connected, the sound will follow TV speaker. • In Twin Picture mode, as picture size reduced, this may decrease picture smoothness. Connect a PC (page 15), and make sure that images from the equipment appear on the screen (page 16). 1 Press . Viewing PIP (Picture in PC input mode only) TV programme 2 Press number buttons or PROG +/- Main Window Sub Window (Location of the pictures. • The picture...
... audio output jacks (refer G in page 15) are connected, the sound will follow TV speaker. • In Twin Picture mode, as picture size reduced, this may decrease picture smoothness. Connect a PC (page 15), and make sure that images from the equipment appear on the screen (page 16). 1 Press . Viewing PIP (Picture in PC input mode only) TV programme 2 Press number buttons or PROG +/- Main Window Sub Window (Location of the pictures. • The picture...
Operating Instructions
Page 18
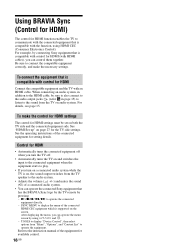
... settings. After displaying the menu, you can operate the menu screen by connecting Sony equipment that is on, the sound output switches from the TV speaker to operate the connected equipment directly. - To connect the equipment that is supported on page 27 for HDMI Connect the compatible equipment and the TV with the function, using F/f/G/g and . - For details, see page 15. SYNC MENU to the HDMI cable, be set on audio system. Refer to the instruction manual of the connected HDMI...
... settings. After displaying the menu, you can operate the menu screen by connecting Sony equipment that is on, the sound output switches from the TV speaker to operate the connected equipment directly. - To connect the equipment that is supported on page 27 for HDMI Connect the compatible equipment and the TV with the function, using F/f/G/g and . - For details, see page 15. SYNC MENU to the HDMI cable, be set on audio system. Refer to the instruction manual of the connected HDMI...
Operating Instructions
Page 22
... "Cinema Drive": "Auto" t "Off" "AV Set-up": "Video Labels", "Auto S Video", "Speaker", "Audio Out", "Colour System" "HDMI Set-up": "Control for HDMI", "Auto Devices Off", "Auto TV On", "Device List Update", "HDMI Device List" "Timer Settings": "Sleep Timer", "On Timer", "Clock Set" "Power Saving": "Standard Power" t "Reduced Power" t "Picture Off" "Light Sensor": "On" t "Off" "Product Information" "Factory Settings" PC Settings PC Wide Mode Reset Auto Adjustment Phase Pitch Horizontal Shift Power Management Full 1 0 0 0 Off Resolution: Select: Set: Exit: MENU PC Settings menu (page 28...
... "Cinema Drive": "Auto" t "Off" "AV Set-up": "Video Labels", "Auto S Video", "Speaker", "Audio Out", "Colour System" "HDMI Set-up": "Control for HDMI", "Auto Devices Off", "Auto TV On", "Device List Update", "HDMI Device List" "Timer Settings": "Sleep Timer", "On Timer", "Clock Set" "Power Saving": "Standard Power" t "Reduced Power" t "Picture Off" "Light Sensor": "On" t "Off" "Product Information" "Factory Settings" PC Settings PC Wide Mode Reset Auto Adjustment Phase Pitch Horizontal Shift Power Management Full 1 0 0 0 Off Resolution: Select: Set: Exit: MENU PC Settings menu (page 28...
Operating Instructions
Page 26
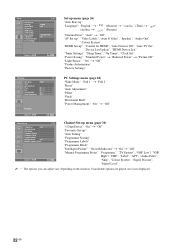
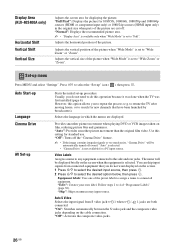
...:": Creates your own label. "Off": Turns off . "Full Pixel": Displays the picture for displaying the picture. "Normal": Displays the recommended picture area. ~ • "Display Area" is available only when "Wide Mode" is selected. Video Labels Assigns a name to any equipment connected to do not need to the side and rear jacks. Follow steps 2 to "Full". Auto S Video Selects the input signal from connected equipment that have been launched...
...:": Creates your own label. "Off": Turns off . "Full Pixel": Displays the picture for displaying the picture. "Normal": Displays the recommended picture area. ~ • "Display Area" is available only when "Wide Mode" is selected. Video Labels Assigns a name to any equipment connected to do not need to the side and rear jacks. Follow steps 2 to "Full". Auto S Video Selects the input signal from connected equipment that have been launched...
Operating Instructions
Page 27
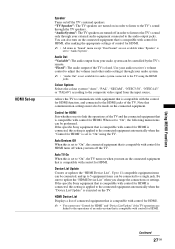
.... Auto TV On When this setting is not available for HDMI. HDMI Device List Displays a list of connected equipment that is compatible with control for HDMI. ~ • You cannot use "Control for HDMI" and "Device List Update" if the TV operations are turned off in order to listen to "On", the connected equipment that is compatible with control for HDMI is connected, this is set to the TV's sound through your audio receiver's volume control to adjust the volume (and other audio settings) through the TV speakers. Control for HDMI Sets...
.... Auto TV On When this setting is not available for HDMI. HDMI Device List Displays a list of connected equipment that is compatible with control for HDMI. ~ • You cannot use "Control for HDMI" and "Device List Update" if the TV operations are turned off in order to listen to "On", the connected equipment that is compatible with control for HDMI is connected, this is set to the TV's sound through your audio receiver's volume control to adjust the volume (and other audio settings) through the TV speakers. Control for HDMI Sets...
Operating Instructions
Page 28
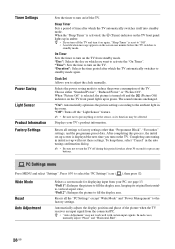
... Settings" except "Wide Mode" and "Power Management" to the factory settings. z • If you turn on the TV. z • "Auto Adjustment" may be affected. "Duration": Selects the time period after which you to the ambient light in the room. Timer Settings Power Saving Light Sensor Product Information Factory Settings Sets the timer to turn on/off and the (Picture Off) indicator on the TV front panel lights up in green. Wide Mode Reset Auto Adjustment Selects a screen mode for displaying input from the connected PC. "Time": Sets...
... Settings" except "Wide Mode" and "Power Management" to the factory settings. z • If you turn on the TV. z • "Auto Adjustment" may be affected. "Duration": Selects the time period after which you to the ambient light in the room. Timer Settings Power Saving Light Sensor Product Information Factory Settings Sets the timer to turn on/off and the (Picture Off) indicator on the TV front panel lights up in green. Wide Mode Reset Auto Adjustment Selects a screen mode for displaying input from the connected PC. "Time": Sets...
Operating Instructions
Page 29
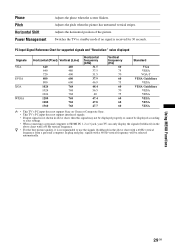
...-T VESA Guidelines VESA VESA Guidelines VESA VESA VESA VESA VESA ~ • This TV's PC input does not support Sync on Green or Composite Sync. • This TV's PC input does not support interlaced signals. • If input signal is recommended to HDMI IN 1, 2 or 3 jack, your settings. • When connecting a personal computer to use the signals (boldfaced) in the above chart with a 60 Hz vertical frequency from a personal computer. Adjusts the pitch when the picture...
...-T VESA Guidelines VESA VESA Guidelines VESA VESA VESA VESA VESA ~ • This TV's PC input does not support Sync on Green or Composite Sync. • This TV's PC input does not support interlaced signals. • If input signal is recommended to HDMI IN 1, 2 or 3 jack, your settings. • When connecting a personal computer to use the signals (boldfaced) in the above chart with a 60 Hz vertical frequency from a personal computer. Adjusts the pitch when the picture...
Operating Instructions
Page 32
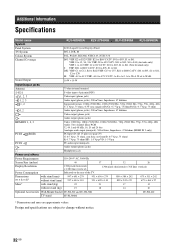
...: 1-5 Vp-p/VD: 1-5 Vp-p PC audio input (minijack) Audio output (phono jacks) i Headphones jack Power and others Power Requirements 110-240 V AC, 50/60 Hz Screen Size (inches) 40 37 32 26 Display Resolution Power Consumption 1,920 pixels (horizontal) × 1,080 lines (vertical) Indicated on the rear of the TV. 1,366 pixels (horizontal) × 768 lines (vertical) Dimensions (w × h × d)* with stand (mm) without stand (mm) 997 × 691...
...: 1-5 Vp-p/VD: 1-5 Vp-p PC audio input (minijack) Audio output (phono jacks) i Headphones jack Power and others Power Requirements 110-240 V AC, 50/60 Hz Screen Size (inches) 40 37 32 26 Display Resolution Power Consumption 1,920 pixels (horizontal) × 1,080 lines (vertical) Indicated on the rear of the TV. 1,366 pixels (horizontal) × 768 lines (vertical) Dimensions (w × h × d)* with stand (mm) without stand (mm) 997 × 691...
Operating Instructions
Page 33
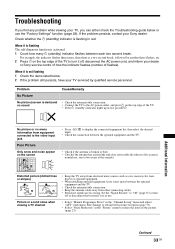
... "Channel Set-up in red. Distorted picture (dotted lines or stripes) Picture or sound noise when viewing a TV channel • Keep the TV away from electrical noise sources such as cars, motorcycles, hairdryers or optional equipment. • When installing optional equipment, leave some space between the optional equipment and the TV. • Check the antenna/cable connection. • Keep the antenna cable away from equipment connected to the video input jack...
... "Channel Set-up in red. Distorted picture (dotted lines or stripes) Picture or sound noise when viewing a TV channel • Keep the TV away from electrical noise sources such as cars, motorcycles, hairdryers or optional equipment. • When installing optional equipment, leave some space between the optional equipment and the TV. • Check the antenna/cable connection. • Keep the antenna cable away from equipment connected to the video input jack...
Operating Instructions
Page 34
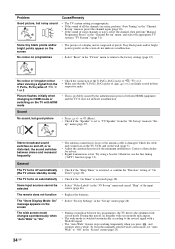
... antenna cable is switched automatically according to the revised signal with HDMI mode • Check the connection of the Y, PB/CB, PR/CR jacks of / 1 or 2. • Make sure that the Y, PB/CB, PR/CR jacks of / 1 or 2 Picture flashes initially when changing to "TV Speaker" from the Y, PB/CB, PR/CR jacks of / 1 or 2 are noisy, perform "Auto Tuning" in the "Channel Set-up " menu...
... antenna cable is switched automatically according to the revised signal with HDMI mode • Check the connection of the Y, PB/CB, PR/CR jacks of / 1 or 2. • Make sure that the Y, PB/CB, PR/CR jacks of / 1 or 2 Picture flashes initially when changing to "TV Speaker" from the Y, PB/CB, PR/CR jacks of / 1 or 2 are noisy, perform "Auto Tuning" in the "Channel Set-up " menu...
Operating Instructions
Page 35
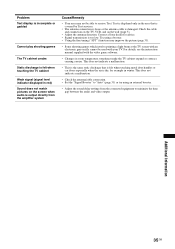
... the cable and connection on the TV, VCR, and on the screen when audio is output directly from the connected equipment to receive Text. Additional Information 35 GB Problem Text display is incomplete or garbled Cannot play shooting games The TV cabinet creaks Static discharge is felt when touching the TV cabinet Weak signal (signal level indicator displayed in red) Sound does not match pictures on the wall (page 5). • Adjust the antenna...
... the cable and connection on the TV, VCR, and on the screen when audio is output directly from the connected equipment to receive Text. Additional Information 35 GB Problem Text display is incomplete or garbled Cannot play shooting games The TV cabinet creaks Static discharge is felt when touching the TV cabinet Weak signal (signal level indicator displayed in red) Sound does not match pictures on the wall (page 5). • Adjust the antenna...


