Operating Instructions
Page 1
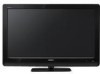
KLV-40S400A KLV-37S400A KLV-32S400A KLV-26S400A © 2008 Sony Corporation LCD Colour TV Operating Instructions 3-870-396-13(1) 3-870-396-13(1)
KLV-40S400A KLV-37S400A KLV-32S400A KLV-26S400A © 2008 Sony Corporation LCD Colour TV Operating Instructions 3-870-396-13(1) 3-870-396-13(1)

Operating Instructions
Page 2
Introduction Thank you for choosing this manual thoroughly and retain it for future reference. Before operating the TV, please read this Sony product. Trademark information • HDMI, the HDMI logo and High-Definition Multimedia Interface are trademarks or registered trademarks of HDMI Licensing LLC. • "BRAVIA" and are of Sony Corporation. 2 GB The illustrations used in this manual are trademarks of the KLV-32S400A unless otherwise stated.
Introduction Thank you for choosing this manual thoroughly and retain it for future reference. Before operating the TV, please read this Sony product. Trademark information • HDMI, the HDMI logo and High-Definition Multimedia Interface are trademarks or registered trademarks of HDMI Licensing LLC. • "BRAVIA" and are of Sony Corporation. 2 GB The illustrations used in this manual are trademarks of the KLV-32S400A unless otherwise stated.
Operating Instructions
Page 3
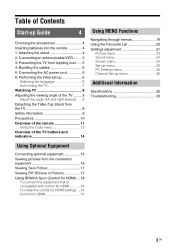
... Performing the initial set-up 6 Selecting the language 6 Auto-tuning the TV 7 Watching TV 8 Adjusting the viewing angle of the TV ......... 8 Adjust the angle left and right (swivel) ......8 Detaching the Table-Top Stand from the TV 8 Safety information 9 Precautions 10 Overview of the remote 11 Using the ...23 Sound menu 24 Screen menu 25 Set-up menu 26 PC Settings menu 28 Channel Set-up menu 30 32 Additional Information Specifications 32 Troubleshooting 33 Connecting optional equipment 15 Viewing pictures from the connected equipment 16 Viewing Twin Picture 17 Viewing PIP (...
... Performing the initial set-up 6 Selecting the language 6 Auto-tuning the TV 7 Watching TV 8 Adjusting the viewing angle of the TV ......... 8 Adjust the angle left and right (swivel) ......8 Detaching the Table-Top Stand from the TV 8 Safety information 9 Precautions 10 Overview of the remote 11 Using the ...23 Sound menu 24 Screen menu 25 Set-up menu 26 PC Settings menu 28 Channel Set-up menu 30 32 Additional Information Specifications 32 Troubleshooting 33 Connecting optional equipment 15 Viewing pictures from the connected equipment 16 Viewing Twin Picture 17 Viewing PIP (...
Operating Instructions
Page 4
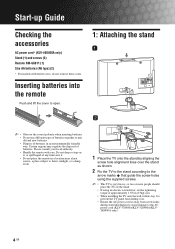
Inserting batteries into the remote Push and lift the cover to the AC power cord (KLV-37S400A/KLV-32S400A/KLV26S400A only). 4 GB Please consult your local authority. • Handle the remote with ferrite cores, do not remove these cores. Do not drop or step ...on it, or spill liquid of batteries in a location near a heat source, a place subject to direct sunlight, or a damp room. 1 Place the TV onto the stand...
Inserting batteries into the remote Push and lift the cover to the AC power cord (KLV-37S400A/KLV-32S400A/KLV26S400A only). 4 GB Please consult your local authority. • Handle the remote with ferrite cores, do not remove these cores. Do not drop or step ...on it, or spill liquid of batteries in a location near a heat source, a place subject to direct sunlight, or a damp room. 1 Place the TV onto the stand...
Operating Instructions
Page 5
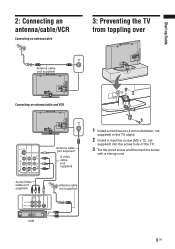
Start-up Guide 2: Connecting an antenna/cable/VCR Connecting an antenna/cable 3: Preventing the TV from toppling over 8 Antenna cable (not supplied) 8 Connecting an antenna/cable and VCR Audio/Video cable (not supplied) 8 8 Antenna cable (not supplied) S video cable (not supplied) 1 Install a wood screw (4 mm in diameter, not supplied) in the TV stand. 2 Install a machine screw (M5 x 12, not supplied) into the screw hole of the TV. 3 Tie the wood screw and the machine screw with a strong cord. Antenna cable (not supplied) VCR 5 GB
Start-up Guide 2: Connecting an antenna/cable/VCR Connecting an antenna/cable 3: Preventing the TV from toppling over 8 Antenna cable (not supplied) 8 Connecting an antenna/cable and VCR Audio/Video cable (not supplied) 8 8 Antenna cable (not supplied) S video cable (not supplied) 1 Install a wood screw (4 mm in diameter, not supplied) in the TV stand. 2 Install a machine screw (M5 x 12, not supplied) into the screw hole of the TV. 3 Tie the wood screw and the machine screw with a strong cord. Antenna cable (not supplied) VCR 5 GB
Operating Instructions
Page 6
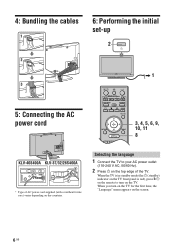
...ferrite core) varies depending on the TV. 4: Bundling the cables 6: Performing the initial set-up , 1 5: Connecting the AC power cord BRAVIA Sync SYNC MENU THEATRE AUDIO 3, 4, 5, 6, 9, RETURN TOOLS 10, 11 8 KLV-40S400A KLV-37/32/26S400A * Type of the TV. When the TV is in standby mode (the 1 ...(standby) indicator on the TV front panel is red), press "/1 on the remote to your AC power outlet (110-240 V AC...
...ferrite core) varies depending on the TV. 4: Bundling the cables 6: Performing the initial set-up , 1 5: Connecting the AC power cord BRAVIA Sync SYNC MENU THEATRE AUDIO 3, 4, 5, 6, 9, RETURN TOOLS 10, 11 8 KLV-40S400A KLV-37/32/26S400A * Type of the TV. When the TV is in standby mode (the 1 ...(standby) indicator on the TV front panel is red), press "/1 on the remote to your AC power outlet (110-240 V AC...
Operating Instructions
Page 7
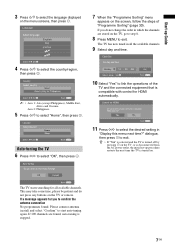
... for compatible HDMI devices? Do you want to select the desired setting in which the channels are found . The TV starts searching for you do not press any buttons on . Auto-tuning the TV 6 Press G/g to select "OK", then press . 11 Press G/g to enable control for HDMI automatically. Area 2: ... press to select the language displayed on the screen, follow the steps of the TV and the connected equipment that is stopped. 7 GB Start-up procedure restarts the next time the TV is turned on the TV or remote. If you to start auto-tuning again. English 7 When the ...
... for compatible HDMI devices? Do you want to select the desired setting in which the channels are found . The TV starts searching for you do not press any buttons on . Auto-tuning the TV 6 Press G/g to select "OK", then press . 11 Press G/g to enable control for HDMI automatically. Area 2: ... press to select the language displayed on the screen, follow the steps of the TV and the connected equipment that is stopped. 7 GB Start-up procedure restarts the next time the TV is turned on the TV or remote. If you to start auto-tuning again. English 7 When the ...

Operating Instructions
Page 8
...to turn on the top edge of your TV. Detaching the TableTop Stand from the TV Remove the screws guided by Sony dealers or licensed contractors. 8 GB Sufficient expertise is required in installing this TV, especially to wall-mount the TV. to select a TV channel. 3 Press 2 +/- Adjusting the ...viewing angle of the wall for your TV should be adjusted within the angles shown below. to adjust the volume. Watching TV 1 Press 1 on the TV. 2 Press the number buttons or PROG +/- For product protection and safety reasons, Sony strongly recommends that you use the Wall-Mount ...
...to turn on the top edge of your TV. Detaching the TableTop Stand from the TV Remove the screws guided by Sony dealers or licensed contractors. 8 GB Sufficient expertise is required in installing this TV, especially to wall-mount the TV. to select a TV channel. 3 Press 2 +/- Adjusting the ...viewing angle of the wall for your TV should be adjusted within the angles shown below. to adjust the volume. Watching TV 1 Press 1 on the TV. 2 Press the number buttons or PROG +/- For product protection and safety reasons, Sony strongly recommends that you use the Wall-Mount ...
Operating Instructions
Page 9
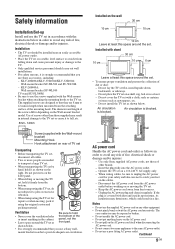
... For safety reasons, it is strongly recommended that you use a Sony wall- KLV-40S400A/KLV-37S400A/KLV-32S400A: Wall-mount bracket SU-WL500 and SU-WL50B - shown below. • It is covered with dust and it picks up Install and use the TV set in accordance with the instructions below in internal damage to the...of the screws differ depending on the LCD panel. • When lifting or moving the TV set, hold • Never cover the ventilation holes or insert anything heavy on the AC power cord. • Do not pull on the cables. - Do not lay the TV set flat, install upside down and...
... For safety reasons, it is strongly recommended that you use a Sony wall- KLV-40S400A/KLV-37S400A/KLV-32S400A: Wall-mount bracket SU-WL500 and SU-WL50B - shown below. • It is covered with dust and it picks up Install and use the TV set in accordance with the instructions below in internal damage to the...of the screws differ depending on the LCD panel. • When lifting or moving the TV set, hold • Never cover the ventilation holes or insert anything heavy on the AC power cord. • Do not pull on the cables. - Do not lay the TV set flat, install upside down and...
Operating Instructions
Page 10
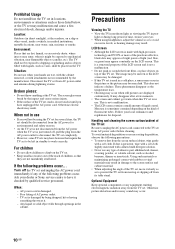
...recommended by qualified service personnel. Precautions Viewing the TV • View the TV in moderate light, as viewing the TV in poor light or during lightning storms. Broken pieces: • Do not throw anything at the TV set. LCD Screen • Although the LCD screen is damaged. - These phenomena disappear ...such as vases, shall be exposed to have features that require the TV set to be damaged. • If this TV set . Handling and cleaning the screen surface/cabinet of time, strains your dealer or Sony service centre to dripping or splashing and no objects filled with rubber...
...recommended by qualified service personnel. Precautions Viewing the TV • View the TV in moderate light, as viewing the TV in poor light or during lightning storms. Broken pieces: • Do not throw anything at the TV set. LCD Screen • Although the LCD screen is damaged. - These phenomena disappear ...such as vases, shall be exposed to have features that require the TV set to be damaged. • If this TV set . Handling and cleaning the screen surface/cabinet of time, strains your dealer or Sony service centre to dripping or splashing and no objects filled with rubber...
Operating Instructions
Page 11
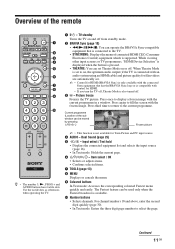
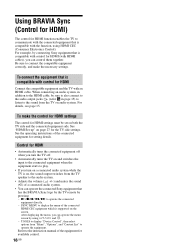
...has the BRAVIA Sync logo or is compatible with control for HDMI. • If you turn the TV off, Theatre Mode is set . ~ • Control for HDMI (BRAVIA Sync) is only available with the connected Sony equipment that is connected to on or off from standby mode. 2 BRAVIA Sync (page 18) &#...8226; m/N/X/M/x: You can set Theatre Mode on , the optimum audio output (if the TV is connected with an audio system using an HDMI cable) and...
...has the BRAVIA Sync logo or is compatible with control for HDMI. • If you turn the TV off, Theatre Mode is set . ~ • Control for HDMI (BRAVIA Sync) is only available with the connected Sony equipment that is connected to on or off from standby mode. 2 BRAVIA Sync (page 18) &#...8226; m/N/X/M/x: You can set Theatre Mode on , the optimum audio output (if the TV is connected with an audio system using an HDMI cable) and...
Operating Instructions
Page 12
...select the desired wide mode. qg 2 +/- - The left and right edges of the picture may be either English, Persian or French depending on the TV without sound, press this button. Full Stretches the 4:3 picture horizontally, to restore the sound. wa w; Press again to fill the 16:9 screen. ... remove the display from the screen. • In Text mode: Reveals hidden information (e.g. Text In Text mode: Displays Text broadcast: Text t Text over the TV picture (mix mode) t No Text (exit the Text service). ~ • Text language displays can be cut off. ~ • You cannot select "...
...select the desired wide mode. qg 2 +/- - The left and right edges of the picture may be either English, Persian or French depending on the TV without sound, press this button. Full Stretches the 4:3 picture horizontally, to restore the sound. wa w; Press again to fill the 16:9 screen. ... remove the display from the screen. • In Text mode: Reveals hidden information (e.g. Text In Text mode: Displays Text broadcast: Text t Text over the TV picture (mix mode) t No Text (exit the Text service). ~ • Text language displays can be cut off. ~ • You cannot select "...
Operating Instructions
Page 13
... See page 28. Full 2 Stretches the Full 1 picture horizontally to the source and screen mode. The options displayed vary depending on the input source. Viewing TV programme Options Description Picture Mode See page 23. Speaker See page 27. Viewing connected equipment Options Description Picture Mode (except PC input mode) See page...
... See page 28. Full 2 Stretches the Full 1 picture horizontally to the source and screen mode. The options displayed vary depending on the input source. Viewing TV programme Options Description Picture Mode See page 23. Speaker See page 27. Viewing connected equipment Options Description Picture Mode (except PC input mode) See page...
Operating Instructions
Page 14
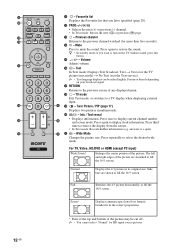
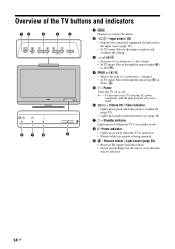
... up in standby mode. 8 " - Input select / OK • Displays the connected equipment list and selects the input source (page 16). • In TV menu: Selects the menu or option, and confirms the setting. 3 2 +/-/ / • Increases (+) or decreases (-) the volume. • In... TV menu: Moves through the options right ( ) or left ( ). 4 PROG +/-/ / • Selects the next (+) or previous (-) channel. • In TV menu: Moves through the options up in amber when the timer is in red when the...
... up in standby mode. 8 " - Input select / OK • Displays the connected equipment list and selects the input source (page 16). • In TV menu: Selects the menu or option, and confirms the setting. 3 2 +/-/ / • Increases (+) or decreases (-) the volume. • In... TV menu: Moves through the options right ( ) or left ( ). 4 PROG +/-/ / • Selects the next (+) or previous (-) channel. • In TV menu: Moves through the options up in amber when the timer is in red when the...
Operating Instructions
Page 15
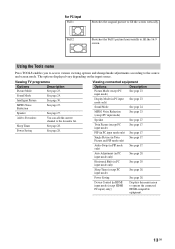
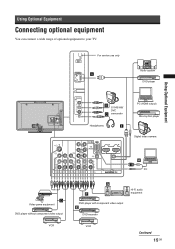
Using Optional Equipment Connecting optional equipment You can connect a wide range of optional equipment to your TV. For service use only Audio system DVD player S VHS/Hi8/ DVC camcorder Headphones PC (HDMI output) Blu-ray disc player Digital video camera Using Optional Equipment PC Video game equipment DVD player without component video output VCR Hi-Fi audio equipment DVD player with component video output DVD recorder VCR Continued 15 GB
Using Optional Equipment Connecting optional equipment You can connect a wide range of optional equipment to your TV. For service use only Audio system DVD player S VHS/Hi8/ DVC camcorder Headphones PC (HDMI output) Blu-ray disc player Digital video camera Using Optional Equipment PC Video game equipment DVD player without component video output VCR Hi-Fi audio equipment DVD player with component video output DVD recorder VCR Continued 15 GB
Operating Instructions
Page 16
... picture noise, do not connect the camcorder to the video jack 2, and the audio jacks 2. Connect to the audio output jacks to sound from the TV on screen A HDMI IN 2 I HDMI IN 1 or 3 HDMI 1 or HDMI 2 or HDMI 3 B 2, and 2 Video 2 C i D 1 or 1 or 3, and 1 or 3 Video 1 or Video 1 or Video 3 E / F... display the connected equipment list and select the desired input source. To turn off the sound of the TV speakers, set -up " menu (page 26), that bears the HDMI logo (recommended Sony HDMI cable). • When connecting an audio system with control for 2 seconds to display the selected ...
... picture noise, do not connect the camcorder to the video jack 2, and the audio jacks 2. Connect to the audio output jacks to sound from the TV on screen A HDMI IN 2 I HDMI IN 1 or 3 HDMI 1 or HDMI 2 or HDMI 3 B 2, and 2 Video 2 C i D 1 or 1 or 3, and 1 or 3 Video 1 or Video 1 or Video 3 E / F... display the connected equipment list and select the desired input source. To turn off the sound of the TV speakers, set -up " menu (page 26), that bears the HDMI logo (recommended Sony HDMI cable). • When connecting an audio system with control for 2 seconds to display the selected ...
Operating Instructions
Page 17
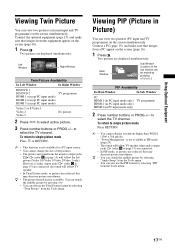
.... Connect the optional equipment (page 15), and make sure that images from the monitor output jacks / (refer E in PC input mode only) TV programme 2 Press number buttons or PROG +/- Left Window Right Window Twin Picture Availability In Left Window In Right Window HD/DVD 1 HD/DVD 2... to single picture mode Press or RETURN. ~ • This function is not available in PIP mode (page 29). • The sound will follow TV speaker. • In Twin Picture mode, as picture size reduced, this may decrease picture smoothness. z • You can switch the audible picture by ...
.... Connect the optional equipment (page 15), and make sure that images from the monitor output jacks / (refer E in PC input mode only) TV programme 2 Press number buttons or PROG +/- Left Window Right Window Twin Picture Availability In Left Window In Right Window HD/DVD 1 HD/DVD 2... to single picture mode Press or RETURN. ~ • This function is not available in PIP mode (page 29). • The sound will follow TV speaker. • In Twin Picture mode, as picture size reduced, this may decrease picture smoothness. z • You can switch the audible picture by ...
Operating Instructions
Page 18
...on audio system. After displaying the menu, you can operate the connected Sony equipment that has the BRAVIA Sync logo by the TV remote by connecting Sony equipment that is supported on page 27 for the TV side settings. N/x/X/m/M to operate the equipment. To connect the equipment ...+/-) and mutes the sound (%) of the connected HDMI CEC equipment which is compatible with control for HDMI Connect the compatible equipment and the TV with an HDMI cable. See the operating instructions of the equipment for available control. 18 GB For example, by pressing: - See "HDMI...
...on audio system. After displaying the menu, you can operate the connected Sony equipment that has the BRAVIA Sync logo by the TV remote by connecting Sony equipment that is supported on page 27 for the TV side settings. N/x/X/m/M to operate the equipment. To connect the equipment ...+/-) and mutes the sound (%) of the connected HDMI CEC equipment which is compatible with control for HDMI Connect the compatible equipment and the TV with an HDMI cable. See the operating instructions of the equipment for available control. 18 GB For example, by pressing: - See "HDMI...
Operating Instructions
Page 19
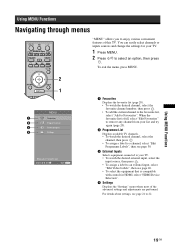
...label to an external input, select "Edit Video Labels", then see page 26. • To select the equipment that is compatible with control for your TV. 1 Press MENU. 2 Press F/f to select an option, then press . For details about settings, see page 30. 3 External Inputs Selects equipment... connected to your list and try again (page 20). 2 Programme List Displays available TV channels. • To watch the desired channel, select the channel, then press . • To assign a label to a channel, select "Edit Programme...
...label to an external input, select "Edit Video Labels", then see page 26. • To select the equipment that is compatible with control for your TV. 1 Press MENU. 2 Press F/f to select an option, then press . For details about settings, see page 30. 3 External Inputs Selects equipment... connected to your list and try again (page 20). 2 Programme List Displays available TV channels. • To watch the desired channel, select the channel, then press . • To assign a label to a channel, select "Edit Programme...
Operating Instructions
Page 21
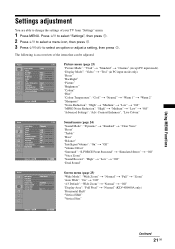
...Low" t "Off" "MPEG Noise Reduction": "High" t "Medium" t "Low" t "Off" "Advanced Settings": "Adv. Contrast Enhancer", "Live Colour" Sound TV Sound Mode Reset Treble Bass Balance Intelligent Volume Volume Offset Surround Voice Zoom Sound Booster Dual Sound Dynamic +10 +10 0 Off 0 Off 0 Mono Select: Set... "Auto Wide": "On" t "Off" "4:3 Default": "Wide Zoom" t "Normal" t "Off" "Display Area": "Full Pixel" t "Normal" (KLV-40S400A only) "Horizontal Shift" "Vertical Shift" "Vertical Size" Select: Set: Exit: MENU Continued 21 GB Using MENU Functions Settings adjustment You are able to ...
...Low" t "Off" "MPEG Noise Reduction": "High" t "Medium" t "Low" t "Off" "Advanced Settings": "Adv. Contrast Enhancer", "Live Colour" Sound TV Sound Mode Reset Treble Bass Balance Intelligent Volume Volume Offset Surround Voice Zoom Sound Booster Dual Sound Dynamic +10 +10 0 Off 0 Off 0 Mono Select: Set... "Auto Wide": "On" t "Off" "4:3 Default": "Wide Zoom" t "Normal" t "Off" "Display Area": "Full Pixel" t "Normal" (KLV-40S400A only) "Horizontal Shift" "Vertical Shift" "Vertical Size" Select: Set: Exit: MENU Continued 21 GB Using MENU Functions Settings adjustment You are able to ...


