User Manual
Page 5
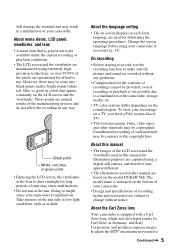
... the LCD screen, the viewfinder, or the lens to direct sunlight for effective use. Unauthorized recording of such materials may be some tiny black points and/or bright points (white, red, blue, or green in color) that is grayed out is indicated on the model DCR-HC54E. will damage the terminal and may result in a malfunction of your camcorder. • Design and specifications of recording media...
... the LCD screen, the viewfinder, or the lens to direct sunlight for effective use. Unauthorized recording of such materials may be some tiny black points and/or bright points (white, red, blue, or green in color) that is grayed out is indicated on the model DCR-HC54E. will damage the terminal and may result in a malfunction of your camcorder. • Design and specifications of recording media...
User Manual
Page 7
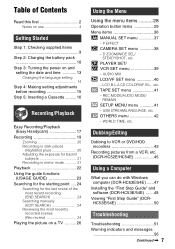
... (Rec review 24 Playing the picture on a TV .......... 26 Using the Menu Using the menu items .......... 28 Operation button items 29 Menu items 36 MANUAL SET menu 37 - D ZOOM/WIDE SEL/ STEADYSHOT, etc. REC MODE/AUDIO MODE/ REMAIN SETUP MENU menu 41 - P EFFECT CAMERA SET menu 38 - AUDIO MIX LCD/VF SET menu 40 - Dubbing/Editing Dubbing to VCR or DVD/HDD recorders 43 Recording pictures from a VCR, etc. (DCR-HC52E/HC54E 45 Using a Computer What you can do with Windows computer (DCR-HC53E/54E) ......47 Installing the "First Step Guide" and software (DCR...
... (Rec review 24 Playing the picture on a TV .......... 26 Using the Menu Using the menu items .......... 28 Operation button items 29 Menu items 36 MANUAL SET menu 37 - D ZOOM/WIDE SEL/ STEADYSHOT, etc. REC MODE/AUDIO MODE/ REMAIN SETUP MENU menu 41 - P EFFECT CAMERA SET menu 38 - AUDIO MIX LCD/VF SET menu 40 - Dubbing/Editing Dubbing to VCR or DVD/HDD recorders 43 Recording pictures from a VCR, etc. (DCR-HC52E/HC54E 45 Using a Computer What you can do with Windows computer (DCR-HC53E/54E) ......47 Installing the "First Step Guide" and software (DCR...
User Manual
Page 11
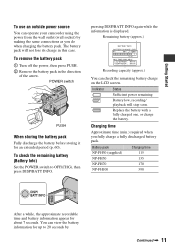
... is displayed. Remaining battery (approx.) BATTERY INFO BATTERY CHARGE LEVEL 0% 50% 100% REC TIME AVAILABLE LCD SCREEN : 85 min VIEWFINDER : 99 min Recording capacity (approx.) You can view the battery information for up to OFF(CHG), then press DISP/BATT INFO. The battery pack will stop soon. To remove the battery pack 1 Turn off the power, then press PUSH. 2 Remove the battery pack in this case. To check the remaining battery (Battery Info) Set the POWER switch...
... is displayed. Remaining battery (approx.) BATTERY INFO BATTERY CHARGE LEVEL 0% 50% 100% REC TIME AVAILABLE LCD SCREEN : 85 min VIEWFINDER : 99 min Recording capacity (approx.) You can view the battery information for up to OFF(CHG), then press DISP/BATT INFO. The battery pack will stop soon. To remove the battery pack 1 Turn off the power, then press PUSH. 2 Remove the battery pack in this case. To check the remaining battery (Battery Info) Set the POWER switch...
User Manual
Page 12
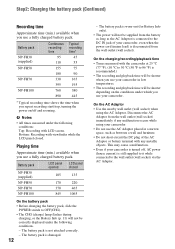
...: Charging the battery pack (Continued) Recording time Approximate time (min.) available when you use the AC Adaptor placed in low temperatures. • The recording and playback time will not be correctly displayed under the following conditions: Top: Recording with viewfinder while the LCD panel closed 135 220 465 1065 On the battery pack • Before changing the battery pack, slide the POWER switch to 86 °F) is connected...
...: Charging the battery pack (Continued) Recording time Approximate time (min.) available when you use the AC Adaptor placed in low temperatures. • The recording and playback time will not be correctly displayed under the following conditions: Top: Recording with viewfinder while the LCD panel closed 135 220 465 1065 On the battery pack • Before changing the battery pack, slide the POWER switch to 86 °F) is connected...
User Manual
Page 13
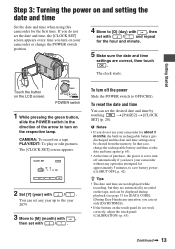
... the POWER switch to [M] (month) with / and repeat for approximately 5 minutes, to turn on a tape. PLAY/EDIT: To play or edit pictures. Getting Started Touch the button on and setting the date and time Set the date and time when using this camcorder for [DATA CODE] (During Easy Handycam operation, you turn off automatically if you do not work correctly, adjust the touch panel (CALIBRATION) (p. 63). z Tips • The date and time are not displayed while recording...
... the POWER switch to [M] (month) with / and repeat for approximately 5 minutes, to turn on a tape. PLAY/EDIT: To play or edit pictures. Getting Started Touch the button on and setting the date and time Set the date and time when using this camcorder for [DATA CODE] (During Easy Handycam operation, you turn off automatically if you do not work correctly, adjust the touch panel (CALIBRATION) (p. 63). z Tips • The date and time are not displayed while recording...
User Manual
Page 15
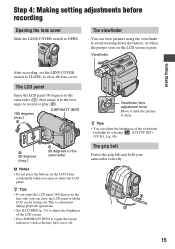
... the buttons on the LCD frame accidentally when you can adjust the brightness of the LCD screen. • Press DISP/BATT INFO to the lens side, you open or adjust the LCD panel. Step 4: Making setting adjustments before recording Opening the lens cover Slide the LENS COVER switch to avoid wearing down the battery, or when the picture seen on the LCD screen is poor. The viewfinder You can view pictures using the...
... the buttons on the LCD frame accidentally when you can adjust the brightness of the LCD screen. • Press DISP/BATT INFO to the lens side, you open or adjust the LCD panel. Step 4: Making setting adjustments before recording Opening the lens cover Slide the LENS COVER switch to avoid wearing down the battery, or when the picture seen on the LCD screen is poor. The viewfinder You can view pictures using the...
User Manual
Page 26
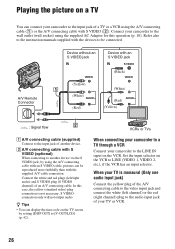
... the red (right channel) plug to the audio input jack of your camcorder to the input jack of a TV or a VCR using the A/V connecting cable (1) or the A/V connecting cable with an S VIDEO jack A/V Remote Connector (Yellow) 1 (White) (Red) (Black) (White) (Red) (Yellow) : Signal flow 2 A A/V connecting cable (supplied) Connect to another device. B A/V connecting cable with S VIDEO (optional) When connecting to the input jack of an A/V connecting cable. S VIDEO connection only will not output audio. Set the input selector on the VCR to [V-OUT/LCD] (p. 42). Playing the picture on...
... the red (right channel) plug to the audio input jack of your camcorder to the input jack of a TV or a VCR using the A/V connecting cable (1) or the A/V connecting cable with an S VIDEO jack A/V Remote Connector (Yellow) 1 (White) (Red) (Black) (White) (Red) (Yellow) : Signal flow 2 A A/V connecting cable (supplied) Connect to another device. B A/V connecting cable with S VIDEO (optional) When connecting to the input jack of an A/V connecting cable. S VIDEO connection only will not output audio. Set the input selector on the VCR to [V-OUT/LCD] (p. 42). Playing the picture on...
User Manual
Page 28
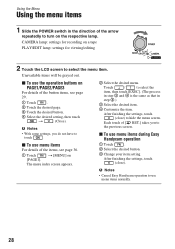
... viewing/editing 2 Touch the LCD screen to touch . Unavailable items will be grayed out. Each touch of the items, see page 29. 1 Touch . 2 Touch the desired page. 3 Touch the desired button. 4 Select the desired setting, then touch t (Close). After finishing the settings, touch (close ) to turn on [PAGE1]. Touch / to use menu items during Easy Handycam operation 1 Touch . 2 Select the desired button. 3 Change...
... viewing/editing 2 Touch the LCD screen to touch . Unavailable items will be grayed out. Each touch of the items, see page 29. 1 Touch . 2 Touch the desired page. 3 Touch the desired button. 4 Select the desired setting, then touch t (Close). After finishing the settings, touch (close ) to turn on [PAGE1]. Touch / to use menu items during Easy Handycam operation 1 Touch . 2 Select the desired button. 3 Change...
User Manual
Page 31
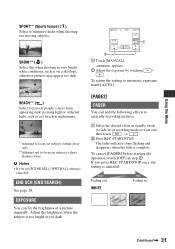
... t . 2 Press REC START/STOP. SNOW** ( ) Select this when shooting in ) or recording mode (to automatic exposure, touch [AUTO]. [PAGE2] FADER You can fix the brightness of a picture manually. BEACH** ( ) Select to focus on a ski slope; b Notes • If you press REC START/STOP once, the setting is canceled. AL EXPOSURE 2 1 Touch [MANUAL]. appears. 2 Adjust the exposure by touching / . Fading out WHITE Fading in midsummer. * Adjusted to focus on...
... t . 2 Press REC START/STOP. SNOW** ( ) Select this when shooting in ) or recording mode (to automatic exposure, touch [AUTO]. [PAGE2] FADER You can fix the brightness of a picture manually. BEACH** ( ) Select to focus on a ski slope; b Notes • If you press REC START/STOP once, the setting is canceled. AL EXPOSURE 2 1 Touch [MANUAL]. appears. 2 Adjust the exposure by touching / . Fading out WHITE Fading in midsummer. * Adjusted to focus on...
User Manual
Page 34
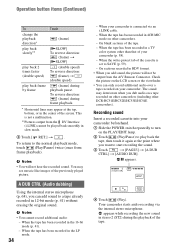
... the LCD screen or the viewfinder. • You can add sound to turn on your camcorder is connected via the internal stereo microphone. X appears. 60min A DUB CTRL 0:00:00:00 RET. To return to SAVE (p. 59). - b Notes • You will not be played back smoothly in slow mode. 2 Touch [ RET.] t . Operation button items (Continued) To Touch change the playback direction* play back slowly** play back 2 times faster (double speed) play back the tape...
... the LCD screen or the viewfinder. • You can add sound to turn on your camcorder is connected via the internal stereo microphone. X appears. 60min A DUB CTRL 0:00:00:00 RET. To return to SAVE (p. 59). - b Notes • You will not be played back smoothly in slow mode. 2 Touch [ RET.] t . Operation button items (Continued) To Touch change the playback direction* play back slowly** play back 2 times faster (double speed) play back the tape...
User Manual
Page 41
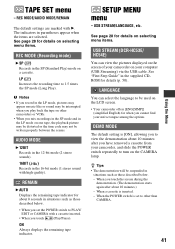
... . • When you set to be written properly between the scenes. REMAIN B AUTO Displays the remaining tape indicator for details on selecting menu items. USB STREAM (DCR-HC53E/ HC54E) You can select the language to other camcorders or VCRs. • When you play back the tape on a cassette. LANGUAGE You can view the pictures displayed on the screen of your camcorder on the CAMERA lamp. When the POWER switch is inserted. - The...
... . • When you set to be written properly between the scenes. REMAIN B AUTO Displays the remaining tape indicator for details on selecting menu items. USB STREAM (DCR-HC53E/ HC54E) You can select the language to other camcorders or VCRs. • When you play back the tape on a cassette. LANGUAGE You can view the pictures displayed on the screen of your camcorder on the CAMERA lamp. When the POWER switch is inserted. - The...
User Manual
Page 43
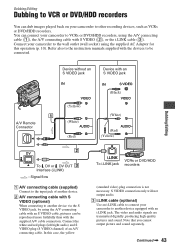
... VCRs or DVD/HDD To i.LINK jack recorders (standard video) plug connection is not necessary. Connect the white and red plugs (left/right audio) and S VIDEO plug (S VIDEO channel) of another device. Note that you cannot output picture and sound separately. Connect your camcorder to be reproduced more faithfully than with S VIDEO (2), or the i.LINK cable (3). You can connect your camcorder to the input jack of an A/V connecting cable. The video and audio signals are transmitted digitally, producing high quality pictures and sound. Device...
... VCRs or DVD/HDD To i.LINK jack recorders (standard video) plug connection is not necessary. Connect the white and red plugs (left/right audio) and S VIDEO plug (S VIDEO channel) of another device. Note that you cannot output picture and sound separately. Connect your camcorder to be reproduced more faithfully than with S VIDEO (2), or the i.LINK cable (3). You can connect your camcorder to the input jack of an A/V connecting cable. The video and audio signals are transmitted digitally, producing high quality pictures and sound. Device...
User Manual
Page 44
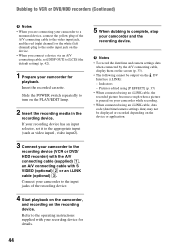
... the operating instructions supplied with S VIDEO (optional) 2 or an i.LINK cable (optional) 3. b Notes • To record the date/time and camera settings data when connected by the A/V connecting cable, display them on the recording device. Slide the POWER switch repeatedly to turn on the device or application. 44 Dubbing to VCR or DVD/HDD recorders (Continued) b Notes • When you are connecting your camcorder to a monaural device, connect the yellow plug of the recording device. 4 Start playback on the camcorder, and recording on the screen...
... the operating instructions supplied with S VIDEO (optional) 2 or an i.LINK cable (optional) 3. b Notes • To record the date/time and camera settings data when connected by the A/V connecting cable, display them on the recording device. Slide the POWER switch repeatedly to turn on the device or application. 44 Dubbing to VCR or DVD/HDD recorders (Continued) b Notes • When you are connecting your camcorder to a monaural device, connect the yellow plug of the recording device. 4 Start playback on the camcorder, and recording on the screen...
User Manual
Page 51
...] - [AUDIO MIX] The camcorder gets warm. • The camcorder may get warmer while you press the RESET button, all settings are reset.) Buttons do not operate your Sony dealer. • Overall operations/Easy Handycam ..... 51 • Batteries/Power sources 51 • LCD screen/viewfinder 52 • Cassette tapes 52 • Recording 53 • Playback 54 • Dubbing/Editing/Connecting to other devices 54 • Connecting to a computer 55 • Functions that are functional (p. 18). Troubleshooting Troubleshooting If...
...] - [AUDIO MIX] The camcorder gets warm. • The camcorder may get warmer while you press the RESET button, all settings are reset.) Buttons do not operate your Sony dealer. • Overall operations/Easy Handycam ..... 51 • Batteries/Power sources 51 • LCD screen/viewfinder 52 • Cassette tapes 52 • Recording 53 • Playback 54 • Dubbing/Editing/Connecting to other devices 54 • Connecting to a computer 55 • Functions that are functional (p. 18). Troubleshooting Troubleshooting If...

User Manual
Page 54
... 4ch microphone recording. The displayed pictures are not clear or do not appear. • Clean the head using the cleaning cassette (optional) (p. 63). 54 No sound or only a low sound is heard. • Turn up the volume (p. 22). • Adjust [AUDIO MIX] until the sound is heard appropriately (p. 35). • If you are playing was recorded without setting the date and time. • A blank section on the tape is being played. • The data code...
... 4ch microphone recording. The displayed pictures are not clear or do not appear. • Clean the head using the cleaning cassette (optional) (p. 63). 54 No sound or only a low sound is heard. • Turn up the volume (p. 22). • Adjust [AUDIO MIX] until the sound is heard appropriately (p. 35). • If you are playing was recorded without setting the date and time. • A blank section on the tape is being played. • The data code...
User Manual
Page 59
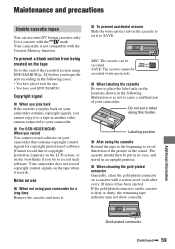
..., you play back If the cassette you cannot copy it . Labeling position x After using your camcorder for copyright protection of software. [Cannot record due to set it has been ejected. Additional Information Gold-plated connector Continued , 59 REC SAVE SAVE: The cassette cannot be recorded. Use a cassette with a cotton-wool swab after every 10 times it to the end of the picture or the sound. Notes on use mini DV format cassettes only...
..., you play back If the cassette you cannot copy it . Labeling position x After using your camcorder for copyright protection of software. [Cannot record due to set it has been ejected. Additional Information Gold-plated connector Continued , 59 REC SAVE SAVE: The cassette cannot be recorded. Use a cassette with a cotton-wool swab after every 10 times it to the end of the picture or the sound. Notes on use mini DV format cassettes only...
User Manual
Page 62
..., dropping or stepping on the lens. Near AM receivers and video equipment. If your camcorder, and leave it checked by placing anything heavy on the camcorder and play a cassette for about 3 minutes. • Use up inside your local authorized Sony service facility. - If there is brought directly from a cold place to direct sunlight. Turn off the power of the device and disconnect the AC Adaptor...
..., dropping or stepping on the lens. Near AM receivers and video equipment. If your camcorder, and leave it checked by placing anything heavy on the camcorder and play a cassette for about 3 minutes. • Use up inside your local authorized Sony service facility. - If there is brought directly from a cold place to direct sunlight. Turn off the power of the device and disconnect the AC Adaptor...
User Manual
Page 63
... Sony service facility to condense, your camcorder sometimes cannot detect condensation. This is opened. Video head It is not a malfunction. This is recommended you use the LCD Cleaning Kit (optional), do not move. - It is inserted and video operation buttons are worn. If you cannot obtain a clear image even after the cassette lid is not a malfunction. x On adjustment of the LCD screen may heat up by a heating device...
... Sony service facility to condense, your camcorder sometimes cannot detect condensation. This is opened. Video head It is not a malfunction. This is recommended you use the LCD Cleaning Kit (optional), do not move. - It is inserted and video operation buttons are worn. If you cannot obtain a clear image even after the cassette lid is not a malfunction. x On adjustment of the LCD screen may heat up by a heating device...
User Manual
Page 74
... OFF (Auto shut off 42 A/V connecting cable .....26, 43 B Backlight 21, 53 Battery 10, 60 BEACH 31 BEEP 32 BLACK 32 B&W 37 C CALIBRATION 63 CAM DATA 33 CAMERA SET menu ...........38 Cassette 16, 59 CD-ROM 47 Charging time 11 Cleaning cassette 63 CLOCK SET 13 Computer 47 D D ZOOM (Digital zoom)......38 DATA CODE 33, 72 DATE/TIME 13, 33, 72 DEMO MODE 41 74 DISP GUIDE (Display guide 72 DISP OUT (Display output 42 Display indicators 71 Dubbing 43 E Easy Handycam 17...
... OFF (Auto shut off 42 A/V connecting cable .....26, 43 B Backlight 21, 53 Battery 10, 60 BEACH 31 BEEP 32 BLACK 32 B&W 37 C CALIBRATION 63 CAM DATA 33 CAMERA SET menu ...........38 Cassette 16, 59 CD-ROM 47 Charging time 11 Cleaning cassette 63 CLOCK SET 13 Computer 47 D D ZOOM (Digital zoom)......38 DATA CODE 33, 72 DATE/TIME 13, 33, 72 DEMO MODE 41 74 DISP GUIDE (Display guide 72 DISP OUT (Display output 42 Display indicators 71 Dubbing 43 E Easy Handycam 17...
User Manual
Page 75
... (Sunrise & Sunset 30 T Tape counter 71 TAPE SET menu 41 Time code 71 Tripod 70 TV 26 TV color systems 58 TWILIGHT 30 U USAGE GUIDE 23 USB STREAM 41 Using abroad 58 V V SPD PLAY (Various speed playback)..... 33 VCR SET menu 39 VF B.L. (Viewfinder back light) ........ 40 VOL (Volume 22 V-OUT/LCD 42 W Warning indicators 56 Warning messages 57 WHITE 31 WHT BAL (White balance 32 WIDE DISP (Wide display 40 WIDE SEL (Wide...
... (Sunrise & Sunset 30 T Tape counter 71 TAPE SET menu 41 Time code 71 Tripod 70 TV 26 TV color systems 58 TWILIGHT 30 U USAGE GUIDE 23 USB STREAM 41 Using abroad 58 V V SPD PLAY (Various speed playback)..... 33 VCR SET menu 39 VF B.L. (Viewfinder back light) ........ 40 VOL (Volume 22 V-OUT/LCD 42 W Warning indicators 56 Warning messages 57 WHITE 31 WHT BAL (White balance 32 WIDE DISP (Wide display 40 WIDE SEL (Wide...


