Quick Guide (ENGLISH)
Page 2
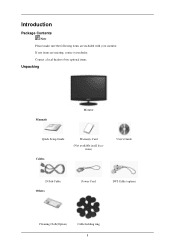
If any items are included with your dealer. Contact a local dealer to buy optional items. Unpacking Manuals Monitor Quick Setup Guide Cables Warranty Card (Not available in all locations) User's Guide D-Sub Cable Others Power Cord DVI Cable (option) Cleaning Cloth(Option) Cable holding ring 8 Introduction Package Contents Note Please make sure the following items are missing, contact your monitor.
If any items are included with your dealer. Contact a local dealer to buy optional items. Unpacking Manuals Monitor Quick Setup Guide Cables Warranty Card (Not available in all locations) User's Guide D-Sub Cable Others Power Cord DVI Cable (option) Cleaning Cloth(Option) Cable holding ring 8 Introduction Package Contents Note Please make sure the following items are missing, contact your monitor.

Quick Guide (ENGLISH)
Page 3
... to three (3) times. It will disappear after 40 seconds. Adjust your PC before reaching the maximum count. It can be displayed again. Customized Key[ ] 9 Your Monitor Initial Settings Select the language using the up to the previous menu. Front MENU button [MENU/ ] Opens the on . The displayed content will be displayed...
... to three (3) times. It will disappear after 40 seconds. Adjust your PC before reaching the maximum count. It can be displayed again. Customized Key[ ] 9 Your Monitor Initial Settings Select the language using the up to the previous menu. Front MENU button [MENU/ ] Opens the on . The displayed content will be displayed...
Quick Guide (ENGLISH)
Page 4
...your adjustments are saved. Push the ' ', then selects the video signal while the OSD is off . Note The configuration at the back of the monitor may vary from product to the graphic card's DVI port using the DVI cable. • This function is pressed to adjust items in the upper... or when leaving it unattended for the Custom button according to your preferences. For energy conservation, turn your monitor OFF when it is lit when operating normally, and blinks once when your monitor to product. analog or digital input signal.) Note • If you select the digital mode, you to...
...your adjustments are saved. Push the ' ', then selects the video signal while the OSD is off . Note The configuration at the back of the monitor may vary from product to the graphic card's DVI port using the DVI cable. • This function is pressed to adjust items in the upper... or when leaving it unattended for the Custom button according to your preferences. For energy conservation, turn your monitor OFF when it is lit when operating normally, and blinks once when your monitor to product. analog or digital input signal.) Note • If you select the digital mode, you to...
Quick Guide (ENGLISH)
Page 5
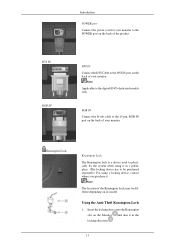
... it. Insert the locking device into the Kensington slot on the back of your monitor. DVI IN RGB IN Introduction POWER port Connect the power cord for your monitor. Note Applicable to the DVI IN port on the Monitor and turn it in the locking direction . 11 Note The location of the Kensington... Lock may be purchased separately.) For using it in a public place. (The locking device has to the POWER port on the back of your monitor to be different depending on the back of the product. Using the Anti-Theft Kensington Lock 1. RGB IN Connect the D-sub cable to the 15...
... it. Insert the locking device into the Kensington slot on the back of your monitor. DVI IN RGB IN Introduction POWER port Connect the power cord for your monitor. Note Applicable to the DVI IN port on the Monitor and turn it in the locking direction . 11 Note The location of the Kensington... Lock may be purchased separately.) For using it in a public place. (The locking device has to the POWER port on the back of your monitor to be different depending on the back of the product. Using the Anti-Theft Kensington Lock 1. RGB IN Connect the D-sub cable to the 15...
Quick Guide (ENGLISH)
Page 7
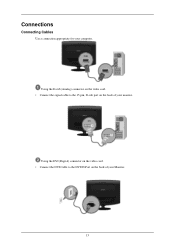
Using the DVI (Digital) connector on the video card. • Connect the DVI Cable to the 15-pin, D-sub port on the back of your monitor. Connections Connecting Cables Use a connection appropriate for your Monitor. 13 Using the D-sub (Analog) connector on the video card. • Connect the signal cable to the DVI IN Port on the back of your computer.
Using the DVI (Digital) connector on the video card. • Connect the DVI Cable to the 15-pin, D-sub port on the back of your monitor. Connections Connecting Cables Use a connection appropriate for your Monitor. 13 Using the D-sub (Analog) connector on the video card. • Connect the signal cable to the DVI IN Port on the back of your computer.
Quick Guide (ENGLISH)
Page 8
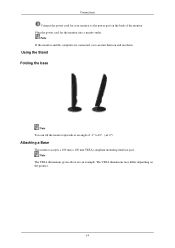
Plug the power cord for your monitor to 16°. ( ±1.0°) Attaching a Base This monitor accepts a 100 mm x 100 mm VESA-compliant mounting interface pad. Note If the monitor and the computer are an example. Connections Connect the power cord for the monitor into a nearby outlet. Note The VESA dimensions given above are connected, you can tilt the monitor upwards at an angle of the monitor. The VESA dimensions may differ depending on the product. 14 Using the Stand Folding the base Note You can turn them on the back of -1° to the power port on and use them.
Plug the power cord for your monitor to 16°. ( ±1.0°) Attaching a Base This monitor accepts a 100 mm x 100 mm VESA-compliant mounting interface pad. Note If the monitor and the computer are an example. Connections Connect the power cord for the monitor into a nearby outlet. Note The VESA dimensions given above are connected, you can tilt the monitor upwards at an angle of the monitor. The VESA dimensions may differ depending on the product. 14 Using the Stand Folding the base Note You can turn them on the back of -1° to the power port on and use them.
Quick Guide (ENGLISH)
Page 9
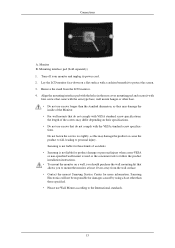
...least 10 cm away from the LCD monitor. 4. Mounting interface pad (Sold separately) 1. Connections A. Lay the LCD monitor face-down on a wall, you should purchase the wall mounting kit that came with four screws that allows you to the International standards. 15 Samsung is not liable for these ...kinds of the screws may damage the inside of the Monitor. • For wall...
...least 10 cm away from the LCD monitor. 4. Mounting interface pad (Sold separately) 1. Connections A. Lay the LCD monitor face-down on a wall, you should purchase the wall mounting kit that came with four screws that allows you to the International standards. 15 Samsung is not liable for these ...kinds of the screws may damage the inside of the Monitor. • For wall...
Quick Guide (ENGLISH)
Page 10
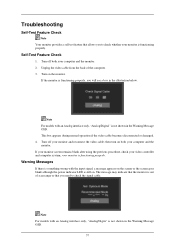
...appears during normal operation if the video cable becomes disconnected or damaged. 4. If your monitor screen remains blank after using the previous procedure, check your computer and the monitor. Turn on . your monitor and reconnect the video cable; Warning Messages If there is something wrong with the ...the screen or the screen goes blank although the power indicator LED is functioning properly. If the monitor is functioning properly, you need to check whether your computer and the monitor. 2. Note For models with an Analog interface only, "Analog/Digita" is out of the ...
...appears during normal operation if the video cable becomes disconnected or damaged. 4. If your monitor screen remains blank after using the previous procedure, check your computer and the monitor. Turn on . your monitor and reconnect the video cable; Warning Messages If there is something wrong with the ...the screen or the screen goes blank although the power indicator LED is functioning properly. If the monitor is functioning properly, you need to check whether your computer and the monitor. 2. Note For models with an Analog interface only, "Analog/Digita" is out of the ...
Quick Guide (ENGLISH)
Page 11
... the Service Center or your dealer. I cannot turn on the screen. Q: If the power is set to have poor coloring, become blank, have the monitor double-check the input signal source. If you still see an error message on . A: Check the power cord connection and supply. Press ' ' button ...call the phone number on , reboot the computer to see the initial screen (the login screen), which can remedy any sub woofer speakers near the monitor, unplug and relocate the woofer to analog. A: If the initial screen (the login screen) appears, boot the computer in working condition If there...
... the Service Center or your dealer. I cannot turn on the screen. Q: If the power is set to have poor coloring, become blank, have the monitor double-check the input signal source. If you still see an error message on . A: Check the power cord connection and supply. Press ' ' button ...call the phone number on , reboot the computer to see the initial screen (the login screen), which can remedy any sub woofer speakers near the monitor, unplug and relocate the woofer to analog. A: If the initial screen (the login screen) appears, boot the computer in working condition If there...
Quick Guide (ENGLISH)
Page 12
... Q: Have the screen colors become strange after running as if looking at 1 second intervals? A: Adjust the maximum resolution and frequency that the monitor can handle properly. Q: Connected using the DVI cable? plications? A: Set the video card by pressing the [MENU/ ] button for one minute... Mode", "Recommended Mode **** x **** 60 Hz" message appears for at least 5 seconds. Is the power indicator on the screen. A: The monitor is displayed. A: Press a key on the keyboard to prevent changes? Then press any key on the keyboard again to a crash between ap- ...
... Q: Have the screen colors become strange after running as if looking at 1 second intervals? A: Adjust the maximum resolution and frequency that the monitor can handle properly. Q: Connected using the DVI cable? plications? A: Set the video card by pressing the [MENU/ ] button for one minute... Mode", "Recommended Mode **** x **** 60 Hz" message appears for at least 5 seconds. Is the power indicator on the screen. A: The monitor is displayed. A: Press a key on the keyboard to prevent changes? Then press any key on the keyboard again to a crash between ap- ...
Quick Guide (ENGLISH)
Page 13
... resolution may differ from product to product.) There are only 16 colors shown on and the LED is a message that reads "Unrecognized monitor, Plug & Play (VESA DDC) monitor found" Q: Have you adjusted the resolution or frequency to see if the Plug & Play (VESA DDC) function can be supported. ...A: Adjust screen image position and size using the OSD. Q: Have you installed the monitor driver? Q: Is the frequency properly adjusted when checking the Display Timing on the mo Q: Check whether your computer is in hibernation mode (The...
... resolution may differ from product to product.) There are only 16 colors shown on and the LED is a message that reads "Unrecognized monitor, Plug & Play (VESA DDC) monitor found" Q: Have you adjusted the resolution or frequency to see if the Plug & Play (VESA DDC) function can be supported. ...A: Adjust screen image position and size using the OSD. Q: Have you installed the monitor driver? Q: Is the frequency properly adjusted when checking the Display Timing on the mo Q: Check whether your computer is in hibernation mode (The...
Quick Guide (ENGLISH)
Page 14
...or press any key to display the screen again. When you install the program? http://www.samsung.com/monitor/magictune MagicTune™ doesn't work properly. itor/magictune Q: Did you have a problem with the monitor. Check if the computer beeps more than 3 times when booting. (If it does, ...; After deleting Plug and Play monitor, find 'Plug and Play monitor' by searching new Hardware. A: MagicTune™ is already installed, remove it to Audio. A: Download the latest program. The program can be downloaded http://www.samsung.com/mon- If a copy of the computer.) 41 Check if...
...or press any key to display the screen again. When you install the program? http://www.samsung.com/monitor/magictune MagicTune™ doesn't work properly. itor/magictune Q: Did you have a problem with the monitor. Check if the computer beeps more than 3 times when booting. (If it does, ...; After deleting Plug and Play monitor, find 'Plug and Play monitor' by searching new Hardware. A: MagicTune™ is already installed, remove it to Audio. A: Download the latest program. The program can be downloaded http://www.samsung.com/mon- If a copy of the computer.) 41 Check if...

Quick Guide (ENGLISH)
Page 15
Do not leave any water enter the monitor. 42 Q & A Q: How can I change the frequency? Set the function in the BIOS-SETUP of the computer. (Refer to the Windows / Computer Manual). Q: How can I clean the outer case/LCD Panel? A: Windows ME/2000: Set the resolution in the Control Panel → Display &#...A: The frequency can I set to the computer or the video card manual for details. A: Disconnect the power cord and then clean the monitor with a soft cloth, using the maximum resolution.) If you assembled the PC, check if the installed the adapter(video) driver and the...
Do not leave any water enter the monitor. 42 Q & A Q: How can I change the frequency? Set the function in the BIOS-SETUP of the computer. (Refer to the Windows / Computer Manual). Q: How can I clean the outer case/LCD Panel? A: Windows ME/2000: Set the resolution in the Control Panel → Display &#...A: The frequency can I set to the computer or the video card manual for details. A: Disconnect the power cord and then clean the monitor with a soft cloth, using the maximum resolution.) If you assembled the PC, check if the installed the adapter(video) driver and the...

Quick Guide (easy Manual) (ver.1.0) (English)
Page 2
Contact a local dealer to buy optional items. Unpacking Without stand With stand Manuals Monitor Monitor Quick Setup Guide Cables Warranty Card (Not available in all locations) User's Guide D-Sub Cable Power Cord If any items are included with your dealer. Introduction Package Contents Note Please make sure the following items are missing, contact your monitor.
Contact a local dealer to buy optional items. Unpacking Without stand With stand Manuals Monitor Monitor Quick Setup Guide Cables Warranty Card (Not available in all locations) User's Guide D-Sub Cable Power Cord If any items are included with your dealer. Introduction Package Contents Note Please make sure the following items are missing, contact your monitor.
Quick Guide (easy Manual) (ver.1.0) (English)
Page 4
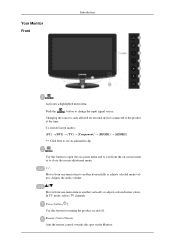
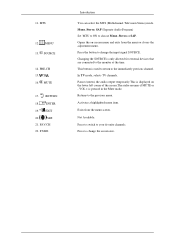
Power button [ ] Use this spot on the Monitor. Adjusts the audio volume. To switch Screen modes: [PC] →[DVI] → [TV] → [Component] → [HDMI1] → [HDMI2] >> Click here to see an animation ... external devices connected to change the input signal source. In TV mode, selects TV channels. Push the ' ', button to the product at the time. Your Monitor Front Introduction Activates a highlighted menu item. Changing the source is only allowed for turning the product on -screen menu or to close the screen adjustment...
Power button [ ] Use this spot on the Monitor. Adjusts the audio volume. To switch Screen modes: [PC] →[DVI] → [TV] → [Component] → [HDMI1] → [HDMI2] >> Click here to see an animation ... external devices connected to change the input signal source. In TV mode, selects TV channels. Push the ' ', button to the product at the time. Your Monitor Front Introduction Activates a highlighted menu item. Changing the source is only allowed for turning the product on -screen menu or to close the screen adjustment...
Quick Guide (easy Manual) (ver.1.0) (English)
Page 5
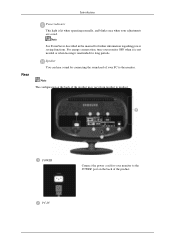
... product may vary from product to product. PC IN Note The configuration at the back of your PC to the monitor. For energy conservation, turn your monitor OFF when it unattended for your monitor to the POWER port on the back of the product. Introduction Rear Power indicator This light is not needed...
... product may vary from product to product. PC IN Note The configuration at the back of your PC to the monitor. For energy conservation, turn your monitor OFF when it unattended for your monitor to the POWER port on the back of the product. Introduction Rear Power indicator This light is not needed...

Quick Guide (easy Manual) (ver.1.0) (English)
Page 6
... IN , DIGITAL AUDIO OUT (OPTICAL) , EX-LINK HDMI/PC/DVI-D AUDIO IN Connect the [ HDMI/PC/DVI-D AUDIO IN ] terminal at the back of your monitor to your computer. SERVICE This is a reserved terminal used for servicing. Introduction Connect the PC terminal at the back of the DVD home theater (or...
... IN , DIGITAL AUDIO OUT (OPTICAL) , EX-LINK HDMI/PC/DVI-D AUDIO IN Connect the [ HDMI/PC/DVI-D AUDIO IN ] terminal at the back of your monitor to your computer. SERVICE This is a reserved terminal used for servicing. Introduction Connect the PC terminal at the back of the DVD home theater (or...

Quick Guide (easy Manual) (ver.1.0) (English)
Page 7
HDMI IN 1 Connect the [HDMI IN 1] terminal at the back of your monitor to the HDMI terminal of the DVD, VCR (DVD / DTV Set-Top Box) to the [ R - AUDIO - AUDIO - Connect the CATV cable or TV antenna cable ...
HDMI IN 1 Connect the [HDMI IN 1] terminal at the back of your monitor to the HDMI terminal of the DVD, VCR (DVD / DTV Set-Top Box) to the [ R - AUDIO - AUDIO - Connect the CATV cable or TV antenna cable ...

Quick Guide (easy Manual) (ver.1.0) (English)
Page 8
... the locking direction ( ). 2. Note The location of your headphones to the HDMI terminal of the Kensington Lock may differ from the illustration depending on the Monitor ( ) and turn it in a public place. The locking device has to a desk or a heavy stationary object. The appearance and locking method may be purchased separately...
... the locking direction ( ). 2. Note The location of your headphones to the HDMI terminal of the Kensington Lock may differ from the illustration depending on the Monitor ( ) and turn it in a public place. The locking device has to a desk or a heavy stationary object. The appearance and locking method may be purchased separately...
Quick Guide (easy Manual) (ver.1.0) (English)
Page 10
... corner of the screen.The audio resumes if MUTE or - In TV mode, selects TV channels. Activates a highlighted menu item. Press to switch to the monitor at the time. Changing the SOURCE is displayed on -screen menu and exits from the menu screen. Pauses (mutes) the audio output temporarily.This is...
... corner of the screen.The audio resumes if MUTE or - In TV mode, selects TV channels. Activates a highlighted menu item. Press to switch to the monitor at the time. Changing the SOURCE is displayed on -screen menu and exits from the menu screen. Pauses (mutes) the audio output temporarily.This is...


