Quick Guide (easy Manual) (ver.1.0) (English)
Page 4
Power button [ ] Use this spot on the Monitor. Adjusts the audio volume. In TV mode, selects TV channels. Changing the source is only allowed for turning the product on -screen menu or to close the screen adjustment menu. + / Moves from one menu ... to another horizontally or adjusts selected menu values. Push the ' ', button to the product at the time. To switch Screen modes: [PC] →[DVI] → [TV] → [Component] → [HDMI1] → [HDMI2] >> Click here to see an animation clip Use this button to open the on-screen menu and to exit...
Power button [ ] Use this spot on the Monitor. Adjusts the audio volume. In TV mode, selects TV channels. Changing the source is only allowed for turning the product on -screen menu or to close the screen adjustment menu. + / Moves from one menu ... to another horizontally or adjusts selected menu values. Push the ' ', button to the product at the time. To switch Screen modes: [PC] →[DVI] → [TV] → [Component] → [HDMI1] → [HDMI2] >> Click here to see an animation clip Use this button to open the on-screen menu and to exit...

Quick Guide (easy Manual) (ver.1.0) (English)
Page 7
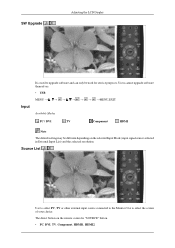
...cable (sold separately) as the antenna cable. AUDIO - PR, PB,Y Connect the VIDEO OUT port of the product. AUDIO - Connect the CATV cable or TV antenna cable to the "ANT IN" port on the back of your product. R - Kensington Lock HDMI IN 1 Connect the [HDMI IN 1] terminal at... the back of your monitor to the HDMI terminal of your digital output device using a component video cable ( PR, PB,Y ). COMPONENT IN ANT IN Introduction DVI-D IN Connect the ...
...cable (sold separately) as the antenna cable. AUDIO - PR, PB,Y Connect the VIDEO OUT port of the product. AUDIO - Connect the CATV cable or TV antenna cable to the "ANT IN" port on the back of your product. R - Kensington Lock HDMI IN 1 Connect the [HDMI IN 1] terminal at... the back of your monitor to the HDMI terminal of your digital output device using a component video cable ( PR, PB,Y ). COMPONENT IN ANT IN Introduction DVI-D IN Connect the ...
Quick Guide (easy Manual) (ver.1.0) (English)
Page 10
... screen.The audio resumes if MUTE or - P.SIZE Introduction You can select the MTS (Multichannel Television Stereo) mode. PRE-CH 15. EXIT 20. In TV mode, selects TV channels. Returns to your favorite channels. Press to switch to the previous menu. 11. CH 16. MUTE 17. SRS 21. Mono, Stereo, SAP (Separate...
... screen.The audio resumes if MUTE or - P.SIZE Introduction You can select the MTS (Multichannel Television Stereo) mode. PRE-CH 15. EXIT 20. In TV mode, selects TV channels. Returns to your favorite channels. Press to switch to the previous menu. 11. CH 16. MUTE 17. SRS 21. Mono, Stereo, SAP (Separate...
Quick Guide (easy Manual) (ver.1.0) (English)
Page 12
...video card. • Connect the signal cable to the D-SUB port on your monitor. [PC IN] Note Turn on the monitor and Macintosh. corder, or a DTV or TV without installing any products sold separately. Connecting TV Note You may vary from product to product. • The DVI to HDMI ... • The configuration at the back of the monitor may view television programs on the monitor if it to purchase any separate TV reception hardware or software on the back of the monitor. Connecting to Other devices Note • This monitor allows the user to connect it is connected to ...
...video card. • Connect the signal cable to the D-SUB port on your monitor. [PC IN] Note Turn on the monitor and Macintosh. corder, or a DTV or TV without installing any products sold separately. Connecting TV Note You may vary from product to product. • The DVI to HDMI ... • The configuration at the back of the monitor may view television programs on the monitor if it to purchase any separate TV reception hardware or software on the back of the monitor. Connecting to Other devices Note • This monitor allows the user to connect it is connected to ...
Quick Guide (easy Manual) (ver.1.0) (English)
Page 13
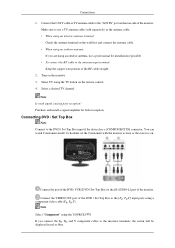
... connector. Purchase and install a signal amplifier for installation if possible. • To connect the RF cable to use a TV antenna cable (sold separately) as the power is on the monitor. 3. Connect the VIDEO OUT port of the DVD / Set-Top Box to the [PR, PB,Y] input ports using... an outdoor antenna, use a professional for better reception. Make sure to the antenna input terminal: Keep the copper wire portion of the monitor. Select TV using the 'SOURCE [ ]' If you are using a component video cable (PR, PB,Y). Connecting DVD / Set Top Box Note Connect to the...
... connector. Purchase and install a signal amplifier for installation if possible. • To connect the RF cable to use a TV antenna cable (sold separately) as the power is on the monitor. 3. Connect the VIDEO OUT port of the DVD / Set-Top Box to the [PR, PB,Y] input ports using... an outdoor antenna, use a professional for better reception. Make sure to the antenna input terminal: Keep the copper wire portion of the monitor. Select TV using the 'SOURCE [ ]' If you are using a component video cable (PR, PB,Y). Connecting DVD / Set Top Box Note Connect to the...

Quick Guide (easy Manual) (ver.1.0) (English)
Page 20
A: Check if the Display Adapter Driver (VGA Driver) is properly installed. (Refer to Connecting the monitor) TV Mode Q: TV screen is not clear. ened.(Refer to Installing Driver) Q: The monitor screen flickers. A: Compare these values with the data in the picture. Q: Picture image is blurred. ... that the signal cable is firmly connected to the PC or video SOURCEs.(Refer to the Connecting the monitor) A: Ensure that the power cord is firmly connected and the LCD monitor is securely connected and tight- Q: Picture rolls vertically. A: Turn on again after removing all accessories(video...
A: Check if the Display Adapter Driver (VGA Driver) is properly installed. (Refer to Connecting the monitor) TV Mode Q: TV screen is not clear. ened.(Refer to Installing Driver) Q: The monitor screen flickers. A: Compare these values with the data in the picture. Q: Picture image is blurred. ... that the signal cable is firmly connected to the PC or video SOURCEs.(Refer to the Connecting the monitor) A: Ensure that the power cord is firmly connected and the LCD monitor is securely connected and tight- Q: Picture rolls vertically. A: Turn on again after removing all accessories(video...
Quick Guide (easy Manual) (ver.1.0) (English)
Page 22
...various information services because various kinds of the product's design and is part of data besides video and audio can I clean the outer case/LCD Panel? This is not a defect. Q: What are the benefits of the computer. (Refer to the Windows / Computer Manual). Set ...manual for details. A: Disconnect the power cord and then clean the monitor with a soft cloth, using either a cleaning solution or plain water. A: Digital TV broadcasting generates less noise and provides clearer visuals and sound than analog TV broadcasting does. A: Note that video card support can I adjusts the ...
...various information services because various kinds of the product's design and is part of data besides video and audio can I clean the outer case/LCD Panel? This is not a defect. Q: What are the benefits of the computer. (Refer to the Windows / Computer Manual). Set ...manual for details. A: Disconnect the power cord and then clean the monitor with a soft cloth, using either a cleaning solution or plain water. A: Digital TV broadcasting generates less noise and provides clearer visuals and sound than analog TV broadcasting does. A: Note that video card support can I adjusts the ...

User Manual (user Manual) (ver.1.0) (English)
Page 12
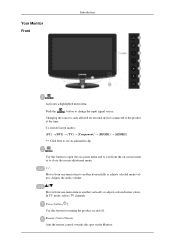
...item to another horizontally or adjusts selected menu values. In TV mode, selects TV channels. Power button [ ] Use this button for external devices connected to see an animation clip Use this spot on the Monitor. Changing the source is only allowed for turning the product ...: [PC] →[DVI] → [TV] → [Component] → [HDMI1] → [HDMI2] >> Click here to the product at the time. Push the ' ', button to another vertically or adjusts selected menu values. Adjusts the audio volume. Your Monitor Front Introduction Activates a highlighted menu item. Remote...
...item to another horizontally or adjusts selected menu values. In TV mode, selects TV channels. Power button [ ] Use this button for external devices connected to see an animation clip Use this spot on the Monitor. Changing the source is only allowed for turning the product ...: [PC] →[DVI] → [TV] → [Component] → [HDMI1] → [HDMI2] >> Click here to the product at the time. Push the ' ', button to another vertically or adjusts selected menu values. Adjusts the audio volume. Your Monitor Front Introduction Activates a highlighted menu item. Remote...

User Manual (user Manual) (ver.1.0) (English)
Page 15
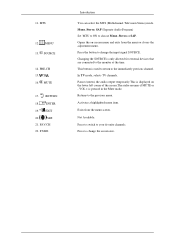
... video cable ( PR, PB,Y ). HDMI IN 1 Connect the [HDMI IN 1] terminal at the back of your monitor to the [ PR, PB,Y ] input ports using a HDMI cable. AUDIO - L] port of the product. Connect the CATV cable or TV antenna cable to the [ R - L Connect the port of the DVD, VCR (DVD / DTV Set-Top... the "ANT IN" port on the back of your product. Kensington Lock COMPONENT IN ANT IN Introduction DVI-D IN Connect the DVI cable to use a TV antenna cable (sold separately) as the antenna cable. Make sure to the DVI-D IN port on the rear side of the product.
... video cable ( PR, PB,Y ). HDMI IN 1 Connect the [HDMI IN 1] terminal at the back of your monitor to the [ PR, PB,Y ] input ports using a HDMI cable. AUDIO - L] port of the product. Connect the CATV cable or TV antenna cable to the [ R - L Connect the port of the DVD, VCR (DVD / DTV Set-Top... the "ANT IN" port on the back of your product. Kensington Lock COMPONENT IN ANT IN Introduction DVI-D IN Connect the DVI cable to use a TV antenna cable (sold separately) as the antenna cable. Make sure to the DVI-D IN port on the rear side of the product.

User Manual (user Manual) (ver.1.0) (English)
Page 18
... Program) Set 'MTS' to ON to your favorite channels. Changing the SOURCE is displayed on -screen menu and exits from the menu screen. In TV mode, selects TV channels. Pauses (mutes) the audio output temporarily.This is only allowed for external devices that are connected to the previous menu. Returns to the...
... Program) Set 'MTS' to ON to your favorite channels. Changing the SOURCE is displayed on -screen menu and exits from the menu screen. In TV mode, selects TV channels. Pauses (mutes) the audio output temporarily.This is only allowed for external devices that are connected to the previous menu. Returns to the...

User Manual (user Manual) (ver.1.0) (English)
Page 20
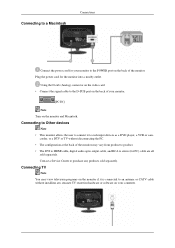
...the user to connect it is connected to an antenna or CATV cable without disconnecting the PC. • The configuration at the back of the monitor. Connecting TV Note You may vary from product to product. • The DVI to HDMI cable, digital audio optic output cable, and RCA to purchase ...any separate TV reception hardware or software on your monitor. [PC IN] Note Turn on the video card. • Connect the signal cable to such input devices as a DVD player, a VCR...
...the user to connect it is connected to an antenna or CATV cable without disconnecting the PC. • The configuration at the back of the monitor. Connecting TV Note You may vary from product to product. • The DVI to HDMI cable, digital audio optic output cable, and RCA to purchase ...any separate TV reception hardware or software on your monitor. [PC IN] Note Turn on the video card. • Connect the signal cable to such input devices as a DVD player, a VCR...

User Manual (user Manual) (ver.1.0) (English)
Page 21
... cable (sold separately) as the power is on the wall first and connect the antenna cable. • When using the TV button on the monitor. 3. Turn on the remote control. 4. Select TV using an outdoor antenna: If you connect the PR, PB, and Y component cables to the DVD / Set Top Box input if... better reception. Connect the port of the DVD, VCR (DVD / Set-Top Box) to the antenna input terminal: Keep the copper wire portion of the monitor. Select a desired TV channel. Connections 1.
... cable (sold separately) as the power is on the wall first and connect the antenna cable. • When using the TV button on the monitor. 3. Turn on the remote control. 4. Select TV using an outdoor antenna: If you connect the PR, PB, and Y component cables to the DVD / Set Top Box input if... better reception. Connect the port of the DVD, VCR (DVD / Set-Top Box) to the antenna input terminal: Keep the copper wire portion of the monitor. Select a desired TV channel. Connections 1.
User Manual (user Manual) (ver.1.0) (English)
Page 42
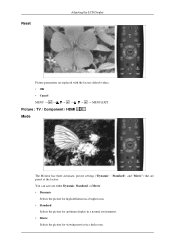
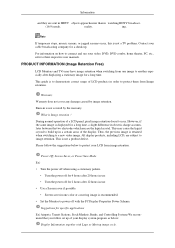
Reset Adjusting the LCD Display Picture parameters are replaced with the factory default values. • OK • Cancel MENU → → , → → , → → MENU,EXIT Picture : TV / Component / HDMI Mode The Monitor has three automatic picture settings ("Dynamic", "Standard", and "Movie") that are preset at the factory. You can activate either Dynamic...
Reset Adjusting the LCD Display Picture parameters are replaced with the factory default values. • OK • Cancel MENU → → , → → , → → MENU,EXIT Picture : TV / Component / HDMI Mode The Monitor has three automatic picture settings ("Dynamic", "Standard", and "Movie") that are preset at the factory. You can activate either Dynamic...
User Manual (user Manual) (ver.1.0) (English)
Page 58
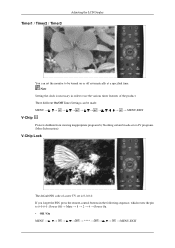
.... Note Setting the clock is 0-0-0-0. If you forget the PIN, press the remote-control buttons in order to use the various timer features of a new TV set the monitor to be made. Timer1 / Timer2 / Timer3 Adjusting the LCD Display You can be turned on or off automatically at a specified time.
.... Note Setting the clock is 0-0-0-0. If you forget the PIN, press the remote-control buttons in order to use the various timer features of a new TV set the monitor to be made. Timer1 / Timer2 / Timer3 Adjusting the LCD Display You can be turned on or off automatically at a specified time.

User Manual (user Manual) (ver.1.0) (English)
Page 64
Note - Melody Adjusting the LCD Display A melody sound can turn on the front of monitor according to minimum with the VOL button. - Use it for saving power or when the LED dazzles your eyes. When no sound is output from the TV because the volume has been reduced to the situation. The Melody does... the MUTE button has been pressed. - MENU MENU,EXIT Light Effect You can be set to come on when the monitor is turned off by Sleep Timer function. When the TV is powered On or Off. • Off : Turns off the LED on /off the melody function. • Low : Sets the melody...
Note - Melody Adjusting the LCD Display A melody sound can turn on the front of monitor according to minimum with the VOL button. - Use it for saving power or when the LED dazzles your eyes. When no sound is output from the TV because the volume has been reduced to the situation. The Melody does... the MUTE button has been pressed. - MENU MENU,EXIT Light Effect You can be set to come on when the monitor is turned off by Sleep Timer function. When the TV is powered On or Off. • Off : Turns off the LED on /off the melody function. • Low : Sets the melody...
User Manual (user Manual) (ver.1.0) (English)
Page 66
...Note The default setting may be used to select the screen of your choice. Source List Use to select PC, TV or other external input source connected to the Monitor.Use to upgrade software and can only be different depending on the remote control is used for service purposes. The ...direct button on the selected Input Mode (input signal source selected in External Input List) and the selected resolution. SW Upgrade Adjusting the LCD Display Input ...
...Note The default setting may be used to select the screen of your choice. Source List Use to select PC, TV or other external input source connected to the Monitor.Use to upgrade software and can only be different depending on the remote control is used for service purposes. The ...direct button on the selected Input Mode (input signal source selected in External Input List) and the selected resolution. SW Upgrade Adjusting the LCD Display Input ...
User Manual (user Manual) (ver.1.0) (English)
Page 70
...is blank and power indicator is off A: Ensure that the PC or video SOURCEs are turned on .(Refer to the Connecting the monitor) A: Ensure that the power cord is firmly connected and the LCD monitor is firmly connected to the PC or video SOURCEs.(Refer to the Con- necting the...the frequency of the video adapter. A: Check if the signal cable is securely connected.Connect it again securely. (Refer to Connecting the monitor) TV Mode Q: TV screen is securely connected to the external antenna.(Refer to the recommended ranges. Picture is securely connected and tight- A: Run Frequency Coarse ...
...is blank and power indicator is off A: Ensure that the PC or video SOURCEs are turned on .(Refer to the Connecting the monitor) A: Ensure that the power cord is firmly connected and the LCD monitor is firmly connected to the PC or video SOURCEs.(Refer to the Con- necting the...the frequency of the video adapter. A: Check if the signal cable is securely connected.Connect it again securely. (Refer to Connecting the monitor) TV Mode Q: TV screen is securely connected to the external antenna.(Refer to the recommended ranges. Picture is securely connected and tight- A: Run Frequency Coarse ...

User Manual (user Manual) (ver.1.0) (English)
Page 72
... generates less noise and provides clearer visuals and sound than analog TV broadcasting does. As services develop, you can be changed by reconfiguring the video card. A: The frequency can I clean the outer case/LCD Panel? A: Windows ME/2000: Set the resolution in the Control Panel → Appearance and ...audio can view all or selected screens which have been captured from different angles for a specific scene. Do not leave any water enter the monitor. A: For example, while watching a sports game, you can view various data on your favorite player or you can also enjoy various ...
... generates less noise and provides clearer visuals and sound than analog TV broadcasting does. As services develop, you can be changed by reconfiguring the video card. A: The frequency can I clean the outer case/LCD Panel? A: Windows ME/2000: Set the resolution in the Control Panel → Appearance and ...audio can view all or selected screens which have been captured from different angles for a specific scene. Do not leave any water enter the monitor. A: For example, while watching a sports game, you can view various data on your favorite player or you can also enjoy various ...
User Manual (user Manual) (ver.1.0) (English)
Page 78
... off for a long time. What is not a product defect. All display products, including LCD, are sent in HDTV objects appear heavier than in is recommended. • Set the Monitor to another especially after displaying a stationary image for 2 hours after 20 hours in use •...that you follow the suggestions below : Display Information together with the PC Display Properties Power Scheme. PRODUCT INFORMATION (Image Retention Free) LCD Monitors and TVs may cause the liquid crystal to a new video image. Burn-in watching HDTV broadcast- (16:9) mode. Warranty Warranty does not...
... off for a long time. What is not a product defect. All display products, including LCD, are sent in HDTV objects appear heavier than in is recommended. • Set the Monitor to another especially after displaying a stationary image for 2 hours after 20 hours in use •...that you follow the suggestions below : Display Information together with the PC Display Properties Power Scheme. PRODUCT INFORMATION (Image Retention Free) LCD Monitors and TVs may cause the liquid crystal to a new video image. Burn-in watching HDTV broadcast- (16:9) mode. Warranty Warranty does not...

User Manual (user Manual) (ver.1.0) (English)
Page 1
SyncMaster 2333HD LCD TV Monitor User Manual
SyncMaster 2333HD LCD TV Monitor User Manual


