
Quick Guide (ENGLISH)
Page 3
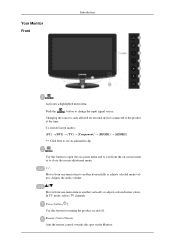
... resolution of your PC resolution so that it is the same as a product feature. Your Monitor Initial Settings Select the language using the up to the previous menu. Front MENU button [MENU/ ] Opens the on . Turn the Power button off and on -screen menu and exits from the menu. Also use to...
... resolution of your PC resolution so that it is the same as a product feature. Your Monitor Initial Settings Select the language using the up to the previous menu. Front MENU button [MENU/ ] Opens the on . Turn the Power button off and on -screen menu and exits from the menu. Also use to...
Quick Guide (ENGLISH)
Page 4
... ', then selects the video signal while the OSD is off . Power Indicator This light is not available for long periods. For energy conservation, turn your monitor OFF when it unattended for products with an Analog interface only. POWER port 10 Enter button [ ] Activates a highlighted menu item. Note The ...configure the customized key for a required function via Setup > Customized Key. AUTO button Usethis button for auto adjustment. (Available in the manual for turning the product on and off . (When the ' ' button is not needed or when leaving it is pressed to change the input mode, ...
... ', then selects the video signal while the OSD is off . Power Indicator This light is not available for long periods. For energy conservation, turn your monitor OFF when it unattended for products with an Analog interface only. POWER port 10 Enter button [ ] Activates a highlighted menu item. Note The ...configure the customized key for a required function via Setup > Customized Key. AUTO button Usethis button for auto adjustment. (Available in the manual for turning the product on and off . (When the ' ' button is not needed or when leaving it is pressed to change the input mode, ...
Quick Guide (ENGLISH)
Page 5
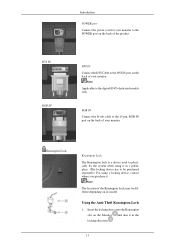
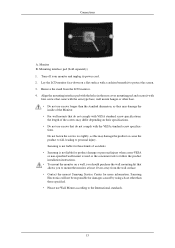
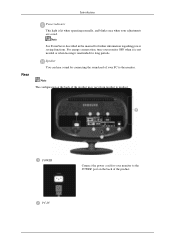
... Insert the locking device into the Kensington slot on the back of the product. Note The location of your monitor to the digital (DVI)-dedicated models only. DVI IN Connect the DVI Cable to the 15-pin, RGB IN port on the... Monitor and turn it in a public place. (The locking device has to be different depending on the back of the Kensington Lock may... device, contact where you purchase it. DVI IN RGB IN Introduction POWER port Connect the power cord for your monitor.
... Insert the locking device into the Kensington slot on the back of the product. Note The location of your monitor to the digital (DVI)-dedicated models only. DVI IN Connect the DVI Cable to the 15-pin, RGB IN port on the... Monitor and turn it in a public place. (The locking device has to be different depending on the back of the Kensington Lock may... device, contact where you purchase it. DVI IN RGB IN Introduction POWER port Connect the power cord for your monitor.
Quick Guide (ENGLISH)
Page 8
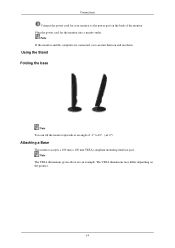
Plug the power cord for your monitor to the power port on the back of -1° to 16°. ( ±1.0°) Attaching a Base This monitor accepts a 100 mm x 100 mm VESA-compliant mounting interface pad. Using the Stand Folding the base Note You can turn them . Note The VESA dimensions given above are connected, you can tilt the monitor upwards at an angle of the monitor. The VESA dimensions may differ depending on and use them on the product. 14 Connections Connect the power cord for the monitor into a nearby outlet. Note If the monitor and the computer are an example.
Plug the power cord for your monitor to the power port on the back of -1° to 16°. ( ±1.0°) Attaching a Base This monitor accepts a 100 mm x 100 mm VESA-compliant mounting interface pad. Using the Stand Folding the base Note You can turn them . Note The VESA dimensions given above are connected, you can tilt the monitor upwards at an angle of the monitor. The VESA dimensions may differ depending on and use them on the product. 14 Connections Connect the power cord for the monitor into a nearby outlet. Note If the monitor and the computer are an example.
Quick Guide (ENGLISH)
Page 9
...with the holes in the rear cover mounting pad and secure it to mount the monitor at least 10 cm away from the LCD monitor. 4. Remove the stand from the wall surface. • Contact the nearest Samsung Service Center for damages caused by using a base other base. • Do ...allows you should purchase the wall mounting kit that do not comply with the VESA standard screw specifications. Samsung Electronics will not be responsible for more information. Connections A. Turn off your monitor and unplug its power cord. 2. Do not fasten the screws too tightly, as they may damage ...
...with the holes in the rear cover mounting pad and secure it to mount the monitor at least 10 cm away from the LCD monitor. 4. Remove the stand from the wall surface. • Contact the nearest Samsung Service Center for damages caused by using a base other base. • Do ...allows you should purchase the wall mounting kit that do not comply with the VESA standard screw specifications. Samsung Electronics will not be responsible for more information. Connections A. Turn off your monitor and unplug its power cord. 2. Do not fasten the screws too tightly, as they may damage ...
Quick Guide (ENGLISH)
Page 10
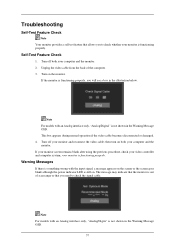
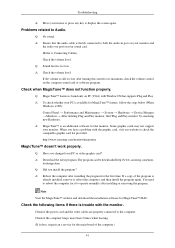
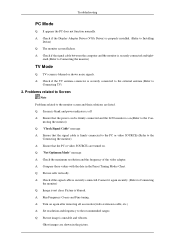
... properly. Unplug the video cable from the back of scan range or that allows you to check the signal cable. Turn on . your computer and the monitor. 2. Warning Messages If there is something wrong with the input signal, a message appears on the screen or the... previous procedure, check your computer and the monitor. This box appears during normal operation if the video cable becomes disconnected or damaged. 4. then turn on both your monitor is out of the computer. 3. The message may indicate that the monitor is functioning properly. Troubleshooting Self-Test Feature...
... properly. Unplug the video cable from the back of scan range or that allows you to check the signal cable. Turn on . your computer and the monitor. 2. Warning Messages If there is something wrong with the input signal, a message appears on the screen or the... previous procedure, check your computer and the monitor. This box appears during normal operation if the video cable becomes disconnected or damaged. 4. then turn on both your monitor is out of the computer. 3. The message may indicate that the monitor is functioning properly. Troubleshooting Self-Test Feature...
Quick Guide (ENGLISH)
Page 11
...connection and supply. Q: If the power is still powered on the screen when the monitor is connected properly, check to analog. Therefore, if there is set to become noisy, and video mode not supported, etc. I cannot turn on the screen. A: (Connected using the D-sub cable) Check the signal cable... connection. (Connected using the DVI cable) If you see the initial screen (the login screen), which can be seen. No images on the monitor. In this can remedy any sub...
...connection and supply. Q: If the power is still powered on the screen when the monitor is connected properly, check to analog. Therefore, if there is set to become noisy, and video mode not supported, etc. I cannot turn on the screen. A: (Connected using the D-sub cable) Check the signal cable... connection. (Connected using the DVI cable) If you see the initial screen (the login screen), which can be seen. No images on the monitor. In this can remedy any sub...
Quick Guide (ENGLISH)
Page 13
...colors have changed the video card or the driver? Q: Has the video card been set properly? There is in hibernation mode (The monitor turns off). 40 The screen is blinking but no images on the screen. A: Adjust the resolution and frequency of the video card. (... or frequency on the mo Q: Check whether your computer is a message that reads "Unrecognized monitor, Plug & Play (VESA DDC) monitor found" Q: Have you installed the monitor driver? A: Install the monitor driver according to the monitor? A: Windows ME/2000 : Set the resolution at the Control Panel → Appearance and ...
...colors have changed the video card or the driver? Q: Has the video card been set properly? There is in hibernation mode (The monitor turns off). 40 The screen is blinking but no images on the screen. A: Adjust the resolution and frequency of the video card. (... or frequency on the mo Q: Check whether your computer is a message that reads "Unrecognized monitor, Plug & Play (VESA DDC) monitor found" Q: Have you installed the monitor driver? A: Install the monitor driver according to the monitor? A: Windows ME/2000 : Set the resolution at the Control Panel → Appearance and ...
Quick Guide (ENGLISH)
Page 14
...; After deleting Plug and Play monitor, find 'Plug and Play monitor' by searching new Hardware. Q: Have you install the program? Q: No sound. The program can be downloaded http://www.samsung.com/mon- If the volume is XP); A: Reboot the computer after turning the control to check the compatible graphic card list provided. Check if...
...; After deleting Plug and Play monitor, find 'Plug and Play monitor' by searching new Hardware. Q: Have you install the program? Q: No sound. The program can be downloaded http://www.samsung.com/mon- If the volume is XP); A: Reboot the computer after turning the control to check the compatible graphic card list provided. Check if...
Quick Guide (easy Manual) (ver.1.0) (English)
Page 4
Changing the source is only allowed for turning the product on -screen menu or to close the screen adjustment menu. + / Moves from one menu item to another horizontally or adjusts selected menu values. ... the product at the time. Moves from one menu item to another vertically or adjusts selected menu values. Power button [ ] Use this spot on the Monitor. Remote Control Sensor Aim the remote control towards this button for external devices connected to change the input signal source. Adjusts the audio volume. Your...
Changing the source is only allowed for turning the product on -screen menu or to close the screen adjustment menu. + / Moves from one menu item to another horizontally or adjusts selected menu values. ... the product at the time. Moves from one menu item to another vertically or adjusts selected menu values. Power button [ ] Use this spot on the Monitor. Remote Control Sensor Aim the remote control towards this button for external devices connected to change the input signal source. Adjusts the audio volume. Your...
Quick Guide (easy Manual) (ver.1.0) (English)
Page 5
... it unattended for long periods. Note See PowerSaver described in the manual for your adjustments are saved. For energy conservation, turn your monitor OFF when it is lit when operating normally, and blinks once when your monitor to the POWER port on the back of the product may vary from product to the...
... it unattended for long periods. Note See PowerSaver described in the manual for your adjustments are saved. For energy conservation, turn your monitor OFF when it is lit when operating normally, and blinks once when your monitor to the POWER port on the back of the product may vary from product to the...

Quick Guide (easy Manual) (ver.1.0) (English)
Page 8
Insert the locking device into the Kensington slot on the Monitor ( ) and turn it in a public place. Connect the Kensington Lock cable. 3. Fix the Kensington Lock to the HDMI terminal of your digital output device using it in ...
Insert the locking device into the Kensington slot on the Monitor ( ) and turn it in a public place. Connect the Kensington Lock cable. 3. Fix the Kensington Lock to the HDMI terminal of your digital output device using it in ...
Quick Guide (easy Manual) (ver.1.0) (English)
Page 9
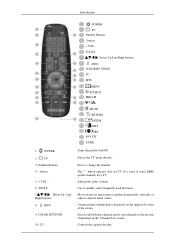
Introduction POWER TV Number Buttons - POWER 2. CC Turns the product On/Off. The "-" button operates only for a TV. Adjusts the audio volume. Use to quickly select frequently used to change the channel. Controls ...
Introduction POWER TV Number Buttons - POWER 2. CC Turns the product On/Off. The "-" button operates only for a TV. Adjusts the audio volume. Use to quickly select frequently used to change the channel. Controls ...
Quick Guide (easy Manual) (ver.1.0) (English)
Page 12
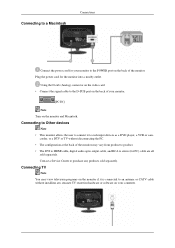
... a nearby outlet. Connecting to a Macintosh Connections Connect the power cord for your monitor. [PC IN] Note Turn on your computer. Contact a Service Center to purchase any separate TV reception hardware or software on the monitor and Macintosh. Connecting TV Note You may vary from product to product. • The DVI to HDMI cable...
... a nearby outlet. Connecting to a Macintosh Connections Connect the power cord for your monitor. [PC IN] Note Turn on your computer. Contact a Service Center to purchase any separate TV reception hardware or software on the monitor and Macintosh. Connecting TV Note You may vary from product to product. • The DVI to HDMI cable...
Quick Guide (easy Manual) (ver.1.0) (English)
Page 13
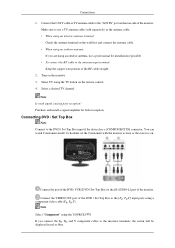
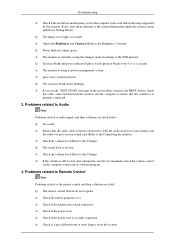
... the incorrect terminals, the screen will be displayed in red or blue. Select TV using an interior antenna terminal: Check the antenna terminal on the monitor. 3. Note Select "Component" using an outdoor antenna, use a TV antenna cable (sold separately) as the power is on the remote control. 4. Purchase and install...long as the antenna cable. • When using the TV button on . Make sure to the [R-AUDIO-L] port of the RF cable straight. 2. Turn on the wall first and connect the antenna cable. • When using an outdoor antenna: If you are using the 'SOURCE [ ]' If you ...
... the incorrect terminals, the screen will be displayed in red or blue. Select TV using an interior antenna terminal: Check the antenna terminal on the monitor. 3. Note Select "Component" using an outdoor antenna, use a TV antenna cable (sold separately) as the power is on the remote control. 4. Purchase and install...long as the antenna cable. • When using the TV button on . Make sure to the [R-AUDIO-L] port of the RF cable straight. 2. Turn on the wall first and connect the antenna cable. • When using an outdoor antenna: If you are using the 'SOURCE [ ]' If you ...
Quick Guide (easy Manual) (ver.1.0) (English)
Page 17
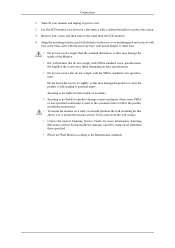
Turn off your monitor and unplug its power cord. 2. Samsung is not liable for these kinds of accidents. • Samsung is not liable for product damage or personal injury when a non-VESA or non-specified wall mount is used or the consumer fails to follow the product installation instructions. • To mount the monitor...specifications. Lay the LCD monitor face-down on a wall, you should purchase the wall mounting kit that allows you to protect the screen. 3. Remove four screws and then remove the stand from the wall surface. • Contact the nearest Samsung Service Center for damages...
Turn off your monitor and unplug its power cord. 2. Samsung is not liable for these kinds of accidents. • Samsung is not liable for product damage or personal injury when a non-VESA or non-specified wall mount is used or the consumer fails to follow the product installation instructions. • To mount the monitor...specifications. Lay the LCD monitor face-down on a wall, you should purchase the wall mounting kit that allows you to protect the screen. 3. Remove four screws and then remove the stand from the wall surface. • Contact the nearest Samsung Service Center for damages...
Quick Guide (easy Manual) (ver.1.0) (English)
Page 18
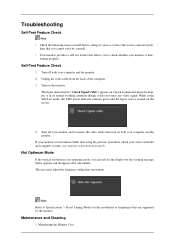
...but the warning message below ("Check Signal Cable") appears on a black background when the monitor is functioning properly. Maintaining the Monitor Case. Turn off both your computer and the monitor. Contact the service center for service. Unplug the video cable from the back of the...Preset Timing Modes for the resolutions or frequencies that are supported by yourself. • Your monitor provides a self test feature that one minute. Turn off your computer and the monitor. 2. Troubleshooting Self-Test Feature Check Note • Check the following items yourself before calling...
...but the warning message below ("Check Signal Cable") appears on a black background when the monitor is functioning properly. Maintaining the Monitor Case. Turn off both your computer and the monitor. Contact the service center for service. Unplug the video cable from the back of the...Preset Timing Modes for the resolutions or frequencies that are supported by yourself. • Your monitor provides a self test feature that one minute. Turn off your computer and the monitor. 2. Troubleshooting Self-Test Feature Check Note • Check the following items yourself before calling...
Quick Guide (easy Manual) (ver.1.0) (English)
Page 20
.... Picture is properly installed. (Refer to the recommended ranges. Ghost images are turned on again after removing all accessories(video extension cable, etc.) A: Set resolution and frequency to Installing Driver) Q: The monitor screen flickers. A: Check if the signal cable is firmly connected to the PC...Con- Q: Screen is blank and power indicator is off A: Ensure that the power cord is firmly connected and the LCD monitor is on.(Refer to the Connecting the monitor) A: Ensure that the signal cable is securely connected.Connect it again securely. (Refer to Connecting TV) 2. necting ...
.... Picture is properly installed. (Refer to the recommended ranges. Ghost images are turned on again after removing all accessories(video extension cable, etc.) A: Set resolution and frequency to Installing Driver) Q: The monitor screen flickers. A: Check if the signal cable is firmly connected to the PC...Con- Q: Screen is blank and power indicator is off A: Ensure that the power cord is firmly connected and the LCD monitor is on.(Refer to the Connecting the monitor) A: Ensure that the signal cable is securely connected.Connect it again securely. (Refer to Connecting TV) 2. necting ...
Quick Guide (easy Manual) (ver.1.0) (English)
Page 21
...A: Check the volume level.(Refer to the Volume) A: If the volume is still too low after turning the control to its power management system A: press a key on your sound card.(Refer to the Connecting the monitor) A: Check the volume level.(Refer to the Volume) Q: The sound level is on . Problems ...Q: The remote control buttons do not respond. Q: Screen is blank and power indicator light is steady green or blinks every 0.5 or 1 seconds A: The monitor is using its maximum, check the volume control on the screen when you see the "TEST GOOD" message on the computer sound card or software...
...A: Check the volume level.(Refer to the Volume) A: If the volume is still too low after turning the control to its power management system A: press a key on your sound card.(Refer to the Connecting the monitor) A: Check the volume level.(Refer to the Volume) Q: The sound level is on . Problems ...Q: The remote control buttons do not respond. Q: Screen is blank and power indicator light is steady green or blinks every 0.5 or 1 seconds A: The monitor is using its maximum, check the volume control on the screen when you see the "TEST GOOD" message on the computer sound card or software...

User Manual (user Manual) (ver.1.0) (English)
Page 6
... such as chopsticks, coins, pins and steel, or flammable objects, such as any containers containing water, vases, flowerpots, med- Do not lift or move the monitor by a table or curtain. • Otherwise, it may result in fire due to moisture, dust, smoke, water, or in a car. • Otherwise,... Otherwise, this may result in electric shock or fire. Safety Instructions If there is a strange smell or a strange sound or smoke is broken, turn the power off and disconnect the power cord. When you drop the product or the case is coming from the product, disconnect the power plug...
... such as chopsticks, coins, pins and steel, or flammable objects, such as any containers containing water, vases, flowerpots, med- Do not lift or move the monitor by a table or curtain. • Otherwise, it may result in fire due to moisture, dust, smoke, water, or in a car. • Otherwise,... Otherwise, this may result in electric shock or fire. Safety Instructions If there is a strange smell or a strange sound or smoke is broken, turn the power off and disconnect the power cord. When you drop the product or the case is coming from the product, disconnect the power plug...


