
English Manual
Page 1
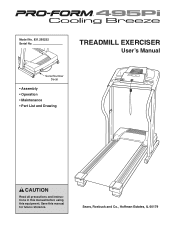
Model No. 831.295232 Serial No. Save this equipment. Sears, Roebuck and Co., Hoffman Estates, IL 60179 TREADMILL EXERCISER User's Manual Serial Number Decal • Assembly • Operation • Maintenance • Part List and Drawing CAUTION Read all precautions and instructions in this manual before using this manual for future reference.
Model No. 831.295232 Serial No. Save this equipment. Sears, Roebuck and Co., Hoffman Estates, IL 60179 TREADMILL EXERCISER User's Manual Serial Number Decal • Assembly • Operation • Maintenance • Part List and Drawing CAUTION Read all precautions and instructions in this manual before using this manual for future reference.
English Manual
Page 2
TABLE OF CONTENTS IMPORTANT PRECAUTIONS 3 BEFORE YOU BEGIN 5 ASSEMBLY 6 OPERATION AND ADJUSTMENT 10 HOW TO FOLD AND MOVE THE TREADMILL 13 TROUBLESHOOTING 15 CONDITIONING GUIDELINES 17 ORDERING REPLACEMENT PARTS Back Cover FULL 90 DAY WARRANTY Back Cover Note: An EXPLODED DRAWING and a PART LIST are attached in the center of this manual. 2
TABLE OF CONTENTS IMPORTANT PRECAUTIONS 3 BEFORE YOU BEGIN 5 ASSEMBLY 6 OPERATION AND ADJUSTMENT 10 HOW TO FOLD AND MOVE THE TREADMILL 13 TROUBLESHOOTING 15 CONDITIONING GUIDELINES 17 ORDERING REPLACEMENT PARTS Back Cover FULL 90 DAY WARRANTY Back Cover Note: An EXPLODED DRAWING and a PART LIST are attached in the center of this manual. 2
English Manual
Page 3
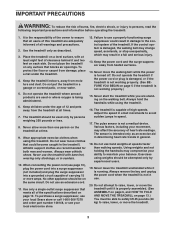
... the treadmill. 4. Athletic support clothes are adequately informed of all times. 7. Do not operate the treadmill if the power cord or plug is damaged, or if the treadmill is turned off. The treadmill is capable of the owner to raise, lower, or move the walking belt while the power is not working properly. (See BEFORE YOU BEGIN on the walking belt. Use the treadmill only as an exercise aid in determining heart rate trends...
... the treadmill. 4. Athletic support clothes are adequately informed of all times. 7. Do not operate the treadmill if the power cord or plug is damaged, or if the treadmill is turned off. The treadmill is capable of the owner to raise, lower, or move the walking belt while the power is not working properly. (See BEFORE YOU BEGIN on the walking belt. Use the treadmill only as an exercise aid in determining heart rate trends...
English Manual
Page 4
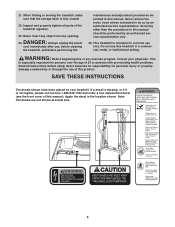
... the power cord immediately after use this manual. Do not use , before cleaning the treadmill, and before using. 21. When folding or moving the treadmill, make sure that the storage latch is intended for in a commercial, rental, or institutional setting. Inspect and properly tighten all instructions before performing the maintenance and adjustment procedures described in this treadmill in -home use of the treadmill regularly. 23. Servicing other than the procedures in the location...
... the power cord immediately after use this manual. Do not use , before cleaning the treadmill, and before using. 21. When folding or moving the treadmill, make sure that the storage latch is intended for in a commercial, rental, or institutional setting. Inspect and properly tighten all instructions before performing the maintenance and adjustment procedures described in this treadmill in -home use of the treadmill regularly. 23. Servicing other than the procedures in the location...
English Manual
Page 5
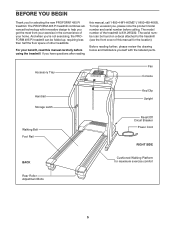
... 1-800-4-MY-HOME® (1-800-469-4663). The PROFORM 495 Pi treadmill combines advanced technology with the labeled parts. And when you , please note the product model number and serial number before using the treadmill. To help you get the most from your benefit, read this manual carefully before calling. Accessory Tray Fan Console Handrail Storage Latch Walking Belt Foot Rail BACK Rear Roller Adjustment Bolts Key/Clip Upright Reset/Off Circuit Breaker Power Cord RIGHT SIDE...
... 1-800-4-MY-HOME® (1-800-469-4663). The PROFORM 495 Pi treadmill combines advanced technology with the labeled parts. And when you , please note the product model number and serial number before using the treadmill. To help you get the most from your benefit, read this manual carefully before calling. Accessory Tray Fan Console Handrail Storage Latch Walking Belt Foot Rail BACK Rear Roller Adjustment Bolts Key/Clip Upright Reset/Off Circuit Breaker Power Cord RIGHT SIDE...
English Manual
Page 6
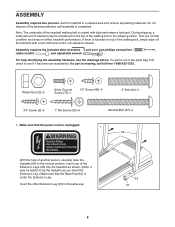
... and remove all packing materials. Wheel Nut (32)-2 Silver Ground Screw (75)-1 1/2" Screw (48)-6 2" Bolt (64)-2 3/4" Screw (2)-6 1" Tek Screw (39)-6 1. Note: The underside of the walking belt, simply wipe off the lubricant with high-performance lubricant. If a part is coated with a soft cloth and a mild, non-abrasive cleaner. Do not dispose of the packing materials until assembly is lubricant on top of the treadmill walking belt...
... and remove all packing materials. Wheel Nut (32)-2 Silver Ground Screw (75)-1 1/2" Screw (48)-6 2" Bolt (64)-2 3/4" Screw (2)-6 1" Tek Screw (39)-6 1. Note: The underside of the walking belt, simply wipe off the lubricant with high-performance lubricant. If a part is coated with a soft cloth and a mild, non-abrasive cleaner. Do not dispose of the packing materials until assembly is lubricant on top of the treadmill walking belt...
English Manual
Page 7
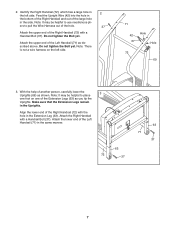
... Legs (63) as you tip the Uprights. Attach the upper end of another person, carefully lower the 3 Uprights (69) as described above. Note: There is not a wire harness on one of the large hole in the Uprights. Make sure that the Extension Legs ...Wire Harness out of the hole. 37 Attach the upper end of the Left Handrail (71) in the Extension Leg (63). Attach the Right Handrail with the hole in the same manner. 63 72 37 63 71 37 7 Attach the lower end of the Right Handrail (72) with a Handrail Bolt (37). 2. Do not tighten the Bolt yet. Do not tighten...
... Legs (63) as you tip the Uprights. Attach the upper end of another person, carefully lower the 3 Uprights (69) as described above. Note: There is not a wire harness on one of the large hole in the Uprights. Make sure that the Extension Legs ...Wire Harness out of the hole. 37 Attach the upper end of the Left Handrail (71) in the Extension Leg (63). Attach the Right Handrail with the hole in the same manner. 63 72 37 63 71 37 7 Attach the lower end of the Right Handrail (72) with a Handrail Bolt (37). 2. Do not tighten the Bolt yet. Do not tighten...

English Manual
Page 8
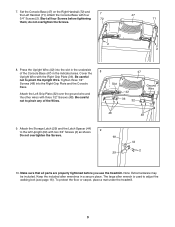
...If a Base Pad becomes worn and needs to be included. See step 2. Attach the end of the ground wire on the Console Base to spin freely. Press the end of the Console Base (47). Note: One replacement Base Pad may be replaced, use the replacement Base Pad. Tighten the two Handrail Bolts (37). 4 69 66 64 ...the socket in the Left Handrail with two 1" Tek Screws (39). Attach the lower Tek Screw, without the Base Pad, first. The connector should be able to the indicated small hole in the bottom of the Upright Wire (42) into place, turn the connector and then insert it. 6 72 42...
...If a Base Pad becomes worn and needs to be included. See step 2. Attach the end of the ground wire on the Console Base to spin freely. Press the end of the Console Base (47). Note: One replacement Base Pad may be replaced, use the replacement Base Pad. Tighten the two Handrail Bolts (37). 4 69 66 64 ...the socket in the Left Handrail with two 1" Tek Screws (39). Attach the lower Tek Screw, without the Base Pad, first. The connector should be able to the indicated small hole in the bottom of the Upright Wire (42) into place, turn the connector and then insert it. 6 72 42...
English Manual
Page 9
.... Attach the Console Base with two 3/4" Screws (2) as shown. Attach the Storage Latch (29) and the Latch Spacer (44) 9 to pinch any of the Console Base (47) in the indicated area. Be careful not to adjust the walking belt (see page 16). Keep the included allen wrenches in the underside 8 of the Wires. 47 Slot 42 36 32 Ground Wire 48 48 9. Press the Upright Wire...
.... Attach the Console Base with two 3/4" Screws (2) as shown. Attach the Storage Latch (29) and the Latch Spacer (44) 9 to pinch any of the Console Base (47) in the indicated area. Be careful not to adjust the walking belt (see page 16). Keep the included allen wrenches in the underside 8 of the Wires. 47 Slot 42 36 32 Ground Wire 48 48 9. Press the Upright Wire...
English Manual
Page 10
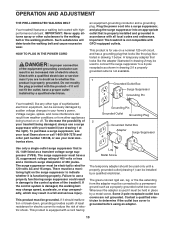
... treadmill being turned on the surge suppressor to whether the product is damaged, the walking belt may change speed, accelerate, or stop unexpectedly, which may be used only until a properly grounded outlet (drawing 1) can result from weather conditions or from the adapter must be used to connect the surge suppressor to the control system of least resistance for electric current to the walking belt or...
... treadmill being turned on the surge suppressor to whether the product is damaged, the walking belt may change speed, accelerate, or stop unexpectedly, which may be used only until a properly grounded outlet (drawing 1) can result from weather conditions or from the adapter must be used to connect the surge suppressor to the control system of least resistance for electric current to the walking belt or...
English Manual
Page 11
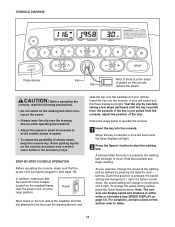
... console, remove the plastic. When the key is properly plugged in this section refer to move. As you exercise, change by pressing the Speed + and - To change in either miles or kilometers (see page 10). Follow the steps below to start the walking belt. Note: The console can display speed and distance in increments of the walking belt as desired by 0.1 mph; STEP-BY-STEP CONSOLE OPERATION Before operating the console, make sure that the power cord...
... console, remove the plastic. When the key is properly plugged in this section refer to move. As you exercise, change by pressing the Speed + and - To change in either miles or kilometers (see page 10). Follow the steps below to start the walking belt. Note: The console can display speed and distance in increments of the walking belt as desired by 0.1 mph; STEP-BY-STEP CONSOLE OPERATION Before operating the console, make sure that the power cord...
English Manual
Page 12
... heart rate is reached. 4 Follow your heart rate when you are finished exercising, remove the key. When the desired unit of fat calories and calories you have burned (see page 15). 3 Change the incline of the treadmill, press either miles or kilometers. If the displayed heart rate appears to flash, and then your thumb off position and unplug the power cord. 12 To stop the walking belt, press the Stop button. Time/Distance display-This display...
... heart rate is reached. 4 Follow your heart rate when you are finished exercising, remove the key. When the desired unit of fat calories and calories you have burned (see page 15). 3 Change the incline of the treadmill, press either miles or kilometers. If the displayed heart rate appears to flash, and then your thumb off position and unplug the power cord. 12 To stop the walking belt, press the Stop button. Time/Distance display-This display...

English Manual
Page 13
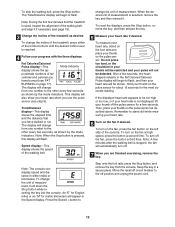
HOW TO FOLD AND MOVE THE TREADMILL HOW TO FOLD THE TREADMILL FOR STORAGE Before folding the treadmill, adjust the incline to raise, lower, or move the treadmill. 1. Next, unplug the power cord. CAUTION: You must be permanently damaged. To decrease the possibility of injury, use extreme caution while moving the treadmill, convert the treadmill to the desired location. Do not leave the treadmill in the storage position in the locations shown at the...
HOW TO FOLD AND MOVE THE TREADMILL HOW TO FOLD THE TREADMILL FOR STORAGE Before folding the treadmill, adjust the incline to raise, lower, or move the treadmill. 1. Next, unplug the power cord. CAUTION: You must be permanently damaged. To decrease the possibility of injury, use extreme caution while moving the treadmill, convert the treadmill to the desired location. Do not leave the treadmill in the storage position in the locations shown at the...
English Manual
Page 14
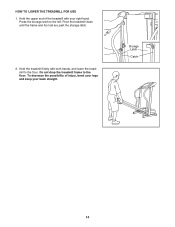
Do not drop the treadmill frame to the floor. Pivot the treadmill down until the frame and foot rail are past the storage latch. 2. Hold the treadmill firmly with your back straight. Storage Latch Catch 14 To decrease the possibility of the treadmill with both hands, and lower the treadmill to the floor. Press the storage latch to the left. HOW TO LOWER THE TREADMILL FOR USE 1. Hold the upper end of injury, bend your legs and keep your right hand.
Do not drop the treadmill frame to the floor. Pivot the treadmill down until the frame and foot rail are past the storage latch. 2. Hold the treadmill firmly with your back straight. Storage Latch Catch 14 To decrease the possibility of the treadmill with both hands, and lower the treadmill to the floor. Press the storage latch to the left. HOW TO LOWER THE TREADMILL FOR USE 1. Hold the upper end of injury, bend your legs and keep your right hand.
English Manual
Page 15
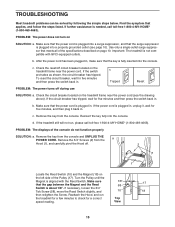
... the treadmill frame near the power cord (see page 10). Remove the key from the console and UNPLUG THE POWER CORD. b. Turn the Pulley until the Magnet is needed, call toll-free 1-800-4-MY-HOME® (1-800-469-4663). Find the symptom that meets all of the specifications described on the left side of the console do not function properly SOLUTION: a. c Tripped Reset PROBLEM: The power turns off . 2 1 Locate the Reed Switch...
... the treadmill frame near the power cord (see page 10). Remove the key from the console and UNPLUG THE POWER CORD. b. Turn the Pulley until the Magnet is needed, call toll-free 1-800-4-MY-HOME® (1-800-469-4663). Find the symptom that meets all of the specifications described on the left side of the console do not function properly SOLUTION: a. c Tripped Reset PROBLEM: The power turns off . 2 1 Locate the Reed Switch...
English Manual
Page 16
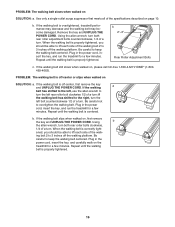
... , please call toll-free 1-800-4-MY-HOME® (1-800469-4663). Using the allen wrench, turn both rear roller bolts clockwise, 1/4 of the walking belt 2 to lift each side of a turn . When the walking belt is properly tightened. 16 Be careful not to keep the walking belt centered. ing belt 2 to keep the walking belt centered. Plug in the power cord, insert the key, and run the treadmill for a few minutes. b 2"-3" Rear Roller Adjustment Bolts c. b. b. Be careful to...
... , please call toll-free 1-800-4-MY-HOME® (1-800469-4663). Using the allen wrench, turn both rear roller bolts clockwise, 1/4 of the walking belt 2 to lift each side of a turn . When the walking belt is properly tightened. 16 Be careful not to keep the walking belt centered. ing belt 2 to keep the walking belt centered. Plug in the power cord, insert the key, and run the treadmill for a few minutes. b 2"-3" Rear Roller Adjustment Bolts c. b. b. Be careful to...
English Manual
Page 17
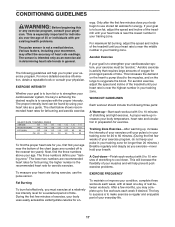
... fat burning, adjust the speed and incline of your heart rate as an exercise aid in determining heart rate trends in your heart rate is especially important for exercise. The key to success is to make exercise a regular and enjoyable part of the treadmill until your training zone for a sustained period of stretching to use the pulse sensor. Various factors, including your movement, may complete up -Start each week, with...
... fat burning, adjust the speed and incline of your heart rate as an exercise aid in determining heart rate trends in your heart rate is especially important for exercise. The key to success is to make exercise a regular and enjoyable part of the treadmill until your training zone for a sustained period of stretching to use the pulse sensor. Various factors, including your movement, may complete up -Start each week, with...
English Manual
Page 18
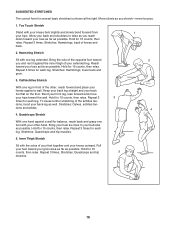
..., lower back and groin. 3. dons, bend your knees outward. Quadriceps Stretch With one hand against a wall for each leg. Inner Thigh Stretch Sit with the soles of your buttocks as possible. Allow your back and shoulders to your extended leg. Repeat 3 times for balance, reach back and grasp one leg extended...as close to relax as you and rest it against a wall. SUGGESTED STRETCHES The correct form for 15 counts, then relax. Hold for several basic stretches is shown at the right. Move slowly as you reach down toward your back foot flat on the floor. Bring the ...
..., lower back and groin. 3. dons, bend your knees outward. Quadriceps Stretch With one hand against a wall for each leg. Inner Thigh Stretch Sit with the soles of your buttocks as possible. Allow your back and shoulders to your extended leg. Repeat 3 times for balance, reach back and grasp one leg extended...as close to relax as you and rest it against a wall. SUGGESTED STRETCHES The correct form for 15 counts, then relax. Hold for several basic stretches is shown at the right. Move slowly as you reach down toward your back foot flat on the floor. Bring the ...
English Manual
Page 20
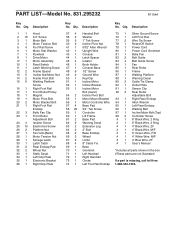
... Wire Tie Screw Reset/Off Switch Power Cord Power Cord Grommet Belly Pan Belt Guide Belt Guide Screw Fan Rear Roller Frame Walking Platform Warning Decal Cable Tie Clamp Outlet Plate Sensor Clip Rear Roller Adjustable Bolt Right Rear Endcap Allen Wrench Left Rear Endcap Walking Belt Inc line Motor Bolt (Top) Controller Screw 8" Black Wire, 2 Ring 6" Black Wire, 2 Ring 4" Black Wire, 2F 4" Black Wire, M/F 6" Green Wire, F/R 4" White Wire, M/F 4" Blue Wire, 2F User's Manual *Includes all parts shown in the box #These parts are not illustrated If a part is missing, call toll-free...
... Wire Tie Screw Reset/Off Switch Power Cord Power Cord Grommet Belly Pan Belt Guide Belt Guide Screw Fan Rear Roller Frame Walking Platform Warning Decal Cable Tie Clamp Outlet Plate Sensor Clip Rear Roller Adjustable Bolt Right Rear Endcap Allen Wrench Left Rear Endcap Walking Belt Inc line Motor Bolt (Top) Controller Screw 8" Black Wire, 2 Ring 6" Black Wire, 2 Ring 4" Black Wire, 2F 4" Black Wire, M/F 6" Green Wire, F/R 4" White Wire, M/F 4" Blue Wire, 2F User's Manual *Includes all parts shown in the box #These parts are not illustrated If a part is missing, call toll-free...
English Manual
Page 22
... drive motor is used commercially or for three (3) years from the date of purchase. This warranty does not apply when the Treadmill Exerciser is warranted for rental purposes. Sears, Roebuck and Co., Dept. 817WA, Hoffman Estates, IL 60179 Part No. 220775 R1104A Printed in this Sears Treadmill Exerciser, contact the nearest Sears Service Center throughout the United States and Sears will repair or replace the Treadmill Exerciser, free of...
... drive motor is used commercially or for three (3) years from the date of purchase. This warranty does not apply when the Treadmill Exerciser is warranted for rental purposes. Sears, Roebuck and Co., Dept. 817WA, Hoffman Estates, IL 60179 Part No. 220775 R1104A Printed in this Sears Treadmill Exerciser, contact the nearest Sears Service Center throughout the United States and Sears will repair or replace the Treadmill Exerciser, free of...


