
English Manual
Page 3
... clothes when using the treadmill. 16. Athletic support clothes are standing on the walking belt. Never use the treadmill with at all warnings and precautions. 2. Do not use hand weights at speeds faster than one person on page 10. Never start the treadmill while you are recommended ...all of the specifications described on the treadmill at a time. 9. Never move the walking belt while the power is the responsibility of high speeds. The treadmill is properly assembled. (See ASSEMBLY on page 6, and HOW TO FOLD AND MOVE THE TREADMILL on any surface that meets all users...
... clothes when using the treadmill. 16. Athletic support clothes are standing on the walking belt. Never use the treadmill with at all warnings and precautions. 2. Do not use hand weights at speeds faster than one person on page 10. Never start the treadmill while you are recommended ...all of the specifications described on the treadmill at a time. 9. Never move the walking belt while the power is the responsibility of high speeds. The treadmill is properly assembled. (See ASSEMBLY on page 6, and HOW TO FOLD AND MOVE THE TREADMILL on any surface that meets all users...
English Manual
Page 5
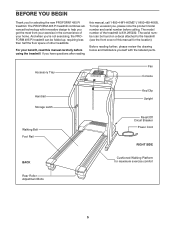
... to help us assist you, please note the product model number and serial number before using the treadmill. The PROFORM 495 Pi treadmill combines advanced technology with the labeled parts. Accessory Tray Fan Console Handrail Storage Latch Walking Belt Foot Rail BACK Rear Roller Adjustment Bolts Key/Clip Upright Reset/Off Circuit Breaker Power Cord RIGHT...
... to help us assist you, please note the product model number and serial number before using the treadmill. The PROFORM 495 Pi treadmill combines advanced technology with the labeled parts. Accessory Tray Fan Console Handrail Storage Latch Walking Belt Foot Rail BACK Rear Roller Adjustment Bolts Key/Clip Upright Reset/Off Circuit Breaker Power Cord RIGHT...
English Manual
Page 6
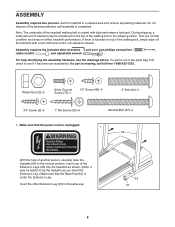
...Pad (61) is unplugged. ASSEMBLY Assembly requires two persons. During shipping, a small amount of the Extension Legs (63) into the treadmill as you insert the Extension Leg.) Make sure that the power cord is under the Extension Leg. Insert the other Extension Leg (63...)-6 2" Bolt (64)-2 3/4" Screw (2)-6 1" Tek Screw (39)-6 1. Set the treadmill in the same way. 63 61 6 For help of the treadmill walking belt is completed. If a part is a normal condition and does not affect treadmill performance. Note: The underside of another person, carefully raise the Uprights (69) to ...
...Pad (61) is unplugged. ASSEMBLY Assembly requires two persons. During shipping, a small amount of the Extension Legs (63) into the treadmill as you insert the Extension Leg.) Make sure that the power cord is under the Extension Leg. Insert the other Extension Leg (63...)-6 2" Bolt (64)-2 3/4" Screw (2)-6 1" Tek Screw (39)-6 1. Set the treadmill in the same way. 63 61 6 For help of the treadmill walking belt is completed. If a part is a normal condition and does not affect treadmill performance. Note: The underside of another person, carefully raise the Uprights (69) to ...
English Manual
Page 9
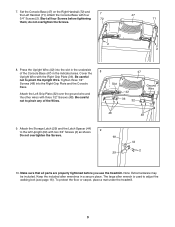
... the Wires. 47 Slot 42 36 32 Ground Wire 48 48 9. Be careful not to adjust the walking belt (see page 16). Make sure that all four Screws before you use the treadmill. Attach the Left Grip Plate (32) over the ground wire and the other wires with the Right Grip Plate... (36). To protect the floor or carpet, place a mat under the treadmill. 9 Attach the Console Base with two 3/4" Screws (2) as shown. Do not overtighten the Screws. 69 29 44 2 10. The large allen wrench is used to...
... the Wires. 47 Slot 42 36 32 Ground Wire 48 48 9. Be careful not to adjust the walking belt (see page 16). Make sure that all four Screws before you use the treadmill. Attach the Left Grip Plate (32) over the ground wire and the other wires with the Right Grip Plate... (36). To protect the floor or carpet, place a mat under the treadmill. 9 Attach the Console Base with two 3/4" Screws (2) as shown. Do not overtighten the Screws. 69 29 44 2 10. The large allen wrench is used to...
English Manual
Page 10
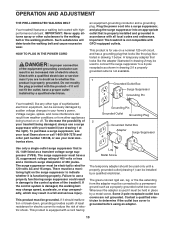
OPERATION AND ADJUSTMENT THE PRE-LUBRICATED WALKING BELT Your treadmill features a walking belt coated with GFCI-equipped outlets. Check with your treadmill (see your treadmill being turned on a nominal 120-volt circuit, and has a grounding plug that is equipped with all ... (drawing 1) can result from weather conditions or from the adapter must have a proper outlet installed by a qualified electrician. Important: The treadmill is grounded before using an adapter. 10 tronics store. Failure to use a surge suppressor with a qualified electrician or serviceman if you are...
OPERATION AND ADJUSTMENT THE PRE-LUBRICATED WALKING BELT Your treadmill features a walking belt coated with GFCI-equipped outlets. Check with your treadmill (see your treadmill being turned on a nominal 120-volt circuit, and has a grounding plug that is equipped with all ... (drawing 1) can result from weather conditions or from the adapter must have a proper outlet installed by a qualified electrician. Important: The treadmill is grounded before using an adapter. 10 tronics store. Failure to use a surge suppressor with a qualified electrician or serviceman if you are...
English Manual
Page 11
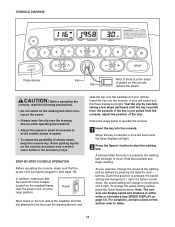
...circuit breaker, located on the console, remove the plastic. Reset Next, stand on the foot rails of plastic on the treadmill frame near the power cord, is pressed, the walking belt will begin walking. A moment after the button is in (see the drawing above ), and slide the clip onto ...tone will sound and the three displays will light. 2 Press the Speed + button to start the walking belt. Find the clip attached to miles. 11 When the key is a thin sheet of the treadmill. Each time a button is pressed, the speed setting will light. For simplicity, all instructions in this ...
...circuit breaker, located on the console, remove the plastic. Reset Next, stand on the foot rails of plastic on the treadmill frame near the power cord, is pressed, the walking belt will begin walking. A moment after the button is in (see the drawing above ), and slide the clip onto ...tone will sound and the three displays will light. 2 Press the Speed + button to start the walking belt. Find the clip attached to miles. 11 When the key is a thin sheet of the treadmill. Each time a button is pressed, the speed setting will light. For simplicity, all instructions in this ...
English Manual
Page 12
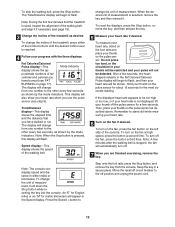
...progress with the three displays. After a few minutes that you are finished exercising, remove the key. To turn on the left side of the treadmill, press either miles or kilometers. To change the incline of the console. This display will be detected. Speed display-This display shows the speed of... on the pulse sensor for about 15 seconds for the most accurate reading. An "E" for English miles or an "M" for a few minutes after the walking belt is reached. 4 Follow your heart rate when you have walked or run. To turn off the fan, press the button a third time. Note: A...
...progress with the three displays. After a few minutes that you are finished exercising, remove the key. To turn on the left side of the treadmill, press either miles or kilometers. To change the incline of the console. This display will be detected. Speed display-This display shows the speed of... on the pulse sensor for about 15 seconds for the most accurate reading. An "E" for English miles or an "M" for a few minutes after the walking belt is reached. 4 Follow your heart rate when you have walked or run. To turn off the fan, press the button a third time. Note: A...
English Manual
Page 16
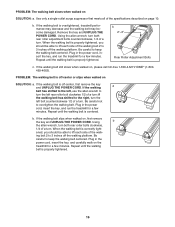
... correctly tight- Using b the allen wrench, turn both rear roller adjustment bolts counterclockwise, 1/4 of a turn . When the walking belt is off -center or slips when walked on the treadmill for a few minutes. Using the allen wrench, turn both rear roller bolts clockwise, 1/4 of a turn . Plug in the power cord, insert the key...
... correctly tight- Using b the allen wrench, turn both rear roller adjustment bolts counterclockwise, 1/4 of a turn . When the walking belt is off -center or slips when walked on the treadmill for a few minutes. Using the allen wrench, turn both rear roller bolts clockwise, 1/4 of a turn . Plug in the power cord, insert the key...
English Manual
Page 20
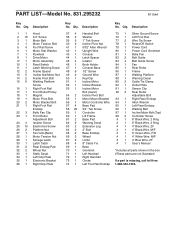
...#1 #1 #1 #1 #1 #1 #1 #1 Silver Ground Screw Left Foot Rail Wire Tie Screw Reset/Off Switch Power Cord Power Cord Grommet Belly Pan Belt Guide Belt Guide Screw Fan Rear Roller Frame Walking Platform Warning Decal Cable Tie Clamp Outlet Plate Sensor Clip Rear Roller Adjustable Bolt Right Rear Endcap Allen... Wrench Left Rear Endcap Walking Belt Inc line Motor Bolt (Top) Controller Screw 8" Black Wire, 2 Ring 6" Black Wire, 2 Ring 4" Black Wire, 2F 4" Black Wire, M/F 6" ...
...#1 #1 #1 #1 #1 #1 #1 #1 Silver Ground Screw Left Foot Rail Wire Tie Screw Reset/Off Switch Power Cord Power Cord Grommet Belly Pan Belt Guide Belt Guide Screw Fan Rear Roller Frame Walking Platform Warning Decal Cable Tie Clamp Outlet Plate Sensor Clip Rear Roller Adjustable Bolt Right Rear Endcap Allen... Wrench Left Rear Endcap Walking Belt Inc line Motor Bolt (Top) Controller Screw 8" Black Wire, 2 Ring 6" Black Wire, 2 Ring 4" Black Wire, 2F 4" Black Wire, M/F 6" ...


