
English Manual
Page 3
... the treadmill. Never leave the treadmill unattended ... when using the treadmill. 16. To purchase...system of the treadmill. Do not use a...treadmill on any surface that meets all warnings and precautions. 2. Do not operate the treadmill... than walking speeds. The treadmill is intended only as described...treadmill. 4. Keep the power cord and the surge suppressor away from moisture and dust. Never start the treadmill...treadmill. 3 Place the treadmill on the same circuit. Keep the treadmill indoors, away from heated surfaces. 14. The treadmill...page 5 if the treadmill is not in a...
... the treadmill. Never leave the treadmill unattended ... when using the treadmill. 16. To purchase...system of the treadmill. Do not use a...treadmill on any surface that meets all warnings and precautions. 2. Do not operate the treadmill... than walking speeds. The treadmill is intended only as described...treadmill. 4. Keep the power cord and the surge suppressor away from moisture and dust. Never start the treadmill...treadmill. 3 Place the treadmill on the same circuit. Keep the treadmill indoors, away from heated surfaces. 14. The treadmill...page 5 if the treadmill is not in a...
English Manual
Page 5
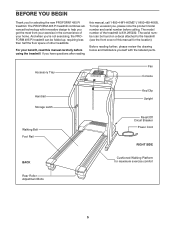
...Storage Latch Walking Belt Foot Rail BACK Rear Roller Adjustment Bolts Key/Clip Upright Reset/Off Circuit Breaker Power Cord RIGHT SIDE Cushioned Walking Platform for selecting the new PROFORM® 495 Pi treadmill. The model number of other treadmills. The serial number can be found on a decal attached .... And when you get the most from your exercise in the convenience of this manual for the location). The PROFORM 495 Pi treadmill combines advanced technology with the labeled parts. Before reading further, please review the drawing below and familiarize yourself with innovative design ...
...Storage Latch Walking Belt Foot Rail BACK Rear Roller Adjustment Bolts Key/Clip Upright Reset/Off Circuit Breaker Power Cord RIGHT SIDE Cushioned Walking Platform for selecting the new PROFORM® 495 Pi treadmill. The model number of other treadmills. The serial number can be found on a decal attached .... And when you get the most from your exercise in the convenience of this manual for the location). The PROFORM 495 Pi treadmill combines advanced technology with the labeled parts. Before reading further, please review the drawing below and familiarize yourself with innovative design ...
English Manual
Page 11
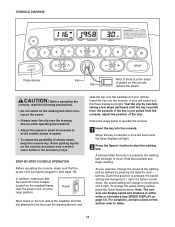
...the three displays will begin walking. For simplicity, all instructions in (see the drawing above ) while operating the treadmill. • Adjust the speed in the reset position. buttons. Insert the key into the console. A moment after the button is held down, the speed setting will light. 2 Press ...power cord is properly plugged in this section refer to operate the console. 1 Insert the key into the console. Reset Next, stand on the foot rails of plastic on the treadmill frame near the power cord, is pulled from the console, adjust the position of electric shock...
...the three displays will begin walking. For simplicity, all instructions in (see the drawing above ) while operating the treadmill. • Adjust the speed in the reset position. buttons. Insert the key into the console. A moment after the button is held down, the speed setting will light. 2 Press ...power cord is properly plugged in this section refer to operate the console. 1 Insert the key into the console. Reset Next, stand on the foot rails of plastic on the treadmill frame near the power cord, is pulled from the console, adjust the position of electric shock...
English Manual
Page 12
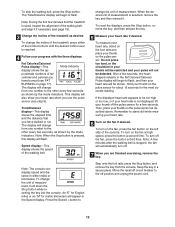
...thumb off the fan, press the button a third time. Note: When the Stop button is selected, remove the key and then reinsert it if necessary (see page 15). 3 Change the incline of the treadmill, press either miles or kilometers. Step onto the foot rails, press the Stop button, and remove the... key from one number to the other every few seconds. Move the reset/off . 7 When you use the pulse sensor...
...thumb off the fan, press the button a third time. Note: When the Stop button is selected, remove the key and then reinsert it if necessary (see page 15). 3 Change the incline of the treadmill, press either miles or kilometers. Step onto the foot rails, press the Stop button, and remove the... key from one number to the other every few seconds. Move the reset/off . 7 When you use the pulse sensor...
English Manual
Page 15
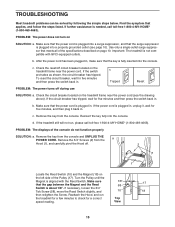
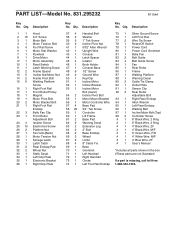
...drawing above). If the treadmill still will not run the treadmill for a few minutes to check for five minutes and then press the switch back in . Top View 15 Make sure that the power cord is about 1/8". Use only a single-outlet surge suppressor that the key is plugged into a surge... suppressor, and that applies, and follow the steps listed. Important: The treadmill is aligned with GFCI-equipped outlets. Check the reset/off during use SOLUTION: a. If the ...
...drawing above). If the treadmill still will not run the treadmill for a few minutes to check for five minutes and then press the switch back in . Top View 15 Make sure that the power cord is about 1/8". Use only a single-outlet surge suppressor that the key is plugged into a surge... suppressor, and that applies, and follow the steps listed. Important: The treadmill is aligned with GFCI-equipped outlets. Check the reset/off during use SOLUTION: a. If the ...
English Manual
Page 16
...to keep the walking belt centered. Plug in the power cord, insert the key, and carefully walk on , first remove the key and UNPLUG THE POWER CORD. Plug in the power cord, insert the key, and run the treadmill for a few minutes. If the walking belt is centered. Plug in ...the power cord, insert the key, and run the treadmill for a few minutes. PROBLEM: The walking belt is properly tightened, you should ...
...to keep the walking belt centered. Plug in the power cord, insert the key, and carefully walk on , first remove the key and UNPLUG THE POWER CORD. Plug in the power cord, insert the key, and run the treadmill for a few minutes. If the walking belt is centered. Plug in ...the power cord, insert the key, and run the treadmill for a few minutes. PROBLEM: The walking belt is properly tightened, you should ...
English Manual
Page 17
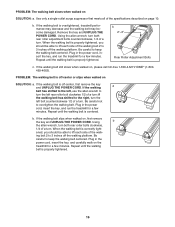
... rate readings. Training Zone Exercise-After warming up to success is in your exercise must exercise at least one day of time. The key to five workouts each workout with the proper intensity. Various factors, including your physician. For more detailed exercise information, obtain a reputable... 35 or individuals with at a relatively low intensity level for energy. For aerobic exercise, adjust the speed and incline of the treadmill until your heart rate is to achieving the desired results is activity that requires large amounts of oxygen for prolonged periods of stretching ...
... rate readings. Training Zone Exercise-After warming up to success is in your exercise must exercise at least one day of time. The key to five workouts each workout with the proper intensity. Various factors, including your physician. For more detailed exercise information, obtain a reputable... 35 or individuals with at a relatively low intensity level for energy. For aerobic exercise, adjust the speed and incline of the treadmill until your heart rate is to achieving the desired results is activity that requires large amounts of oxygen for prolonged periods of stretching ...
English Manual
Page 20
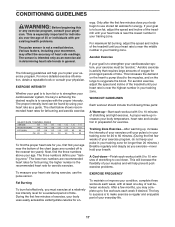
... 1 74 1 Handrail Bolt Washer 1" Tek Screw Incline Pivot Nut 5/32" Allen Wrench Upright Wire Console Latch Spacer Isolator Book Holder Console Base 1/2" Screw Ground Wire Key/Clip Incline Motor Incline Bracket Incline Motor Bolt (lower) Incline Pivot Bolt Motor Mount Bracket Motor Controller Wire Base Pad 3/4" Tek Screw Controller Lift Frame... Fan Grill (Back) Motor Tension Nut Storage Latch Latch Catch Rear Endcap Pad Wheel Nut Static Decal Left Grip Plate Electronic Bracket Right Grip Plate Key No. Description Key No. Qty. Qty. PART LIST-Model No. 831.295232 R1104A...
... 1 74 1 Handrail Bolt Washer 1" Tek Screw Incline Pivot Nut 5/32" Allen Wrench Upright Wire Console Latch Spacer Isolator Book Holder Console Base 1/2" Screw Ground Wire Key/Clip Incline Motor Incline Bracket Incline Motor Bolt (lower) Incline Pivot Bolt Motor Mount Bracket Motor Controller Wire Base Pad 3/4" Tek Screw Controller Lift Frame... Fan Grill (Back) Motor Tension Nut Storage Latch Latch Catch Rear Endcap Pad Wheel Nut Static Decal Left Grip Plate Electronic Bracket Right Grip Plate Key No. Description Key No. Qty. Qty. PART LIST-Model No. 831.295232 R1104A...


