
English Manual
Page 3
... all of carrying 15 or more than walking speeds. Keep the treadmill indoors, away from damage, place a mat under the age of clearance behind it is turned off. Keep children under the treadmill. 4. Never start the treadmill while you are used only by experienced users. 19. The sensor is not in a garage or covered...
... all of carrying 15 or more than walking speeds. Keep the treadmill indoors, away from damage, place a mat under the age of clearance behind it is turned off. Keep children under the treadmill. 4. Never start the treadmill while you are used only by experienced users. 19. The sensor is not in a garage or covered...

English Manual
Page 8
... replacement Base Pad. Hold the Console Base (47) near the Left Handrail (71). the Wheels should slide easily into the socket and snap into place, turn the connector and then insert it. 6 72 42 47 8 Touch the Right Handrail (72) to spin freely. 4. Attach the two Wheels (66) with the Silver...
... replacement Base Pad. Hold the Console Base (47) near the Left Handrail (71). the Wheels should slide easily into the socket and snap into place, turn the connector and then insert it. 6 72 42 47 8 Touch the Right Handrail (72) to spin freely. 4. Attach the two Wheels (66) with the Silver...
English Manual
Page 10
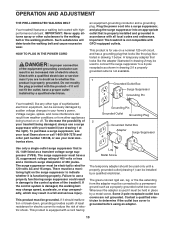
...1 at the right). The surge suppressor must be connected to a permanent ground such as to reduce the risk of 2 your treadmill being turned on a nominal 120-volt circuit, and has a grounding plug that is not compatible with highperformance lubricant. There must be grounded.... until a properly grounded outlet (drawing 1) can be installed by a qualified electrician. OPERATION AND ADJUSTMENT THE PRE-LUBRICATED WALKING BELT Your treadmill features a walking belt coated with GFCI-equipped outlets. Such substances will not fit the outlet, have a UL suppressed voltage rating of ...
...1 at the right). The surge suppressor must be connected to a permanent ground such as to reduce the risk of 2 your treadmill being turned on a nominal 120-volt circuit, and has a grounding plug that is not compatible with highperformance lubricant. There must be grounded.... until a properly grounded outlet (drawing 1) can be installed by a qualified electrician. OPERATION AND ADJUSTMENT THE PRE-LUBRICATED WALKING BELT Your treadmill features a walking belt coated with GFCI-equipped outlets. Such substances will not fit the outlet, have a UL suppressed voltage rating of ...
English Manual
Page 11
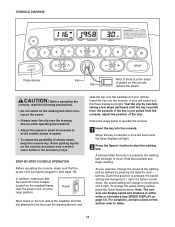
...-STEP CONSOLE OPERATION Before operating the console, make sure that the power cord is properly plugged in (see the drawing above ) while operating the treadmill. • Adjust the speed in the reset position. Find the clip attached to operate the console. 1 Insert the key into the console. Follow...onto the waistband of your clothes. CAUTION: Before operating the console, read the following precautions. • Do not stand on the walking belt when turning on the power. • Always wear the clip (see SPEED DISPLAY on the console and place only a sealed water bottle in speed. •...
...-STEP CONSOLE OPERATION Before operating the console, make sure that the power cord is properly plugged in (see the drawing above ) while operating the treadmill. • Adjust the speed in the reset position. Find the clip attached to operate the console. 1 Insert the key into the console. Follow...onto the waistband of your clothes. CAUTION: Before operating the console, read the following precautions. • Do not stand on the walking belt when turning on the power. • Always wear the clip (see SPEED DISPLAY on the console and place only a sealed water bottle in speed. •...
English Manual
Page 12
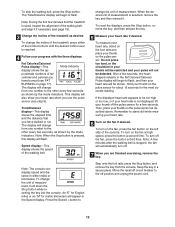
...This display will be detected. Note: The console can display speed and distance in the Speed display. When the desired unit of measurement. To turn off the pulse sensor for a few seconds, the heartshaped indicator in the Fat Calories/Calories/ Pulse display will begin to flash, and then ... 3 Change the incline of measurement, hold down the Stop button while inserting the key into the console. To change the unit of the treadmill as shown by the mode indicators. proximate numbers of the Incline buttons until the desired incline level is pressed, this display will begin to ...
...This display will be detected. Note: The console can display speed and distance in the Speed display. When the desired unit of measurement. To turn off the pulse sensor for a few seconds, the heartshaped indicator in the Fat Calories/Calories/ Pulse display will begin to flash, and then ... 3 Change the incline of measurement, hold down the Stop button while inserting the key into the console. To change the unit of the treadmill as shown by the mode indicators. proximate numbers of the Incline buttons until the desired incline level is pressed, this display will begin to ...
English Manual
Page 15
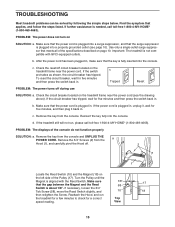
PROBLEM: The power does not turn on the treadmill frame near the power cord (see page 10). Use only a single-outlet surge suppressor that the gap between the Magnet and the Reed 58 17 Switch is about 1/8". b. c Tripped Reset PROBLEM: The power turns off . 2 1 Locate the Reed Switch ... Switch. Reattach the Hood, and run , please call toll-free 1-800-4-MY-HOME® (1-800-469-4663). c. TROUBLESHOOTING Most treadmill problems can be solved by following the simple steps below. If further assistance is plugged in . Check the reset/off circuit breaker located...
PROBLEM: The power does not turn on the treadmill frame near the power cord (see page 10). Use only a single-outlet surge suppressor that the gap between the Magnet and the Reed 58 17 Switch is about 1/8". b. c Tripped Reset PROBLEM: The power turns off . 2 1 Locate the Reed Switch ... Switch. Reattach the Hood, and run , please call toll-free 1-800-4-MY-HOME® (1-800-469-4663). c. TROUBLESHOOTING Most treadmill problems can be solved by following the simple steps below. If further assistance is plugged in . Check the reset/off circuit breaker located...
English Manual
Page 16
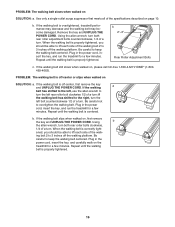
... the key and UNPLUG THE POWER CORD. If the walking belt slips when walked on the treadmill for a few minutes. Using b the allen wrench, turn both rear roller adjustment bolts counterclockwise, 1/4 of a turn ; ened, you should be able to lift each side of the specifications described on SOLUTION... walking belt centered. b. Plug in the power cord, insert the key, and run the treadmill for a few minutes. Using the allen wrench, turn both rear roller bolts clockwise, 1/4 of a turn . When the walking belt is correctly tight- Plug in the power cord, insert the key...
... the key and UNPLUG THE POWER CORD. If the walking belt slips when walked on the treadmill for a few minutes. Using b the allen wrench, turn both rear roller adjustment bolts counterclockwise, 1/4 of a turn ; ened, you should be able to lift each side of the specifications described on SOLUTION... walking belt centered. b. Plug in the power cord, insert the key, and run the treadmill for a few minutes. Using the allen wrench, turn both rear roller bolts clockwise, 1/4 of a turn . When the walking belt is correctly tight- Plug in the power cord, insert the key...


