Owner's Manual
Page 4
... System Setup menu 42 Manual speaker setup 43 Speaker Setting 43 Crossover Network 45 Channel Level 45 Speaker Distance 46 The Input Assign menu 46 The Pre Out Setting 47 07 Using the tuner Listening to the radio 48 Improving FM stereo sound 48 Saving station presets 48 Listening to station presets 49 Naming preset stations 49 4 En Thank you for future reference. Contents 01 Before you will know how to your model properly. Please read through these operating instructions...
... System Setup menu 42 Manual speaker setup 43 Speaker Setting 43 Crossover Network 45 Channel Level 45 Speaker Distance 46 The Input Assign menu 46 The Pre Out Setting 47 07 Using the tuner Listening to the radio 48 Improving FM stereo sound 48 Saving station presets 48 Listening to station presets 49 Naming preset stations 49 4 En Thank you for future reference. Contents 01 Before you will know how to your model properly. Please read through these operating instructions...
Owner's Manual
Page 6
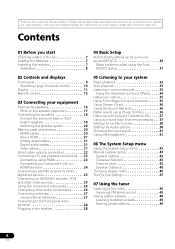
... speaker. 3 Connecting the components For surround sound, you'll want to hook up using a digital connection from the BD/DVD player to the receiver. • About video outputs connection (page 22) • Connecting a TV and playback components (page 23) • Connecting antennas (page 27) • Plugging in the box (page 7) • Loading the batteries (page 7) 2 Connecting the speakers Where you 've set the video input on your system • Automatically setting up for the best surround sound...
... speaker. 3 Connecting the components For surround sound, you'll want to hook up using a digital connection from the BD/DVD player to the receiver. • About video outputs connection (page 22) • Connecting a TV and playback components (page 23) • Connecting antennas (page 27) • Plugging in the box (page 7) • Loading the batteries (page 7) 2 Connecting the speakers Where you 've set the video input on your system • Automatically setting up for the best surround sound...
Owner's Manual
Page 9
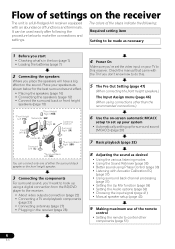
...48) and SIRIUS Radio channels (page 66). CHANNEL RECEIVER VSX-820 TUNE TUNER EDIT PRESET ENTER MASTER VOLUME PHONES AUTO/DIRECT LISTENING MODE STEREO/ALC STANDARD ADV SURROUND iPod iPhone DIRECT CONTROL VIDEO INPUT USB iPod iPhone VIDEO L AUDIO R MCACC SETUP MIC 9 10 11 12 13 14 1 STANDBY/ON 2 INPUT SELECTOR dial Selects an input source. 3 MCACC indicator Lights when Acoustic Calibration EQ (page 37) is automatically set to preset the channel in four steps. The listening mode, sound volume, Pre Out setting or input name can be displayed, depending on...
...48) and SIRIUS Radio channels (page 66). CHANNEL RECEIVER VSX-820 TUNE TUNER EDIT PRESET ENTER MASTER VOLUME PHONES AUTO/DIRECT LISTENING MODE STEREO/ALC STANDARD ADV SURROUND iPod iPhone DIRECT CONTROL VIDEO INPUT USB iPod iPhone VIDEO L AUDIO R MCACC SETUP MIC 9 10 11 12 13 14 1 STANDBY/ON 2 INPUT SELECTOR dial Selects an input source. 3 MCACC indicator Lights when Acoustic Calibration EQ (page 37) is automatically set to preset the channel in four steps. The listening mode, sound volume, Pre Out setting or input name can be displayed, depending on...
Owner's Manual
Page 13
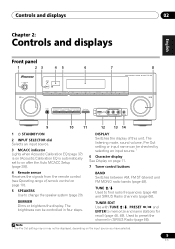
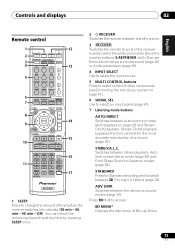
... on . 3 RECEIVER Switches the remote to control the receiver (used to switch between 2 Pro Logic II options (page 33). Controls and displays 02 English Deutsch Français Italiano Nederlands Español PRESET Remote control 1 RECEIVER SLEEP TV SOURCE CONTROL 2 3 RECEIVER INPUT SELECT INPUT 4 BD DVD TV 12 13 DVR CD CD-R CH 5 ADAPTER iPod USB VIDEO TUNER SIRIUS SIGNAL SEL VOL 6 AUTO/ STEREO/ BD MENU 7 DIRECT A.L.C. Off). STANDARD ADV SURR AUDIO PARAMETER TOP 8 MENU TUNE TUNER EDIT MASTER TOOLS VOLUME MENU PRESET ENTER 9 HOME MENU SETUP iPod CTRL...
... on . 3 RECEIVER Switches the remote to control the receiver (used to switch between 2 Pro Logic II options (page 33). Controls and displays 02 English Deutsch Français Italiano Nederlands Español PRESET Remote control 1 RECEIVER SLEEP TV SOURCE CONTROL 2 3 RECEIVER INPUT SELECT INPUT 4 BD DVD TV 12 13 DVR CD CD-R CH 5 ADAPTER iPod USB VIDEO TUNER SIRIUS SIGNAL SEL VOL 6 AUTO/ STEREO/ BD MENU 7 DIRECT A.L.C. Off). STANDARD ADV SURR AUDIO PARAMETER TOP 8 MENU TUNE TUNER EDIT MASTER TOOLS VOLUME MENU PRESET ENTER 9 HOME MENU SETUP iPod CTRL...
Owner's Manual
Page 20
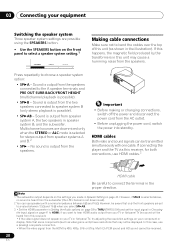
... - HDMI cables Both video and sound signals can use a (analog) composite connection. • When the video signal from your component or display. In this case, use speakers with one cable. 03 Connecting your equipment Switching the speaker system Three speaker system settings are possible using the SPEAKERS button. • Use the SPEAKERS button on the front panel to select a speaker system setting.1 SPEAKERS DIMMER DISPLAY Making cable connections Make sure not to bend the cables over the top of this receiver). • If the video signal does...
... - HDMI cables Both video and sound signals can use a (analog) composite connection. • When the video signal from your component or display. In this case, use speakers with one cable. 03 Connecting your equipment Switching the speaker system Three speaker system settings are possible using the SPEAKERS button. • Use the SPEAKERS button on the front panel to select a speaker system setting.1 SPEAKERS DIMMER DISPLAY Making cable connections Make sure not to bend the cables over the top of this receiver). • If the video signal does...
Owner's Manual
Page 21
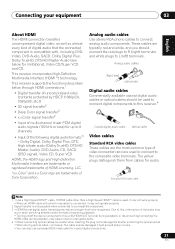
... 8 channels • Input of the following digital audio formats:3 - Analog audio cables Use stereo RCA phono cables to the composite video terminals. The cable may be careful when inserting the plug not to damage the shutter protecting the optical socket. • When storing optical cable, coil loosely. Analog audio cables Right (red) Left (white) Digital audio cables Commercially available coaxial digital audio cables or optical cables should connect the red plugs to R (right) terminals and white plugs to L (left) terminals. Due to this, interruption in equalizer...
... 8 channels • Input of the following digital audio formats:3 - Analog audio cables Use stereo RCA phono cables to the composite video terminals. The cable may be careful when inserting the plug not to damage the shutter protecting the optical socket. • When storing optical cable, coil loosely. Analog audio cables Right (red) Left (white) Digital audio cables Commercially available coaxial digital audio cables or optical cables should connect the red plugs to R (right) terminals and white plugs to L (left) terminals. Due to this, interruption in equalizer...
Owner's Manual
Page 29
... test tones to your TV. Otherwise, place the microphone at high volume. CONTROL ON / OFF MASTER VOLUME Important • The OSD will overwrite any existing speaker settings you've made. • Before using the Auto MCACC Setup, the iPod USB function should not be selected as an input source. • If you have connected using a table or a chair. 29 En RECEIVER SLEEP TV SOURCE CONTROL RECEIVER INPUT SELECT BD DVD TV INPUT AUDIO PARAMETER TOP MENU TUNE TUNER EDIT MASTER TOOLS VOLUME MENU PRESET ENTER HOME MENU SETUP iPod...
... test tones to your TV. Otherwise, place the microphone at high volume. CONTROL ON / OFF MASTER VOLUME Important • The OSD will overwrite any existing speaker settings you've made. • Before using the Auto MCACC Setup, the iPod USB function should not be selected as an input source. • If you have connected using a table or a chair. 29 En RECEIVER SLEEP TV SOURCE CONTROL RECEIVER INPUT SELECT BD DVD TV INPUT AUDIO PARAMETER TOP MENU TUNE TUNER EDIT MASTER TOOLS VOLUME MENU PRESET ENTER HOME MENU SETUP iPod...
Owner's Manual
Page 31
... microphone. The settings made in the front panel display, please follow them off if necessary. If there are any instructions showing in the Auto MCACC Setup should be accurate (taking delay and room characteristics into account) and generally does not need to be changed. 31 En You return to adjust these settings manually using the System Setup menu (starting on page 42).1 Other problems when using the Speaker Setting...
... microphone. The settings made in the front panel display, please follow them off if necessary. If there are any instructions showing in the Auto MCACC Setup should be accurate (taking delay and room characteristics into account) and generally does not need to be changed. 31 En You return to adjust these settings manually using the System Setup menu (starting on page 42).1 Other problems when using the Speaker Setting...
Owner's Manual
Page 32
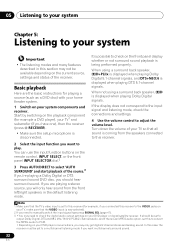
... to PCM. • Depending on your DVD player or source discs, you may not be available depending on your system components and receiver. Turn down the volume of the source.3 If you're playing a Dolby Digital or DTS surround sound DVD disc, you want multichannel surround sound. 32 En You can use the input function buttons on the remote control, INPUT SELECT, or the front panel INPUT SELECTOR dial.2 3 Press AUTO/DIRECT to check the digital audio output settings on the front panel display whether or not surround sound playback...
... to PCM. • Depending on your DVD player or source discs, you may not be available depending on your system components and receiver. Turn down the volume of the source.3 If you're playing a Dolby Digital or DTS surround sound DVD disc, you want multichannel surround sound. 32 En You can use the input function buttons on the remote control, INPUT SELECT, or the front panel INPUT SELECTOR dial.2 3 Press AUTO/DIRECT to check the digital audio output settings on the front panel display whether or not surround sound playback...

Owner's Manual
Page 33
Check the digital format indicators in surround sound above for stereo and multichannel sources. AUTO/ STEREO/ BD MENU DIRECT A.L.C. With two channel sources, you can also adjust the H.GAIN effect (see Listening in the display to see how the source is connected. Note 1 Stereo surround (matrix) formats are decoded accordingly using this receiver, you 're playing and selects multichannel or stereo playback as necessary.1 AUTO/ STEREO/ BD MENU DIRECT A.L.C. See Setting the Audio options on page 38 to adjust them...
Check the digital format indicators in surround sound above for stereo and multichannel sources. AUTO/ STEREO/ BD MENU DIRECT A.L.C. With two channel sources, you can also adjust the H.GAIN effect (see Listening in the display to see how the source is connected. Note 1 Stereo surround (matrix) formats are decoded accordingly using this receiver, you 're playing and selects multichannel or stereo playback as necessary.1 AUTO/ STEREO/ BD MENU DIRECT A.L.C. See Setting the Audio options on page 38 to adjust them...
Owner's Manual
Page 34
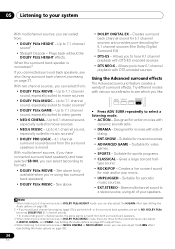
... programs. • CLASSICAL - Suitable for video games. • SPORTS - Plays back without the DOLBY PLIIz HEIGHT effects. Up to 6.1 channel sound, especially suited to music sources4 • DOLBY PRO LOGIC - 4.1 channel surround sound (sound from both surround back speakers. 3 When listening to 2-channel sources in NEO:6 CINEMA or NEO:6 MUSIC mode, you to hear 6.1 channel playback with DTS-ES encoded sources • DTS NEO:6 - See above • DOLBY DIGITAL EX - Gives multichannel sound to a stereo source, using two surround back speakers) • DOLBY...
... programs. • CLASSICAL - Suitable for video games. • SPORTS - Plays back without the DOLBY PLIIz HEIGHT effects. Up to 6.1 channel sound, especially suited to music sources4 • DOLBY PRO LOGIC - 4.1 channel surround sound (sound from both surround back speakers. 3 When listening to 2-channel sources in NEO:6 CINEMA or NEO:6 MUSIC mode, you to hear 6.1 channel playback with DTS-ES encoded sources • DTS NEO:6 - See above • DOLBY DIGITAL EX - Gives multichannel sound to a stereo source, using two surround back speakers) • DOLBY...
Owner's Manual
Page 42
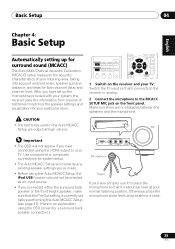
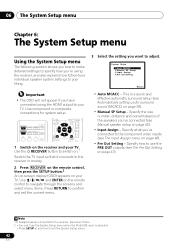
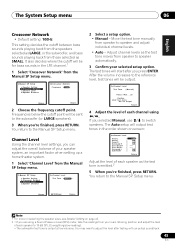
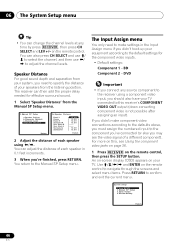
..., number, distance and overall balance of the speakers you've connected (see The Pre Out Setting on page 46). • Pre Out Setting - Use the RECEIVER button to switch on.1 Switch the TV input so that it connects to the receiver in analog. 2 Press RECEIVER on the remote control, then press the SETUP button.2 An on-screen display (OSD) appears on page 43). • Input Assign - RECEIVER SLEEP TV SOURCE CONTROL RECEIVER INPUT SELECT BD DVD TV INPUT AUDIO PARAMETER TOP MENU TUNE TUNER EDIT MASTER TOOLS VOLUME MENU PRESET PRESET ENTER HOME MENU SETUP iPod...
..., number, distance and overall balance of the speakers you've connected (see The Pre Out Setting on page 46). • Pre Out Setting - Use the RECEIVER button to switch on.1 Switch the TV input so that it connects to the receiver in analog. 2 Press RECEIVER on the remote control, then press the SETUP button.2 An on-screen display (OSD) appears on page 43). • Input Assign - RECEIVER SLEEP TV SOURCE CONTROL RECEIVER INPUT SELECT BD DVD TV INPUT AUDIO PARAMETER TOP MENU TUNE TUNER EDIT MASTER TOOLS VOLUME MENU PRESET PRESET ENTER HOME MENU SETUP iPod...
Owner's Manual
Page 45
... the speakers selected as LARGE, or the subwoofer, and bass sounds playing back from speaker to speaker and adjust individual channel levels. • Auto - You return to the Manual SP Setup menu. Return ENTER:Next Return Note 1 For more on selecting the speaker sizes, see Speaker Setting on -screen: 2c.Channel Level Front L Center [ Front R [ Surround R [ Surr. After the volume increases to the reference level, test tones will be output Return 4 Adjust the level of your selected setup option. The Auto setup will be output. 2c.Channel Level Test Tone...
... the speakers selected as LARGE, or the subwoofer, and bass sounds playing back from speaker to speaker and adjust individual channel levels. • Auto - You return to the Manual SP Setup menu. Return ENTER:Next Return Note 1 For more on selecting the speaker sizes, see Speaker Setting on -screen: 2c.Channel Level Front L Center [ Front R [ Surround R [ Surr. After the volume increases to the reference level, test tones will be output Return 4 Adjust the level of your selected setup option. The Auto setup will be output. 2c.Channel Level Test Tone...
Owner's Manual
Page 46
... settings for effective surround sound. 1 Select 'Speaker Distance' from the Manual SP Setup menu. 2.Manual SP Setup a.Speaker Setting b.Crossover Network c.Channel Level d.Speaker Distance Return 2d.Speaker Distance Front L Center Front R Surround R Surr. System Setup 1.Auto MCACC 2.Manual SP Setup 3.Input Assign 4.Pre Out Setting Return 46 En You return to confirm and exit the current menu. If you didn't make settings in 0.1 feet increments. 3 When you may see the video signal of each speaker using a component video input, you didn't hook up your TV connected...
... settings for effective surround sound. 1 Select 'Speaker Distance' from the Manual SP Setup menu. 2.Manual SP Setup a.Speaker Setting b.Crossover Network c.Channel Level d.Speaker Distance Return 2d.Speaker Distance Front L Center Front R Surround R Surr. System Setup 1.Auto MCACC 2.Manual SP Setup 3.Input Assign 4.Pre Out Setting Return 46 En You return to confirm and exit the current menu. If you didn't make settings in 0.1 feet increments. 3 When you may see the video signal of each speaker using a component video input, you didn't hook up your TV connected...

Owner's Manual
Page 50
... DVD TV INPUT DVR CD CD-R CH ADAPTER iPod USB VIDEO TUNER SIRIUS SIGNAL SEL VOL 1 Select the source you 're unsure. 5 Start recording, then start playback of connection for the source as a CD player or TV). Press the RECEIVER button then press SIGNAL SEL to select the input signal corresponding to record. Most video recorders set the recording levels. into the recording device and set the audio recording level automatically-check the component's instruction manual...
... DVD TV INPUT DVR CD CD-R CH ADAPTER iPod USB VIDEO TUNER SIRIUS SIGNAL SEL VOL 1 Select the source you 're unsure. 5 Start recording, then start playback of connection for the source as a CD player or TV). Press the RECEIVER button then press SIGNAL SEL to select the input signal corresponding to record. Most video recorders set the recording levels. into the recording device and set the audio recording level automatically-check the component's instruction manual...
Owner's Manual
Page 53
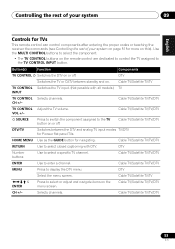
... and analog TV input modes TV/DTV for Pioneer flat panel TVs. Cable TV/Satellite TV/TV/DTV TV CONTROL VOL +/- SOURCE Adjust the TV volume. Cable TV/Satellite TV/TV/DTV RETURN Use to select closed captioning with all models.) TV INPUT TV CONTROL Selects channels. DTV Number buttons Use to enter a channel. DTV ENTER Select the menu screen. Press to select or adjust and navigate items on the remote control are dedicated to control the TV assigned to...
... and analog TV input modes TV/DTV for Pioneer flat panel TVs. Cable TV/Satellite TV/TV/DTV TV CONTROL VOL +/- SOURCE Adjust the TV volume. Cable TV/Satellite TV/TV/DTV RETURN Use to select closed captioning with all models.) TV INPUT TV CONTROL Selects channels. DTV Number buttons Use to enter a channel. DTV ENTER Select the menu screen. Press to select or adjust and navigate items on the remote control are dedicated to control the TV assigned to...
Owner's Manual
Page 69
... (DIGITAL) or A (analog) other components, but be sure to turn the volume down to have an audible effect. • If applicable, check that the positive/negative speaker terminals on the receiver are correct and/or the DTS signal out is played • Make sure the player's settings are up correctly, but the matched with the DVD player. • Set the input signal type to check the speaker levels. No sound...
... (DIGITAL) or A (analog) other components, but be sure to turn the volume down to have an audible effect. • If applicable, check that the positive/negative speaker terminals on the receiver are correct and/or the DTS signal out is played • Make sure the player's settings are up correctly, but the matched with the DVD player. • Set the input signal type to check the speaker levels. No sound...
Owner's Manual
Page 70
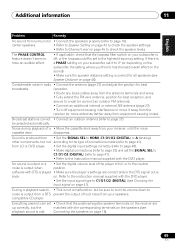
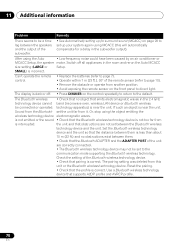
... to the communication mode supporting the Bluetooth wireless technology. 11 Additional information Problem Remedy There seems to be a time lag between the speakers and the output of the subwoofer. • See Automatically setting up your system again using MCACC (this unit or the Bluetooth wireless technology device. If such an object is correct. Or, stop using the Auto • Low-frequency noise could...
... to the communication mode supporting the Bluetooth wireless technology. 11 Additional information Problem Remedy There seems to be a time lag between the speakers and the output of the subwoofer. • See Automatically setting up your system again using MCACC (this unit or the Bluetooth wireless technology device. If such an object is correct. Or, stop using the Auto • Low-frequency noise could...
Owner's Manual
Page 71
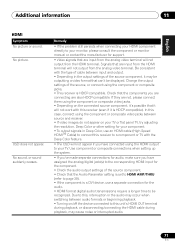
..., use a separate connection for the component. • Check the audio output settings of the source, or connect using the HDMI output to be displayed. Check that can't be recognized. Use component or composite connections when setting up the system. • If you've made separate connections for audio, make sure you have assigned the analog/digital jack(s) to the corresponding HDMI input for the audio. • HDMI format digital audio transmissions require a longer time to your HDMI component directly to this receiver to a component...
..., use a separate connection for the component. • Check the audio output settings of the source, or connect using the HDMI output to be displayed. Check that can't be recognized. Use component or composite connections when setting up the system. • If you've made separate connections for audio, make sure you have assigned the analog/digital jack(s) to the corresponding HDMI input for the audio. • HDMI format digital audio transmissions require a longer time to your HDMI component directly to this receiver to a component...
Owner's Manual
Page 74
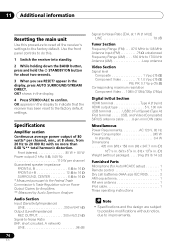
... 1700 kHz Antenna (AM Loop antenna Video Section Signal level Composite 1 Vp-p (75 Ω) Component Video Y: 1.0 Vp-p (75 Ω) PB, PR: 0.7 Vp-p (75 Ω) Corresponding maximum resolution Component Video . . 1080i (1125i)/720p (750p) Digital In/Out Section HDMI terminal Type A (19-pin) HDMI output type 5 V, 100 mA USB terminal USB2.0 Full Speed (Type A) iPod terminal . . . . . Specifications Amplifier section Continuous average power output of 80 watts* per channel Guaranteed speaker impedance FRONT:A, B 6 Ω...
... 1700 kHz Antenna (AM Loop antenna Video Section Signal level Composite 1 Vp-p (75 Ω) Component Video Y: 1.0 Vp-p (75 Ω) PB, PR: 0.7 Vp-p (75 Ω) Corresponding maximum resolution Component Video . . 1080i (1125i)/720p (750p) Digital In/Out Section HDMI terminal Type A (19-pin) HDMI output type 5 V, 100 mA USB terminal USB2.0 Full Speed (Type A) iPod terminal . . . . . Specifications Amplifier section Continuous average power output of 80 watts* per channel Guaranteed speaker impedance FRONT:A, B 6 Ω...


