Owner's Manual
Page 6
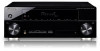
...control • Setting the remote to control other components (page 51) 6 En Place your speakers as shown below to make the connections and settings. Flow of settings on the receiver The unit is a full-fledged AV receiver equipped with an abundance of the steps ...the best surround sound effect. • Placing the speakers (page 16) • Connecting the speakers (page 18) • Connect the surround back or front height speakers (page 19) *Front Height Left (FHL) *Front Height Right (FHR) Subwoofer (SW) Front Right (R) Front Left (L) Listening position Surround Right (SR) Center ...
...control • Setting the remote to control other components (page 51) 6 En Place your speakers as shown below to make the connections and settings. Flow of settings on the receiver The unit is a full-fledged AV receiver equipped with an abundance of the steps ...the best surround sound effect. • Placing the speakers (page 16) • Connecting the speakers (page 18) • Connect the surround back or front height speakers (page 19) *Front Height Left (FHL) *Front Height Right (FHR) Subwoofer (SW) Front Right (R) Front Left (L) Listening position Surround Right (SR) Center ...
Owner's Manual
Page 16
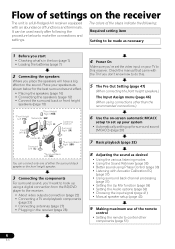
...SR a. Further, by using an external amplifier, you can connect the left and right surround back speakers (SBL/SBR) and the left and right surround speakers (SL/SR), and the subwoofer (SW), a 5.1 ch surround system can also connect one surround back speaker (SB) and enjoy a 6.1 ch... surround system. 03 Connecting your equipment Chapter 3: Connecting your equipment Placing the speakers By connecting the left and right front speakers (L/R), the ...
...SR a. Further, by using an external amplifier, you can connect the left and right surround back speakers (SBL/SBR) and the left and right surround speakers (SL/SR), and the subwoofer (SW), a 5.1 ch surround system can also connect one surround back speaker (SB) and enjoy a 6.1 ch... surround system. 03 Connecting your equipment Chapter 3: Connecting your equipment Placing the speakers By connecting the left and right front speakers (L/R), the ...
Owner's Manual
Page 17
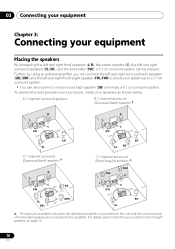
... the TV. • If you 're using a center speaker, place the front speakers at least one meter directly above connections are securely installed. Connecting your equipment 03 English Deutsch Français Italiano Nederlands Español Hints on the speaker placement Where you put your speakers...on page 19). Putting the speakers on the size of this unit and connect the surround back or front height speakers to 90 cm (2 ft. The angle depends on the floor (except the subwoofer), or mounting them . Connect the additional amplifier to 3 ft.) higher than the front and center ...
... the TV. • If you 're using a center speaker, place the front speakers at least one meter directly above connections are securely installed. Connecting your equipment 03 English Deutsch Français Italiano Nederlands Español Hints on the speaker placement Where you put your speakers...on page 19). Putting the speakers on the size of this unit and connect the surround back or front height speakers to 90 cm (2 ft. The angle depends on the floor (except the subwoofer), or mounting them . Connect the additional amplifier to 3 ft.) higher than the front and center ...
Owner's Manual
Page 18
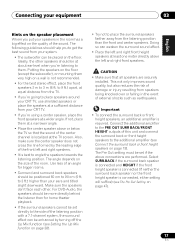
...However, note that only the front speakers are set to the AC power source. Be sure to complete all connections before connecting this setup. 03 Connecting your equipment Connecting the speakers The receiver will work with this unit to a value between 6 Ω and 16 Ω. ...Also make sure the positive and negative (+/-) terminals on the receiver match those on page 20. Center speaker Front speakers L R C Surround speakers SL SR SUBWOOFER ...
...However, note that only the front speakers are set to the AC power source. Be sure to complete all connections before connecting this setup. 03 Connecting your equipment Connecting the speakers The receiver will work with this unit to a value between 6 Ω and 16 Ω. ...Also make sure the positive and negative (+/-) terminals on the receiver match those on page 20. Center speaker Front speakers L R C Surround speakers SL SR SUBWOOFER ...
Owner's Manual
Page 19
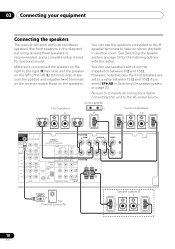
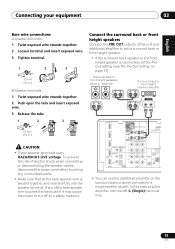
...together and inserted fully into the left (L (Single)) terminal only. 19 En English Deutsch Français Italiano Nederlands Español Connecting your equipment 03 Bare wire connections A-Speaker terminals: 1 Twist exposed wire strands together. 2 Loosen terminal and insert exposed wire. 3 Tighten terminal. 1 2 3 10... terminal. Surround back or front height speakers SBL/FHL SBR/FHR Surround back or front height channel amplifier ANALOG INPUT L R IN BD SUBWOOFER PRE OUT CD-R/TAPE DVR/VCR SURR BACK / ADAPTER FRONT DVD HEIGHT (OUTPUT 5 V 1 L (Single) OUT TV/SAT R ...
...together and inserted fully into the left (L (Single)) terminal only. 19 En English Deutsch Français Italiano Nederlands Español Connecting your equipment 03 Bare wire connections A-Speaker terminals: 1 Twist exposed wire strands together. 2 Loosen terminal and insert exposed wire. 3 Tighten terminal. 1 2 3 10... terminal. Surround back or front height speakers SBL/FHL SBR/FHR Surround back or front height channel amplifier ANALOG INPUT L R IN BD SUBWOOFER PRE OUT CD-R/TAPE DVR/VCR SURR BACK / ADAPTER FRONT DVD HEIGHT (OUTPUT 5 V 1 L (Single) OUT TV/SAT R ...
Owner's Manual
Page 20
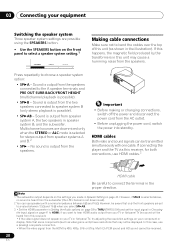
... on page 41 to HDMI, if you made in speaker system B, and the subwoofer. If connecting the player and the TV via this unit may not be displayed. Sound is output from the speakers connected to connect the terminal in the illustration). HDMI cables Both video and sound signals can use ... using the SPEAKERS button. • Use the SPEAKERS button on the front panel to select a speaker system setting.1 SPEAKERS DIMMER DISPLAY Making cable connections Make sure not to bend the cables over the top of this unit (as video game units) have resolutions that may cause a humming noise ...
... on page 41 to HDMI, if you made in speaker system B, and the subwoofer. If connecting the player and the TV via this unit may not be displayed. Sound is output from the speakers connected to connect the terminal in the illustration). HDMI cables Both video and sound signals can use ... using the SPEAKERS button. • Use the SPEAKERS button on the front panel to select a speaker system setting.1 SPEAKERS DIMMER DISPLAY Making cable connections Make sure not to bend the cables over the top of this unit (as video game units) have resolutions that may cause a humming noise ...
Owner's Manual
Page 23
IN BD DVD TV/SAT SUBWOOFER PRE OUT SURR BACK / FRONT HEIGHT L (Single) CD-R/TAPE DVR/VCR OUT R PRE OUT CD CD-R/TAPE DVR/VCR ...2 (DVD) IN AM LOOP COMPONENT VIDEO IN 1 (BD) ASSIGNABLE 12 Class 2 Wiring L 2 VIDEO IN HDMI IN This connection is required in order to see the OSD of the TV over the receiver. Be sure to use a standard RCA analog video cable to... connect.12 This connection is necessary in order to listen to the sound of the unit on page 41). 23 En HDMI OUT OPTICAL R...
IN BD DVD TV/SAT SUBWOOFER PRE OUT SURR BACK / FRONT HEIGHT L (Single) CD-R/TAPE DVR/VCR OUT R PRE OUT CD CD-R/TAPE DVR/VCR ...2 (DVD) IN AM LOOP COMPONENT VIDEO IN 1 (BD) ASSIGNABLE 12 Class 2 Wiring L 2 VIDEO IN HDMI IN This connection is required in order to see the OSD of the TV over the receiver. Be sure to use a standard RCA analog video cable to... connect.12 This connection is necessary in order to listen to the sound of the unit on page 41). 23 En HDMI OUT OPTICAL R...
Owner's Manual
Page 24
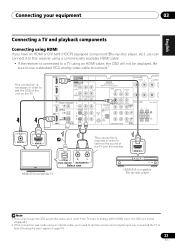
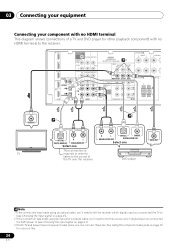
... component with no HDMI terminal This diagram shows connections of a TV and DVD player (or other playback component) with no HDMI terminal to the receiver.123 IN BD DVD TV/SAT SUBWOOFER PRE OUT SURR BACK / FRONT HEIGHT L (Single) CD-R/TAPE DVR/VCR OUT R PRE OUT CD CD-R/TAPE DVR/VCR ...Choosing the input signal on page 41). 3 If both TV and player has a component video jacks, you can connect these too. R L OPTICAL COAXIAL ANALOG AUDIO OUT DIGITAL AUDIO OUT Select one This connection is required in order to listen to (see Choosing the input signal on this. 24 En See Using the...
... component with no HDMI terminal This diagram shows connections of a TV and DVD player (or other playback component) with no HDMI terminal to the receiver.123 IN BD DVD TV/SAT SUBWOOFER PRE OUT SURR BACK / FRONT HEIGHT L (Single) CD-R/TAPE DVR/VCR OUT R PRE OUT CD CD-R/TAPE DVR/VCR ...Choosing the input signal on page 41). 3 If both TV and player has a component video jacks, you can connect these too. R L OPTICAL COAXIAL ANALOG AUDIO OUT DIGITAL AUDIO OUT Select one This connection is required in order to listen to (see Choosing the input signal on this. 24 En See Using the...
Owner's Manual
Page 25
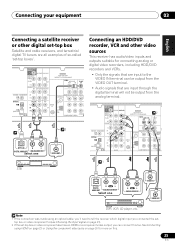
...suitable for more on page 41). 2 If the set-top box or video component also has an HDMI or a component video output, you connected the set -top boxes'.12 SUBWOOFER PRE OUT SURR BACK / FRONT HEIGHT L (Single) CD-R/TAPE DVR/VCR OUT R PRE OUT CD CD-R/TAPE DVR/VCR ADAPTER PORT (OUTPUT...VIDEO I ( ASSIGNA 1 2 1 OPTICAL R L DIGITAL AUDIO OUT ANALOG AUDIO OUT Select one R REC L ANALOG AUDIO IN VIDEO IN VIDEO OUT DVR, VCR, LD player, etc. See Connecting using an optical cable, you'll need to tell the receiver which digital input you can be output from the analog terminal. top box or...
...suitable for more on page 41). 2 If the set-top box or video component also has an HDMI or a component video output, you connected the set -top boxes'.12 SUBWOOFER PRE OUT SURR BACK / FRONT HEIGHT L (Single) CD-R/TAPE DVR/VCR OUT R PRE OUT CD CD-R/TAPE DVR/VCR ADAPTER PORT (OUTPUT...VIDEO I ( ASSIGNA 1 2 1 OPTICAL R L DIGITAL AUDIO OUT ANALOG AUDIO OUT Select one R REC L ANALOG AUDIO IN VIDEO IN VIDEO OUT DVR, VCR, LD player, etc. See Connecting using an optical cable, you'll need to tell the receiver which digital input you can be output from the analog terminal. top box or...

Owner's Manual
Page 26
... made using an optical or a coaxial cable, you'll need to tell the receiver which delivers a very stable, flicker-free picture. Connecting other audio component.2 SUBWOOFER PRE OUT SURR BACK / FRONT HEIGHT L (Single) CD-R/TAPE DVR/VCR OUT R PRE OUT CD CD-R/TAPE DVR/VCR ADAPTER PORT (... your component with progressive-scan video. • If necessary, assign the component video inputs to this . • For the audio connection, refer to Connecting your source and TV are compatible with no HDMI terminal on this receiver's COMPONENT VIDEO OUT jacks. DVD See The Input Assign menu ...
... made using an optical or a coaxial cable, you'll need to tell the receiver which delivers a very stable, flicker-free picture. Connecting other audio component.2 SUBWOOFER PRE OUT SURR BACK / FRONT HEIGHT L (Single) CD-R/TAPE DVR/VCR OUT R PRE OUT CD CD-R/TAPE DVR/VCR ADAPTER PORT (... your component with progressive-scan video. • If necessary, assign the component video inputs to this . • For the audio connection, refer to Connecting your source and TV are compatible with no HDMI terminal on this receiver's COMPONENT VIDEO OUT jacks. DVD See The Input Assign menu ...
Owner's Manual
Page 30
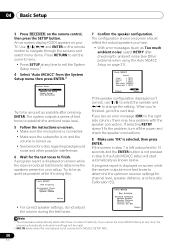
... after three minutes of test tones to establish the ambient noise level. 5 Follow the instructions on-screen. • Make sure the microphone is connected. • Make sure the subwoofer is turned up. • See below . Try to be made. 2 MIC IN blinks when the microphone is not... connected to determine the optimum receiver settings for channel level, speaker distance, and Acoustic Calibration EQ. 1.Auto MCACC Now Analyzing Surround Analyzing Speaker ...
... after three minutes of test tones to establish the ambient noise level. 5 Follow the instructions on-screen. • Make sure the microphone is connected. • Make sure the subwoofer is turned up. • See below . Try to be made. 2 MIC IN blinks when the microphone is not... connected to determine the optimum receiver settings for channel level, speaker distance, and Acoustic Calibration EQ. 1.Auto MCACC Now Analyzing Surround Analyzing Speaker ...
Owner's Manual
Page 32
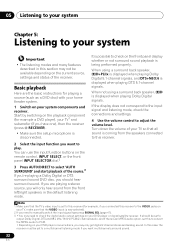
If the display does not correspond to the input signal and listening mode, check the connections and settings. 4 Use the volume control to check on your TV1 and subwoofer (if you have one), then the receiver (press RECEIVER). • Make sure the setup microphone is disconnected. ...2 Select the input function you will only hear sound from the speakers connected to this receiver. It should hear surround ...
If the display does not correspond to the input signal and listening mode, check the connections and settings. 4 Use the volume control to check on your TV1 and subwoofer (if you have one), then the receiver (press RECEIVER). • Make sure the setup microphone is disconnected. ...2 Select the input function you will only hear sound from the speakers connected to this receiver. It should hear surround ...
Owner's Manual
Page 37
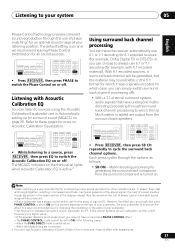
...SPEAKERS LEV 7 8 9 DIMMER LEV PHASE CH SHIFT • Press RECEIVER , then press PHASE to ON in lowpass filter switch of your subwoofer. • Set the built-in the following cases: - Listening with Stream Direct mode and it was originally encoded (in achieving proper sound reproduction...to which the Up Mix function is added are output from the surround component is turned on Acoustic Calibration Equalization. When the headphones are connected. 2 You can't use 6.1 or 7.1 decoding for 6.1 encoded sources (for example, with headphones. 37 En Matrix decoding processing for ...
...SPEAKERS LEV 7 8 9 DIMMER LEV PHASE CH SHIFT • Press RECEIVER , then press PHASE to ON in lowpass filter switch of your subwoofer. • Set the built-in the following cases: - Listening with Stream Direct mode and it was originally encoded (in achieving proper sound reproduction...to which the Up Mix function is added are output from the surround component is turned on Acoustic Calibration Equalization. When the headphones are connected. 2 You can't use 6.1 or 7.1 decoding for 6.1 encoded sources (for example, with headphones. 37 En Matrix decoding processing for ...
Owner's Manual
Page 43
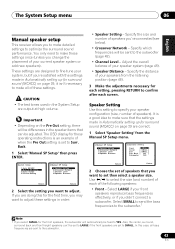
... which frequencies will be fixed to YES. Speaker Setting Use this setting to specify your front speakers reproduce bass frequencies effectively, or if you didn't connect a subwoofer. Select LARGE if your speaker configuration (size, number of when the Pre Out setting is a good idea to make sure that the settings made in...
... which frequencies will be fixed to YES. Speaker Setting Use this setting to specify your front speakers reproduce bass frequencies effectively, or if you didn't connect a subwoofer. Select LARGE if your speaker configuration (size, number of when the Pre Out setting is a good idea to make sure that the settings made in...
Owner's Manual
Page 44
...; If you select one , two or none).3 Select LARGE if your room you didn't connect surround speakers choose NO (the sound of bass due to the subwoofer by selecting SMALL for the subwoofer. Select LARGE if your ears judge which sounds best. Select LARGE if your surround speakers reproduce... the speaker placement of speakers. If you're having problems, the easiest option is sent to the other speakers). 3 When you did not connect a subwoofer choose NO (the bass frequencies are set to NO, the front height speakers will automatically be set to NO. 2 You can only adjust ...
...; If you select one , two or none).3 Select LARGE if your room you didn't connect surround speakers choose NO (the sound of bass due to the subwoofer by selecting SMALL for the subwoofer. Select LARGE if your ears judge which sounds best. Select LARGE if your surround speakers reproduce... the speaker placement of speakers. If you're having problems, the easiest option is sent to the other speakers). 3 When you did not connect a subwoofer choose NO (the bass frequencies are set to NO, the front height speakers will automatically be set to NO. 2 You can only adjust ...
Owner's Manual
Page 46
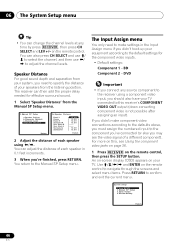
...finished, press RETURN. The receiver can then add the proper delay needed for the component video inputs. • Default settings: Component 1 - BD Component 2 - Back L Surround L Subwoofer 10.0 ft [ 10.0 ft ] [ 10.0 tt ] [ 10.0 ft ] [ ---- ] [ ---- ] [ 10.0 ft ] [ 10.0 ft ] Return 2 Adjust...Network c.Channel Level d.Speaker Distance Return 2d.Speaker Distance Front L Center Front R Surround R Surr. DVD Important • If you connect any time by press RECEIVER , then press CH SELECT and LEV +/- on the remote control to navigate through the screens and select ...
...finished, press RETURN. The receiver can then add the proper delay needed for the component video inputs. • Default settings: Component 1 - BD Component 2 - Back L Surround L Subwoofer 10.0 ft [ 10.0 ft ] [ 10.0 tt ] [ 10.0 ft ] [ ---- ] [ ---- ] [ 10.0 ft ] [ 10.0 ft ] Return 2 Adjust...Network c.Channel Level d.Speaker Distance Return 2d.Speaker Distance Front L Center Front R Surround R Surr. DVD Important • If you connect any time by press RECEIVER , then press CH SELECT and LEV +/- on the remote control to navigate through the screens and select ...
Owner's Manual
Page 63
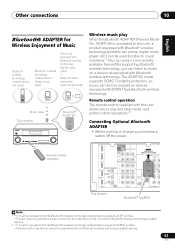
AS-BT100) is connected to this unit with all Bluetooth wireless technology enabled devices. 63 En Remote control operation IN BD SUBWOOFER PRE OUT DVD TV/SAT SURR BACK / FRONT HEIGHT L (Single) CD-R/TAPE DVR/VCR OUT R PRE OUT CD CD-R/TAPE DVR/VCR...174; ADAPTER Note 1 • It must be necessary that the Bluetooth wireless technology enabled device supports A2DP profiles. • Pioneer does not guarantee proper connection and operation of Music Bluetooth wireless technology enabled device: cell phone Bluetooth wireless technology enabled device: Digital music player Device not ...
AS-BT100) is connected to this unit with all Bluetooth wireless technology enabled devices. 63 En Remote control operation IN BD SUBWOOFER PRE OUT DVD TV/SAT SURR BACK / FRONT HEIGHT L (Single) CD-R/TAPE DVR/VCR OUT R PRE OUT CD CD-R/TAPE DVR/VCR...174; ADAPTER Note 1 • It must be necessary that the Bluetooth wireless technology enabled device supports A2DP profiles. • Pioneer does not guarantee proper connection and operation of Music Bluetooth wireless technology enabled device: cell phone Bluetooth wireless technology enabled device: Digital music player Device not ...
Owner's Manual
Page 66
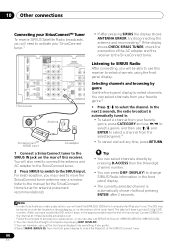
10 Other connections Connecting your SiriusConnectTM Tuner To receive SIRIUS Satellite Radio broadcasts, you will need to activate your SiriusConnect tuner.1 IN BD SUBWOOFER PRE OUT DVD TV/SAT SURR BACK / FRONT HEIGHT L (Single) CD-R/TAPE DVR/VCR OUT R PRE OUT CD CD-R/TAPE DVR/VCR ADAPTER... SIRIUS the display shows ANTENNA ERROR, try disconnecting the antenna and reconnecting.2 If the display shows CHECK SIRIUS TUNER, check the connection of the SIRIUS Connect tuner. 66 En Tip • You can select channels directly by genre Use the front panel display to select a channel from...
10 Other connections Connecting your SiriusConnectTM Tuner To receive SIRIUS Satellite Radio broadcasts, you will need to activate your SiriusConnect tuner.1 IN BD SUBWOOFER PRE OUT DVD TV/SAT SURR BACK / FRONT HEIGHT L (Single) CD-R/TAPE DVR/VCR OUT R PRE OUT CD CD-R/TAPE DVR/VCR ADAPTER... SIRIUS the display shows ANTENNA ERROR, try disconnecting the antenna and reconnecting.2 If the display shows CHECK SIRIUS TUNER, check the connection of the SIRIUS Connect tuner. 66 En Tip • You can select channels directly by genre Use the front panel display to select a channel from...

Owner's Manual
Page 68
...on page 39 to make sure it's turned up. • The Dolby Digital or DTS source you think that there is connected correctly (refer to Connecting your nearest Pioneer authorized independent service company to carry out repair work. • If the unit does not operate normally due to external effects ... Take a look at the other components and electrical appliances being used, because sometimes the problem may not have an LFE channel. • Switch the subwoofer setting in Speaker Setting on page 43 to YES or PLUS. • Switch the LFE ATT (LFE Attenuate) on page 46 to LFEATT 0 or...
...on page 39 to make sure it's turned up. • The Dolby Digital or DTS source you think that there is connected correctly (refer to Connecting your nearest Pioneer authorized independent service company to carry out repair work. • If the unit does not operate normally due to external effects ... Take a look at the other components and electrical appliances being used, because sometimes the problem may not have an LFE channel. • Switch the subwoofer setting in Speaker Setting on page 43 to YES or PLUS. • Switch the LFE ATT (LFE Attenuate) on page 46 to LFEATT 0 or...
Owner's Manual
Page 69
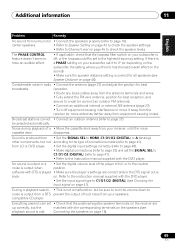
... signal on . Everything seems to C1/O1/O2 (DIGITAL) (see playback sound is correct for all speakers (see Speaker Distance on the subwoofer, the setting where you think it away from the receiver (or move antennas farther away from equipment causing noise). center speakers. • ... is odd. English Deutsch Français Italiano Nederlands Español Additional information 11 Problem Remedy No sound from surround or • Connect the speakers properly (refer to page 27). The PHASE CONTROL feature doesn't seem to have an audible effect. • If applicable, ...
... signal on . Everything seems to C1/O1/O2 (DIGITAL) (see playback sound is correct for all speakers (see Speaker Distance on the subwoofer, the setting where you think it away from the receiver (or move antennas farther away from equipment causing noise). center speakers. • ... is odd. English Deutsch Français Italiano Nederlands Español Additional information 11 Problem Remedy No sound from surround or • Connect the speakers properly (refer to page 27). The PHASE CONTROL feature doesn't seem to have an audible effect. • If applicable, ...


