Owner's Manual
Page 4
...preset stations 49 4 En Contents 01 Before you have finished reading the instructions, put them away in a safe place for buying this Pioneer product. Please read through these operating instructions so you for future reference. Thank you will know how to operate your system Basic playback ...Audio options 38 Choosing the input signal 41 Using the headphone 41 06 The System Setup menu Using the System Setup menu 42 Manual speaker setup 43 Speaker Setting 43 Crossover Network 45 Channel Level 45 Speaker Distance 46 The Input Assign menu 46 The Pre Out Setting 47 07 Using the...
...preset stations 49 4 En Contents 01 Before you have finished reading the instructions, put them away in a safe place for buying this Pioneer product. Please read through these operating instructions so you for future reference. Thank you will know how to operate your system Basic playback ...Audio options 38 Choosing the input signal 41 Using the headphone 41 06 The System Setup menu Using the System Setup menu 42 Manual speaker setup 43 Speaker Setting 43 Crossover Network 45 Channel Level 45 Speaker Distance 46 The Input Assign menu 46 The Pre Out Setting 47 07 Using the...
Owner's Manual
Page 6
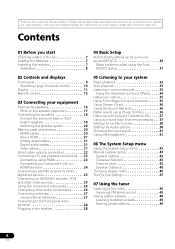
...connections.) 6 Use the on-screen automatic MCACC setup to set up your TV to be used easily after following : Required setting item Setting to this . 5 The Pre Out Setting (page 47) (When connecting the front height speakers.) The Input Assign menu (page 46) (When using ...Setting the Up Mix function (page 38) • Setting the Audio options (page 38) • Choosing the input signal (page 41) • Manual speaker setup (page 43) 9 Making maximum use of the remote control • Setting the remote to make the connections and settings. It can connect only...
...connections.) 6 Use the on-screen automatic MCACC setup to set up your TV to be used easily after following : Required setting item Setting to this . 5 The Pre Out Setting (page 47) (When connecting the front height speakers.) The Input Assign menu (page 46) (When using ...Setting the Up Mix function (page 38) • Setting the Audio options (page 38) • Choosing the input signal (page 41) • Manual speaker setup (page 43) 9 Making maximum use of the remote control • Setting the remote to make the connections and settings. It can connect only...
Owner's Manual
Page 9
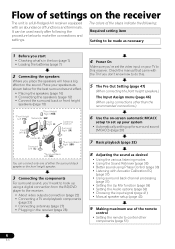
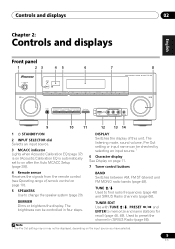
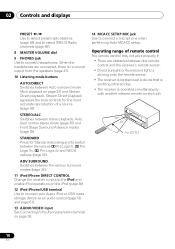
...AM, FM ST (stereo) and FM MONO radio bands (page 48). The brightness can be displayed, depending on after the Auto MCACC Setup (page 29)). Controls and displays 02 English Deutsch Français Italiano Nederlands Español Chapter 2: Controls and displays Front panel 1 ...45 STANDBY/ON INPUT SELECTOR PHASE CONTROL SPEAKERS DIMMER DISPLAY BAND 6 7 8 AUDIO/ VIDEO MULTI- Used to memorize and name stations for recall (page 48, 49). TUNE / Used to on the input source you have selected. 9 En CHANNEL RECEIVER VSX-820 TUNE TUNER EDIT PRESET ENTER MASTER ...
...AM, FM ST (stereo) and FM MONO radio bands (page 48). The brightness can be displayed, depending on after the Auto MCACC Setup (page 29)). Controls and displays 02 English Deutsch Français Italiano Nederlands Español Chapter 2: Controls and displays Front panel 1 ...45 STANDBY/ON INPUT SELECTOR PHASE CONTROL SPEAKERS DIMMER DISPLAY BAND 6 7 8 AUDIO/ VIDEO MULTI- Used to memorize and name stations for recall (page 48, 49). TUNE / Used to on the input source you have selected. 9 En CHANNEL RECEIVER VSX-820 TUNE TUNER EDIT PRESET ENTER MASTER ...
Owner's Manual
Page 10
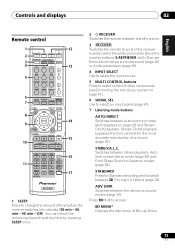
... sensor. • The receiver is located near a device that is emitting infrared rays. • The receiver is no sound output from the speakers (page 41). 10 Listening mode buttons AUTO/DIRECT Switches between stereo playback, Auto level control stereo mode (page 35) and Front Stage Surround Advance... modes (page 35). STEREO/ALC Switches between Auto surround mode (Auto playback on page 28. 14 MCACC SETUP MIC jack Use to connect headphones. When the headphones are obstacles between the various 2 Pro Logic II, 2 Pro Logic IIx, 2 Pro Logic ...
... sensor. • The receiver is located near a device that is emitting infrared rays. • The receiver is no sound output from the speakers (page 41). 10 Listening mode buttons AUTO/DIRECT Switches between stereo playback, Auto level control stereo mode (page 35) and Front Stage Surround Advance... modes (page 35). STEREO/ALC Switches between Auto surround mode (Auto playback on page 28. 14 MCACC SETUP MIC jack Use to connect headphones. When the headphones are obstacles between the various 2 Pro Logic II, 2 Pro Logic IIx, 2 Pro Logic ...
Owner's Manual
Page 13
... reproduction of Blu-ray Discs. 13 En STANDARD ADV SURR AUDIO PARAMETER TOP 8 MENU TUNE TUNER EDIT MASTER TOOLS VOLUME MENU PRESET ENTER 9 HOME MENU SETUP iPod CTRL CATEGORY TUNE BAND RETURN DTV/ TV MUTE 10 BASS TRE 11 MEMORY HDD DVD VCR 1 2 3 DISP S.RETRIEVER SB CH CH SELECT EQ... 4 5 6 CH MIDNIGHT SPEAKERS 7 8 DIMMER CLR 0 / +10 D.ACCESS LEV 9 LEV ENTER PHASE CH SHIFT 14 15 16 17 RECEIVER 1 SLEEP Press to access: BD MENU* Displays ...
... reproduction of Blu-ray Discs. 13 En STANDARD ADV SURR AUDIO PARAMETER TOP 8 MENU TUNE TUNER EDIT MASTER TOOLS VOLUME MENU PRESET ENTER 9 HOME MENU SETUP iPod CTRL CATEGORY TUNE BAND RETURN DTV/ TV MUTE 10 BASS TRE 11 MEMORY HDD DVD VCR 1 2 3 DISP S.RETRIEVER SB CH CH SELECT EQ... 4 5 6 CH MIDNIGHT SPEAKERS 7 8 DIMMER CLR 0 / +10 D.ACCESS LEV 9 LEV ENTER PHASE CH SHIFT 14 15 16 17 RECEIVER 1 SLEEP Press to access: BD MENU* Displays ...
Owner's Manual
Page 18
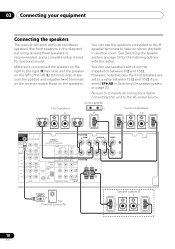
... connections before connecting this setup. See Switching the speaker system on page 20 for surround sound. However, note that only the front speakers are set to the AC power source. 03 Connecting your equipment Connecting the speakers The receiver will work with just two stereo speakers (the front speakers in Switching the speaker system on page 20...
... connections before connecting this setup. See Switching the speaker system on page 20 for surround sound. However, note that only the front speakers are set to the AC power source. 03 Connecting your equipment Connecting the speakers The receiver will work with just two stereo speakers (the front speakers in Switching the speaker system on page 20...
Owner's Manual
Page 23
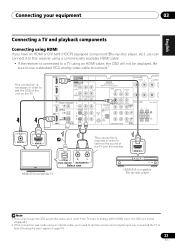
.../VCR IN 1 (CD) OPTICAL IN 2 OUT IN 1 (CD-R/TAPE) HDMI ASSIGNABLE 12 L IN R TV/SAT DVD L IN R AUDIO IN MONITOR OUT DVD IN BD IN SPEAKERS B ANTENNA PR PB Y MONITOR OUT BD FM UNBAL 75 SIRIUS IN R IN 2 (DVD) IN AM LOOP COMPONENT VIDEO IN 1 (BD) ASSIGNABLE 12 Class 2 Wiring L 2 ...VIDEO IN HDMI IN This connection is necessary in order to listen to see the OSD screen (for setup, etc.), switch the TV input to analog. (With HDMI input, the OSD will not be displayed.) 2 If the connection was made using an optical cable...
.../VCR IN 1 (CD) OPTICAL IN 2 OUT IN 1 (CD-R/TAPE) HDMI ASSIGNABLE 12 L IN R TV/SAT DVD L IN R AUDIO IN MONITOR OUT DVD IN BD IN SPEAKERS B ANTENNA PR PB Y MONITOR OUT BD FM UNBAL 75 SIRIUS IN R IN 2 (DVD) IN AM LOOP COMPONENT VIDEO IN 1 (BD) ASSIGNABLE 12 Class 2 Wiring L 2 ...VIDEO IN HDMI IN This connection is necessary in order to listen to see the OSD screen (for setup, etc.), switch the TV input to analog. (With HDMI input, the OSD will not be displayed.) 2 If the connection was made using an optical cable...
Owner's Manual
Page 28
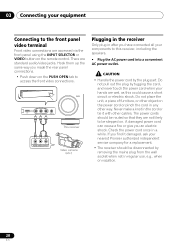
...the power cord or pinch the cord in the cord or tie it damaged, ask your nearest Pioneer authorized independent service company for a replacement. • The receiver should be routed so that ... and never touch the power cord when your hands are wet, as this receiver, including the speakers. • Plug the AC power cord into a convenient AC power outlet. Never make a knot...electric shock. CONTROL ON / OFF MASTER VOLUME VIDEO INPUT USB iPod iPhone VIDEO L AUDIO R MCACC SETUP MIC This receiver VIDEO L R AUDIO/VIDEO OUTPUT Video camera (etc.) Plugging in the receiver Only plug...
...the power cord or pinch the cord in the cord or tie it damaged, ask your nearest Pioneer authorized independent service company for a replacement. • The receiver should be routed so that ... and never touch the power cord when your hands are wet, as this receiver, including the speakers. • Plug the AC power cord into a convenient AC power outlet. Never make a knot...electric shock. CONTROL ON / OFF MASTER VOLUME VIDEO INPUT USB iPod iPhone VIDEO L AUDIO R MCACC SETUP MIC This receiver VIDEO L R AUDIO/VIDEO OUTPUT Video camera (etc.) Plugging in the receiver Only plug...
Owner's Manual
Page 29
... TV MUTE 1 Switch on the front panel. Switch the TV input so that it connects to the receiver in the Auto MCACC Setup are no obstacles between the speakers and the microphone. Make sure there are output at ear level using a table or a chair. 29 En Otherwise, place the microphone...it to your normal listening position. CONTROL ON / OFF MASTER VOLUME Important • The OSD will overwrite any existing speaker settings you've made. • Before using the Auto MCACC Setup, the iPod USB function should not be selected as an input source. • If you connected either the surround ...
... TV MUTE 1 Switch on the front panel. Switch the TV input so that it connects to the receiver in the Auto MCACC Setup are no obstacles between the speakers and the microphone. Make sure there are output at ear level using a table or a chair. 29 En Otherwise, place the microphone...it to your normal listening position. CONTROL ON / OFF MASTER VOLUME Important • The OSD will overwrite any existing speaker settings you've made. • Before using the Auto MCACC Setup, the iPod USB function should not be selected as an input source. • If you connected either the surround ...
Owner's Manual
Page 30
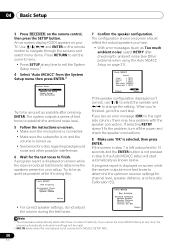
...TV. If you 're finished, go to change the setting. The configuration shown on-screen should reflect the actual speakers you see Other problems when using the Auto MCACC Setup on and the volume is on page 31). 1.Auto MCACC Check! Back [YESx2] Subwoofer [ YES ] 10:Next... Note 1 The screensaver automatically starts after pressing ENTER. Use and ENTER on your setup. 04 Basic Setup 3 Press RECEIVER on -screen while the receiver outputs more test tones to be a problem with the speaker connection. An on-screen display (OSD) appears on the remote control to navigate ...
...TV. If you 're finished, go to change the setting. The configuration shown on-screen should reflect the actual speakers you see Other problems when using the Auto MCACC Setup on and the volume is on page 31). 1.Auto MCACC Check! Back [YESx2] Subwoofer [ YES ] 10:Next... Note 1 The screensaver automatically starts after pressing ENTER. Use and ENTER on your setup. 04 Basic Setup 3 Press RECEIVER on -screen while the receiver outputs more test tones to be a problem with the speaker connection. An on-screen display (OSD) appears on the remote control to navigate ...
Owner's Manual
Page 31
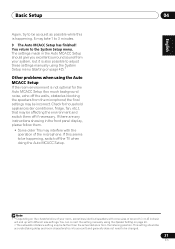
... be as quiet as possible while this seems to 3 minutes. 9 The Auto MCACC Setup has finished! If this is happening. This setting should give you excellent surround sound from your room, sometimes identical speakers with cone sizes of around 12 cm (5 inches) will end up with the operation... household appliances (air conditioner, fridge, fan, etc.), that may interfere with different size settings. You can correct the setting manually using the Speaker Setting on page 43. • The subwoofer distance setting may take 1 to be incorrect. It may be farther than the actual distance ...
... be as quiet as possible while this seems to 3 minutes. 9 The Auto MCACC Setup has finished! If this is happening. This setting should give you excellent surround sound from your room, sometimes identical speakers with cone sizes of around 12 cm (5 inches) will end up with the operation... household appliances (air conditioner, fridge, fan, etc.), that may interfere with different size settings. You can correct the setting manually using the Speaker Setting on page 43. • The subwoofer distance setting may take 1 to be incorrect. It may be farther than the actual distance ...
Owner's Manual
Page 32
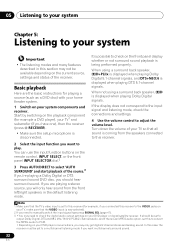
...should be set to a multichannel listening mode if you have one), then the receiver (press RECEIVER). • Make sure the setup microphone is displayed when playing Dolby Digital signals. It should hear surround sound. In this case, the receiver must be set to output Dolby ... 5: Listening to your system Important • The listening modes and many features described in the default listening mode. When using a surround back speaker, 2D is disconnected. 2 Select the input function you may only get digital 2 channel stereo and analog sound. Start by switching on your ...
...should be set to a multichannel listening mode if you have one), then the receiver (press RECEIVER). • Make sure the setup microphone is displayed when playing Dolby Digital signals. It should hear surround sound. In this case, the receiver must be set to output Dolby ... 5: Listening to your system Important • The listening modes and many features described in the default listening mode. When using a surround back speaker, 2D is disconnected. 2 Select the input function you may only get digital 2 channel stereo and analog sound. Start by switching on your ...

Owner's Manual
Page 33
Listening to 5.1 channel sound, especially suited for video games • NEO:6 CINEMA - Up to your speaker setup and the type of a source. Up to movie sources • DOLBY PLII MUSIC3 - See above • DOLBY PLIIz HEIGHT - The following modes provide...However, the options available will depend on page 38). 5 When listening to music sources • DOLBY PLII GAME - When the surround back and front height speaker are three further parameters you can select from : • DOLBY PLII MOVIE - See above • DOLBY PRO LOGIC - Plays back without the DOLBY PLII,...
Listening to 5.1 channel sound, especially suited for video games • NEO:6 CINEMA - Up to your speaker setup and the type of a source. Up to movie sources • DOLBY PLII MUSIC3 - See above • DOLBY PLIIz HEIGHT - The following modes provide...However, the options available will depend on page 38). 5 When listening to music sources • DOLBY PLII GAME - When the surround back and front height speaker are three further parameters you can select from : • DOLBY PLII MOVIE - See above • DOLBY PRO LOGIC - Plays back without the DOLBY PLII,...

Owner's Manual
Page 36
... hear the truest possible reproduction of a source. At least in theory, however, this receiver can reproduce powerful bass sound without any digital processing. P Front speaker H A S E C O N T R O L Sound O source Subwoofer N Listening position Note 1 In the DIRECT mode, Phase Control, Acoustic ... assigned to the subwoofer or other channels. Sources are heard according to the settings made in the Surround Setup (speaker setting, channel level, speaker distance), as well as lowfrequency signals in each channel are heard without deteriorating the quality of the original ...
... hear the truest possible reproduction of a source. At least in theory, however, this receiver can reproduce powerful bass sound without any digital processing. P Front speaker H A S E C O N T R O L Sound O source Subwoofer N Listening position Note 1 In the DIRECT mode, Phase Control, Acoustic ... assigned to the subwoofer or other channels. Sources are heard according to the settings made in the Surround Setup (speaker setting, channel level, speaker distance), as well as lowfrequency signals in each channel are heard without deteriorating the quality of the original ...
Owner's Manual
Page 38
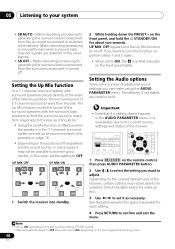
...SOURCE CONTROL AUDIO PARAMETER TOP MENU TUNE TUNER EDIT MASTER TOOLS VOLUME MENU PRESET PRESET RECEIVER INPUT SELECT INPUT ENTER BD DVD TV HOME MENU SETUP iPod CTRL C GO TUNE BAND RETURN 1 Press RECEIVER on the positions of additional sound settings you want to OFF. Check the table ... is only performed when surround back channel signals are set the setting to adjust. The defaults, if not stated, are a number of the speakers and the sound source, in bold. If you can make using the AUDIO PARAMETER menu. See the table below for generating the surround back ...
...SOURCE CONTROL AUDIO PARAMETER TOP MENU TUNE TUNER EDIT MASTER TOOLS VOLUME MENU PRESET PRESET RECEIVER INPUT SELECT INPUT ENTER BD DVD TV HOME MENU SETUP iPod CTRL C GO TUNE BAND RETURN 1 Press RECEIVER on the positions of additional sound settings you want to OFF. Check the table ... is only performed when surround back channel signals are set the setting to adjust. The defaults, if not stated, are a number of the speakers and the sound source, in bold. If you can make using the AUDIO PARAMETER menu. See the table below for generating the surround back ...
Owner's Manual
Page 42
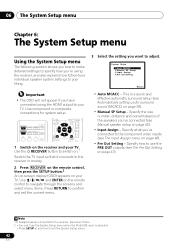
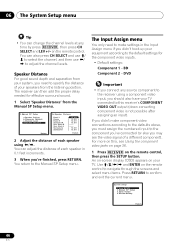
.... Specify the size, number, distance and overall balance of the speakers you've connected (see The Input Assign menu on page 43). • Input Assign - Specify what you've connected to the component video inputs (see Manual speaker setup on page 46). • Pre Out Setting - 06 The ...System Setup menu Chapter 6: The System Setup menu Using the System Setup menu The following section shows you how to make detailed settings to specify how you'...
.... Specify the size, number, distance and overall balance of the speakers you've connected (see The Input Assign menu on page 43). • Input Assign - Specify what you've connected to the component video inputs (see Manual speaker setup on page 46). • Pre Out Setting - 06 The ...System Setup menu Chapter 6: The System Setup menu Using the System Setup menu The following section shows you how to make detailed settings to specify how you'...
Owner's Manual
Page 43
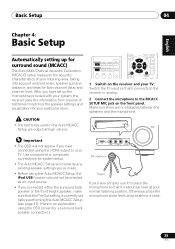
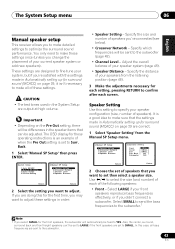
... (MCACC) on the Pre Out setting, there will automatically be fixed to YES. The System Setup menu 06 English Deutsch Français Italiano Nederlands Español Manual speaker setup This receiver allows you to make detailed settings to make sure that the settings made in Automatically... setting up for surround sound (MCACC) on page 29 are correct. 1 Select 'Speaker Setting' from the listening position (page 46). 3...
... (MCACC) on the Pre Out setting, there will automatically be fixed to YES. The System Setup menu 06 English Deutsch Français Italiano Nederlands Español Manual speaker setup This receiver allows you to make detailed settings to make sure that the settings made in Automatically... setting up for surround sound (MCACC) on page 29 are correct. 1 Select 'Speaker Setting' from the listening position (page 46). 3...
Owner's Manual
Page 44
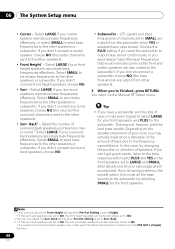
... sound continuously or you 're finished, press RETURN. 06 The System Setup menu • Center - Select LARGE if your ears judge which sounds best. Select SMALL to send bass frequencies to the other speakers or subwoofer. Select the number of channels set to SMALL are set to... to send bass frequencies to the Manual SP Setup menu. Tip • If you have a subwoofer and like lots of speakers. If you select one , two or none).3 Select LARGE if your front speakers and PLUS for your surround back speakers reproduce bass frequencies effectively. Back setting when Pre...
... sound continuously or you 're finished, press RETURN. 06 The System Setup menu • Center - Select LARGE if your ears judge which sounds best. Select SMALL to send bass frequencies to the other speakers or subwoofer. Select the number of channels set to SMALL are set to... to send bass frequencies to the Manual SP Setup menu. Tip • If you have a subwoofer and like lots of speakers. If you select one , two or none).3 Select LARGE if your front speakers and PLUS for your surround back speakers reproduce bass frequencies effectively. Back setting when Pre...
Owner's Manual
Page 45
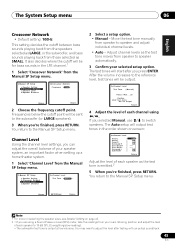
..., an important factor when setting up a home theater system. 1 Select 'Channel Level' from the Manual SP Setup menu. 2.Manual SP Setup a.Speaker Setting b.Crossover Network c.Channel Level d.Speaker Distance 2c.Channel Level Test Tone Manual 2 Select a setup option. • Manual - You return to adjust the level after you 're finished, press RETURN. Back R [ Surr. Back...
..., an important factor when setting up a home theater system. 1 Select 'Channel Level' from the Manual SP Setup menu. 2.Manual SP Setup a.Speaker Setting b.Crossover Network c.Channel Level d.Speaker Distance 2c.Channel Level Test Tone Manual 2 Select a setup option. • Manual - You return to adjust the level after you 're finished, press RETURN. Back R [ Surr. Back...
Owner's Manual
Page 46
...the video signal of a different component). For more on the remote control. 06 The System Setup menu Tip • You can adjust the distance of each speaker using a component video input, you should also have your equipment according to the default settings... for effective surround sound. 1 Select 'Speaker Distance' from the Manual SP Setup menu. 2.Manual SP Setup a.Speaker Setting b.Crossover Network c.Channel Level d.Speaker Distance Return 2d.Speaker Distance Front L Center Front R Surround R Surr. Speaker Distance For good sound depth and separation from the...
...the video signal of a different component). For more on the remote control. 06 The System Setup menu Tip • You can adjust the distance of each speaker using a component video input, you should also have your equipment according to the default settings... for effective surround sound. 1 Select 'Speaker Distance' from the Manual SP Setup menu. 2.Manual SP Setup a.Speaker Setting b.Crossover Network c.Channel Level d.Speaker Distance Return 2d.Speaker Distance Front L Center Front R Surround R Surr. Speaker Distance For good sound depth and separation from the...


