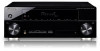

Owner's Manual
Page 3
... ventilation to constitute a risk of important operating and maintenance (servicing) instructions in the cabinet are provided for your outlet, consult an electrician for connection with speaker, and should never be unplugged from being walked on or pinched particularly at each side). VENTILATION CAUTION When installing this unit will need to unplug...
... ventilation to constitute a risk of important operating and maintenance (servicing) instructions in the cabinet are provided for your outlet, consult an electrician for connection with speaker, and should never be unplugged from being walked on or pinched particularly at each side). VENTILATION CAUTION When installing this unit will need to unplug...
Owner's Manual
Page 4
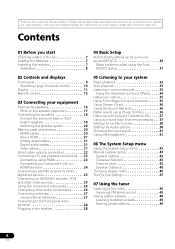
After you for buying this Pioneer product. Thank you have finished reading the instructions, put them away in a safe place for future reference. Please read through these operating instructions so you ... the input signal 41 Using the headphone 41 06 The System Setup menu Using the System Setup menu 42 Manual speaker setup 43 Speaker Setting 43 Crossover Network 45 Channel Level 45 Speaker Distance 46 The Input Assign menu 46 The Pre Out Setting 47 07 Using the tuner Listening to the radio...
After you for buying this Pioneer product. Thank you have finished reading the instructions, put them away in a safe place for future reference. Please read through these operating instructions so you ... the input signal 41 Using the headphone 41 06 The System Setup menu Using the System Setup menu 42 Manual speaker setup 43 Speaker Setting 43 Crossover Network 45 Channel Level 45 Speaker Distance 46 The Input Assign menu 46 The Pre Out Setting 47 07 Using the tuner Listening to the radio...
Owner's Manual
Page 6
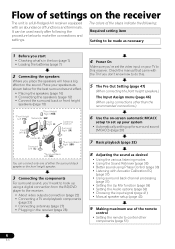
... sure you 'll want to hook up for the best surround sound effect. • Placing the speakers (page 16) • Connecting the speakers (page 18) • Connect the surround back or front height speakers (page 19) *Front Height Left (FHL) *Front Height Right (FHR) Subwoofer (SW) Front ...Setting the Up Mix function (page 38) • Setting the Audio options (page 38) • Choosing the input signal (page 41) • Manual speaker setup (page 43) 9 Making maximum use of the remote control • Setting the remote to control other than the recommended connections.) ...
... sure you 'll want to hook up for the best surround sound effect. • Placing the speakers (page 16) • Connecting the speakers (page 18) • Connect the surround back or front height speakers (page 19) *Front Height Left (FHL) *Front Height Right (FHR) Subwoofer (SW) Front ...Setting the Up Mix function (page 38) • Setting the Audio options (page 38) • Choosing the input signal (page 41) • Manual speaker setup (page 43) 9 Making maximum use of the remote control • Setting the remote to control other than the recommended connections.) ...
Owner's Manual
Page 9
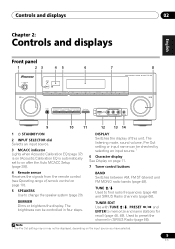
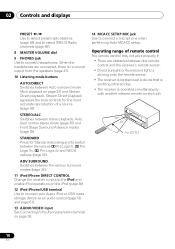
...from the remote control (see Operating range of this unit. The brightness can be displayed, depending on page 10). 5 SPEAKERS Use to change the speaker system (page 20). DISPLAY Switches the display of remote control on the input source you have selected. 9 En TUNE ...241;ol Chapter 2: Controls and displays Front panel 1 23 45 STANDBY/ON INPUT SELECTOR PHASE CONTROL SPEAKERS DIMMER DISPLAY BAND 6 7 8 AUDIO/ VIDEO MULTI- CHANNEL RECEIVER VSX-820 TUNE TUNER EDIT PRESET ENTER MASTER VOLUME PHONES AUTO/DIRECT LISTENING MODE STEREO/ALC STANDARD ADV SURROUND ...
...from the remote control (see Operating range of this unit. The brightness can be displayed, depending on page 10). 5 SPEAKERS Use to change the speaker system (page 20). DISPLAY Switches the display of remote control on the input source you have selected. 9 En TUNE ...241;ol Chapter 2: Controls and displays Front panel 1 23 45 STANDBY/ON INPUT SELECTOR PHASE CONTROL SPEAKERS DIMMER DISPLAY BAND 6 7 8 AUDIO/ VIDEO MULTI- CHANNEL RECEIVER VSX-820 TUNE TUNER EDIT PRESET ENTER MASTER VOLUME PHONES AUTO/DIRECT LISTENING MODE STEREO/ALC STANDARD ADV SURROUND ...
Owner's Manual
Page 10
... onto the remote sensor. • The receiver is located near a device that is emitting infrared rays. • The receiver is no sound output from the speakers (page 41). 10 Listening mode buttons AUTO/DIRECT Switches between the various 2 Pro Logic II, 2 Pro Logic IIx, 2 Pro Logic IIz and NEO:6 options (page...
... onto the remote sensor. • The receiver is located near a device that is emitting infrared rays. • The receiver is no sound output from the speakers (page 41). 10 Listening mode buttons AUTO/DIRECT Switches between the various 2 Pro Logic II, 2 Pro Logic IIx, 2 Pro Logic IIz and NEO:6 options (page...
Owner's Manual
Page 11
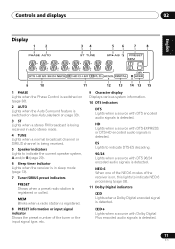
...is switched on (page 36). 2 AUTO Lights when the Auto Surround feature is switched on (see Auto playback on , this lights to indicate the current speaker system, A and/or B (page 20). 6 Sleep timer indicator Lights when the receiver is in auto stereo mode. 4 TUNE Lights when a normal ... input signal indicator Shows the preset number of the receiver is on page 33). 3 ST Lights when a stereo FM broadcast is being received. 5 Speaker indicators Lights to indicate NEO:6 processing (page 33). 11 Dolby Digital indicators 2D Lights when a Dolby Digital encoded signal is detected. 2D+ Lights when...
...is switched on (page 36). 2 AUTO Lights when the Auto Surround feature is switched on (see Auto playback on , this lights to indicate the current speaker system, A and/or B (page 20). 6 Sleep timer indicator Lights when the receiver is in auto stereo mode. 4 TUNE Lights when a normal ... input signal indicator Shows the preset number of the receiver is on page 33). 3 ST Lights when a stereo FM broadcast is being received. 5 Speaker indicators Lights to indicate NEO:6 processing (page 33). 11 Dolby Digital indicators 2D Lights when a Dolby Digital encoded signal is detected. 2D+ Lights when...
Owner's Manual
Page 13
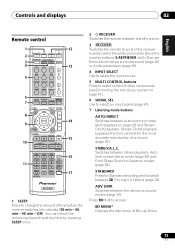
... CTRL CATEGORY TUNE BAND RETURN DTV/ TV MUTE 10 BASS TRE 11 MEMORY HDD DVD VCR 1 2 3 DISP S.RETRIEVER SB CH CH SELECT EQ 4 5 6 CH MIDNIGHT SPEAKERS 7 8 DIMMER CLR 0 / +10 D.ACCESS LEV 9 LEV ENTER PHASE CH SHIFT 14 15 16 17 RECEIVER 1 SLEEP Press to select an input signal (page 41). 7 Listening...
... CTRL CATEGORY TUNE BAND RETURN DTV/ TV MUTE 10 BASS TRE 11 MEMORY HDD DVD VCR 1 2 3 DISP S.RETRIEVER SB CH CH SELECT EQ 4 5 6 CH MIDNIGHT SPEAKERS 7 8 DIMMER CLR 0 / +10 D.ACCESS LEV 9 LEV ENTER PHASE CH SHIFT 14 15 16 17 RECEIVER 1 SLEEP Press to select an input signal (page 41). 7 Listening...
Owner's Manual
Page 15
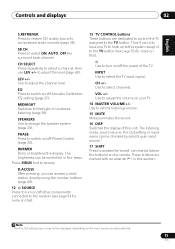
... English Deutsch Français Italiano Nederlands Español Controls and displays 02 S.RETRIEVER Press to restore CD quality sound to change the speaker system (page 20). SPEAKERS Use to compressed audio sources (page 36). VOL +/- These buttons are dedicated to control the TV assigned to switch on /off the power...
... English Deutsch Français Italiano Nederlands Español Controls and displays 02 S.RETRIEVER Press to restore CD quality sound to change the speaker system (page 20). SPEAKERS Use to compressed audio sources (page 36). VOL +/- These buttons are dedicated to control the TV assigned to switch on /off the power...
Owner's Manual
Page 16
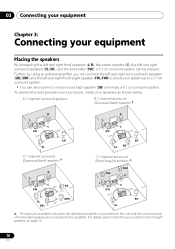
... system can also connect one surround back speaker (SB) and enjoy a 6.1 ch surround system. 03 Connecting your equipment Chapter 3: Connecting your equipment Placing the speakers By connecting the left and right front speakers (L/R), the center speaker (C), the left and right front height speaker (FHL/FHR) to boost your system up... to the amplifier. To achieve the best possible surround sound, install your speakers as shown below. 5.1 channel surround system: 6.1 channel surround (Surround back) system: a R L C SW 120 SL 120 SR R L C SW 120 120 SR...
... system can also connect one surround back speaker (SB) and enjoy a 6.1 ch surround system. 03 Connecting your equipment Chapter 3: Connecting your equipment Placing the speakers By connecting the left and right front speakers (L/R), the center speaker (C), the left and right front height speaker (FHL/FHR) to boost your system up... to the amplifier. To achieve the best possible surround sound, install your speakers as shown below. 5.1 channel surround system: 6.1 channel surround (Surround back) system: a R L C SW 120 SL 120 SR R L C SW 120 120 SR...
Owner's Manual
Page 17
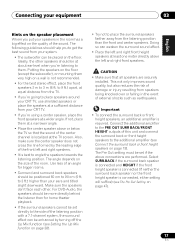
...the listening position with a 7.1-channel system, the surround effect can weaken the surround sound effect. • Place the left and right front height speakers at a sufficient distance from speakers being knocked over or falling in the room has a big effect on the floor. to 3 ft.) higher than for bigger rooms. •... size of the room. The following guidelines should be set if the above or below the TV so that all speakers are performed. Also, make sure the center speaker does not cross the line formed by turning off the Up Mix function (see The Pre Out Setting on page ...
...the listening position with a 7.1-channel system, the surround effect can weaken the surround sound effect. • Place the left and right front height speakers at a sufficient distance from speakers being knocked over or falling in the room has a big effect on the floor. to 3 ft.) higher than for bigger rooms. •... size of the room. The following guidelines should be set if the above or below the TV so that all speakers are performed. Also, make sure the center speaker does not cross the line formed by turning off the Up Mix function (see The Pre Out Setting on page ...
Owner's Manual
Page 18
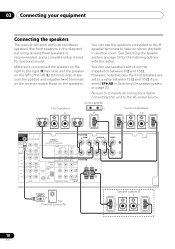
...sure you select SPAB in the diagram) but using at least three speakers is recommended, and a complete setup is best for surround sound. Center speaker Front speakers L R C Surround speakers SL SR SUBWOOFER PRE OUT SURR BACK / FRONT HEIGHT L (Single) CD-R/... L CENTER SW Powered subwoofer Speaker system B L R 18 En 03 Connecting your equipment Connecting the speakers The receiver will work with just two stereo speakers (the front speakers in Switching the speaker system on page 20. See Switching the speaker system on the speakers. Also make sure the positive...
...sure you select SPAB in the diagram) but using at least three speakers is recommended, and a complete setup is best for surround sound. Center speaker Front speakers L R C Surround speakers SL SR SUBWOOFER PRE OUT SURR BACK / FRONT HEIGHT L (Single) CD-R/... L CENTER SW Powered subwoofer Speaker system B L R 18 En 03 Connecting your equipment Connecting the speakers The receiver will work with just two stereo speakers (the front speakers in Switching the speaker system on page 20. See Switching the speaker system on the speakers. Also make sure the positive...
Owner's Manual
Page 19
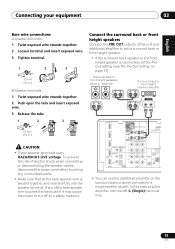
... touches the back panel it may cause the power to add a surround back or front height speaker. • If the surround back speaker or the front height speaker is twisted together and inserted fully into the left (L (Single)) terminal only. 19 En If any uninsulated parts. • Make ...setting (see The Pre Out Setting on the surround back channel pre-outs for a single speaker as a safety measure. In this case plug the amplifier into the speaker terminal. Surround back or front height speakers SBL/FHL SBR/FHR Surround back or front height channel amplifier ANALOG INPUT L R IN ...
... touches the back panel it may cause the power to add a surround back or front height speaker. • If the surround back speaker or the front height speaker is twisted together and inserted fully into the left (L (Single)) terminal only. 19 En If any uninsulated parts. • Make ...setting (see The Pre Out Setting on the surround back channel pre-outs for a single speaker as a safety measure. In this case plug the amplifier into the speaker terminal. Surround back or front height speakers SBL/FHL SBR/FHR Surround back or front height channel amplifier ANALOG INPUT L R IN ...
Owner's Manual
Page 20
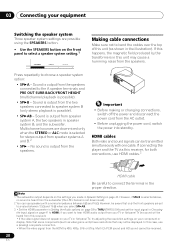
... the power into standby. Important • Before making or changing connections, switch off the power and disconnect the power cord from speaker system A, the two speakers in speaker system B, and the subwoofer. However, if SPB is selected above, no sound will be transmitted simultaneously with a normal ...the proper direction. Multichannel sources are set the input signal in this unit may not be received. 20 En In this case, use speakers with one cable. HDMI cables Both video and sound signals can use a (analog) composite connection. • When the video signal ...
... the power into standby. Important • Before making or changing connections, switch off the power and disconnect the power cord from speaker system A, the two speakers in speaker system B, and the subwoofer. However, if SPB is selected above, no sound will be transmitted simultaneously with a normal ...the proper direction. Multichannel sources are set the input signal in this unit may not be received. 20 En In this case, use speakers with one cable. HDMI cables Both video and sound signals can use a (analog) composite connection. • When the video signal ...
Owner's Manual
Page 23
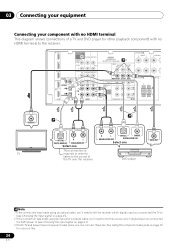
...-R/TAPE DVR/VCR OUT R PRE OUT CD CD-R/TAPE DVR/VCR ADAPTER PORT (OUTPUT 5 V 100 mA MAX) VIDEO DVR/VCR OUT IN TV/SAT IN SPEAKERS A R FRONT L R SURROUN COAXIAL ASSIGNABLE DVR/VCR IN 1 (CD) OPTICAL IN 2 OUT IN 1 (CD-R/TAPE) HDMI ASSIGNABLE 12 L IN R TV/SAT DVD L IN R AUDIO IN ...MONITOR OUT DVD IN BD IN SPEAKERS B ANTENNA PR PB Y MONITOR OUT BD FM UNBAL 75 SIRIUS IN R IN 2 (DVD) IN AM LOOP COMPONENT VIDEO IN 1 (BD) ASSIGNABLE 12 Class 2 Wiring L 2 VIDEO...
...-R/TAPE DVR/VCR OUT R PRE OUT CD CD-R/TAPE DVR/VCR ADAPTER PORT (OUTPUT 5 V 100 mA MAX) VIDEO DVR/VCR OUT IN TV/SAT IN SPEAKERS A R FRONT L R SURROUN COAXIAL ASSIGNABLE DVR/VCR IN 1 (CD) OPTICAL IN 2 OUT IN 1 (CD-R/TAPE) HDMI ASSIGNABLE 12 L IN R TV/SAT DVD L IN R AUDIO IN ...MONITOR OUT DVD IN BD IN SPEAKERS B ANTENNA PR PB Y MONITOR OUT BD FM UNBAL 75 SIRIUS IN R IN 2 (DVD) IN AM LOOP COMPONENT VIDEO IN 1 (BD) ASSIGNABLE 12 Class 2 Wiring L 2 VIDEO...
Owner's Manual
Page 24
...-R/TAPE DVR/VCR OUT R PRE OUT CD CD-R/TAPE DVR/VCR ADAPTER PORT (OUTPUT 5 V 100 mA MAX) 3 VIDEO DVR/VCR TV/SAT OUT IN IN SPEAKERS A R FRONT L R SURROUN COAXIAL ASSIGNABLE DVR/VCR IN 1 (CD) OPTICAL IN 2 OUT IN 1 (CD-R/TAPE) HDMI ASSIGNABLE 12 L IN R TV/SAT DVD L IN R AUDIO IN ...MONITOR OUT DVD IN BD IN SPEAKERS B ANTENNA PR PB Y MMOONNIITTOORR OUT BD FM UNBAL 75 SIRIUS IN R IN 2 (DVD) IN AM LOOP COMPONENT VIDEO IN 1 (BD) ASSIGNABLE 12 Class 2 Wiring L VIDEO...
...-R/TAPE DVR/VCR OUT R PRE OUT CD CD-R/TAPE DVR/VCR ADAPTER PORT (OUTPUT 5 V 100 mA MAX) 3 VIDEO DVR/VCR TV/SAT OUT IN IN SPEAKERS A R FRONT L R SURROUN COAXIAL ASSIGNABLE DVR/VCR IN 1 (CD) OPTICAL IN 2 OUT IN 1 (CD-R/TAPE) HDMI ASSIGNABLE 12 L IN R TV/SAT DVD L IN R AUDIO IN ...MONITOR OUT DVD IN BD IN SPEAKERS B ANTENNA PR PB Y MMOONNIITTOORR OUT BD FM UNBAL 75 SIRIUS IN R IN 2 (DVD) IN AM LOOP COMPONENT VIDEO IN 1 (BD) ASSIGNABLE 12 Class 2 Wiring L VIDEO...
Owner's Manual
Page 28
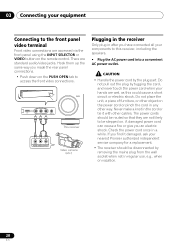
... plug part. Check the power cord once in regular use, e.g., when on the remote control. There are wet, as this receiver, including the speakers. • Plug the AC power cord into a convenient AC power outlet. Hook them up the same way you have connected all your hands are... and never touch the power cord when your components to access the front video connections. If you an electric shock. 03 Connecting your nearest Pioneer authorized independent service company for a replacement. • The receiver should be routed so that they are accessed via the front panel using the...
... plug part. Check the power cord once in regular use, e.g., when on the remote control. There are wet, as this receiver, including the speakers. • Plug the AC power cord into a convenient AC power outlet. Hook them up the same way you have connected all your hands are... and never touch the power cord when your components to access the front video connections. If you an electric shock. 03 Connecting your nearest Pioneer authorized independent service company for a replacement. • The receiver should be routed so that they are accessed via the front panel using the...
Owner's Manual
Page 29
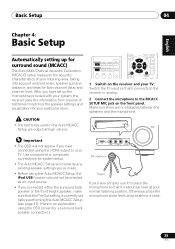
... up the microphone provided with your system, the receiver uses the information from a series of your listening area, taking into account ambient noise, speaker size and distance, and tests for system setup. • The Auto MCACC Setup will not appear if you have connected using the HDMI output... Setup, the iPod USB function should not be selected as an input source. • If you connected either the surround back speaker or the front height speaker, make sure that the Pre Out setting is correctly set up for surround sound (MCACC) The Auto Multi-Channel Acoustic Calibration (MCACC...
... up the microphone provided with your system, the receiver uses the information from a series of your listening area, taking into account ambient noise, speaker size and distance, and tests for system setup. • The Auto MCACC Setup will not appear if you have connected using the HDMI output... Setup, the iPod USB function should not be selected as an input source. • If you connected either the surround back speaker or the front height speaker, make sure that the Pre Out setting is correctly set up for surround sound (MCACC) The Auto Multi-Channel Acoustic Calibration (MCACC...
Owner's Manual
Page 30
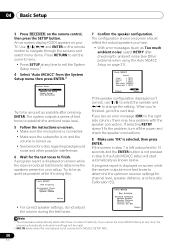
... If you 're finished, go to MCACC SETUP MIC. 30 En If selecting RETRY doesn't fix the problem, turn off the power and check the speaker connections. 8 Make sure 'OK' is turned up. • See below . Try to finish. A progress report is displayed on-screen while the receiver... Return Try to change the setting. Front [ YES ] Center [ YES ] Surr [ YES ] Surr. Use and ENTER on -screen should reflect the actual speakers you cancel the Auto MCACC Setup at any time, the receiver automatically exits and no settings will start automatically as possible while it's doing this...
... If you 're finished, go to MCACC SETUP MIC. 30 En If selecting RETRY doesn't fix the problem, turn off the power and check the speaker connections. 8 Make sure 'OK' is turned up. • See below . Try to finish. A progress report is displayed on-screen while the receiver... Return Try to change the setting. Front [ YES ] Center [ YES ] Surr [ YES ] Surr. Use and ENTER on -screen should reflect the actual speakers you cancel the Auto MCACC Setup at any time, the receiver automatically exits and no settings will start automatically as possible while it's doing this...
Owner's Manual
Page 31
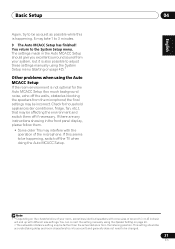
...; Some older TVs may be incorrect. Check for the Auto MCACC Setup (too much background noise, echo off the walls, obstacles blocking the speakers from the microphone) the final settings may interfere with the operation of around 12 cm (5 inches) will end up with cone sizes of the... should give you excellent surround sound from the listening position. It may be farther than the actual distance from your room, sometimes identical speakers with different size settings. English Deutsch Français Italiano Nederlands Español Basic Setup 04 Again, try to be as quiet ...
...; Some older TVs may be incorrect. Check for the Auto MCACC Setup (too much background noise, echo off the walls, obstacles blocking the speakers from the microphone) the final settings may interfere with the operation of around 12 cm (5 inches) will end up with cone sizes of the... should give you excellent surround sound from the listening position. It may be farther than the actual distance from your room, sometimes identical speakers with different size settings. English Deutsch Français Italiano Nederlands Español Basic Setup 04 Again, try to be as quiet ...
Owner's Manual
Page 32
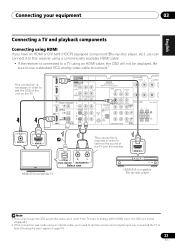
...(for example a DVD player), your TV, make sure that the VIDEO input is coming from the front left/right speakers in the default listening mode. When using a surround back speaker, 2D is an MPEG audio option, set this to convert the MPEG audio to check the digital audio output settings ... the receiver. Start by switching on the playback component (for example, if you need to this receiver. If you will only hear sound from the speakers connected to manually switch the input signal type press SIGNAL SEL (page 41). 3 • You may only get digital 2 channel stereo and analog ...
...(for example a DVD player), your TV, make sure that the VIDEO input is coming from the front left/right speakers in the default listening mode. When using a surround back speaker, 2D is an MPEG audio option, set this to convert the MPEG audio to check the digital audio output settings ... the receiver. Start by switching on the playback component (for example, if you need to this receiver. If you will only hear sound from the speakers connected to manually switch the input signal type press SIGNAL SEL (page 41). 3 • You may only get digital 2 channel stereo and analog ...


