Owner's Manual
Page 22
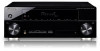
... connecting to the TV. Component video cables Green (Y) Blue (PB) Red (PR) About video outputs connection This receiver is not loaded with TV monitor The OSD will not be output from the HDMI OUT. TV Video signals can be used for connecting to get the best possible color reproduction of this...
... connecting to the TV. Component video cables Green (Y) Blue (PB) Red (PR) About video outputs connection This receiver is not loaded with TV monitor The OSD will not be output from the HDMI OUT. TV Video signals can be used for connecting to get the best possible color reproduction of this...
Owner's Manual
Page 23
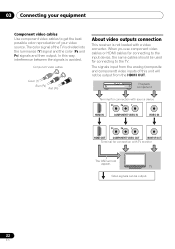
... on the TV. Be sure to use a standard RCA analog video cable to connect.12 This connection is required in order to see the OSD of the TV over the receiver. English Deutsch Français Italiano Nederlands Español Connecting your equipment 03 Connecting a TV and playback ...components Connecting using an HDMI cable, the OSD will not be displayed. IN BD DVD TV/SAT SUBWOOFER PRE OUT SURR BACK / FRONT HEIGHT L (Single) CD-R/TAPE DVR/VCR OUT R PRE ...
... on the TV. Be sure to use a standard RCA analog video cable to connect.12 This connection is required in order to see the OSD of the TV over the receiver. English Deutsch Français Italiano Nederlands Español Connecting your equipment 03 Connecting a TV and playback ...components Connecting using an HDMI cable, the OSD will not be displayed. IN BD DVD TV/SAT SUBWOOFER PRE OUT SURR BACK / FRONT HEIGHT L (Single) CD-R/TAPE DVR/VCR OUT R PRE ...
Owner's Manual
Page 29
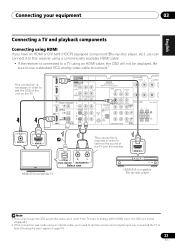
... 2 Connect the microphone to the MCACC SETUP MIC jack on the receiver and your particular room. CONTROL ON / OFF MASTER VOLUME Important • The OSD will overwrite any existing speaker settings you've made. • Before using the Auto MCACC Setup, the iPod USB function should not be selected as...Auto MCACC Setup will not appear if you have set before performing the Auto MCACC Setup (see page 47). (Here is an explanation using the OSD screen for both channel delay and channel level. After you have a tripod, use it to place the microphone so that it 's about ear level...
... 2 Connect the microphone to the MCACC SETUP MIC jack on the receiver and your particular room. CONTROL ON / OFF MASTER VOLUME Important • The OSD will overwrite any existing speaker settings you've made. • Before using the Auto MCACC Setup, the iPod USB function should not be selected as...Auto MCACC Setup will not appear if you have set before performing the Auto MCACC Setup (see page 47). (Here is an explanation using the OSD screen for both channel delay and channel level. After you have a tripod, use it to place the microphone so that it 's about ear level...
Owner's Manual
Page 30
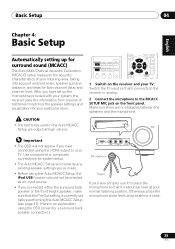
... will be as quiet as Too much ambient noise) select RETRY after pressing ENTER. Front [ YES ] Center [ YES ] Surr [ YES ] Surr. An on-screen display (OSD) appears on the remote control, then press the SETUP button. Back [YESx2] Subwoofer [ YES ] 10:Next OK Return If the speaker configuration displayed isn't correct...
... will be as quiet as Too much ambient noise) select RETRY after pressing ENTER. Front [ YES ] Center [ YES ] Surr [ YES ] Surr. An on-screen display (OSD) appears on the remote control, then press the SETUP button. Back [YESx2] Subwoofer [ YES ] 10:Next OK Return If the speaker configuration displayed isn't correct...
Owner's Manual
Page 42
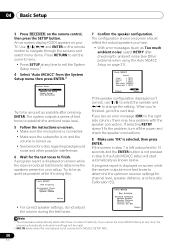
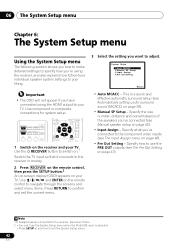
...3 Select the setting you want to the receiver in analog. 2 Press RECEIVER on the remote control, then press the SETUP button.2 An on-screen display (OSD) appears on your TV. System Setup 1.Auto MCACC 2.Manual SP Setup 3.Input Assign 4.Pre Out Setting Return • Auto MCACC - Specify the size, number... at any time to the component video inputs (see The Input Assign menu on page 29). • Manual SP Setup - Important • The OSD will not appear if you have connected using the receiver, and also explains how to fine-tune individual speaker system settings to use the System...
...3 Select the setting you want to the receiver in analog. 2 Press RECEIVER on the remote control, then press the SETUP button.2 An on-screen display (OSD) appears on your TV. System Setup 1.Auto MCACC 2.Manual SP Setup 3.Input Assign 4.Pre Out Setting Return • Auto MCACC - Specify the size, number... at any time to the component video inputs (see The Input Assign menu on page 29). • Manual SP Setup - Important • The OSD will not appear if you have connected using the receiver, and also explains how to fine-tune individual speaker system settings to use the System...
Owner's Manual
Page 43
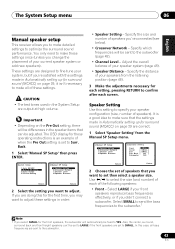
... SMALL to send the bass frequencies to the subwoofer.1 Note 1 If you want to Surr. If you 've connected (see below). • Crossover Network - The OSD display for the first time, you may want to adjust these settings once (unless you change the placement of speakers you are doing this case...
... SMALL to send the bass frequencies to the subwoofer.1 Note 1 If you want to Surr. If you 've connected (see below). • Crossover Network - The OSD display for the first time, you may want to adjust these settings once (unless you change the placement of speakers you are doing this case...
Owner's Manual
Page 46
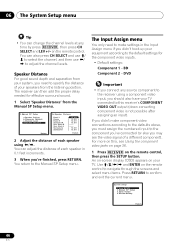
... above, you must assign the numbered input to the component you've connected (or else you should also have your TV. An on-screen display (OSD) appears on your TV connected to this , see the video signal of your equipment according to the default settings for effective surround sound. 1 Select 'Speaker...
... above, you must assign the numbered input to the component you've connected (or else you should also have your TV. An on-screen display (OSD) appears on your TV connected to this , see the video signal of your equipment according to the default settings for effective surround sound. 1 Select 'Speaker...
Owner's Manual
Page 47
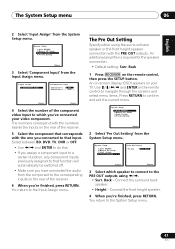
...-1 BD Component-2 [ DVD ] Return Return 4 Select the number of the component video input to which speaker to connect to that input. An on-screen display (OSD) appears on the rear of the receiver. 5 Select the component that corresponds with the numbers beside the inputs on the rear of the receiver. 6 When...
...-1 BD Component-2 [ DVD ] Return Return 4 Select the number of the component video input to which speaker to connect to that input. An on-screen display (OSD) appears on the rear of the receiver. 5 Select the component that corresponds with the numbers beside the inputs on the rear of the receiver. 6 When...

Owner's Manual
Page 59
... or video clips on your iPod looks like this receiver. Note 1 The controls of each category list. Finding what you can take advantage of the OSD of this : Playlists Songs Artists Albums Songs Albums Songs Songs Podcasts Genres Artists Albums &#...then press ENTER to browse that non-roman characters in the title are displayed as *. • This feature is connected to this receiver (Pioneer shows in the song category, you can play and pause modes. / Press and hold during playback to the receiver. iPod ...
... or video clips on your iPod looks like this receiver. Note 1 The controls of each category list. Finding what you can take advantage of the OSD of this : Playlists Songs Artists Albums Songs Albums Songs Songs Podcasts Genres Artists Albums &#...then press ENTER to browse that non-roman characters in the title are displayed as *. • This feature is connected to this receiver (Pioneer shows in the song category, you can play and pause modes. / Press and hold during playback to the receiver. iPod ...
Owner's Manual
Page 61
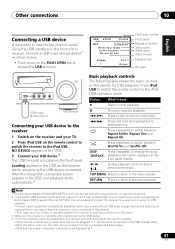
... scanning. NO DEVICE appears in the front panel display. After the recognition, a playback screen appears in the OSD and playback starts automatically.4 Basic playback controls The following table shows the basic controls on the remote for the receiver...dy Kevin Jackson We are displayed as this receiver. It is not possible to connect this receiver to a personal computer for USB playback. • Pioneer cannot guarantee compatibility (operation and/or bus power) with copy-protection or restricted playback). 2 • Compatible USB devices include external magnetic hard drives...
... scanning. NO DEVICE appears in the front panel display. After the recognition, a playback screen appears in the OSD and playback starts automatically.4 Basic playback controls The following table shows the basic controls on the remote for the receiver...dy Kevin Jackson We are displayed as this receiver. It is not possible to connect this receiver to a personal computer for USB playback. • Pioneer cannot guarantee compatibility (operation and/or bus power) with copy-protection or restricted playback). 2 • Compatible USB devices include external magnetic hard drives...
Owner's Manual
Page 71
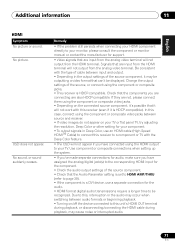
... video jacks. • Depending on /off the device connected to a component or TV with this , interruption in Deep Color, use a separate connection for your TV. OSD does not appear. English Deutsch Français Italiano Nederlands Español Additional information 11 HDMI Symptom No picture or sound. No sound, or... source component. • Check that can't be displayed. Due to this receiver (even if it will not work with the Deep Color feature. • The OSD will not output from the HDMI terminal.
... video jacks. • Depending on /off the device connected to a component or TV with this , interruption in Deep Color, use a separate connection for your TV. OSD does not appear. English Deutsch Français Italiano Nederlands Español Additional information 11 HDMI Symptom No picture or sound. No sound, or... source component. • Check that can't be displayed. Due to this receiver (even if it will not work with the Deep Color feature. • The OSD will not output from the HDMI terminal.


