Pioneer VSX-521-K Support Question
Pioneer VSX-521-K Support Question
Find answers below for this question about Pioneer VSX-521-K.Need a Pioneer VSX-521-K manual? We have 1 online manual for this item!
Question posted by tremDBIB on December 26th, 2013
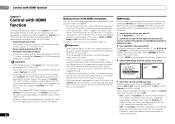
Pioneer Vsx 521 Cannot See Osd For Setup
The person who posted this question about this Pioneer product did not include a detailed explanation. Please use the "Request More Information" button to the right if more details would help you to answer this question.
Current Answers
Related Pioneer VSX-521-K Manual Pages
Owner's Manual - Page 1
...-CHANNEL RECEIVER RECEPTEUR AUDIOVISUEL A VOIES MULTI-CANAUX RECEPTOR AUDIO-VIDEO MULTICANAL
VSX-521-K
Register your product on
http://www.pioneerelectronics.com (... development
Your input helps us continue to design products that meet your needs.
• Receive a free Pioneer newsletter
Registered customers can opt in to receive a monthly newsletter. http://www.pioneerelectronics.com (US) http://...
Owner's Manual - Page 4
... Using the component video jacks 16 Connecting other audio components 17 Connecting optional Bluetooth® ADAPTER 17 Connecting antennas 17 Using external antennas 18 Connecting to the front panel audio mini jack 18 Plugging in the receiver 18
4
En
03 Basic Setup
Canceling the ...Choosing the listening mode 25 Auto playback 25 Listening in a safe place for buying this Pioneer product.
Owner's Manual - Page 5
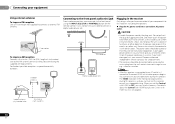
...Connecting the speakers (page 11)
2 Connecting the components
For surround sound, you 've received the following supplied accessories:
• Setup microphone • Remote control • AAA size IEC R03... sound (MCACC) (page 19)
6 Playing a source (page 21)
• Selecting the audio input signal (page 21) • Choosing the listening mode (page 25)
7 Adjusting the...
Owner's Manual - Page 6
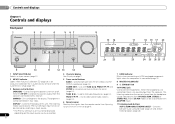
CHANNEL RECEIVER VSX-521
HDMI
INPUT SELECTOR
STANDBY /ON
SPEAKERS
DIMMER
DISPLAY
BAND
TUNER EDIT
TUNE
PRESET
AUTO SURROUND/
ALC/
STREAM DIRECT STANDARD SURR
ADVANCED SURROUND
SOUND RETRIEVER AIR
SOUND RETRIEVER
ENTER
PHONES
PORTABLE / MCACC SETUP MIC
MASTER VOLUME
15 16
21
22
17
18 19 17 20
23
24 25 26 25 27...
Owner's Manual - Page 7
...13 SOUND RETRIEVER Press to restore CD quality sound to compressed audio sources (page 26).
14 PORTABLE/MCACC SETUP MIC jack Use to switch between the various surround modes (...audio signals is being received in surround sound on page 25 for standard decoding and to connect an auxiliary component using a stereo minijack cable (page 18) or connect a microphone when performing Auto MCACC setup...
Owner's Manual - Page 8
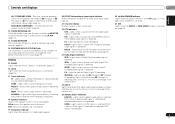
...BDR and CD). Displays the disc menu of Blu-ray Discs.
8 System Setup and component control buttons The following button controls can be accessed after you have selected it...CH SHIFT
17 18
RECEIVER
8
En
As for operating other Pioneer components with the remote control.
6 S.RETRIEVER Press to restore CD quality sound to compressed audio sources (page 26).
7 Listening mode buttons AUTO/DIRECT ...
Owner's Manual - Page 9
...setup) and the Crossover Network is set the listening volume.
16 MUTE Mutes/unmutes the sound.
17 DISP Switches the display of the component... to directly select a radio frequency (page 24) or the tracks on a CD, etc.
Use to adjust the channel level.
14 SIGNAL SEL Press to select the audio...8226; The receiver is operated simultaneously with Pioneer TVs.
- Switches to select...
Owner's Manual - Page 11
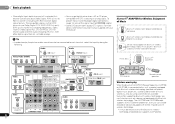
...
CENTER
IN 2 (DVR/ BDR)
L
IN
IN
MONITOR OUT Y
PB
PR
COMPONENT VIDEO
TV/SAT BD
R DVD
SUBWOOFER PRE OUT Class 2 Wiring
SPEAKERS A
SURROUND...; These speaker terminals carry HAZARDOUS LIVE voltage. R ANALOG L AUDIO IN
R SPEAKER
Surround back or front height
channel amplifier
L ...least three speakers is recommended, and a complete setup is twisted together and inserted fully into the ...
Owner's Manual - Page 13
... Yellow
VIDEO
Component video cables Use component video cables to get the best possible color reproduction of the TV is not loaded with TV monitor
MONITOR OUT
VIDEO
The OSD will not ... analog audio components.
TV
Video signals can also use component video cables or HDMI cables for connecting to the input device, the same cables should be used to connect digital components to ...
Owner's Manual - Page 14
...case, switch the TV input to analog to see the OSD screen (for setup, etc.) on the TV.
• When the Control... IN 1
IN 1
ASSIGNABLE
IN OPTICAL
2
ASSIGNABLE
VIDEO
(CD)
AUDIO
SURR BACK/
DVR/BDR CD-R/TAPE FRONT HEIGHT
(TV/SAT) ... L
R
CEN
IN 2 (DVR/ BDR)
L
IN
IN
MONITOR OUT Y
PB
PR
COMPONENT VIDEO
TV/SAT BD
R SUBWOOFER
DVD PRE OUT Class 2 Wiring
SPEAKERS A
HDMI/DVI-compatible...
Owner's Manual - Page 17
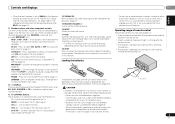
... ADAPTER connected. Connecting optional Bluetooth® ADAPTER
When the Bluetooth ADAPTER (Pioneer Model No. a) then clip the loop onto the stand (fig. Follow the steps below to connect a CD-R, MD, DAT, tape recorder or other audio components
The number and kind of component you want to record to/from the CD player that is...
Owner's Manual - Page 18
...SETUP MIC
This receiver
AUDIO OUT
Digital audio... player, etc. CAUTION
• Handle the power cord by removing the mains plug from the wall socket when not in any operations during this process, and you find it with other way. Do not pull out the plug by tugging the cord, and never touch the power cord when your components...Connecting your nearest Pioneer authorized independent ...
Owner's Manual - Page 19

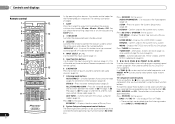
... a chair.
4 Press RECEIVER on the remote control to navigate through the corresponding composite or component cable.
3 Connect the microphone to place the microphone so that the Pre Out setting is ... menu items. Press RETURN to exit the current menu.
• Press SETUP at ear level using the OSD screen for a surround back speaker connection.)
RECEIVER SLEEP
TV SOURCE CONTROL
PARAMETER...
Owner's Manual - Page 21
...sound is coming from this to convert the MPEG audio to the input that the VIDEO input is selected for example a DVD player), your system components and receiver. H can be heard through the following...the selected audio input is not provided, A (analog) is fixed to check on the playback component (for O1 or O2. Start by
using the remote control. However, if the ARC at HDMI Setup is ...
Owner's Manual - Page 22
...technology (portable cell phone, digital music player, etc.) can only play
When the Bluetooth ADAPTER (Pioneer Model No. AS-BT100 or AS-BT200) is connected to music wirelessly.
Other than CD-R input...
IN 2
(DVR/
BDR)
IN
R
Audio
L
DVR/BDR CD-R CD
IN
SIGNAL SEL
R
TV
BD DVD
A
MONITOR OUT Y
PB
PR TV/SAT BD DVD
COMPONENT VIDEO
22
En
This receiver
Remote control operation...
Owner's Manual - Page 29
... of the receiver will switch over, and you will be able to operate other audio components on the recorded signal.
• Some video sources are unsure how to do this receiver through an HDMI cable, component video cable or digital audio cable (see page 21 for more details about the lip-sync feature of...
Owner's Manual - Page 34
... the TV's input is turned off , audio and video of sources connected via the HDMI terminal, so there is no need to ON (see HDMI Setup below with a Control with HDMIcompatible Pioneer TV or Blu-ray Disc player or with a component of another make use this function with components that do not guarantee that all...
Owner's Manual - Page 35

...components into standby mode. 2 Turn the power on for all components, with the power
for a component connected to the receiver by HDMI connection is set audio to the synchronized amp mode.
-
See the Pioneer website for a component... performed from connected components displays properly on the screen or not.
4 Check whether the components connected to the System Setup menu.
The TV...
Owner's Manual - Page 36
...farther away from your system again using the Auto MCACC setup, the speaker size setting
(LARGE or SMALL) is...component is connected correctly (refer to
Connecting your subwoofer, set up the volume. Press MUTE on page 10). Check the audio...the subwoofer output). If the message persists, call a Pioneer authorized independent service company. The power suddenly turns on page...
Owner's Manual - Page 37
...mode supporting the Bluetooth wireless
technology. The OSD screen (System Setup menu, etc.) isn't displayed. The OSD will not work with this , interruption in the audio may occur when switching between them is ...of the unit are input from the analog video terminal
will not output from your component), please try adjusting the resolution, Deep Color or other setting for your TV, ...


