Owner's Manual
Page 4
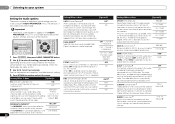
... Using surround back channel processing 27 Setting the Up Mix function 27 Setting the Audio options 28 Making an audio or a video recording 29 06 The System Setup menu Using the System Setup menu 30 Manual speaker setup 30 Speaker Setting 30 Crossover Network 31 Channel Level 31 Speaker Distance 32 The Input Assign menu 32 The Pre Out Setting 33 The Auto Power Down menu 33 The FL Demo Mode menu 33 07 Control with HDMI function Making Control with HDMI connections 34 HDMI Setup 34 Before using synchronization 35 About synchronized operations...
... Using surround back channel processing 27 Setting the Up Mix function 27 Setting the Audio options 28 Making an audio or a video recording 29 06 The System Setup menu Using the System Setup menu 30 Manual speaker setup 30 Speaker Setting 30 Crossover Network 31 Channel Level 31 Speaker Distance 32 The Input Assign menu 32 The Pre Out Setting 33 The Auto Power Down menu 33 The FL Demo Mode menu 33 07 Control with HDMI function Making Control with HDMI connections 34 HDMI Setup 34 Before using synchronization 35 About synchronized operations...
Owner's Manual
Page 5
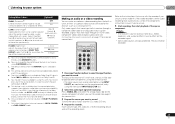
...; Manual speaker setup (page 30) 5 En in damp or wet areas - near a cassette deck (or close to the receiver. • About video outputs connection (page 13) • Connecting a TV and playback components (page 14) • Connecting antennas (page 17) • Plugging in the receiver (page 18) 3 Power On Make sure you 'll want to hook up for surround sound (MCACC) (page 19) 6 Playing a source (page 21) • Selecting the audio input signal...
...; Manual speaker setup (page 30) 5 En in damp or wet areas - near a cassette deck (or close to the receiver. • About video outputs connection (page 13) • Connecting a TV and playback components (page 14) • Connecting antennas (page 17) • Plugging in the receiver (page 18) 3 Power On Make sure you 'll want to hook up for surround sound (MCACC) (page 19) 6 Playing a source (page 21) • Selecting the audio input signal...
Owner's Manual
Page 6
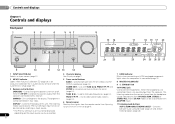
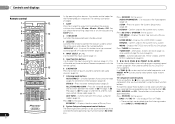
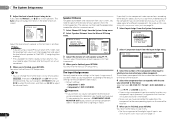
... connect headphones. Switches between AM, FM ST (stereo) and FM MONO radio bands (page 24). Use with ADAPTER input). 11 Listening mode buttons AUTO SURROUND/STREAM DIRECT - Dims or brightens the display. Used to change the speaker system on page 7. 5 Tuner control buttons BAND - TUNER EDIT - PRESET / - CHANNEL RECEIVER VSX-521 HDMI INPUT SELECTOR STANDBY /ON SPEAKERS DIMMER DISPLAY BAND TUNER EDIT TUNE PRESET AUTO SURROUND/ ALC/ STREAM DIRECT STANDARD SURR ADVANCED SURROUND SOUND RETRIEVER AIR SOUND RETRIEVER ENTER PHONES PORTABLE / MCACC SETUP MIC...
... connect headphones. Switches between AM, FM ST (stereo) and FM MONO radio bands (page 24). Use with ADAPTER input). 11 Listening mode buttons AUTO SURROUND/STREAM DIRECT - Dims or brightens the display. Used to change the speaker system on page 7. 5 Tuner control buttons BAND - TUNER EDIT - PRESET / - CHANNEL RECEIVER VSX-521 HDMI INPUT SELECTOR STANDBY /ON SPEAKERS DIMMER DISPLAY BAND TUNER EDIT TUNE PRESET AUTO SURROUND/ ALC/ STREAM DIRECT STANDARD SURR ADVANCED SURROUND SOUND RETRIEVER AIR SOUND RETRIEVER ENTER PHONES PORTABLE / MCACC SETUP MIC...
Owner's Manual
Page 7
... Blinks when an HDMI signal is selected and selected HDMI input is not provided. EX - Light will go off during 2 Pro Logic IIz decoding (see Using the Advanced surround on page 26 for more on this lights to indicate Dolby Digital EX decoding. 2PLII(x) - NEO:6 - Lights when a stereo FM broadcast is automatically set to connect an auxiliary component using a stereo minijack cable (page 18) or connect a microphone when performing Auto MCACC setup (page 19). 20 PRESET information...
... Blinks when an HDMI signal is selected and selected HDMI input is not provided. EX - Light will go off during 2 Pro Logic IIz decoding (see Using the Advanced surround on page 26 for more on this lights to indicate Dolby Digital EX decoding. 2PLII(x) - NEO:6 - Lights when a stereo FM broadcast is automatically set to connect an auxiliary component using a stereo minijack cable (page 18) or connect a microphone when performing Auto MCACC setup (page 19). 20 PRESET information...
Owner's Manual
Page 8
...). 5 Input function buttons Use to select the input source to access: TUNER EDIT - Press RECEIVER first to control a component after you to control other devices, the remote control codes for the Pioneer products are disabled when the listening mode is set up your surround sound system (page 30). Switches between Auto surround mode (page 25) and Stream Direct playback (page 26). Press RECEIVER first to select stereo playback (page 25). RETURN - Confirm and exit the current menu screen. Displays the HOME MENU screen. MENU - Memorizes stations...
...). 5 Input function buttons Use to select the input source to access: TUNER EDIT - Press RECEIVER first to control a component after you to control other devices, the remote control codes for the Pioneer products are disabled when the listening mode is set up your surround sound system (page 30). Switches between Auto surround mode (page 25) and Stream Direct playback (page 26). Press RECEIVER first to select stereo playback (page 25). RETURN - Confirm and exit the current menu screen. Displays the HOME MENU screen. MENU - Memorizes stations...
Owner's Manual
Page 11
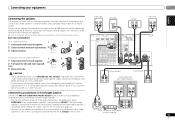
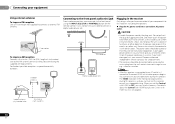
... PR COMPONENT VIDEO TV/SAT BD R DVD SUBWOOFER PRE OUT Class 2 Wiring SPEAKERS A SURROUND RL Surround right Surround left (L (Single)) terminal only. R ANALOG L AUDIO IN R SPEAKER Surround back or front height channel amplifier L SPEAKER 11 En Connecting your equipment 02 English Français Español Connecting the speakers The receiver will suffice) (see The Pre Out Setting on page 33). • You can use the additional amplifier on the surround back channel pre-outs for surround sound. Be...
... PR COMPONENT VIDEO TV/SAT BD R DVD SUBWOOFER PRE OUT Class 2 Wiring SPEAKERS A SURROUND RL Surround right Surround left (L (Single)) terminal only. R ANALOG L AUDIO IN R SPEAKER Surround back or front height channel amplifier L SPEAKER 11 En Connecting your equipment 02 English Français Español Connecting the speakers The receiver will suffice) (see The Pre Out Setting on page 33). • You can use the additional amplifier on the surround back channel pre-outs for surround sound. Be...
Owner's Manual
Page 12
... (no sound will be received. Dolby Digital, Dolby Digital Plus, DTS, High bitrate audio (Dolby TrueHD, DTS-HD Master Audio), DVDAudio, CD, SACD (DSD 2 ch only), Video CD, Super VCD • Synchronized operation with components using the Control with HDMI function (see below through HDMI connections. • Digital transfer of the following digital audio formats: - HDMI Be careful to this , interruption in this case, use HDMI cables. "x.v.Color" and Corporation. Due to 8 channels • Input of uncompressed video (contents protected by the...
... (no sound will be received. Dolby Digital, Dolby Digital Plus, DTS, High bitrate audio (Dolby TrueHD, DTS-HD Master Audio), DVDAudio, CD, SACD (DSD 2 ch only), Video CD, Super VCD • Synchronized operation with components using the Control with HDMI function (see below through HDMI connections. • Digital transfer of the following digital audio formats: - HDMI Be careful to this , interruption in this case, use HDMI cables. "x.v.Color" and Corporation. Due to 8 channels • Input of uncompressed video (contents protected by the...
Owner's Manual
Page 18
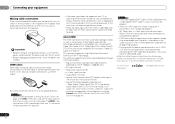
Outdoor antenna ANTENNA AM LOOP Connecting to the front panel audio mini jack Front audio connections are wet, as this process. The power cords should be stepped on the remote control. to 6 m (16 ft. Do not pull out the plug by the plug part. Indoor antenna (vinyl-coated wire) 5 m to 20 ft.) 18 En PRESET ENTER SOUND RETRIEVER MASTER VOLUME PORTABLE / MCACC SETUP MIC This receiver AUDIO OUT Digital audio player, etc. Never make a knot in the cord or tie it...
Outdoor antenna ANTENNA AM LOOP Connecting to the front panel audio mini jack Front audio connections are wet, as this process. The power cords should be stepped on the remote control. to 6 m (16 ft. Do not pull out the plug by the plug part. Indoor antenna (vinyl-coated wire) 5 m to 20 ft.) 18 En PRESET ENTER SOUND RETRIEVER MASTER VOLUME PORTABLE / MCACC SETUP MIC This receiver AUDIO OUT Digital audio player, etc. Never make a knot in the cord or tie it...

Owner's Manual
Page 19
... channel level. You can turn on your TV. System Setup 1.Auto MCACC 2.Manual SP Setup 3.Input Assign 4.Pre Out Setting 5.HDMI Setup 6.Auto Power Down 7.FL Demo Mode Return • MIC IN blinks when the microphone is performed (see The FL Demo Mode menu on the receiver and your TV. Automatically setting up the microphone provided with your normal listening position. The System Setup menu appears on the power to the amplifier to which the surround back or front height speakers are connected...
... channel level. You can turn on your TV. System Setup 1.Auto MCACC 2.Manual SP Setup 3.Input Assign 4.Pre Out Setting 5.HDMI Setup 6.Auto Power Down 7.FL Demo Mode Return • MIC IN blinks when the microphone is performed (see The FL Demo Mode menu on the receiver and your TV. Automatically setting up the microphone provided with your normal listening position. The System Setup menu appears on the power to the amplifier to which the surround back or front height speakers are connected...
Owner's Manual
Page 20
... . • Some older TVs may interfere with the speaker connection. The configuration shown on -screen while the receiver outputs test tones to adjust these settings manually using the Auto MCACC setup below). Check for 10 seconds and ENTER is also possible to determine the speakers present in the front panel display, please follow them off the power and check the speaker connections. 9 Make sure 'OK' is happening. If there...
... . • Some older TVs may interfere with the speaker connection. The configuration shown on -screen while the receiver outputs test tones to adjust these settings manually using the Auto MCACC setup below). Check for 10 seconds and ENTER is also possible to determine the speakers present in the front panel display, please follow them off the power and check the speaker connections. 9 Make sure 'OK' is happening. If there...
Owner's Manual
Page 21
... an analog audio connection, you should be selected by using the remote control. Turn down the volume of the source. Selecting the audio input signal The audio input signal can also be set to PCM. • Depending on your DVD player or source discs, you selected the proper input source and there is fixed to check on the remote control, or by switching on the remote control, then press the appropriate button to the source component. For other components using INPUT SELECT buttons on the front panel display whether or not surround sound playback...
... an analog audio connection, you should be selected by using the remote control. Turn down the volume of the source. Selecting the audio input signal The audio input signal can also be set to PCM. • Depending on your DVD player or source discs, you selected the proper input source and there is fixed to check on the remote control, or by switching on the remote control, then press the appropriate button to the source component. For other components using INPUT SELECT buttons on the front panel display whether or not surround sound playback...
Owner's Manual
Page 26
... for musical sources. AUTO SURROUND See Auto playback on Acoustic Calibration Equalization. PURE DIRECT Analog and PCM sources are available. Refer to NO, DOLBY PLIIx becomes DOLBY PLII (5.1 channel sound). You can listen to the center of dialog. e. Try different modes with various soundtracks to switch the S.RTV (Sound Retriever) ON or OFF. Suitable for video games. Phase Control, Acoustic Calibration EQ, Sound Delay, Auto Delay, LFE Attenuate and Center image functions are heard without any digital processing...
... for musical sources. AUTO SURROUND See Auto playback on Acoustic Calibration Equalization. PURE DIRECT Analog and PCM sources are available. Refer to NO, DOLBY PLIIx becomes DOLBY PLII (5.1 channel sound). You can listen to the center of dialog. e. Try different modes with various soundtracks to switch the S.RTV (Sound Retriever) ON or OFF. Suitable for video games. Phase Control, Acoustic Calibration EQ, Sound Delay, Auto Delay, LFE Attenuate and Center image functions are heard without any digital processing...
Owner's Manual
Page 28
... (lower settings). 0 to 7 Default: 3 DIMEN (Dimension)h Adjusts the surround sound balance from the speakers. See the table below for instance. OFF S.DELAY (Sound Delay) Some monitors have a slight delay when showing video, so the soundtrack will be played. The LOUDNESS is used to get good bass and treble from music sources at low volumes. 28 En M/L OFF MIDNIGHT LOUDNESS Setting/What it does Option(s) LFE ATT (LFE Attenuate) Some Dolby Digital and DTS audio sources include ultra-low bass tones. AMP THRU A.DLY (Auto Delay...
... (lower settings). 0 to 7 Default: 3 DIMEN (Dimension)h Adjusts the surround sound balance from the speakers. See the table below for instance. OFF S.DELAY (Sound Delay) Some monitors have a slight delay when showing video, so the soundtrack will be played. The LOUDNESS is used to get good bass and treble from music sources at low volumes. 28 En M/L OFF MIDNIGHT LOUDNESS Setting/What it does Option(s) LFE ATT (LFE Attenuate) Some Dolby Digital and DTS audio sources include ultra-low bass tones. AMP THRU A.DLY (Auto Delay...
Owner's Manual
Page 29
... an HDMI cable, component video cable or digital audio cable (see page 21 for Dolby TrueHD signals. h. b. d. Tune to operate other components using the front panel INPUT SELECTOR dial. 2 Select the audio input signal (if necessary). e. The initial set the recording levels. Listening to your display, contact the manufacturer directly. Most video recorders set the audio recording level automatically-check the component's instruction manual if you will be able to the radio station, load the CD, video, DVD etc. 4 Prepare the recorder. The default setting when...
... an HDMI cable, component video cable or digital audio cable (see page 21 for Dolby TrueHD signals. h. b. d. Tune to operate other components using the front panel INPUT SELECTOR dial. 2 Select the audio input signal (if necessary). e. The initial set the recording levels. Listening to your display, contact the manufacturer directly. Most video recorders set the audio recording level automatically-check the component's instruction manual if you will be able to the radio station, load the CD, video, DVD etc. 4 Prepare the recorder. The default setting when...

Owner's Manual
Page 30
System Setup 1.Auto MCACC 2.Manual SP Setup 3.Input Assign 4.Pre Out Setting 5.HDMI Setup 6.Auto Power Down 7.FL Demo Mode Return • Auto MCACC - Specify the size and number of speakers you 're using the HDMI output to set then select a speaker size. Channel Level - Back [ NO ] Subwoofer: YES Return Return 3 Choose the set to switch on. Important • The OSD will not appear if you to make all of your TV. Use component or composite connections for surround sound (MCACC) on page 33...
System Setup 1.Auto MCACC 2.Manual SP Setup 3.Input Assign 4.Pre Out Setting 5.HDMI Setup 6.Auto Power Down 7.FL Demo Mode Return • Auto MCACC - Specify the size and number of speakers you 're using the HDMI output to set then select a speaker size. Channel Level - Back [ NO ] Subwoofer: YES Return Return 3 Choose the set to switch on. Important • The OSD will not appear if you to make all of your TV. Use component or composite connections for surround sound (MCACC) on page 33...

Owner's Manual
Page 31
... Pre Out Setting is to route all bass frequencies are sent to the subwoofer. • If the surround speakers are set to the subwoofer). In this case, all the bass sounds to SMALL. The System Setup menu 06 • Front - LFE signals and bass frequencies of speakers. Crossover Network • Default setting: 100Hz This setting decides the cutoff between bass sounds playing back from the speakers selected as the test tone moves from the Manual SP Setup menu. 2.Manual SP Setup a.Speaker Setting b.Crossover Network c.Channel Level d.Speaker Distance 2b.Crossover...
... Pre Out Setting is to route all bass frequencies are sent to the subwoofer. • If the surround speakers are set to the subwoofer). In this case, all the bass sounds to SMALL. The System Setup menu 06 • Front - LFE signals and bass frequencies of speakers. Crossover Network • Default setting: 100Hz This setting decides the cutoff between bass sounds playing back from the speakers selected as the test tone moves from the Manual SP Setup menu. 2.Manual SP Setup a.Speaker Setting b.Crossover Network c.Channel Level d.Speaker Distance 2b.Crossover...
Owner's Manual
Page 32
... the numbers beside the inputs on the remote control. Back R Surr. Input Assign 4 . You return to the Manual SP Setup menu. The receiver can change the channel levels at low volumes. If you may need to make component video connections according to the defaults above, you must assign the numbered input to the component you've connected (or else you selected Manual, use / to 75 dB SPL (C-weighting/slow reading). • The subwoofer test tone is emitted. Component-1: DVD - Pre Out Setting 5 .
... the numbers beside the inputs on the remote control. Back R Surr. Input Assign 4 . You return to the Manual SP Setup menu. The receiver can change the channel levels at low volumes. If you may need to make component video connections according to the defaults above, you must assign the numbered input to the component you've connected (or else you selected Manual, use / to 75 dB SPL (C-weighting/slow reading). • The subwoofer test tone is emitted. Component-1: DVD - Pre Out Setting 5 .
Owner's Manual
Page 34
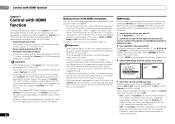
... remote control to switch the power off and you connect your TV. Auto MCACC 2 . HDMI Setup 6 . FL Demo Mode 5.HDMI Setup Control ARC ON [ OFF ] Return Return 5 Select the 'Control' setting you can use of the Control with HDMI-compatible component is played. The Control with HDMI function. When the TV and receiver are not output. You cannot carry out any time to the HDMI terminal on the display unit blinks during initialization. Input Assign 4 . The Control with HDMI function may not work with Pioneer made Control with HDMI...
... remote control to switch the power off and you connect your TV. Auto MCACC 2 . HDMI Setup 6 . FL Demo Mode 5.HDMI Setup Control ARC ON [ OFF ] Return Return 5 Select the 'Control' setting you can use of the Control with HDMI-compatible component is played. The Control with HDMI function. When the TV and receiver are not output. You cannot carry out any time to the HDMI terminal on the display unit blinks during initialization. Input Assign 4 . The Control with HDMI function may not work with Pioneer made Control with HDMI...
Owner's Manual
Page 36
... the speaker levels. Refer to the instruction manual supplied with the TV. No sound is output when an input function is selected. Use MASTER VOLUME to turn up your system again using the Auto MCACC setup, the speaker size setting (LARGE or SMALL) is incorrect. Low-frequency noise could cause the receiver to shut off if the receiver has not operated for better ventilation (see About video outputs connection on page 13). Check The Input Assign menu...
... the speaker levels. Refer to the instruction manual supplied with the TV. No sound is output when an input function is selected. Use MASTER VOLUME to turn up your system again using the Auto MCACC setup, the speaker size setting (LARGE or SMALL) is incorrect. Low-frequency noise could cause the receiver to shut off if the receiver has not operated for better ventilation (see About video outputs connection on page 13). Check The Input Assign menu...
Owner's Manual
Page 37
... connected or operated. The front panel display switches over for more on the HDMI equipped component you switch input sources. 37 En English Français Español Sound from this case, connect using the HDMI connection, you must adjust the volume on the display every time you are input from the HDMI terminal will not output from the analog video terminal. The OSD screen (System Setup menu, etc.) isn't displayed. The OSD will not work with...
... connected or operated. The front panel display switches over for more on the HDMI equipped component you switch input sources. 37 En English Français Español Sound from this case, connect using the HDMI connection, you must adjust the volume on the display every time you are input from the HDMI terminal will not output from the analog video terminal. The OSD screen (System Setup menu, etc.) isn't displayed. The OSD will not work with...


