Owner's Manual
Page 4
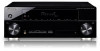
...Setting the Audio options 38 Choosing the input signal 41 Using the headphone 41 06 The System Setup menu Using the System Setup menu 42 Manual speaker setup 43 Speaker Setting 43 Crossover Network 45 Channel Level 45 Speaker Distance 46 The Input Assign menu...Listening in a safe place for future reference. Contents 01 Before you for buying this Pioneer product. Thank you start Checking what's in the box 7 Loading the batteries 7 Installing the receiver 7 Ventilation 8 04 Basic Setup Automatically setting up for surround sound (MCACC 29 Other problems when using the Auto MCACC...
...Setting the Audio options 38 Choosing the input signal 41 Using the headphone 41 06 The System Setup menu Using the System Setup menu 42 Manual speaker setup 43 Speaker Setting 43 Crossover Network 45 Channel Level 45 Speaker Distance 46 The Input Assign menu...Listening in a safe place for future reference. Contents 01 Before you for buying this Pioneer product. Thank you start Checking what's in the box 7 Loading the batteries 7 Installing the receiver 7 Ventilation 8 04 Basic Setup Automatically setting up for surround sound (MCACC 29 Other problems when using the Auto MCACC...
Owner's Manual
Page 6
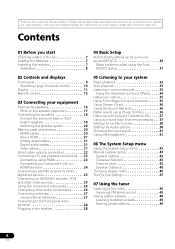
... menu (page 46) (When using Phase Control (page 36) • Listening with an abundance of functions and terminals. Flow of settings on -screen automatic MCACC setup to set the video input on the sound. Place your TV to do this receiver. Check the manual that came with the TV if you...) • Setting the Up Mix function (page 38) • Setting the Audio options (page 38) • Choosing the input signal (page 41) • Manual speaker setup (page 43) 9 Making maximum use of the remote control • Setting the remote to control other components (page 51) 6 En
... menu (page 46) (When using Phase Control (page 36) • Listening with an abundance of functions and terminals. Flow of settings on -screen automatic MCACC setup to set the video input on the sound. Place your TV to do this receiver. Check the manual that came with the TV if you...) • Setting the Up Mix function (page 38) • Setting the Audio options (page 38) • Choosing the input signal (page 41) • Manual speaker setup (page 43) 9 Making maximum use of the remote control • Setting the remote to control other components (page 51) 6 En
Owner's Manual
Page 7
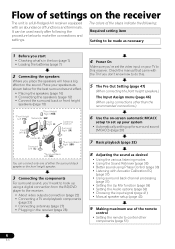
... - they may interfere with governmental regulations or environmental public instruction's rules that you start 01 Chapter 1: Before you 've received the following supplied accessories: • Setup microphone • Remote control • Dry cell batteries (AAA size IEC R03) x2 • AM loop antenna • FM wire antenna • iPod cable •...
... - they may interfere with governmental regulations or environmental public instruction's rules that you start 01 Chapter 1: Before you 've received the following supplied accessories: • Setup microphone • Remote control • Dry cell batteries (AAA size IEC R03) x2 • AM loop antenna • FM wire antenna • iPod cable •...
Owner's Manual
Page 9
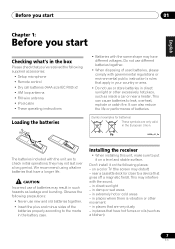
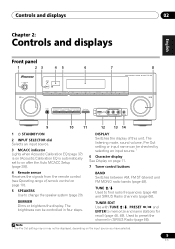
CHANNEL RECEIVER VSX-820 TUNE TUNER EDIT PRESET ENTER MASTER VOLUME PHONES AUTO/DIRECT LISTENING MODE STEREO/ALC STANDARD ADV SURROUND iPod iPhone DIRECT CONTROL VIDEO INPUT USB iPod iPhone VIDEO L AUDIO R MCACC SETUP MIC 9 10 11 12 13 14 1 STANDBY/ON 2 INPUT SELECTOR dial Selects an .... TUNE / Used to change the speaker system (page 20). The brightness can be displayed, depending on after the Auto MCACC Setup (page 29)). The listening mode, sound volume, Pre Out setting or input name can be controlled in SIRIUS Radio (page 66). Note...
CHANNEL RECEIVER VSX-820 TUNE TUNER EDIT PRESET ENTER MASTER VOLUME PHONES AUTO/DIRECT LISTENING MODE STEREO/ALC STANDARD ADV SURROUND iPod iPhone DIRECT CONTROL VIDEO INPUT USB iPod iPhone VIDEO L AUDIO R MCACC SETUP MIC 9 10 11 12 13 14 1 STANDBY/ON 2 INPUT SELECTOR dial Selects an .... TUNE / Used to change the speaker system (page 20). The brightness can be displayed, depending on after the Auto MCACC Setup (page 29)). The listening mode, sound volume, Pre Out setting or input name can be controlled in SIRIUS Radio (page 66). Note...
Owner's Manual
Page 10
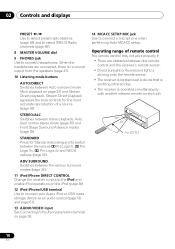
STEREO/ALC Switches between Auto surround mode (Auto playback on page 28. 14 MCACC SETUP MIC jack Use to switch between the various 2 Pro Logic II, 2 Pro Logic IIx, 2 Pro Logic IIz and NEO:6 options (page 32). STANDARD Press for ...° 30° 7 m (23 ft.) 10 En Stream Direct playback bypasses the tone controls for Standard decoding and to connect a microphone when performing Auto MCACC setup. ADV SURROUND Switches between the various surround modes (page 34). 11 iPod iPhone DIRECT CONTROL Change the receiver's input to the iPod and enable iPod...
STEREO/ALC Switches between Auto surround mode (Auto playback on page 28. 14 MCACC SETUP MIC jack Use to switch between the various 2 Pro Logic II, 2 Pro Logic IIx, 2 Pro Logic IIz and NEO:6 options (page 32). STANDARD Press for ...° 30° 7 m (23 ft.) 10 En Stream Direct playback bypasses the tone controls for Standard decoding and to connect a microphone when performing Auto MCACC setup. ADV SURROUND Switches between the various surround modes (page 34). 11 iPod iPhone DIRECT CONTROL Change the receiver's input to the iPod and enable iPod...
Owner's Manual
Page 13
... SEL VOL 6 AUTO/ STEREO/ BD MENU 7 DIRECT A.L.C. STANDARD ADV SURR AUDIO PARAMETER TOP 8 MENU TUNE TUNER EDIT MASTER TOOLS VOLUME MENU PRESET ENTER 9 HOME MENU SETUP iPod CTRL CATEGORY TUNE BAND RETURN DTV/ TV MUTE 10 BASS TRE 11 MEMORY HDD DVD VCR 1 2 3 DISP S.RETRIEVER SB CH CH SELECT EQ 4 5 6 CH...
... SEL VOL 6 AUTO/ STEREO/ BD MENU 7 DIRECT A.L.C. STANDARD ADV SURR AUDIO PARAMETER TOP 8 MENU TUNE TUNER EDIT MASTER TOOLS VOLUME MENU PRESET ENTER 9 HOME MENU SETUP iPod CTRL CATEGORY TUNE BAND RETURN DTV/ TV MUTE 10 BASS TRE 11 MEMORY HDD DVD VCR 1 2 3 DISP S.RETRIEVER SB CH CH SELECT EQ 4 5 6 CH...
Owner's Manual
Page 14
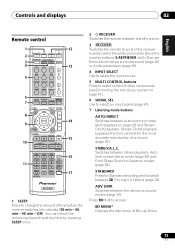
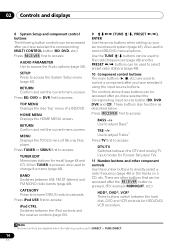
...a radio frequency (page 48) or the tracks on a CD, etc. Press RECEIVER first to access: AUDIO PARAMETER Use to access the System Setup menu (page 42). RETURN Confirm and exit the current menu screen. There are other component controls Use the number buttons to access: TOP MENU Displays... listening mode is pressed, also used to browse SIRIUS radio broadcasts. Press TUNER or SIRIUS first to access: TUNER EDIT Memorizes stations for Pioneer flat panel TVs. 11 Number buttons and other buttons that can be accessed after you have selected the corresponding MULTI CONTROL button (BD, DVD...
...a radio frequency (page 48) or the tracks on a CD, etc. Press RECEIVER first to access: AUDIO PARAMETER Use to access the System Setup menu (page 42). RETURN Confirm and exit the current menu screen. There are other component controls Use the number buttons to access: TOP MENU Displays... listening mode is pressed, also used to browse SIRIUS radio broadcasts. Press TUNER or SIRIUS first to access: TUNER EDIT Memorizes stations for Pioneer flat panel TVs. 11 Number buttons and other buttons that can be accessed after you have selected the corresponding MULTI CONTROL button (BD, DVD...
Owner's Manual
Page 18
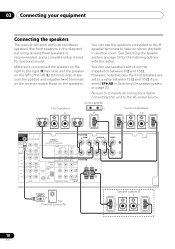
See Switching the speaker system on the speakers. Be sure to complete all connections before connecting this setup. Center speaker Front speakers L R C Surround speakers SL SR SUBWOOFER PRE OUT SURR BACK / FRONT HEIGHT L (Single) CD-R/TAPE DVR/VCR OUT R PRE OUT CD CD-R/... between 6 Ω and 16 Ω. Make sure you select SPAB in the diagram) but using at least three speakers is recommended, and a complete setup is best for surround sound.
See Switching the speaker system on the speakers. Be sure to complete all connections before connecting this setup. Center speaker Front speakers L R C Surround speakers SL SR SUBWOOFER PRE OUT SURR BACK / FRONT HEIGHT L (Single) CD-R/TAPE DVR/VCR OUT R PRE OUT CD CD-R/... between 6 Ω and 16 Ω. Make sure you select SPAB in the diagram) but using at least three speakers is recommended, and a complete setup is best for surround sound.
Owner's Manual
Page 23
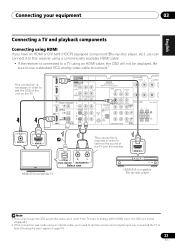
... AUDIO OUT Select one HDMI/DVI-compatible TV HDMI/DVI-compatible Blu-ray disc player Note 1 If you wish to see the OSD screen (for setup, etc.), switch the TV input to analog. (With HDMI input, the OSD will not be displayed.) 2 If the connection was made using an optical cable...
... AUDIO OUT Select one HDMI/DVI-compatible TV HDMI/DVI-compatible Blu-ray disc player Note 1 If you wish to see the OSD screen (for setup, etc.), switch the TV input to analog. (With HDMI input, the OSD will not be displayed.) 2 If the connection was made using an optical cable...
Owner's Manual
Page 28
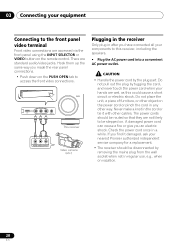
.... Check the power cord once in any other cables. A damaged power cord can cause a fire or give you have connected all your nearest Pioneer authorized independent service company for a replacement. • The receiver should be stepped on the power cord or pinch the cord in a while. ... the INPUT SELECTOR or VIDEO button on vacation. 28 En CONTROL ON / OFF MASTER VOLUME VIDEO INPUT USB iPod iPhone VIDEO L AUDIO R MCACC SETUP MIC This receiver VIDEO L R AUDIO/VIDEO OUTPUT Video camera (etc.) Plugging in the receiver Only plug in regular use, e.g., when on the ...
.... Check the power cord once in any other cables. A damaged power cord can cause a fire or give you have connected all your nearest Pioneer authorized independent service company for a replacement. • The receiver should be stepped on the power cord or pinch the cord in a while. ... the INPUT SELECTOR or VIDEO button on vacation. 28 En CONTROL ON / OFF MASTER VOLUME VIDEO INPUT USB iPod iPhone VIDEO L AUDIO R MCACC SETUP MIC This receiver VIDEO L R AUDIO/VIDEO OUTPUT Video camera (etc.) Plugging in the receiver Only plug in regular use, e.g., when on the ...
Owner's Manual
Page 29
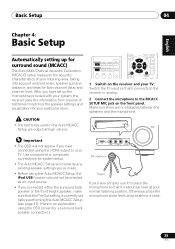
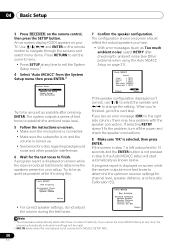
...so that the Pre Out setting is correctly set up for surround sound (MCACC) The Auto Multi-Channel Acoustic Calibration (MCACC) setup measures the acoustic characteristics of test tones to optimize the speaker settings and equalization for your particular room. Otherwise, place the ...microphone at your normal listening position. English Deutsch Français Italiano Nederlands Español PRESET Basic Setup 04 Chapter 4: Basic Setup Automatically setting up the microphone provided with your system, the receiver uses the information from a series of your listening area...
...so that the Pre Out setting is correctly set up for surround sound (MCACC) The Auto Multi-Channel Acoustic Calibration (MCACC) setup measures the acoustic characteristics of test tones to optimize the speaker settings and equalization for your particular room. Otherwise, place the ...microphone at your normal listening position. English Deutsch Français Italiano Nederlands Español PRESET Basic Setup 04 Chapter 4: Basic Setup Automatically setting up the microphone provided with your system, the receiver uses the information from a series of your listening area...
Owner's Manual
Page 30
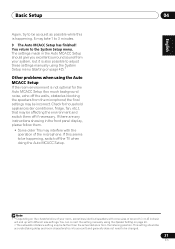
...inactivity. If selecting RETRY doesn't fix the problem, turn off the power and check the speaker connections. 8 Make sure 'OK' is not connected to MCACC SETUP MIC. 30 En If you 're finished, go to the next step. Back [YESx2] Subwoofer [ YES ] 10:Next OK Return If the speaker ...speakers present in the right side column, there may be made. 2 MIC IN blinks when the microphone is selected, then press ENTER. 04 Basic Setup 3 Press RECEIVER on -screen while the receiver outputs more test tones to determine the optimum receiver settings for channel level, speaker distance, and Acoustic ...
...inactivity. If selecting RETRY doesn't fix the problem, turn off the power and check the speaker connections. 8 Make sure 'OK' is not connected to MCACC SETUP MIC. 30 En If you 're finished, go to the next step. Back [YESx2] Subwoofer [ YES ] 10:Next OK Return If the speaker ...speakers present in the right side column, there may be made. 2 MIC IN blinks when the microphone is selected, then press ENTER. 04 Basic Setup 3 Press RECEIVER on -screen while the receiver outputs more test tones to determine the optimum receiver settings for channel level, speaker distance, and Acoustic ...
Owner's Manual
Page 31
Note 1 • Depending on the characteristics of your system, but it is also possible to adjust these settings manually using the System Setup menu (starting on page 42).1 Other problems when using the Speaker Setting on page 43. • The subwoofer distance setting may be farther than the ..., etc.), that may be as quiet as possible while this seems to be changed. 31 En If this is not optimal for the Auto MCACC Setup (too much background noise, echo off the walls, obstacles blocking the speakers from your room, sometimes identical speakers with cone sizes of around 12 cm...
Note 1 • Depending on the characteristics of your system, but it is also possible to adjust these settings manually using the System Setup menu (starting on page 42).1 Other problems when using the Speaker Setting on page 43. • The subwoofer distance setting may be farther than the ..., etc.), that may be as quiet as possible while this seems to be changed. 31 En If this is not optimal for the Auto MCACC Setup (too much background noise, echo off the walls, obstacles blocking the speakers from your room, sometimes identical speakers with cone sizes of around 12 cm...
Owner's Manual
Page 32
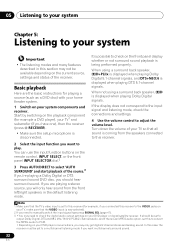
...) with your home theater system. 1 Switch on your TV1 and subwoofer (if you have one), then the receiver (press RECEIVER). • Make sure the setup microphone is disconnected. 2 Select the input function you may not be set to output Dolby Digital, DTS and 88.2 kHz / 96 kHz PCM (2 channel) audio...
...) with your home theater system. 1 Switch on your TV1 and subwoofer (if you have one), then the receiver (press RECEIVER). • Make sure the setup microphone is disconnected. 2 Select the input function you may not be set to output Dolby Digital, DTS and 88.2 kHz / 96 kHz PCM (2 channel) audio...

Owner's Manual
Page 33
... 5.1 channel sound, especially suited to 2-channel sources in DOLBY PLII MUSIC mode, there are not connected. See above • Straight Decode - Listening to your speaker setup and the type of source you're listening to. AUTO/ STEREO/ BD MENU DIRECT A.L.C. See Setting the Audio options on page 38). 33 En Press...
... 5.1 channel sound, especially suited to 2-channel sources in DOLBY PLII MUSIC mode, there are not connected. See above • Straight Decode - Listening to your speaker setup and the type of source you're listening to. AUTO/ STEREO/ BD MENU DIRECT A.L.C. See Setting the Audio options on page 38). 33 En Press...

Owner's Manual
Page 36
... in theory, however, this receiver can reproduce powerful bass sound without any digital processing. Sources are heard according to the settings made in the Surround Setup (speaker setting, channel level, speaker distance), as well as lowfrequency signals in each channel are assigned to the subwoofer or other channels. STANDARD ADV SURR...
... in theory, however, this receiver can reproduce powerful bass sound without any digital processing. Sources are heard according to the settings made in the Surround Setup (speaker setting, channel level, speaker distance), as well as lowfrequency signals in each channel are assigned to the subwoofer or other channels. STANDARD ADV SURR...
Owner's Manual
Page 38
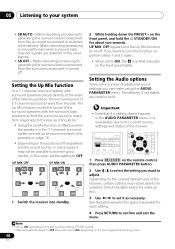
... SOURCE CONTROL AUDIO PARAMETER TOP MENU TUNE TUNER EDIT MASTER TOOLS VOLUME MENU PRESET PRESET RECEIVER INPUT SELECT INPUT ENTER BD DVD TV HOME MENU SETUP iPod CTRL C GO TUNE BAND RETURN 1 Press RECEIVER on the positions of 5.1-channel sources is only performed when surround back channel signals are set up...
... SOURCE CONTROL AUDIO PARAMETER TOP MENU TUNE TUNER EDIT MASTER TOOLS VOLUME MENU PRESET PRESET RECEIVER INPUT SELECT INPUT ENTER BD DVD TV HOME MENU SETUP iPod CTRL C GO TUNE BAND RETURN 1 Press RECEIVER on the positions of 5.1-channel sources is only performed when surround back channel signals are set up...
Owner's Manual
Page 42
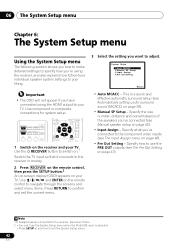
... menu. 3 Select the setting you want to your liking. Use and ENTER on page 47). 06 The System Setup menu Chapter 6: The System Setup menu Using the System Setup menu The following section shows you how to make detailed settings to specify how you're using the HDMI output to... SOURCE CONTROL RECEIVER INPUT SELECT BD DVD TV INPUT AUDIO PARAMETER TOP MENU TUNE TUNER EDIT MASTER TOOLS VOLUME MENU PRESET PRESET ENTER HOME MENU SETUP iPod CTRL CATEGORY TUNE BAND RETURN DTV/ TV MUTE 1 Switch on your TV. Use the RECEIVER button to switch on.1 Switch ...
... menu. 3 Select the setting you want to your liking. Use and ENTER on page 47). 06 The System Setup menu Chapter 6: The System Setup menu Using the System Setup menu The following section shows you how to make detailed settings to specify how you're using the HDMI output to... SOURCE CONTROL RECEIVER INPUT SELECT BD DVD TV INPUT AUDIO PARAMETER TOP MENU TUNE TUNER EDIT MASTER TOOLS VOLUME MENU PRESET PRESET ENTER HOME MENU SETUP iPod CTRL CATEGORY TUNE BAND RETURN DTV/ TV MUTE 1 Switch on your TV. Use the RECEIVER button to switch on.1 Switch ...
Owner's Manual
Page 43
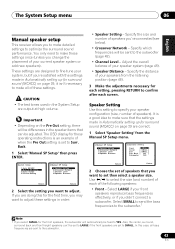
...all bass frequencies are sent to specify your current speaker system or add new speakers). System Setup 1.Auto MCACC 2.Manual SP Setup 3.Input Assign 4.Pre Out Setting 2.Manual SP Setup a.Speaker Setting b.Crossover Network c.Channel Level d.Speaker Distance Return Return 2 Select the setting ...be fixed to the subwoofer (page 45). • Channel Level - Back. 1 Select 'Manual SP Setup' then press ENTER. The OSD display for these settings in the System Setup are set to Surr. Important • Depending on page 29, it isn't necessary to make these ...
...all bass frequencies are sent to specify your current speaker system or add new speakers). System Setup 1.Auto MCACC 2.Manual SP Setup 3.Input Assign 4.Pre Out Setting 2.Manual SP Setup a.Speaker Setting b.Crossover Network c.Channel Level d.Speaker Distance Return Return 2 Select the setting ...be fixed to the subwoofer (page 45). • Channel Level - Back. 1 Select 'Manual SP Setup' then press ENTER. The OSD display for these settings in the System Setup are set to Surr. Important • Depending on page 29, it isn't necessary to make these ...
Owner's Manual
Page 44
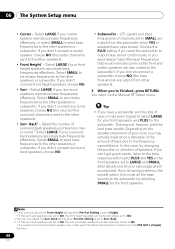
... Height setting when Pre Out Setting is set to Height. • If the surround speakers are output from other speakers or subwoofer. 06 The System Setup menu • Center - Select LARGE if your front speakers and PLUS for the front speakers. This may not, however, yield the best bass results. Select...
... Height setting when Pre Out Setting is set to Height. • If the surround speakers are output from other speakers or subwoofer. 06 The System Setup menu • Center - Select LARGE if your front speakers and PLUS for the front speakers. This may not, however, yield the best bass results. Select...


