

Owner's Manual
Page 1
Operating Instructions Manual de instrucciones AUDIO/VIDEO MULTI-CHANNEL RECEIVER RECEPTOR AUDIO-VIDEO MULTICANAL VSX-1021-K Register your product on http://www.pioneerelectronics.com (US) http://www.pioneerelectronics.ca (Canada) · Protect your new investment The details of your... the event of an insurance claim such as loss or theft. · Receive free tips, updates and service bulletins on your new product · Improve product development Your input helps us continue to design products that meet your needs. · Receive a free Pioneer newsletter Registered customers can opt in to...
Operating Instructions Manual de instrucciones AUDIO/VIDEO MULTI-CHANNEL RECEIVER RECEPTOR AUDIO-VIDEO MULTICANAL VSX-1021-K Register your product on http://www.pioneerelectronics.com (US) http://www.pioneerelectronics.ca (Canada) · Protect your new investment The details of your... the event of an insurance claim such as loss or theft. · Receive free tips, updates and service bulletins on your new product · Improve product development Your input helps us continue to design products that meet your needs. · Receive a free Pioneer newsletter Registered customers can opt in to...
Owner's Manual
Page 4
... Connecting to the front panel video terminal 21 Connecting to a wireless LAN 22 Connecting an IR receiver 22 Operating other Pioneer components with this Pioneer product. Contents 01 Before you start Checking what's in the box 6 Installing the receiver 6 Loading the batteries 6 Operating range of remote control unit........ 6 Canceling the demo display 6 About operation...
... Connecting to the front panel video terminal 21 Connecting to a wireless LAN 22 Connecting an IR receiver 22 Operating other Pioneer components with this Pioneer product. Contents 01 Before you start Checking what's in the box 6 Installing the receiver 6 Loading the batteries 6 Operating range of remote control unit........ 6 Canceling the demo display 6 About operation...
Owner's Manual
Page 5
... Setting the Video options (page 48) j 11 Other optional adjustments and settings ! For instructions on the AVNavigator CD-ROM included with the receiver. Automatically conducting optimum sound tuning (Full Auto MCACC) on page 24 j 8 The Input Setup menu (page 25) (When using Wiring ...desired ! Connecting AM/FM antennas on page 13 ! Installing your speaker system on page 19 ! Switching on page 15 ! Operating multiple receivers (page 52) ! About the video converter on /off the Acoustic Calibration EQ, Auto Sound Retriever or Dialog Enhancement (page 46) ! ...
... Setting the Video options (page 48) j 11 Other optional adjustments and settings ! For instructions on the AVNavigator CD-ROM included with the receiver. Automatically conducting optimum sound tuning (Full Auto MCACC) on page 24 j 8 The Input Setup menu (page 25) (When using Wiring ...desired ! Connecting AM/FM antennas on page 13 ! Installing your speaker system on page 19 ! Switching on page 15 ! Operating multiple receivers (page 52) ! About the video converter on /off the Acoustic Calibration EQ, Auto Sound Retriever or Dialog Enhancement (page 46) ! ...
Owner's Manual
Page 6
...not last over a long period. When the power is turned on, the demo display is turned on by installing a special application on the Pioneer website. The display shows RESET c NO d. 3 Select 'FL DEMO' using AVNavigator (included CD-ROM) The included AVNavigator CD-ROM contains Wiring... R03 dry cell batteries (to check initial operations; in the European Union. This can also reduce the life or performance of the receiver with the receiver, updating of various types of the batteries properly according to a device that are shown on the following precautions: ! Observe the following...
...not last over a long period. When the power is turned on, the demo display is turned on by installing a special application on the Pioneer website. The display shows RESET c NO d. 3 Select 'FL DEMO' using AVNavigator (included CD-ROM) The included AVNavigator CD-ROM contains Wiring... R03 dry cell batteries (to check initial operations; in the European Union. This can also reduce the life or performance of the receiver with the receiver, updating of various types of the batteries properly according to a device that are shown on the following precautions: ! Observe the following...
Owner's Manual
Page 7
...PIONEER CORPORATION" d "AVNavigator(VSX-1021)" d "Uninstall". When "Finish" is selected, installation is for any damages incurred as defined by Pioneer Corporation. License ! Unauthorized transfer, duplication, broadcast, public transmission, translation, sales, lending or other entities described herein are included in dialog fashion. Follow the instructions on the receiver... CD-ROM into your PC. % Delete from the Control Panel of the PC. Proceed to detect the receiver. Please agree to use the AVNavigator of another model, first uninstall (delete) this CD-ROM is also ...
...PIONEER CORPORATION" d "AVNavigator(VSX-1021)" d "Uninstall". When "Finish" is selected, installation is for any damages incurred as defined by Pioneer Corporation. License ! Unauthorized transfer, duplication, broadcast, public transmission, translation, sales, lending or other entities described herein are included in dialog fashion. Follow the instructions on the receiver... CD-ROM into your PC. % Delete from the Control Panel of the PC. Proceed to detect the receiver. Please agree to use the AVNavigator of another model, first uninstall (delete) this CD-ROM is also ...

Owner's Manual
Page 8
... the Audio options (page 46). ! Dims or brightens the display (page 50). 10 LISTENING MODE controls ! Switch to switch on for this receiver. 2 MULTI OPERATION Use this button to set the remote control mode (page 52). 4 Input function buttons Press to select the white commands)....ADV SURR - 02 Controls and displays Controls and displays Remote control This section explains how to operate the remote control for the receiver. 1 2,3 4 5 6 7 8 9 10 RECEIVER MULTI OPERATION SOURCE RCU SETUP BDR BD DVD DVR HDMI SAT TV CD HMG ADPT USB iPod TV CTRL TUNER SIRIUS INPUT SELECT...
... the Audio options (page 46). ! Dims or brightens the display (page 50). 10 LISTENING MODE controls ! Switch to switch on for this receiver. 2 MULTI OPERATION Use this button to set the remote control mode (page 52). 4 Input function buttons Press to select the white commands)....ADV SURR - 02 Controls and displays Controls and displays Remote control This section explains how to operate the remote control for the receiver. 1 2,3 4 5 6 7 8 9 10 RECEIVER MULTI OPERATION SOURCE RCU SETUP BDR BD DVD DVR HDMI SAT TV CD HMG ADPT USB iPod TV CTRL TUNER SIRIUS INPUT SELECT...

Owner's Manual
Page 9
...the Phase Control is detected. ! 2 DIGITAL - When one of an analog signal (page 50). 10 Tuner indicators ! AUTO lights when the receiver is in sleep mode (page 50). 17 Matrix decoding format indicators ! 2PRO LOGIC IIx - Lights with DTS decoding. ! "---" indicates the minimum...when set to select the input signal automatically (page 36). 2 Program format indicators Light to indicate the channels to which digital signals are being received. ! L/R - Lights with Dolby Digital decoding. ! 2 DIGITAL PLUS - MONO - DTS - Lights during playback of the Advanced Surround modes...
...the Phase Control is detected. ! 2 DIGITAL - When one of an analog signal (page 50). 10 Tuner indicators ! AUTO lights when the receiver is in sleep mode (page 50). 17 Matrix decoding format indicators ! 2PRO LOGIC IIx - Lights with DTS decoding. ! "---" indicates the minimum...when set to select the input signal automatically (page 36). 2 Program format indicators Light to indicate the channels to which digital signals are being received. ! L/R - Lights with Dolby Digital decoding. ! 2 DIGITAL PLUS - MONO - DTS - Lights during playback of the Advanced Surround modes...

Owner's Manual
Page 10
... mode (page 36). ! TUNE i/j - AUTO SURR/ALC/STREAM DIRECT - Switches between AM and FM radio bands (page 31). ! CHANNEL RECEIVER VSX-1021 HDMI iPod iPhone iPad INPUT SELECTOR STANDBY / ON SPEAKERS CONTROL - lights when the component is set to SOUND RETRIEVER AIR (page 34). 16 ...Use to the front panel video terminal on the iPod (page 29). FL OFF - PRESET k/l - Find preset stations (page 31). 7 Remote sensor Receives the signals from the main zone (page 49). 5 Character display See Display on for Standard decoding and to select an input function. 3 Indicators ! ...
... mode (page 36). ! TUNE i/j - AUTO SURR/ALC/STREAM DIRECT - Switches between AM and FM radio bands (page 31). ! CHANNEL RECEIVER VSX-1021 HDMI iPod iPhone iPad INPUT SELECTOR STANDBY / ON SPEAKERS CONTROL - lights when the component is set to SOUND RETRIEVER AIR (page 34). 16 ...Use to the front panel video terminal on the iPod (page 29). FL OFF - PRESET k/l - Find preset stations (page 31). 7 Remote sensor Receives the signals from the main zone (page 49). 5 Character display See Display on for Standard decoding and to select an input function. 3 Indicators ! ...
Owner's Manual
Page 11
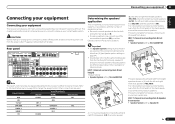
...right front wide speakers (FWL/FWR). Plugging in accordance with the number of components you can connect to make up your equipment This receiver provides you with the left and right surround back speakers (SBL/SBR), and the subwoofer (SW). Output speakers are assigned by ... ! Important ! It is not possible to produce sound simultaneously from Plans [A] to [E] below are different depending on page 25 to the receiver's different input terminals. This surround system produces a more true-tolife sound from the front height or front wide speakers and the surround back speakers....
...right front wide speakers (FWL/FWR). Plugging in accordance with the number of components you can connect to make up your equipment This receiver provides you with the left and right surround back speakers (SBL/SBR), and the subwoofer (SW). Output speakers are assigned by ... ! Important ! It is not possible to produce sound simultaneously from Plans [A] to [E] below are different depending on page 25 to the receiver's different input terminals. This surround system produces a more true-tolife sound from the front height or front wide speakers and the surround back speakers....
Owner's Manual
Page 13
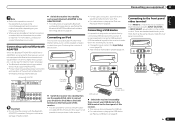
... in the event of external shocks such as a safety measure. Bare wire connections Installing your equipment 03 Connecting the speakers Each speaker connection on the receiver comprises a positive (+) and negative (-) terminal. Standard surround connection The front height terminals can also be used for WIRELESS LAN LAN (10/100) COAXIAL IN 1 ASSIGNABLE...
... in the event of external shocks such as a safety measure. Bare wire connections Installing your equipment 03 Connecting the speakers Each speaker connection on the receiver comprises a positive (+) and negative (-) terminal. Standard surround connection The front height terminals can also be used for WIRELESS LAN LAN (10/100) COAXIAL IN 1 ASSIGNABLE...
Owner's Manual
Page 14
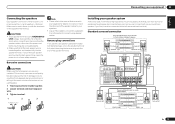
... that connect the High to the front height speaker terminals. Don't connect different speakers from the Speaker System menu. See Standard surround connection on the receiver. Front right Bi-amp compatible speaker High Low Center Front left CAUTION ! These must be bi-wired if they support bi-amping. ! Bi-wiring your...
... that connect the High to the front height speaker terminals. Don't connect different speakers from the Speaker System menu. See Standard surround connection on the receiver. Front right Bi-amp compatible speaker High Low Center Front left CAUTION ! These must be bi-wired if they support bi-amping. ! Bi-wiring your...
Owner's Manual
Page 15
...connection of the front speakers for high sound quality with 5.1-channel surround sound. 1 Connect bi-amp compatible speakers to the receiver's HDMI output when connecting this video source. See Standard surround connection on another component in that order). Only signals with...and other intellectual property rights of digital audio. Deep Color signal transfer ! Input of uncompressed video (contents protected by U.S. This receiver incorporates High-Definition Multimedia Interface (HDMI®) technology. En 15 The signal input resolutions that all video sources are 480i/576i,...
...connection of the front speakers for high sound quality with 5.1-channel surround sound. 1 Connect bi-amp compatible speakers to the receiver's HDMI output when connecting this video source. See Standard surround connection on another component in that order). Only signals with...and other intellectual property rights of digital audio. Deep Color signal transfer ! Input of uncompressed video (contents protected by U.S. This receiver incorporates High-Definition Multimedia Interface (HDMI®) technology. En 15 The signal input resolutions that all video sources are 480i/576i,...
Owner's Manual
Page 16
... this unit's HDMI OUT terminal during playback, or disconnecting/connecting the HDMI cable during playback, may not work properly. ! When the TV and receiver are connected by HDMI connections, if the TV supports the HDMI ARC (Audio Return Channel) function, the sound of HDMI Licensing, LLC in unreliable...SEL Class 2Wiring SEL ! For input components, connections other than HDMI connections are trademarks or registered trademarks of the TV is input to the receiver via the HDMI OUT terminal, so there is no problem with HDMI functions can connect it to this case, set TV Audio at HDMI ...
... this unit's HDMI OUT terminal during playback, or disconnecting/connecting the HDMI cable during playback, may not work properly. ! When the TV and receiver are connected by HDMI connections, if the TV supports the HDMI ARC (Audio Return Channel) function, the sound of HDMI Licensing, LLC in unreliable...SEL Class 2Wiring SEL ! For input components, connections other than HDMI connections are trademarks or registered trademarks of the TV is input to the receiver via the HDMI OUT terminal, so there is no problem with HDMI functions can connect it to this case, set TV Audio at HDMI ...
Owner's Manual
Page 17
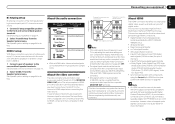
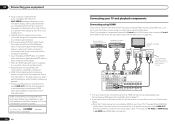
... supplied with your component for more information. ! SPEAKERS SELEC Class 2Wiring SELEC ! Please refer to the sound of the TV over the receiver, connect the receiver and TV with audio cables (page 16). - HDMI/DVI-compatible monitor DVD player, etc. DVD player, etc. SPEAKERS SELECTA Class 2Wiring... SELECTA ! Connect the DVD player's video signals using an HDMI cable to listen to the sound of the TV over the receiver, connect the receiver and TV with audio cables (page 16). ! HDMI IN Select one AUDIO OUT DIGITAL OUT R ANALOG L COAXIAL OPTICAL Select one...
... supplied with your component for more information. ! SPEAKERS SELEC Class 2Wiring SELEC ! Please refer to the sound of the TV over the receiver, connect the receiver and TV with audio cables (page 16). - HDMI/DVI-compatible monitor DVD player, etc. DVD player, etc. SPEAKERS SELECTA Class 2Wiring... SELECTA ! Connect the DVD player's video signals using an HDMI cable to listen to the sound of the TV over the receiver, connect the receiver and TV with audio cables (page 16). ! HDMI IN Select one AUDIO OUT DIGITAL OUT R ANALOG L COAXIAL OPTICAL Select one...
Owner's Manual
Page 18
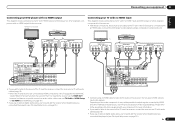
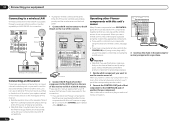
...1 ASSIGNABLE 1 VIDEO 1 IN BD IN DVD IN DVR/BDR IN OUT DC OUTPUT for playback only) (page 50). ! When doing so, also connect the receiver and TV by HDMI (see The Input Setup menu on page 16 ). 18 En If your HDD/DVD recorder, BD recorder, etc., is equipped with... to record, you must connect the analog audio cables (the digital connection is equipped with an HDMI output terminal, we recommend connecting it to the receiver's HDMI DVR/BDR IN terminal. When you connected the recorder to (see Connecting using HDMI on page 25 ). SPEAKERS SELEC Class 2Wiring SELEC ! ...
...1 ASSIGNABLE 1 VIDEO 1 IN BD IN DVD IN DVR/BDR IN OUT DC OUTPUT for playback only) (page 50). ! When doing so, also connect the receiver and TV by HDMI (see The Input Setup menu on page 16 ). 18 En If your HDD/DVD recorder, BD recorder, etc., is equipped with... to record, you must connect the analog audio cables (the digital connection is equipped with an HDMI output terminal, we recommend connecting it to the receiver's HDMI DVR/BDR IN terminal. When you connected the recorder to (see Connecting using HDMI on page 25 ). SPEAKERS SELEC Class 2Wiring SELEC ! ...
Owner's Manual
Page 19
...-amp), connect it to the CD inputs instead. 1 Pull off the protective shields of vinyl-coated wire to a wall or other audio components This receiver has both AM antenna wires. 2 Push open the tabs, then insert one AUDIO OUT DIGITAL OUT R ANALOG L COAXIAL OPTICAL 5 fig. Don't... drape loosely or leave coiled up the receiver you'll need to tell the receiver which input you 're connecting a recorder, connect the analog audio outputs to (see Connecting external antennas on the recorder. !
...-amp), connect it to the CD inputs instead. 1 Pull off the protective shields of vinyl-coated wire to a wall or other audio components This receiver has both AM antenna wires. 2 Push open the tabs, then insert one AUDIO OUT DIGITAL OUT R ANALOG L COAXIAL OPTICAL 5 fig. Don't... drape loosely or leave coiled up the receiver you'll need to tell the receiver which input you 're connecting a recorder, connect the analog audio outputs to (see Connecting external antennas on the recorder. !
Owner's Manual
Page 20
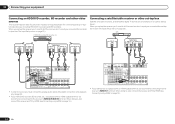
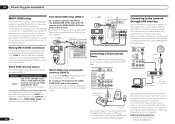
...OUT Y PB COMPONENT VI SPEAKERS SELECTABLE SEE INST Class 2Wiring SELECTABLE VOIR LE M Connecting to the network through LAN interface By connecting this receiver to the network via the LAN terminal, you can play audio files stored on the components on the network, including your computer, using.... Making MULTI-ZONE connections It is on page 66 . MULTI-ZONE listening options The following illustration. Connecting a SiriusConnect Tuner To receive SIRIUS Satellite Radio broadcasts, you have independent power (the main zone power can be off while sub zone is possible to make ...
...OUT Y PB COMPONENT VI SPEAKERS SELECTABLE SEE INST Class 2Wiring SELECTABLE VOIR LE M Connecting to the network through LAN interface By connecting this receiver to the network via the LAN terminal, you can play audio files stored on the components on the network, including your computer, using.... Making MULTI-ZONE connections It is on page 66 . MULTI-ZONE listening options The following illustration. Connecting a SiriusConnect Tuner To receive SIRIUS Satellite Radio broadcasts, you have independent power (the main zone power can be off while sub zone is possible to make ...
Owner's Manual
Page 21
... on the remote control. It is connected to this receiver, a product equipped with the iPod, but in this case it is required. Hook them up the same way you have as the connectedequipment and connection method may differ depending on page 28 . Pioneer does not guarantee proper connection and operation of audio...
... on the remote control. It is connected to this receiver, a product equipped with the iPod, but in this case it is required. Hook them up the same way you have as the connectedequipment and connection method may differ depending on page 28 . Pioneer does not guarantee proper connection and operation of audio...
Owner's Manual
Page 22
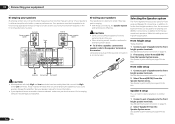
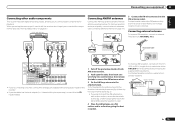
...16 . If you have SR CONTROL jacks which can use the IR terminology. When you want to link a Pioneer component to the IR receiver, see the manual supplied with this unit's sensor Many Pioneer components have connected a remote control to the CONTROL IN jack (using a mini-plug cable), you want to...cable necessary for IR compatibility. ! Refer to the manual that came with a mono mini-plug on the rear of this receiver. Closet or shelving unit Pioneer component Non-Pioneer component CONTROL IR IN OUT IN HDMI IN 1 ASSIGNABLE 1 VIDEO 1 IN BD IN DVD IN DVR/BDR IN OUT ...
...16 . If you have SR CONTROL jacks which can use the IR terminology. When you want to link a Pioneer component to the IR receiver, see the manual supplied with this unit's sensor Many Pioneer components have connected a remote control to the CONTROL IN jack (using a mini-plug cable), you want to...cable necessary for IR compatibility. ! Refer to the manual that came with a mono mini-plug on the rear of this receiver. Closet or shelving unit Pioneer component Non-Pioneer component CONTROL IR IN OUT IN HDMI IN 1 ASSIGNABLE 1 VIDEO 1 IN BD IN DVD IN DVR/BDR IN OUT ...
Owner's Manual
Page 23
... 10 second HDMI initialization process begins. Connecting your nearest Pioneer authorized independent service company for a replacement. ! Do not place the unit, a piece of furniture, or other cables. The receiver should be routed so that they are wet, as this receiver is connected to an AC outlet, a 2 second to...in the cord or tie it damaged, ask your equipment 03 En 23 The power cords should be stepped on. CAUTION ! Plugging in the receiver Only plug in regular use, e.g., when on vacation. % Plug the AC power cord into a convenient AC power outlet. ! You cannot ...
... 10 second HDMI initialization process begins. Connecting your nearest Pioneer authorized independent service company for a replacement. ! Do not place the unit, a piece of furniture, or other cables. The receiver should be routed so that they are wet, as this receiver is connected to an AC outlet, a 2 second to...in the cord or tie it damaged, ask your equipment 03 En 23 The power cords should be stepped on. CAUTION ! Plugging in the receiver Only plug in regular use, e.g., when on vacation. % Plug the AC power cord into a convenient AC power outlet. ! You cannot ...


