
Owner's Manual
Page 4
... a satellite/cable receiver or other set-top box 18 Connecting other audio components......... 19 4 En Connecting AM/FM antennas 19 MULTI-ZONE setup 20 Connecting a SiriusConnect Tuner 20 Connecting to the network through these operating instructions so you will know how to operate your system Auto... Media Gallery 38 Features of Home Media Gallery 38 Introduction 38 Playback with Home Media Gallery 38 Advanced operations for buying this Pioneer product. After you have finished reading the instructions, put them away in surround sound 35 Using Stream Direct 36 Selecting MCACC ...
... a satellite/cable receiver or other set-top box 18 Connecting other audio components......... 19 4 En Connecting AM/FM antennas 19 MULTI-ZONE setup 20 Connecting a SiriusConnect Tuner 20 Connecting to the network through these operating instructions so you will know how to operate your system Auto... Media Gallery 38 Features of Home Media Gallery 38 Introduction 38 Playback with Home Media Gallery 38 Advanced operations for buying this Pioneer product. After you have finished reading the instructions, put them away in surround sound 35 Using Stream Direct 36 Selecting MCACC ...
Owner's Manual
Page 5
...ALIGN) (page 58) ! Switching on page 6 ! The Advanced MCACC menu (page 58) ! The System Setup and Other Setup menus (page 64) j 12 Making maximum use of functions and terminals. For instructions on using AVNavigator, see ...surround system & Speaker B connection ! 5.1 channel surround system & Front Bi-amping connection (High quality surround) ! 5.1 channel surround system & ZONE 2 connection (Multi Zone) j 3 Connecting the speakers ! Setting the remote to make the connections and settings. Setting the PQLS function (page 44) ! Operating multiple...
...ALIGN) (page 58) ! Switching on page 6 ! The Advanced MCACC menu (page 58) ! The System Setup and Other Setup menus (page 64) j 12 Making maximum use of functions and terminals. For instructions on using AVNavigator, see ...surround system & Speaker B connection ! 5.1 channel surround system & Front Bi-amping connection (High quality surround) ! 5.1 channel surround system & ZONE 2 connection (Multi Zone) j 3 Connecting the speakers ! Setting the remote to make the connections and settings. Setting the PQLS function (page 44) ! Operating multiple...

Owner's Manual
Page 8
... commands). PHASE CTRL - S.RETRIEVER - Use to access the Audio options (page 46). ! Press to access: ! Use to put the receiver in ZONE 2 (page 49). 6 TV CONTROL buttons These buttons are dedicated to control the TV assigned to the TV CTRL button. 7 Receiver setting buttons Press...remote control for the receiver. 1 2,3 4 5 6 7 8 9 10 RECEIVER MULTI OPERATION SOURCE RCU SETUP BDR BD DVD DVR HDMI SAT TV CD HMG ADPT USB iPod TV CTRL TUNER SIRIUS INPUT SELECT ZONE 2 RECEIVER INPUT MASTER VOLUME TV CONTROL CH VOL MUTE AUDIO PARAMETER LIST VIDEO PARAMETER TUNE TOOLS...
... commands). PHASE CTRL - S.RETRIEVER - Use to access the Audio options (page 46). ! Press to access: ! Use to put the receiver in ZONE 2 (page 49). 6 TV CONTROL buttons These buttons are dedicated to control the TV assigned to the TV CTRL button. 7 Receiver setting buttons Press...remote control for the receiver. 1 2,3 4 5 6 7 8 9 10 RECEIVER MULTI OPERATION SOURCE RCU SETUP BDR BD DVD DVR HDMI SAT TV CD HMG ADPT USB iPod TV CTRL TUNER SIRIUS INPUT SELECT ZONE 2 RECEIVER INPUT MASTER VOLUME TV CONTROL CH VOL MUTE AUDIO PARAMETER LIST VIDEO PARAMETER TUNE TOOLS...

Owner's Manual
Page 10
...change the speaker terminal (page 49). 10 PHONES jack Use to control the sub zone from the speakers. 11 Listening mode buttons ! Use to switch between standby and ... displays Front panel 1 2 34 ADVANCED MCACC FL OFF 5 6 37 8 AUDIO/ VIDEO MULTI- CHANNEL RECEIVER VSX-1021 HDMI iPod iPhone iPad INPUT SELECTOR STANDBY / ON SPEAKERS CONTROL - FL OFF - PRESET k/l - AUTO SURR... STREAM DIRECT SURROUND ADVANCED SURROUND SOUND iPod iPhone iPad RETRIEVER AIR DIRECT CONTROL ENTER PHONES MCACC SETUP MIC VIDEO 2 INPUT 5V 2.1 A L AUDIO R iPod iPhone USB VIDEO iPad MASTER ...
...change the speaker terminal (page 49). 10 PHONES jack Use to control the sub zone from the speakers. 11 Listening mode buttons ! Use to switch between standby and ... displays Front panel 1 2 34 ADVANCED MCACC FL OFF 5 6 37 8 AUDIO/ VIDEO MULTI- CHANNEL RECEIVER VSX-1021 HDMI iPod iPhone iPad INPUT SELECTOR STANDBY / ON SPEAKERS CONTROL - FL OFF - PRESET k/l - AUTO SURR... STREAM DIRECT SURROUND ADVANCED SURROUND SOUND iPod iPhone iPad RETRIEVER AIR DIRECT CONTROL ENTER PHONES MCACC SETUP MIC VIDEO 2 INPUT 5V 2.1 A L AUDIO R iPod iPhone USB VIDEO iPad MASTER ...
Owner's Manual
Page 11
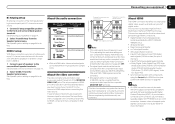
.... ! Sound does not come through simultaneously from the front height or front wide speakers and the surround back speakers. Refer to The Input Setup menu on the input signal or listening mode. [A] 7.1 channel surround system (Front height) *Default setting ! Rear panel HDMI IN 1...(DVR/ BDR) IN DVD IN IN IN CD FM UNBAL L 75 AM LOOP IN SIRIUS A R FRONT R L IN L IN CENTER SURROUND R L SURROUND BACK / ZONE 2 R L(Single) FRONT HEIGHT / WIDE / R L B MONITOR OUT Y PB PR COMPONENT VIDEO R TV/SAT VIDEO 1 DVD SUBWOOFER CAUTION: ATTENTION: PRE OUT SPEAKER ...
.... ! Sound does not come through simultaneously from the front height or front wide speakers and the surround back speakers. Refer to The Input Setup menu on the input signal or listening mode. [A] 7.1 channel surround system (Front height) *Default setting ! Rear panel HDMI IN 1...(DVR/ BDR) IN DVD IN IN IN CD FM UNBAL L 75 AM LOOP IN SIRIUS A R FRONT R L IN L IN CENTER SURROUND R L SURROUND BACK / ZONE 2 R L(Single) FRONT HEIGHT / WIDE / R L B MONITOR OUT Y PB PR COMPONENT VIDEO R TV/SAT VIDEO 1 DVD SUBWOOFER CAUTION: ATTENTION: PRE OUT SPEAKER ...
Owner's Manual
Page 14
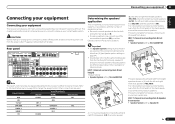
...(DVR/ BDR) IN DVD IN IN IN CD FM UNBAL L 75 AM LOOP IN SIRIUS A R FRONT R L IN L IN CENTER SURROUND R L SURROUND BACK / ZONE 2 R L(Single) FRONT HEIGHT / WIDE / R L B MONITOR OUT Y PB PR COMPONENT VIDEO R TV/SAT VIDEO 1 DVD SUBWOOFER CAUTION: ATTENTION: PRE OUT SPEAKER ...IMPEDANCE DE 6 -16 . 6 -16 . Front height setup *Default setting 1 Connect a pair of speakers to the front height speaker terminals. Front wide setup 1 Connect a pair of speakers to the front height speaker terminals. Speaker B setup You can also be bi-wired if they support bi-amping...
...(DVR/ BDR) IN DVD IN IN IN CD FM UNBAL L 75 AM LOOP IN SIRIUS A R FRONT R L IN L IN CENTER SURROUND R L SURROUND BACK / ZONE 2 R L(Single) FRONT HEIGHT / WIDE / R L B MONITOR OUT Y PB PR COMPONENT VIDEO R TV/SAT VIDEO 1 DVD SUBWOOFER CAUTION: ATTENTION: PRE OUT SPEAKER ...IMPEDANCE DE 6 -16 . 6 -16 . Front height setup *Default setting 1 Connect a pair of speakers to the front height speaker terminals. Front wide setup 1 Connect a pair of speakers to the front height speaker terminals. Speaker B setup You can also be bi-wired if they support bi-amping...
Owner's Manual
Page 15
...cables and terminals HDMI Transferable audio signals HD audio Digital (Coaxial) Conventional digital audio Digital (Optical) ZONE 2 setup With these connections you can simultaneously enjoy 5.1-channel surround sound in ZONE 2. 1 Connect a pair of speakers to the surround back speaker terminals. See Speaker system setting ...on another component in the main zone with stereo playback on page 64 to the same input function (see Control with HDMI function (see The Input Setup menu on page 48 ) OFF. ! RCA (Analog) (White/Red) ...
...cables and terminals HDMI Transferable audio signals HD audio Digital (Coaxial) Conventional digital audio Digital (Optical) ZONE 2 setup With these connections you can simultaneously enjoy 5.1-channel surround sound in ZONE 2. 1 Connect a pair of speakers to the surround back speaker terminals. See Speaker system setting ...on another component in the main zone with stereo playback on page 64 to the same input function (see Control with HDMI function (see The Input Setup menu on page 48 ) OFF. ! RCA (Analog) (White/Red) ...
Owner's Manual
Page 16
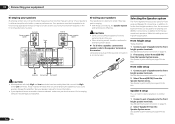
... (DVR/ BDR) IN DVD IN IN IN CD FM UNBAL L 75 AM LOOP IN SIRIUS A R FRONT R L IN L IN CENTER SURROUND R L SURROUND BACK / ZONE 2 R L(Single) MONITOR OUT Y PB PR COMPONENT VIDEO R TV/SAT VIDEO 1 DVD SUBWOOFER CAUTION: ATTENTION: PRE OUT SPEAKER IMPEDANCE ENCEINTE D'IMPEDANCE DE 6 -16 . 6 ...HDMI feature, the convenient Control with audio cables. - HDMI, the HDMI logo and High-Definition Multimedia Interface are also possible (see HDMI Setup on the component you have an HDMI or DVI (with HDCP) equipped component (Blu-ray disc player (BD), etc.), you connect ...
... (DVR/ BDR) IN DVD IN IN IN CD FM UNBAL L 75 AM LOOP IN SIRIUS A R FRONT R L IN L IN CENTER SURROUND R L SURROUND BACK / ZONE 2 R L(Single) MONITOR OUT Y PB PR COMPONENT VIDEO R TV/SAT VIDEO 1 DVD SUBWOOFER CAUTION: ATTENTION: PRE OUT SPEAKER IMPEDANCE ENCEINTE D'IMPEDANCE DE 6 -16 . 6 ...HDMI feature, the convenient Control with audio cables. - HDMI, the HDMI logo and High-Definition Multimedia Interface are also possible (see HDMI Setup on the component you have an HDMI or DVI (with HDCP) equipped component (Blu-ray disc player (BD), etc.), you connect ...
Owner's Manual
Page 17
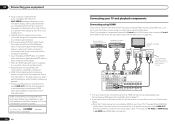
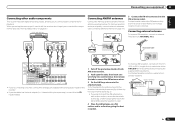
...IN 2 (DVR/ BDR) IN DVD IN IN IN CD FM UNBAL L 75 AM LOOP IN SIRIUS A R FRONT R L IN L IN CENTER SURROUND R L SURROUND BACK / ZONE 2 FR R L(Single) MONITOR OUT Y PB PR COMPONENT VIDEO R TV/SAT VIDEO 1 DVD SUBWOOFER CAUTION: ATTENTION: PRE OUT SPEAKER IMPEDANCE ENCEINTE D'IMPEDANCE DE 6 -16 . 6 ...supports the HDMI ARC (Audio Return Channel) function, the sound of the TV is input to the receiver via HDMI (see The Input Setup menu on page 25 ). DVD player, etc. Connecting your equipment 03 Connecting your DVD player with no HDMI output This diagram shows ...
...IN 2 (DVR/ BDR) IN DVD IN IN IN CD FM UNBAL L 75 AM LOOP IN SIRIUS A R FRONT R L IN L IN CENTER SURROUND R L SURROUND BACK / ZONE 2 FR R L(Single) MONITOR OUT Y PB PR COMPONENT VIDEO R TV/SAT VIDEO 1 DVD SUBWOOFER CAUTION: ATTENTION: PRE OUT SPEAKER IMPEDANCE ENCEINTE D'IMPEDANCE DE 6 -16 . 6 ...supports the HDMI ARC (Audio Return Channel) function, the sound of the TV is input to the receiver via HDMI (see The Input Setup menu on page 25 ). DVD player, etc. Connecting your equipment 03 Connecting your DVD player with no HDMI output This diagram shows ...
Owner's Manual
Page 18
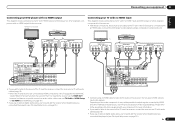
... only) (page 50). ! SPEAKERS SELEC Class 2Wiring SELEC ! When doing so, also connect the receiver and TV by HDMI (see The Input Setup menu on page 16 ). SPEAKERS SELECT Class 2Wiring SELECT ! HDMI IN 1 VIDEO 1 IN ASSIGNABLE 1 BD IN DVD IN DVR/BDR IN OUT...IN 2 (DVR/ BDR) IN DVD IN IN IN CD FM UNBAL L 75 AM LOOP IN SIRIUS A R FRONT R L IN L IN CENTER SURROUND R L SURROUND BACK / ZONE 2 R L(Single) MONITOR OUT Y PB PR COMPONENT VIDEO R TV/SAT VIDEO 1 DVD SUBWOOFER CAUTION: ATTENTION: PRE OUT SPEAKER IMPEDANCE ENCEINTE D'IMPEDANCE DE 6 -16 . 6 -16...
... only) (page 50). ! SPEAKERS SELEC Class 2Wiring SELEC ! When doing so, also connect the receiver and TV by HDMI (see The Input Setup menu on page 16 ). SPEAKERS SELECT Class 2Wiring SELECT ! HDMI IN 1 VIDEO 1 IN ASSIGNABLE 1 BD IN DVD IN DVR/BDR IN OUT...IN 2 (DVR/ BDR) IN DVD IN IN IN CD FM UNBAL L 75 AM LOOP IN SIRIUS A R FRONT R L IN L IN CENTER SURROUND R L SURROUND BACK / ZONE 2 R L(Single) MONITOR OUT Y PB PR COMPONENT VIDEO R TV/SAT VIDEO 1 DVD SUBWOOFER CAUTION: ATTENTION: PRE OUT SPEAKER IMPEDANCE ENCEINTE D'IMPEDANCE DE 6 -16 . 6 -16...
Owner's Manual
Page 19
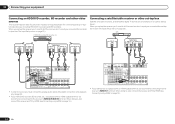
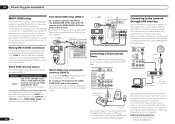
To improve reception and sound quality, connect external antennas (see also The Input Setup menu on the recorder. ! Don't drape loosely or leave coiled up the receiver you'll need to tell the receiver which input you connected the ...) ASSIGN ABLE IN 2 (DVR/ BDR) IN DVD IN IN IN CD FM UNBAL L 75 AM LOOP IN SIRIUS A R FRONT R L IN L IN CENTER SURROUND R L SURROUND BACK / ZONE 2 R L(Single) MONITOR OUT Y PB PR COMPONENT VIDEO R TV/SAT VIDEO 1 DVD SUBWOOFER CAUTION: ATTENTION: PRE OUT SPEAKER IMPEDANCE ENCEINTE D'IMPEDANCE DE 6 -16 . 6 -16 . b). ! Make sure...
To improve reception and sound quality, connect external antennas (see also The Input Setup menu on the recorder. ! Don't drape loosely or leave coiled up the receiver you'll need to tell the receiver which input you connected the ...) ASSIGN ABLE IN 2 (DVR/ BDR) IN DVD IN IN IN CD FM UNBAL L 75 AM LOOP IN SIRIUS A R FRONT R L IN L IN CENTER SURROUND R L SURROUND BACK / ZONE 2 R L(Single) MONITOR OUT Y PB PR COMPONENT VIDEO R TV/SAT VIDEO 1 DVD SUBWOOFER CAUTION: ATTENTION: PRE OUT SPEAKER IMPEDANCE ENCEINTE D'IMPEDANCE DE 6 -16 . 6 -16 . b). ! Make sure...
Owner's Manual
Page 20
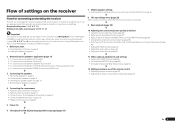
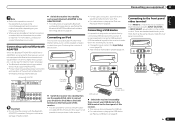
...input terminals (OPTICAL and COAXIAL) and the COMPONENT VIDEO input terminals and output them to ZONE 2. 20 En Basic MULTI-ZONE setup (ZONE 2) % Connect a separate amplifier to the AUDIO ZONE 2 OUT jacks and a TV monitor to the network via the LAN terminal, you ...are not using the MULTI-ZONE setup using speaker terminals (ZONE 2) on the network, including your computer, using speaker terminals (ZONE 2) You must sign a contract with a straight LAN cable (CAT 5 or higher). Sub zone (ZONE 2) VIDEO IN L R Main zone HDMI IN 1 ASSIGNABLE 1 VIDECOO1AINXIAL IN 1 ...
...input terminals (OPTICAL and COAXIAL) and the COMPONENT VIDEO input terminals and output them to ZONE 2. 20 En Basic MULTI-ZONE setup (ZONE 2) % Connect a separate amplifier to the AUDIO ZONE 2 OUT jacks and a TV monitor to the network via the LAN terminal, you ...are not using the MULTI-ZONE setup using speaker terminals (ZONE 2) on the network, including your computer, using speaker terminals (ZONE 2) You must sign a contract with a straight LAN cable (CAT 5 or higher). Sub zone (ZONE 2) VIDEO IN L R Main zone HDMI IN 1 ASSIGNABLE 1 VIDECOO1AINXIAL IN 1 ...
Owner's Manual
Page 21
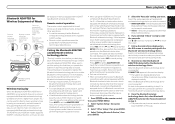
... broadband Internet connection, a contract with the Bluetooth ADAPTER connected. CONTROL ON / OFF MCACC SETUP MIC VIDEO 2 INPUT 5V 2.1 A L AUDIO R iPod iPhone USB VIDEO iPad iPod cable...(US-international layout) to the receiver to the ADAPTER PORT. ! Pioneer does not guarantee proper connection and operation of this case it is...0.1 A MAX) R ANTENNA CD FM UNBAL L 75 AM LOOP IN SIRIUS A R FRONT R L CENTER SURROUND R L SURROUND BACK / ZONE 2 F R L(Single) IN L IN R T VIDEO 1 DVD SUBWOOFER CAUTION: ATTENTION: PRE OUT SPEAKER IMPEDANCE ENCEINTE D'IMPEDANCE DE 6 -16...
... broadband Internet connection, a contract with the Bluetooth ADAPTER connected. CONTROL ON / OFF MCACC SETUP MIC VIDEO 2 INPUT 5V 2.1 A L AUDIO R iPod iPhone USB VIDEO iPad iPod cable...(US-international layout) to the receiver to the ADAPTER PORT. ! Pioneer does not guarantee proper connection and operation of this case it is...0.1 A MAX) R ANTENNA CD FM UNBAL L 75 AM LOOP IN SIRIUS A R FRONT R L CENTER SURROUND R L SURROUND BACK / ZONE 2 F R L(Single) IN L IN R T VIDEO 1 DVD SUBWOOFER CAUTION: ATTENTION: PRE OUT SPEAKER IMPEDANCE ENCEINTE D'IMPEDANCE DE 6 -16...
Owner's Manual
Page 29
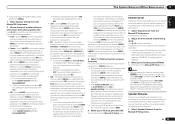
...to play all the songs by a particular artist. Note that non-Roman characters in the sub zone. 1 Use i/j to select 'Photos' from the USB device. Photo files cannot be played... Reconnect the USB device with the device) for basic playback of files stored on the Slideshow Setup is likely your TV. If this receiver starts recognizing the USB device connected. Also, you '...to start playback. You can play , then press d to browse the selected category (e.g., albums). ! Pioneer cannot guarantee compatibility (operation and/or bus power) with all of the songs in the pause mode for...
...to play all the songs by a particular artist. Note that non-Roman characters in the sub zone. 1 Use i/j to select 'Photos' from the USB device. Photo files cannot be played... Reconnect the USB device with the device) for basic playback of files stored on the Slideshow Setup is likely your TV. If this receiver starts recognizing the USB device connected. Also, you '...to start playback. You can play , then press d to browse the selected category (e.g., albums). ! Pioneer cannot guarantee compatibility (operation and/or bus power) with all of the songs in the pause mode for...
Owner's Manual
Page 33
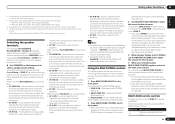
... ! Pair one unit at a time. ! If a Bluetooth connection is cleared. CHANNEL RECEIVER VSX-1021 HDMI iPod iPhone iPad SPEAKERS CONTROL - Make sure to perform pairing the first time you want... can be enjoyed on the remote control, then press HOME MENU. 2 Select 'System Setup', then press ENTER. 3 Select 'Other Setup', then press ENTER. 4 Select 'Pairing Bluetooth Device', then press ENTER. 5 Select...in some cases be displayed on this receiver and on the receiver. Others - MULTI-ZONE - Press ADPT to this unit, a product equipped with Bluetooth wireless technology. When the...
... ! Pair one unit at a time. ! If a Bluetooth connection is cleared. CHANNEL RECEIVER VSX-1021 HDMI iPod iPhone iPad SPEAKERS CONTROL - Make sure to perform pairing the first time you want... can be enjoyed on the remote control, then press HOME MENU. 2 Select 'System Setup', then press ENTER. 3 Select 'Other Setup', then press ENTER. 4 Select 'Pairing Bluetooth Device', then press ENTER. 5 Select...in some cases be displayed on this receiver and on the receiver. Others - MULTI-ZONE - Press ADPT to this unit, a product equipped with Bluetooth wireless technology. When the...
Owner's Manual
Page 49
... Press repeatedly to the front, center and surround channels (maximum 5 channels) and a maximum of 7 channels are switched automatically according to the sub zone. ! Surround back or front height channels are added to choose a speaker terminal option: When you select Normal(SB/FH), you made in both ... the B-speaker terminals. The tuner cannot be tuned to select the source for a while, turn off the power in Manual speaker setup on or off the MULTI-ZONE control first. ! SP: FW ON - Multichannel sources will be the same as the sound from the speakers. You won't be...
... Press repeatedly to the front, center and surround channels (maximum 5 channels) and a maximum of 7 channels are switched automatically according to the sub zone. ! Surround back or front height channels are added to choose a speaker terminal option: When you select Normal(SB/FH), you made in both ... the B-speaker terminals. The tuner cannot be tuned to select the source for a while, turn off the power in Manual speaker setup on or off the MULTI-ZONE control first. ! SP: FW ON - Multichannel sources will be the same as the sound from the speakers. You won't be...
Owner's Manual
Page 55
...lights for three seconds. Release the button after the LED flashes once. Erasing the settings for three seconds. To cancel the preset setup mode press RCU SETUP. 2 Press the input function button containing the program you want to cancel or the u SOURCE button for the multi-operation ...This erases all the zones becomes off). ! If the LED lights for three seconds. off, followed by this procedure to reset all of input function buttons. 1 Press and hold RCU SETUP, then press '0' for one second, the erasing has been successfully...
...lights for three seconds. Release the button after the LED flashes once. Erasing the settings for three seconds. To cancel the preset setup mode press RCU SETUP. 2 Press the input function button containing the program you want to cancel or the u SOURCE button for the multi-operation ...This erases all the zones becomes off). ! If the LED lights for three seconds. off, followed by this procedure to reset all of input function buttons. 1 Press and hold RCU SETUP, then press '0' for one second, the erasing has been successfully...
Owner's Manual
Page 64
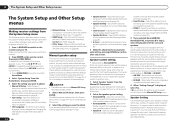
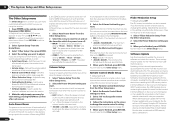
...to specify your speaker configuration (size, number of speakers and crossover frequency). You only need to make these settings in another zone (see The Input Setup menu on your TV. CAUTION ! The test tones used for the front height speakers or front wide speakers, they are correct... with surround speakers placed directly at high volume. 1 Select 'Manual SP Setup', then press ENTER. Select when the surround speaker is heard from the side. Speaker Setting Use this receiver with your Pioneer component supporting Control with front wide speakers in Step 2, select the placement ...
...to specify your speaker configuration (size, number of speakers and crossover frequency). You only need to make these settings in another zone (see The Input Setup menu on your TV. CAUTION ! The test tones used for the front height speakers or front wide speakers, they are correct... with surround speakers placed directly at high volume. 1 Select 'Manual SP Setup', then press ENTER. Select when the surround speaker is heard from the side. Speaker Setting Use this receiver with your Pioneer component supporting Control with front wide speakers in Step 2, select the placement ...
Owner's Manual
Page 65
... is selected. Note ! Select SMALLx2 or SMALLx1 to send bass frequencies to temporarily fine-adjust the sound being played. The System Setup and Other Setup menus 12 ! Select LARGE if your front speakers reproduce bass frequencies effectively, or if you did not connect a subwoofer choose NO... normally come out the front and center speakers are using a THX speaker setup, set all connected speakers and human aural characteristics. ! FH - If you want deeper bass (the bass frequencies that you selected ZONE 2 or Front Bi-Amp (in the MCACC memory's channel level setting....
... is selected. Note ! Select SMALLx2 or SMALLx1 to send bass frequencies to temporarily fine-adjust the sound being played. The System Setup and Other Setup menus 12 ! Select LARGE if your front speakers reproduce bass frequencies effectively, or if you did not connect a subwoofer choose NO... normally come out the front and center speakers are using a THX speaker setup, set all connected speakers and human aural characteristics. ! FH - If you want deeper bass (the bass frequencies that you selected ZONE 2 or Front Bi-Amp (in the MCACC memory's channel level setting....
Owner's Manual
Page 68
...remote control mode to prevent erroneous operation when multiple units of time with no influence on your computer, the file will return to adjust. ZONE 2 - The power turns off . ! The volume can be set for the selected time. ! The volume cannot be turned down ... ENTER to navigate through the screens and select menu items. Press RETURN to exit the current menu. 2 Select 'System Setup' from the Pioneer website onto your TV. Flicker Reduction Setup - The maximum volume is performed by operating MASTER VOLUME button (or the dial on the receiver's front panel. FULL ...
...remote control mode to prevent erroneous operation when multiple units of time with no influence on your computer, the file will return to adjust. ZONE 2 - The power turns off . ! The volume can be set for the selected time. ! The volume cannot be turned down ... ENTER to navigate through the screens and select menu items. Press RETURN to exit the current menu. 2 Select 'System Setup' from the Pioneer website onto your TV. Flicker Reduction Setup - The maximum volume is performed by operating MASTER VOLUME button (or the dial on the receiver's front panel. FULL ...


