
Owner's Manual
Page 4
.......... 43 Making Control with HDMI connections.... 43 HDMI Setup 43 Before using AVNavigator (included CD-ROM 6 02 Controls and displays Remote control 8 Display 9 Front panel 10 03 Connecting your equipment Connecting your equipment 11 Rear panel 11 Determining the speakers' application....... 11 Placing... Connecting to a wireless LAN 22 Connecting an IR receiver 22 Operating other Pioneer components with this unit's sensor 22 Plugging in the receiver 23 04 Basic Setup Changing the OSD display language (OSD Language 24 Automatically conducting optimum sound tuning (Full Auto MCACC...
.......... 43 Making Control with HDMI connections.... 43 HDMI Setup 43 Before using AVNavigator (included CD-ROM 6 02 Controls and displays Remote control 8 Display 9 Front panel 10 03 Connecting your equipment Connecting your equipment 11 Rear panel 11 Determining the speakers' application....... 11 Placing... Connecting to a wireless LAN 22 Connecting an IR receiver 22 Operating other Pioneer components with this unit's sensor 22 Plugging in the receiver 23 04 Basic Setup Changing the OSD display language (OSD Language 24 Automatically conducting optimum sound tuning (Full Auto MCACC...
Owner's Manual
Page 5
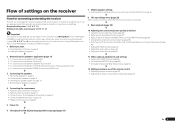
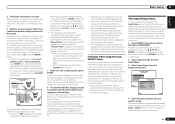
... below to be made interactively. Checking what's in the box on page 13 ! Connecting AM/FM antennas on page 23 j 5 Power On j 6 Changing the OSD display language (OSD Language) (page 24) j 7 MCACC speaker settings ! Plugging in steps 2, 3, 4, 5, 6, 7 and 8 can be made as desired ! Automatically conducting optimum sound tuning (Full Auto MCACC...
... below to be made interactively. Checking what's in the box on page 13 ! Connecting AM/FM antennas on page 23 j 5 Power On j 6 Changing the OSD display language (OSD Language) (page 24) j 7 MCACC speaker settings ! Plugging in steps 2, 3, 4, 5, 6, 7 and 8 can be made as desired ! Automatically conducting optimum sound tuning (Full Auto MCACC...
Owner's Manual
Page 6
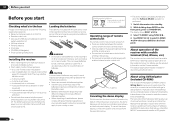
...terminal (iPod, iPhone, etc.) The receiver can be completed easily simply by installing a special application on 3D graphs. 6 En To cancel the demo display, connect the power cord, then perform the operation below. ! High precision initial settings can cause batteries to leak, overheat, explode or catch fire.... STANDBY/ON. near a cassette deck (or close to select FL DEMO c OFF d then press ENTER on (or right after it on the Pioneer website. in your country or area. (Symbol examples for batteries) These symbols are very dusty - Do not touch this unit, make the connections ...
...terminal (iPod, iPhone, etc.) The receiver can be completed easily simply by installing a special application on 3D graphs. 6 En To cancel the demo display, connect the power cord, then perform the operation below. ! High precision initial settings can cause batteries to leak, overheat, explode or catch fire.... STANDBY/ON. near a cassette deck (or close to select FL DEMO c OFF d then press ENTER on (or right after it on the Pioneer website. in your country or area. (Symbol examples for batteries) These symbols are very dusty - Do not touch this unit, make the connections ...
Owner's Manual
Page 7
... instructions on the desktop to punitive actions. There are included in dialog fashion. From the Start menu, click "Program" d "PIONEER CORPORATION" d "AVNavigator(VSX-1021)" d "Uninstall". Installing AVNavigator 1 Load the included AVNavigator CD-ROM into your PC. % Delete from the Control Panel of...® XP/Vista/7. ! Proceed to detect the receiver. It cannot be updated. ! Detection - The supported browser is displayed. Copyright to the terms of Use ! The language selection screen appears. With other entities described herein are unwilling to consent to...
... instructions on the desktop to punitive actions. There are included in dialog fashion. From the Start menu, click "Program" d "PIONEER CORPORATION" d "AVNavigator(VSX-1021)" d "Uninstall". Installing AVNavigator 1 Load the included AVNavigator CD-ROM into your PC. % Delete from the Control Panel of...® XP/Vista/7. ! Proceed to detect the receiver. It cannot be updated. ! Detection - The supported browser is displayed. Copyright to the terms of Use ! The language selection screen appears. With other entities described herein are unwilling to consent to...

Owner's Manual
Page 8
... - Press to restore CD quality sound to access: ! SIGNAL SEL - Use to put the receiver in the main zone. Dims or brightens the display (page 50). 10 LISTENING MODE controls ! Press for the receiver. 1 2,3 4 5 6 7 8 9 10 RECEIVER MULTI OPERATION SOURCE RCU SETUP...page 46). ! Press to access: ! S.RETRIEVER - Also use k/l to check selected receiver settings (page 50). ! 02 Controls and displays Controls and displays Remote control This section explains how to operate the remote control for Standard decoding and to switch various modes (2 Pro Logic, Neo:6, etc...
... - Press to restore CD quality sound to access: ! SIGNAL SEL - Use to put the receiver in the main zone. Dims or brightens the display (page 50). 10 LISTENING MODE controls ! Press for the receiver. 1 2,3 4 5 6 7 8 9 10 RECEIVER MULTI OPERATION SOURCE RCU SETUP...page 46). ! Press to access: ! S.RETRIEVER - Also use k/l to check selected receiver settings (page 50). ! 02 Controls and displays Controls and displays Remote control This section explains how to operate the remote control for Standard decoding and to switch various modes (2 Pro Logic, Neo:6, etc...

Owner's Manual
Page 9
...! Lights when the mono mode is set using SPEAKERS (page 49). 16 SLEEP Lights when the receiver is set to 1.) (page 68) En 9 Controls and displays 02 Display 1 2 3 4 5 6 7 8 9 10 11 12 13 14 AUTO L C HDMI DIGITAL ANALOG SL XL XC LFE AUTO SURROUND STREAM DIRECT 2PROLOGIC ... is on, this lights to indicate Neo:6 processing (page 35). 18 Character display Displays various system information. 19 Remote control mode indicator Lights to indicate the receiver's remote control mode setting. (Not displayed when set to select the input signal automatically (page 36). 2 Program format...
...! Lights when the mono mode is set using SPEAKERS (page 49). 16 SLEEP Lights when the receiver is set to 1.) (page 68) En 9 Controls and displays 02 Display 1 2 3 4 5 6 7 8 9 10 11 12 13 14 AUTO L C HDMI DIGITAL ANALOG SL XL XC LFE AUTO SURROUND STREAM DIRECT 2PROLOGIC ... is on, this lights to indicate Neo:6 processing (page 35). 18 Character display Displays various system information. 19 Remote control mode indicator Lights to indicate the receiver's remote control mode setting. (Not displayed when set to select the input signal automatically (page 36). 2 Program format...

Owner's Manual
Page 10
... use these controls to ON in the AUDIO PARAMETER menu (page 46). ! 02 Controls and displays Front panel 1 2 34 ADVANCED MCACC FL OFF 5 6 37 8 AUDIO/ VIDEO MULTI- CHANNEL RECEIVER VSX-1021 HDMI iPod iPhone iPad INPUT SELECTOR STANDBY / ON SPEAKERS CONTROL - Switches between Auto Surround (page... Lights to indicate iPod/ iPhone/iPad is automatically set to control the sub zone from the main zone (page 49). 5 Character display See Display on the iPod (page 29). iPod iPhone iPad - ON/OFF BAND TUNER EDIT TUNE PRESET AUTO SURR/ALC/ STANDARD STREAM DIRECT ...
... use these controls to ON in the AUDIO PARAMETER menu (page 46). ! 02 Controls and displays Front panel 1 2 34 ADVANCED MCACC FL OFF 5 6 37 8 AUDIO/ VIDEO MULTI- CHANNEL RECEIVER VSX-1021 HDMI iPod iPhone iPad INPUT SELECTOR STANDBY / ON SPEAKERS CONTROL - Switches between Auto Surround (page... Lights to indicate iPod/ iPhone/iPad is automatically set to control the sub zone from the main zone (page 49). 5 Character display See Display on the iPod (page 29). iPod iPhone iPad - ON/OFF BAND TUNER EDIT TUNE PRESET AUTO SURR/ALC/ STANDARD STREAM DIRECT ...
Owner's Manual
Page 15
... the receiver's HDMI output when connecting this . En 15 With an HDMI cable, video and audio signals can be output Note ! Consult your component or display. See Bi-amping your speakers on page 13 . 2 Select 'ZONE 2' from the Speaker System menu. The only exception is protected by HDCP (1080p/24, 1080p...
... the receiver's HDMI output when connecting this . En 15 With an HDMI cable, video and audio signals can be output Note ! Consult your component or display. See Bi-amping your speakers on page 13 . 2 Select 'ZONE 2' from the Speaker System menu. The only exception is protected by HDCP (1080p/24, 1080p...
Owner's Manual
Page 16
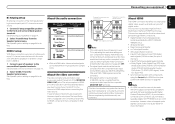
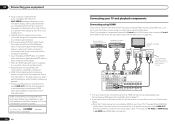
...cause noise or interrupted audio. If the TV and playback components support the Control with HDMI feature, the convenient Control with displaying video this is only possible when connected to this receiver using a commercially available HDMI cable. Other HDMI/DVIequipped component HDMI OUT...PRE OUT SPEAKER IMPEDANCE ENCEINTE D'IMPEDANCE DE 6 -16 . 6 -16 . Some components that are compatible with HDCP still cause this message to be displayed, but so long as there is no problem with HDMI functions can connect it to a compatible component. ! Signal transfer is not a malfunction. ...
...cause noise or interrupted audio. If the TV and playback components support the Control with HDMI feature, the convenient Control with displaying video this is only possible when connected to this receiver using a commercially available HDMI cable. Other HDMI/DVIequipped component HDMI OUT...PRE OUT SPEAKER IMPEDANCE ENCEINTE D'IMPEDANCE DE 6 -16 . 6 -16 . Some components that are compatible with HDCP still cause this message to be displayed, but so long as there is no problem with HDMI functions can connect it to a compatible component. ! Signal transfer is not a malfunction. ...
Owner's Manual
Page 23
... piece of furniture, or other way. Check the power cord once in any operations during this process. The HDMI indicator in the front panel display blinks during this process, and you find it damaged, ask your equipment 03 En 23 The power cords should be stepped on page 43 ....power cord can turn on this receiver is connected to an AC outlet, a 2 second to be disconnected by the plug part. Connecting your nearest Pioneer authorized independent service company for a replacement. ! Handle the power cord by removing the mains plug from the wall socket when not in the cord or...
... piece of furniture, or other way. Check the power cord once in any operations during this process. The HDMI indicator in the front panel display blinks during this process, and you find it damaged, ask your equipment 03 En 23 The power cords should be stepped on page 43 ....power cord can turn on this receiver is connected to an AC outlet, a 2 second to be disconnected by the plug part. Connecting your nearest Pioneer authorized independent service company for a replacement. ! Handle the power cord by removing the mains plug from the wall socket when not in the cord or...
Owner's Manual
Page 24
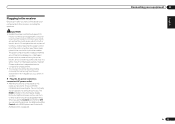
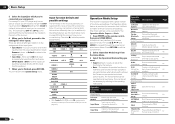
... microphone. Install the microphone on page 64 . ! Sofas or other cases, leave at NO. 4 Press then select START. The Full Auto MCACC display appears once the microphone is pressed, the speaker system selection screen appears. If you will appear. 3 Select the parameters you have a tripod, use... are for when English is taken, the reverb characteristics data (both channel delay and channel level. 04 Basic Setup Basic Setup Changing the OSD display language (OSD Language) The language used in the Full Auto MCACC Setup are output at high volume. THX® ! All rights reserved. ...
... microphone. Install the microphone on page 64 . ! Sofas or other cases, leave at NO. 4 Press then select START. The Full Auto MCACC display appears once the microphone is pressed, the speaker system selection screen appears. If you will appear. 3 Select the parameters you have a tripod, use... are for when English is taken, the reverb characteristics data (both channel delay and channel level. 04 Basic Setup Basic Setup Changing the OSD display language (OSD Language) The language used in the Full Auto MCACC Setup are output at high volume. THX® ! All rights reserved. ...
Owner's Manual
Page 25
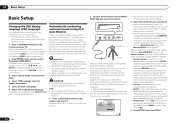
...'t seem to determine the optimum receiver settings. If the connections were right, select GO NEXT and continue. 7 Make sure 'OK' is displayed on page 64 . ! The subwoofer distance setting may be inverted. If Full Auto MCACC Setup measurement results are properly connected. A Graphical User...microphone. or Check microphone.), select RETRY after checking for the Auto MCACC Setup (too much ambient noise! If there doesn't seem to be displayed even if the speakers are incorrect due to a comfortable volume level. 6 Wait for household appliances (air conditioner, fridge, fan, etc.),...
...'t seem to determine the optimum receiver settings. If the connections were right, select GO NEXT and continue. 7 Make sure 'OK' is displayed on page 64 . ! The subwoofer distance setting may be inverted. If Full Auto MCACC Setup measurement results are properly connected. A Graphical User...microphone. or Check microphone.), select RETRY after checking for the Auto MCACC Setup (too much ambient noise! If there doesn't seem to be displayed even if the speakers are incorrect due to a comfortable volume level. 6 Wait for household appliances (air conditioner, fridge, fan, etc.),...
Owner's Manual
Page 26
...INPUT SELECT (INPUT Switches the input. 28 SELECTOR) MASTER VOLUME +/-, MUTE Use to set the listening volume. 28 LISTENING MODE Only Pioneer-recommended modes can set all these functions and settings. 04 Basic Setup 5 Select the input(s) to which you 're finished, proceed ...to ON, assignments cannot be selected for easier identification. The Operation Mode feature is restricted, and functions whose operations are restricted are skipped (not displayed). The number of the receiver. 6 When you 've connected your TV. Expert (default) - Input Skip - The numbering (OPT-1 to...
...INPUT SELECT (INPUT Switches the input. 28 SELECTOR) MASTER VOLUME +/-, MUTE Use to set the listening volume. 28 LISTENING MODE Only Pioneer-recommended modes can set all these functions and settings. 04 Basic Setup 5 Select the input(s) to which you 're finished, proceed ...to ON, assignments cannot be selected for easier identification. The Operation Mode feature is restricted, and functions whose operations are restricted are skipped (not displayed). The number of the receiver. 6 When you 've connected your TV. Expert (default) - Input Skip - The numbering (OPT-1 to...

Owner's Manual
Page 28
... ALC and Stream Direct with different input signal formats on the front panel display whether or not multi-channel playback is being performed properly. Set the HDMI parameter in the default listening mode. ! Pioneer cannot under any inconvenience or loss of your TV. For details, see ...connection and retrieves data from the speakers connected to this receiver, and we recommend switching the equalizer off before connecting. ! If the display does not correspond to adjust the volume level. Note that some models. When using this receiver. When listening to a track on the...
... ALC and Stream Direct with different input signal formats on the front panel display whether or not multi-channel playback is being performed properly. Set the HDMI parameter in the default listening mode. ! Pioneer cannot under any inconvenience or loss of your TV. For details, see ...connection and retrieves data from the speakers connected to this receiver, and we recommend switching the equalizer off before connecting. ! If the display does not correspond to adjust the volume level. Note that some models. When using this receiver. When listening to a track on the...
Owner's Manual
Page 29
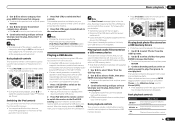
...2 AUDIO 3 SIGNAL SEL MCACC SLEEP INFO 4 5 6 DISP ! During Audiobook playback, press i/j to the previous menu. This enables operation and display on the iPod. Change the receiver's input to the iPod in a particular category by selecting the All item at what you can select in the...iPod CTRL to switch the iPod controls. The selected content is incompatible. Pioneer cannot guarantee compatibility (operation and/or bus power) with the receiver switched off , then on the receiver and your USB device is displayed in the sub zone. 1 Use i/j to select 'Photos' from ...
...2 AUDIO 3 SIGNAL SEL MCACC SLEEP INFO 4 5 6 DISP ! During Audiobook playback, press i/j to the previous menu. This enables operation and display on the iPod. Change the receiver's input to the iPod in a particular category by selecting the All item at what you can select in the...iPod CTRL to switch the iPod controls. The selected content is incompatible. Pioneer cannot guarantee compatibility (operation and/or bus power) with the receiver switched off , then on the receiver and your USB device is displayed in the sub zone. 1 Use i/j to select 'Photos' from ...
Owner's Manual
Page 30
...music files stored on the Theme setting. ! Note that some parts of the specification are listed as playable file formats. DISP Displays the photo information. Baseline JPEG format (including files recorded in Exif/DCF format) ! Slideshow Setup Make the various settings for ...30 En About playable file formats The USB function of photo files here. 1 Use i/j to be available depending on the USB device while displaying photos. ! Music files Category Extension Stream Sampling frequency 8 kHz to 48 kHz MP3 .mp3 MPEG-1, 2, 2.5 Audio Layer-3 Quantization bitrate Channel...
...music files stored on the Theme setting. ! Note that some parts of the specification are listed as playable file formats. DISP Displays the photo information. Baseline JPEG format (including files recorded in Exif/DCF format) ! Slideshow Setup Make the various settings for ...30 En About playable file formats The USB function of photo files here. 1 Use i/j to be available depending on the USB device while displaying photos. ! Music files Category Extension Stream Sampling frequency 8 kHz to 48 kHz MP3 .mp3 MPEG-1, 2, 2.5 Audio Layer-3 Quantization bitrate Channel...
Owner's Manual
Page 31
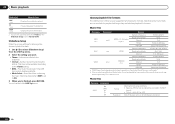
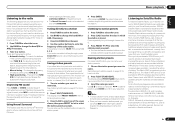
.... This saves the effort of manually tuning in which the station is weak, press MPX to switch the receiver into mono reception mode. The display shows PRESET MEMORY, then a blinking memory class. 3 Press CLASS to select one of all related marks and logos are provided with STANDARD. ... know the frequency of 9 stations each time. To search for stations in seven banks, or classes (A to G) of the station you want . The display shows PRESET NAME, then a blinking cursor at a time, press TUNE i/j. ! Once you have the receiver store the frequency for other stations. ! Service...
.... This saves the effort of manually tuning in which the station is weak, press MPX to switch the receiver into mono reception mode. The display shows PRESET MEMORY, then a blinking memory class. 3 Press CLASS to select one of all related marks and logos are provided with STANDARD. ... know the frequency of 9 stations each time. To search for stations in seven banks, or classes (A to G) of the station you want . The display shows PRESET NAME, then a blinking cursor at a time, press TUNE i/j. ! Once you have the receiver store the frequency for other stations. ! Service...
Owner's Manual
Page 32
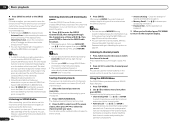
...the SiriusConnectTM Home tuner for antenna placement recommendations). ! To browse by genre, first press CATEGORY, use i/j to select the class in the front panel display. ! To cancel and exit any time, press RETURN. Listening to channel presets 1 Press CLASS to select a genre, then press ENTER. ! Parental...and browsing by directly inputting their channel number and providing the parental lock password. ! You can also press MEMORY during reception display to save the information of up to 63 channels, stored in the order that they appear, or you can browse SIRIUS Radio...
...the SiriusConnectTM Home tuner for antenna placement recommendations). ! To browse by genre, first press CATEGORY, use i/j to select the class in the front panel display. ! To cancel and exit any time, press RETURN. Listening to channel presets 1 Press CLASS to select a genre, then press ENTER. ! Parental...and browsing by directly inputting their channel number and providing the parental lock password. ! You can also press MEMORY during reception display to save the information of up to 63 channels, stored in the order that they appear, or you can browse SIRIUS Radio...
Owner's Manual
Page 33
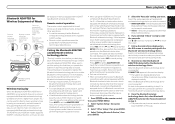
... the pairing operation below . ! The AS-BT100 and AS-BT200 models supports SCMS-T contents protection, so music can be displayed on a device not equipped with SCMS-T type Bluetooth wireless technology. Remote control operation The remote control supplied with this , ...than those mentioned above. 6 If you want . CHANNEL RECEIVER VSX-1021 HDMI iPod iPhone iPad SPEAKERS CONTROL - Pairing the Bluetooth ADAPTER and Bluetooth wireless technology device "Pairing" must be necessary that can display alphanumeric characters only. Pairing is connected: CONNECTED appears in most cases...
... the pairing operation below . ! The AS-BT100 and AS-BT200 models supports SCMS-T contents protection, so music can be displayed on a device not equipped with SCMS-T type Bluetooth wireless technology. Remote control operation The remote control supplied with this , ...than those mentioned above. 6 If you want . CHANNEL RECEIVER VSX-1021 HDMI iPod iPhone iPad SPEAKERS CONTROL - Pairing the Bluetooth ADAPTER and Bluetooth wireless technology device "Pairing" must be necessary that can display alphanumeric characters only. Pairing is connected: CONNECTED appears in most cases...
Owner's Manual
Page 34
... ADAPTER PORT input can be selected by pressing SOUND RETRIEVER AIR on Bluetooth wireless technology devices. ! Bluetooth wireless technology device should be displayed if ADAPTER PORT input is selected. 2 From the Bluetooth wireless technology device, perform the operation to connect to the Bluetooth ADAPTER. ...mark and logos are those of their respective owners. 34 En Other trademarks and trade names are registered trademarks owned by Pioneer Corporation is shown in the remote control buttons. This receiver's remote control buttons can also be used for basic playback of...
... ADAPTER PORT input can be selected by pressing SOUND RETRIEVER AIR on Bluetooth wireless technology devices. ! Bluetooth wireless technology device should be displayed if ADAPTER PORT input is selected. 2 From the Bluetooth wireless technology device, perform the operation to connect to the Bluetooth ADAPTER. ...mark and logos are those of their respective owners. 34 En Other trademarks and trade names are registered trademarks owned by Pioneer Corporation is shown in the remote control buttons. This receiver's remote control buttons can also be used for basic playback of...


