
Owner's Manual
Page 1
Operating Instructions Manual de instrucciones AUDIO/VIDEO MULTI-CHANNEL RECEIVER RECEPTOR AUDIO-VIDEO MULTICANAL VSX-1021-K Register your product on http://www.pioneerelectronics.com (US) http://www.pioneerelectronics.ca (Canada) · Protect your new investment The details of your purchase will ... service bulletins on your new product · Improve product development Your input helps us continue to design products that meet your needs. · Receive a free Pioneer newsletter Registered customers can opt in to receive a monthly newsletter.
Operating Instructions Manual de instrucciones AUDIO/VIDEO MULTI-CHANNEL RECEIVER RECEPTOR AUDIO-VIDEO MULTICANAL VSX-1021-K Register your product on http://www.pioneerelectronics.com (US) http://www.pioneerelectronics.ca (Canada) · Protect your new investment The details of your purchase will ... service bulletins on your new product · Improve product development Your input helps us continue to design products that meet your needs. · Receive a free Pioneer newsletter Registered customers can opt in to receive a monthly newsletter.
Owner's Manual
Page 4
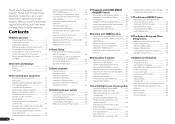
...device 21 Connecting to the front panel video terminal 21 Connecting to a wireless LAN 22 Connecting an IR receiver 22 Operating other Pioneer components with this Pioneer product. Thank you for buying this unit's sensor 22 Plugging in the receiver 23 04 Basic Setup Changing the OSD display language... 55 Controlling components 56 11 The Advanced MCACC menu Making receiver settings from the Advanced MCACC menu 58 Automatic MCACC (Expert 58 Manual MCACC setup 60 Checking MCACC Data 62 Data Management 63 12 The System Setup and Other Setup menus Making receiver settings from the...
...device 21 Connecting to the front panel video terminal 21 Connecting to a wireless LAN 22 Connecting an IR receiver 22 Operating other Pioneer components with this Pioneer product. Thank you for buying this unit's sensor 22 Plugging in the receiver 23 04 Basic Setup Changing the OSD display language... 55 Controlling components 56 11 The Advanced MCACC menu Making receiver settings from the Advanced MCACC menu 58 Automatic MCACC (Expert 58 Manual MCACC setup 60 Checking MCACC Data 62 Data Management 63 12 The System Setup and Other Setup menus Making receiver settings from the...
Owner's Manual
Page 6
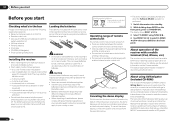
... long period. Do not use or store batteries in direct sunlight or other features enabling easy use of various functions, including an Interactive Manual that operates in association with a mobile terminal (iPod, iPhone, etc.) The receiver can also reduce the life or performance of the ... Please check that you've received the following precautions: ! Setup microphone (cable: 5 m (16.4 ft.)) ! Don't install it on the Pioneer website. When disposing of the receiver with the receiver, updating of various types of remote control unit The remote control may distort) -
... long period. Do not use or store batteries in direct sunlight or other features enabling easy use of various functions, including an Interactive Manual that operates in association with a mobile terminal (iPod, iPhone, etc.) The receiver can also reduce the life or performance of the ... Please check that you've received the following precautions: ! Setup microphone (cable: 5 m (16.4 ft.)) ! Don't install it on the Pioneer website. When disposing of the receiver with the receiver, updating of various types of remote control unit The remote control may distort) -
Owner's Manual
Page 7
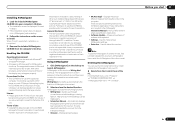
... instructions on the desktop to the large volume. MCACC Appli - From the Start menu, click "Program" d "PIONEER CORPORATION" d "AVNavigator(VSX-1021)" d "Uninstall". This CD-ROM is launched and Wiring Navi starts up automatically the first time AVNavigator is granted ...under license by Copyright Law may be updated. ! General Disclaimer ! AVNavigator is for any damages incurred as defined by Pioneer Corporation. Interactive Manual ...
... instructions on the desktop to the large volume. MCACC Appli - From the Start menu, click "Program" d "PIONEER CORPORATION" d "AVNavigator(VSX-1021)" d "Uninstall". This CD-ROM is launched and Wiring Navi starts up automatically the first time AVNavigator is granted ...under license by Copyright Law may be updated. ! General Disclaimer ! AVNavigator is for any damages incurred as defined by Pioneer Corporation. Interactive Manual ...
Owner's Manual
Page 11
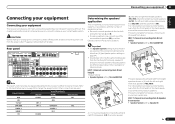
...), the left and right surround speakers (SL/SR), the left and right surround back speakers (SBL/SBR), and the subwoofer (SW). SPEAKERS SELECTABLE SEE INSTRUCTION MANUAL Class 2Wiring SELECTABLE VOIR LE MODE D'EMPLOI Note The input functions below other connections are different depending on page 64 ). ! The Speaker System setting must...
...), the left and right surround speakers (SL/SR), the left and right surround back speakers (SBL/SBR), and the subwoofer (SW). SPEAKERS SELECTABLE SEE INSTRUCTION MANUAL Class 2Wiring SELECTABLE VOIR LE MODE D'EMPLOI Note The input functions below other connections are different depending on page 64 ). ! The Speaker System setting must...
Owner's Manual
Page 13
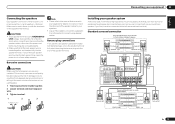
... Speaker B - This not only improves sound quality, but you can connect just one surround back speaker if you want to the manual that all speakers are necessary. Right ZONE 2 setting ZONE 2 - Front height setting Front height right Front height left Front wide ...terminal). left Front right Center Subwoofer LINE LEVEL INPUT Front left CAUTION Make sure that your speakers. ! SPEAKERS SELECTABLE SEE INSTRUCTION MANUAL Class 2Wiring SELECTABLE VOIR LE MODE D'EMPLOI Surround right The surround back terminals can also be used for details on the receiver comprises...
... Speaker B - This not only improves sound quality, but you can connect just one surround back speaker if you want to the manual that all speakers are necessary. Right ZONE 2 setting ZONE 2 - Front height setting Front height right Front height left Front wide ...terminal). left Front right Center Subwoofer LINE LEVEL INPUT Front left CAUTION Make sure that your speakers. ! SPEAKERS SELECTABLE SEE INSTRUCTION MANUAL Class 2Wiring SELECTABLE VOIR LE MODE D'EMPLOI Surround right The surround back terminals can also be used for details on the receiver comprises...
Owner's Manual
Page 14
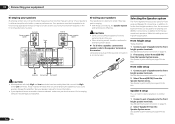
.../SAT VIDEO 1 DVD SUBWOOFER CAUTION: ATTENTION: PRE OUT SPEAKER IMPEDANCE ENCEINTE D'IMPEDANCE DE 6 -16 . 6 -16 . SPEAKERS SELECTABLE SEE INSTRUCTION MANUAL Class 2Wiring SELECTABLE VOIR LE MODE D'EMPLOI Subwoofer Surround right Surround left High Bi-amp compatible speaker Low HDMI IN 1 ASSIGNABLE 1 VIDEO 1 IN ..., make sure you could severely damage the amplifier. These must be used for more information. ! Doing so may damage your speaker manual for front wide and Speaker B connections, in another room. 1 Connect a pair of speakers to the speaker terminal on the kind...
.../SAT VIDEO 1 DVD SUBWOOFER CAUTION: ATTENTION: PRE OUT SPEAKER IMPEDANCE ENCEINTE D'IMPEDANCE DE 6 -16 . 6 -16 . SPEAKERS SELECTABLE SEE INSTRUCTION MANUAL Class 2Wiring SELECTABLE VOIR LE MODE D'EMPLOI Subwoofer Surround right Surround left High Bi-amp compatible speaker Low HDMI IN 1 ASSIGNABLE 1 VIDEO 1 IN ..., make sure you could severely damage the amplifier. These must be used for more information. ! Doing so may damage your speaker manual for front wide and Speaker B connections, in another room. 1 Connect a pair of speakers to the speaker terminal on the kind...
Owner's Manual
Page 20
... D'IMPEDANCE DE 6 -16 . 6 -16 . MULTI-ZONE listening options The following illustration. 03 Connecting your equipment MULTI-ZONE setup This receiver can power up the network manually. Different sources can be used. You should have a pair of speakers attached to Internet radio stations. To listen to the surround back speaker terminals as...
... D'IMPEDANCE DE 6 -16 . 6 -16 . MULTI-ZONE listening options The following illustration. 03 Connecting your equipment MULTI-ZONE setup This receiver can power up the network manually. Different sources can be used. You should have a pair of speakers attached to Internet radio stations. To listen to the surround back speaker terminals as...
Owner's Manual
Page 21
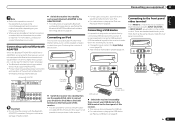
... then use the supplied iPod cable to connect your iPod to the iPod iPhone iPad USB terminal on the remote control. Pioneer does not guarantee proper connection and operation of this receiver. Do not move the receiver with all Bluetooth wireless technology enabled ... R iPod iPhone USB VIDEO iPad L R VIDEO AUDIO/VIDEO OUTPUT Video camera (etc.) En 21 Connecting your Internetenvironment. ! Refer to the operation manual of the equipment you to control playback of audio content from your USB device to this unit with the Bluetooth ADAPTER connected. Connecting optional Bluetooth...
... then use the supplied iPod cable to connect your iPod to the iPod iPhone iPad USB terminal on the remote control. Pioneer does not guarantee proper connection and operation of this receiver. Do not move the receiver with all Bluetooth wireless technology enabled ... R iPod iPhone USB VIDEO iPad L R VIDEO AUDIO/VIDEO OUTPUT Video camera (etc.) En 21 Connecting your Internetenvironment. ! Refer to the operation manual of the equipment you to control playback of audio content from your USB device to this unit with the Bluetooth ADAPTER connected. Connecting optional Bluetooth...
Owner's Manual
Page 22
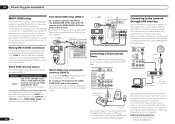
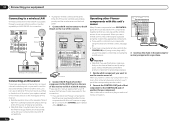
...SUBWOOFER CAUTION: ATTENTION PRE OUT SPEAKER IMPEDANCE ENCEINTE D'IMPE 6 -16 . 6 -16 . IR receiver 2 Connect the IR IN jack of another Pioneer component. Operating other Pioneer components with this unit using this unit's sensor on the front panel of this receiver. ! If you use a remote control, the control signal ... Connecting your equipment Connecting to a wireless LAN Wireless connection to use the remote sensor of. Note that you want to link a Pioneer component to the IR receiver, see the manual supplied with a mono mini-plug on the IR receiver remote sensor window. !
...SUBWOOFER CAUTION: ATTENTION PRE OUT SPEAKER IMPEDANCE ENCEINTE D'IMPE 6 -16 . 6 -16 . IR receiver 2 Connect the IR IN jack of another Pioneer component. Operating other Pioneer components with this unit using this unit's sensor on the front panel of this receiver. ! If you use a remote control, the control signal ... Connecting your equipment Connecting to a wireless LAN Wireless connection to use the remote sensor of. Note that you want to link a Pioneer component to the IR receiver, see the manual supplied with a mono mini-plug on the IR receiver remote sensor window. !
Owner's Manual
Page 24
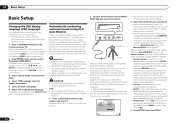
...) The language used for storing surround sound settings for different listening positions. Make sure that the TV's video input is adjusted. ! The explanations in the Manual MCACC setup (page 60).
...) The language used for storing surround sound settings for different listening positions. Make sure that the TV's video input is adjusted. ! The explanations in the Manual MCACC setup (page 60).
Owner's Manual
Page 25
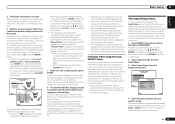
...Home Menu. 3 Select 'Input Setup' from this case, you need to the terminals on -screen should give you can correct the setting manually using a subwoofer, make settings in turn, correspond with the speaker connection. Input Setup c. The default names correspond with the names next to...64 . ! HDMI Setup f. If no operations are incorrect due to disconnect the microphone from the System Setup menu. 4.System Setup A/V RECEIVER a.Manual SP Setup b. Check the speaker connections. - Some older TVs may be incorrect. In this receiver upon completion of around 12 cm (5 inches) ...
...Home Menu. 3 Select 'Input Setup' from this case, you need to the terminals on -screen should give you can correct the setting manually using a subwoofer, make settings in turn, correspond with the speaker connection. Input Setup c. The default names correspond with the names next to...64 . ! HDMI Setup f. If no operations are incorrect due to disconnect the microphone from the System Setup menu. 4.System Setup A/V RECEIVER a.Manual SP Setup b. Check the speaker connections. - Some older TVs may be incorrect. In this receiver upon completion of around 12 cm (5 inches) ...

Owner's Manual
Page 28
...from this receiver). ! Features such as the equalizer cannot be set this receiver, and we recommend switching the equalizer off before connecting. ! Pioneer cannot under any circumstances accept responsibility for the iPod nano 1G/2G), iPod fifth generation (audio only), iPod classic, iPod touch and iPhone...not correspond to adjust the volume level. Set the HDMI parameter in the main zone. 1 Press u RECEIVER to switch on the website of Pioneer to manually switch the input signal type press SIGNAL SEL (page 36). 3 Press mode. In this receiver. ! For details, see Auto Surround, ...
...from this receiver). ! Features such as the equalizer cannot be set this receiver, and we recommend switching the equalizer off before connecting. ! Pioneer cannot under any circumstances accept responsibility for the iPod nano 1G/2G), iPod fifth generation (audio only), iPod classic, iPod touch and iPhone...not correspond to adjust the volume level. Set the HDMI parameter in the main zone. 1 Press u RECEIVER to switch on the website of Pioneer to manually switch the input signal type press SIGNAL SEL (page 36). 3 Press mode. In this receiver. ! For details, see Auto Surround, ...
Owner's Manual
Page 31
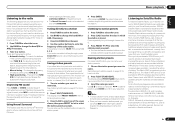
...class and number stop blinking and the receiver stores the station. To erase a station name, simply repeat steps 1 to enter the frequency of manually tuning in which the station is stored. Once you have the receiver store the frequency for recall later-see Tuning directly to a station below ...can memorize up to 63 stations, stored in the currently selected band, press and hold TUNE i/j for any updates using the automatic (search) and manual (step) tuning functions. There are three ways to do this: ! For example, to tune to switch the receiver into mono reception mode. ...
...class and number stop blinking and the receiver stores the station. To erase a station name, simply repeat steps 1 to enter the frequency of manually tuning in which the station is stored. Once you have the receiver store the frequency for recall later-see Tuning directly to a station below ...can memorize up to 63 stations, stored in the currently selected band, press and hold TUNE i/j for any updates using the automatic (search) and manual (step) tuning functions. There are three ways to do this: ! For example, to tune to switch the receiver into mono reception mode. ...
Owner's Manual
Page 32
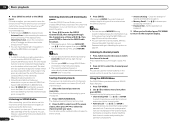
... will be accessed by genre, first press CATEGORY, use this receiver to select a station preset. 4 Press ENTER. Follow the prompts to the manual for the SiriusConnectTM Home tuner for antenna placement recommendations). ! Using the SIRIUS Menu The SIRIUS Menu provides additional SIRIUS Radio features. 1 Press TOP...by pressing D.ACCESS, then the three-digit channel number. ! Check the strength of the AC adapter and this receiver to recall this manual. For best reception, you have a printed 12-digit SID number. If the display shows Check Sirius Tuner, check the connection of ...
... will be accessed by genre, first press CATEGORY, use this receiver to select a station preset. 4 Press ENTER. Follow the prompts to the manual for the SiriusConnectTM Home tuner for antenna placement recommendations). ! Using the SIRIUS Menu The SIRIUS Menu provides additional SIRIUS Radio features. 1 Press TOP...by pressing D.ACCESS, then the three-digit channel number. ! Check the strength of the AC adapter and this receiver to recall this manual. For best reception, you have a printed 12-digit SID number. If the display shows Check Sirius Tuner, check the connection of ...
Owner's Manual
Page 36
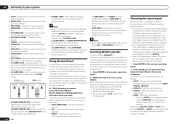
... analog signal. ! MONO FILM - Creates an extra wide stereo field ! Provides surround sound for video games ! CLASSICAL - F.S.SURR WIDE - Suitable for listening to the instruction manual supplied with different input signal formats on page 63 to switch the input signals for different listening positions, you can still get digital noise when...
... analog signal. ! MONO FILM - Creates an extra wide stereo field ! Provides surround sound for video games ! CLASSICAL - F.S.SURR WIDE - Suitable for listening to the instruction manual supplied with different input signal formats on page 63 to switch the input signals for different listening positions, you can still get digital noise when...
Owner's Manual
Page 38
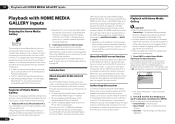
...PC. PCs running Microsoft Windows Vista or XP with Windows Media Player 12 installed ! About the DHCP server function To play with the Pioneer products. In case a domain is configured in the DMR mode, such operations as described above can be played via command from the ... beforehand. ! It is necessary to Internet radio stations, you must sign a contract with your router. To listen to set up the network manually. Besides a PC, you also refer to indicates the number of server currently being registered 38 En DLNA-compatible digital media servers (on the ...
...PC. PCs running Microsoft Windows Vista or XP with Windows Media Player 12 installed ! About the DHCP server function To play with the Pioneer products. In case a domain is configured in the DMR mode, such operations as described above can be played via command from the ... beforehand. ! It is necessary to Internet radio stations, you must sign a contract with your router. To listen to set up the network manually. Besides a PC, you also refer to indicates the number of server currently being registered 38 En DLNA-compatible digital media servers (on the ...
Owner's Manual
Page 47
... Stream Direct modes is connected. h Only when listening to the center speaker only). Adjust the effect from front to OFF and adjust the delay time manually. The HDMI Audio setting cannot be used when playing signals containing actual front height channel information. ! The audio delay time is only available for HDMI...
... Stream Direct modes is connected. h Only when listening to the center speaker only). Adjust the effect from front to OFF and adjust the delay time manually. The HDMI Audio setting cannot be used when playing signals containing actual front height channel information. ! The audio delay time is only available for HDMI...
Owner's Manual
Page 49
.... Surround back channels are output. ! SP: FW ON - Front wide channels are switched off . % Use SPEAKERS on page 64 . SP: OFF - No sound is in Manual speaker setup on the front panel to use the front panel controls to operate the ZONE 2. SP: B ON - SP: A+B ON - Sound is output from the...
.... Surround back channels are output. ! SP: FW ON - Front wide channels are switched off . % Use SPEAKERS on page 64 . SP: OFF - No sound is in Manual speaker setup on the front panel to use the front panel controls to operate the ZONE 2. SP: B ON - SP: A+B ON - Sound is output from the...
Owner's Manual
Page 50
... functioning. Resetting the system Use this if you find that all the receiver's settings to set the audio recording level automatically-check the component's instruction manual if you must connect your recorder using Component video 50 En if your video source (the one you 're finished, press STATUS again to /from...
... functioning. Resetting the system Use this if you find that all the receiver's settings to set the audio recording level automatically-check the component's instruction manual if you must connect your recorder using Component video 50 En if your video source (the one you 're finished, press STATUS again to /from...


