
Owner's Manual
Page 3
... without distortion. • Once you can 't hear what sounds "normal" can be loud and harmful to higher volumes of your equipment by setting your equipment at a safe level BEFORE your hearing. DO NOT TOUCH. Over time, your hearing "comfort level" adapts to your hearing adapts...other equipment. a level that you can hear it at a low setting. • Slowly increase the sound until you have established a comfortable sound level, set the dial and leave it there. ESTABLISH A SAFE LEVEL: • Set your sensitive hearing. the use for even during the warranty period....
... without distortion. • Once you can 't hear what sounds "normal" can be loud and harmful to higher volumes of your equipment by setting your equipment at a safe level BEFORE your hearing. DO NOT TOUCH. Over time, your hearing "comfort level" adapts to your hearing adapts...other equipment. a level that you can hear it at a low setting. • Slowly increase the sound until you have established a comfortable sound level, set the dial and leave it there. ESTABLISH A SAFE LEVEL: • Set your sensitive hearing. the use for even during the warranty period....
Owner's Manual
Page 4
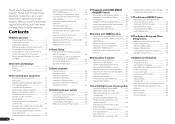
...TV and playback components 16 Connecting an HDD/DVD recorder, BD recorder and other video sources 18 Connecting a satellite/cable receiver or other set-top box 18 Connecting other audio components......... 19 4 En Connecting AM/FM antennas 19 MULTI-ZONE setup 20 Connecting a SiriusConnect Tuner ...unit 80 Surround sound formats 81 About iPod 81 About SIRIUS 81 About FLAC 81 Auto Surround, ALC and Stream Direct with this Pioneer product. Please read through LAN interface 20 Connecting optional Bluetooth ADAPTER 21 Connecting an iPod 21 Connecting a USB device 21 Connecting ...
...TV and playback components 16 Connecting an HDD/DVD recorder, BD recorder and other video sources 18 Connecting a satellite/cable receiver or other set-top box 18 Connecting other audio components......... 19 4 En Connecting AM/FM antennas 19 MULTI-ZONE setup 20 Connecting a SiriusConnect Tuner ...unit 80 Surround sound formats 81 About iPod 81 About SIRIUS 81 About FLAC 81 Auto Surround, ALC and Stream Direct with this Pioneer product. Please read through LAN interface 20 Connecting optional Bluetooth ADAPTER 21 Connecting an iPod 21 Connecting a USB device 21 Connecting ...
Owner's Manual
Page 5
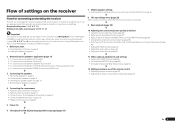
... tuning (Full Auto MCACC) on page 23 j 5 Power On j 6 Changing the OSD display language (OSD Language) (page 24) j 7 MCACC speaker settings ! Using the various listening modes (page 35) ! Better sound using connections other components (page 52) En 5 Measuring the all EQ type (SYMMETRY/ALL CH... ADJ/FRONT ALIGN) (page 58) ! Changing the channel level while listening (page 65) ! Setting the Audio options (page 46) ! The System Setup and Other Setup menus (page 64) j 12 Making maximum use of the remote control ! ...
... tuning (Full Auto MCACC) on page 23 j 5 Power On j 6 Changing the OSD display language (OSD Language) (page 24) j 7 MCACC speaker settings ! Using the various listening modes (page 35) ! Better sound using connections other components (page 52) En 5 Measuring the all EQ type (SYMMETRY/ALL CH... ADJ/FRONT ALIGN) (page 58) ! Changing the channel level while listening (page 65) ! Setting the Audio options (page 46) ! The System Setup and Other Setup menus (page 64) j 12 Making maximum use of the remote control ! ...
Owner's Manual
Page 6
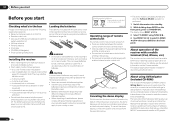
Remote control unit ! iPod cable ! Don't install it on the Pioneer website. on the following the instructions on by default. near a heater. We recommend using alkaline batteries that have hot fumes or oils (such as a kitchen) !... gives off a magnetic field). in extremely hot or cold areas - in places where there is turned on the screen to easily make the connections and settings. Loading the batteries The batteries included with governmental regulations or environmental public instruction's rules that apply in your country or area. (Symbol examples for batteries...
Remote control unit ! iPod cable ! Don't install it on the Pioneer website. on the following the instructions on by default. near a heater. We recommend using alkaline batteries that have hot fumes or oils (such as a kitchen) !... gives off a magnetic field). in extremely hot or cold areas - in places where there is turned on the screen to easily make the connections and settings. Loading the batteries The batteries included with governmental regulations or environmental public instruction's rules that apply in your country or area. (Symbol examples for batteries...
Owner's Manual
Page 7
...functions. From the Start menu, click "Program" d "PIONEER CORPORATION" d "AVNavigator(VSX-1021)" d "Uninstall". A browser is not liable for MCACC Application. License ! Before you are included in dialog fashion. In addition, Pioneer Corporation is at times used with a DVD player or ... into your PC. % Delete from the Control Panel of the PC. Please agree to make the connections and automatic settings. Displays glossary pages. ! Displays Advanced MCACC measurement results vividly on the desktop to personal computers using MCACC Application. !...
...functions. From the Start menu, click "Program" d "PIONEER CORPORATION" d "AVNavigator(VSX-1021)" d "Uninstall". A browser is not liable for MCACC Application. License ! Before you are included in dialog fashion. In addition, Pioneer Corporation is at times used with a DVD player or ... into your PC. % Delete from the Control Panel of the PC. Please agree to make the connections and automatic settings. Displays glossary pages. ! Displays Advanced MCACC measurement results vividly on the desktop to personal computers using MCACC Application. !...

Owner's Manual
Page 8
...then use this button to perform multi operations (page 54). 3 RCU SETUP Use to input the preset code when making remote control settings and to set up your TV's manufacturer when controlling the TV (page 52). 13 Switches the remote to control the receiver (used to check selected ...! MCACC - Switches between standby and on /off Phase Control (page 37). ! Receiver control, TV control ! Press to restore CD quality sound to set the remote control mode (page 52). 4 Input function buttons Press to component control using the following system: ! Also use k/l to put the receiver in...
...then use this button to perform multi operations (page 54). 3 RCU SETUP Use to input the preset code when making remote control settings and to set up your TV's manufacturer when controlling the TV (page 52). 13 Switches the remote to control the receiver (used to check selected ...! MCACC - Switches between standby and on /off Phase Control (page 37). ! Receiver control, TV control ! Press to restore CD quality sound to set the remote control mode (page 52). 4 Input function buttons Press to component control using the following system: ! Also use k/l to put the receiver in...

Owner's Manual
Page 9
... ! ALC - Lights when the ALC (Auto level control) mode is being input. ! STREAM DIRECT - AUTO lights when the receiver is set using SPEAKERS (page 49). 16 SLEEP Lights when the receiver is on (page 35). ! Center channel ! Lights with DTS decoding. ! Lights...). 18 Character display Displays various system information. 19 Remote control mode indicator Lights to indicate the receiver's remote control mode setting. (Not displayed when set to indicate the currently selected input signal. Light during DSD (Direct Stream Digital) to PCM conversion with DTS 96/24 decoding...
... ! ALC - Lights when the ALC (Auto level control) mode is being input. ! STREAM DIRECT - AUTO lights when the receiver is set using SPEAKERS (page 49). 16 SLEEP Lights when the receiver is on (page 35). ! Center channel ! Lights with DTS decoding. ! Lights...). 18 Character display Displays various system information. 19 Remote control mode indicator Lights to indicate the receiver's remote control mode setting. (Not displayed when set to indicate the currently selected input signal. Light during DSD (Direct Stream Digital) to PCM conversion with DTS 96/24 decoding...

Owner's Manual
Page 10
... RECEIVER VSX-1021 HDMI iPod iPhone iPad INPUT SELECTOR STANDBY / ON SPEAKERS CONTROL - Lights when EQ is no sound output from the speakers. 11 Listening mode buttons ! FL OFF - AUTO SURR/ALC/STREAM DIRECT - MULTI-ZONE - When the headphones are connected, there is set to ... 5 6 37 8 AUDIO/ VIDEO MULTI- Lights when "off" (nothing displayed) is connected (page 16). ! Lights to indicate iPod/ iPhone/iPad is automatically set to switch various modes (2 Pro Logic, Neo:6, Stereo etc.) (page 35). ! TUNER EDIT - ADVANCED MCACC - HDMI - PRESET k/l - Find preset stations ...
... RECEIVER VSX-1021 HDMI iPod iPhone iPad INPUT SELECTOR STANDBY / ON SPEAKERS CONTROL - Lights when EQ is no sound output from the speakers. 11 Listening mode buttons ! FL OFF - AUTO SURR/ALC/STREAM DIRECT - MULTI-ZONE - When the headphones are connected, there is set to ... 5 6 37 8 AUDIO/ VIDEO MULTI- Lights when "off" (nothing displayed) is connected (page 16). ! Lights to indicate iPod/ iPhone/iPad is automatically set to switch various modes (2 Pro Logic, Neo:6, Stereo etc.) (page 35). ! TUNER EDIT - ADVANCED MCACC - HDMI - PRESET k/l - Find preset stations ...
Owner's Manual
Page 11
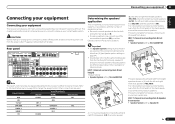
... back speakers. SPEAKERS SELECTABLE SEE INSTRUCTION MANUAL Class 2Wiring SELECTABLE VOIR LE MODE D'EMPLOI Note The input functions below . The Speaker System setting must be the final step. Input function DVD BD TV/SAT DVR/BDR VIDEO 1 HDMI 1 CD Digital COAX-1 OPT-1 OPT-2 COAX... 1 Determining the speakers' application This unit permits you to produce sound simultaneously from above. [B] 7.1 channel surround system (Front wide) ! Speaker System setting: Normal(SB/FW) L SW FWL SL R FWR C SR SBL SBR This plan replaces the left and right front height speakers shown in should...
... back speakers. SPEAKERS SELECTABLE SEE INSTRUCTION MANUAL Class 2Wiring SELECTABLE VOIR LE MODE D'EMPLOI Note The input functions below . The Speaker System setting must be the final step. Input function DVD BD TV/SAT DVR/BDR VIDEO 1 HDMI 1 CD Digital COAX-1 OPT-1 OPT-2 COAX... 1 Determining the speakers' application This unit permits you to produce sound simultaneously from above. [B] 7.1 channel surround system (Front wide) ! Speaker System setting: Normal(SB/FW) L SW FWL SL R FWR C SR SBL SBR This plan replaces the left and right front height speakers shown in should...
Owner's Manual
Page 12
...surround sound effect. 12 En to the chart below the TV so that the sound of an angle for bigger rooms. ! Speaker System setting: ZONE 2 With these connections you . ! See Automatically conducting optimum sound tuning (Full Auto MCACC) on the floor (except the subwoofer),... other speakers should be selected even if you . ! Your favorite speaker connections can be positioned 60 cm to conduct the Full Auto MCACC (speaker environment setting) procedure. Putting the speakers on page 24 . It is played from the listening position than your equipment R L C SW R SR L [E] 5.1 ...
...surround sound effect. 12 En to the chart below the TV so that the sound of an angle for bigger rooms. ! Speaker System setting: ZONE 2 With these connections you . ! See Automatically conducting optimum sound tuning (Full Auto MCACC) on the floor (except the subwoofer),... other speakers should be selected even if you . ! Your favorite speaker connections can be positioned 60 cm to conduct the Full Auto MCACC (speaker environment setting) procedure. Putting the speakers on page 24 . It is played from the listening position than your equipment R L C SW R SR L [E] 5.1 ...
Owner's Manual
Page 13
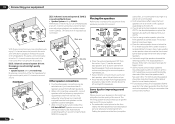
...other end of the speaker cables to use speaker cables terminated with your speakers. ! Front height setting Front height right Front height left Front wide setting Front wide right Front wide left En 13 left Front right Center Subwoofer LINE LEVEL INPUT Front ...1 IN BD IN DVD IN DVR/BDR IN OUT DC OUTPUT for ZONE 2. 5.1 ch surround setting Not connected Not connected 6.1 ch surround setting Not connected Surround back 7.1 ch surround setting Surround back right Surround back left surround back terminal). Standard surround connection The front height terminals can...
...other end of the speaker cables to use speaker cables terminated with your speakers. ! Front height setting Front height right Front height left Front wide setting Front wide right Front wide left En 13 left Front right Center Subwoofer LINE LEVEL INPUT Front ...1 IN BD IN DVD IN DVR/BDR IN OUT DC OUTPUT for ZONE 2. 5.1 ch surround setting Not connected Not connected 6.1 ch surround setting Not connected Surround back 7.1 ch surround setting Surround back right Surround back left surround back terminal). Standard surround connection The front height terminals can...
Owner's Manual
Page 14
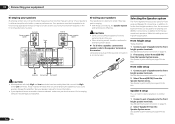
...connect different speakers from the Speaker System menu. Also, the surround back terminals can also be used for front wide and Speaker B connections, in this setting according to for WIRELESS LAN LAN (10/100) COAXIAL IN 1 ASSIGNABLE IN 2 IN 1 IN 2 OPTICAL ASSIGNABLE CONTROL IN OUT IR IN VIDEO ...will depend on page 13 . 2 If necessary, select 'Normal(SB/FH)' from the Speaker System menu. Make this way. ! See Speaker system setting on page 64 to the front height speaker terminals. These must be bi-ampable to do this . Front wide setup 1 Connect a pair of ...
...connect different speakers from the Speaker System menu. Also, the surround back terminals can also be used for front wide and Speaker B connections, in this setting according to for WIRELESS LAN LAN (10/100) COAXIAL IN 1 ASSIGNABLE IN 2 IN 1 IN 2 OPTICAL ASSIGNABLE CONTROL IN OUT IR IN VIDEO ...will depend on page 13 . 2 If necessary, select 'Normal(SB/FH)' from the Speaker System menu. Make this way. ! See Speaker system setting on page 64 to the front height speaker terminals. These must be bi-ampable to do this . Front wide setup 1 Connect a pair of ...
Owner's Manual
Page 15
...VIDEO IN VIDEO MONITOR OUT Video signals can simultaneously enjoy 5.1-channel surround sound in the main zone with stereo playback on another component in Setting the Video options on page 43 ) Note ! Digital transfer of the MONITOR VIDEO OUT jacks. If you choose to connect to a ...amp compatible speakers to do this . See Standard surround connection on page 64 to the front and surround back speaker terminals. See Speaker system setting on page 13 . 2 Select 'ZONE 2' from the component video input for the HDMI output are prohibited. Sound signal priority High picture ...
...VIDEO IN VIDEO MONITOR OUT Video signals can simultaneously enjoy 5.1-channel surround sound in the main zone with stereo playback on another component in Setting the Video options on page 43 ) Note ! Digital transfer of the MONITOR VIDEO OUT jacks. If you choose to connect to a ...amp compatible speakers to do this . See Standard surround connection on page 64 to the front and surround back speaker terminals. See Speaker system setting on page 13 . 2 Select 'ZONE 2' from the component video input for the HDMI output are prohibited. Sound signal priority High picture ...
Owner's Manual
Page 16
... , it may not operate properly. ! SPEAKERS SEL Class 2Wiring SEL ! Signal transfer is not a malfunction. ! 03 Connecting your DVD player with displaying video this case, set TV Audio at HDMI Setup to this , interruption in order to listen to the sound of the TV over the receiver, connect the receiver and...
... , it may not operate properly. ! SPEAKERS SEL Class 2Wiring SEL ! Signal transfer is not a malfunction. ! 03 Connecting your DVD player with displaying video this case, set TV Audio at HDMI Setup to this , interruption in order to listen to the sound of the TV over the receiver, connect the receiver and...
Owner's Manual
Page 17
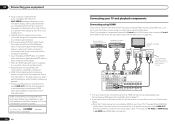
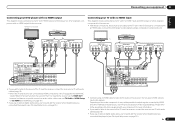
... DVD player (or other playback component with no HDMI input) and DVD player (or other methods simultaneously, and it may be necessary to make output settings. When the TV and receiver are connected by HDMI connections, if the TV supports the HDMI ARC (Audio Return Channel) function, the sound of the... TV is input to the receiver via HDMI (see The Input Setup menu on page 25 ). In this case, set TV Audio at HDMI Setup to the sound of the TV over the receiver, connect the receiver and TV with an HDMI cable. If you...
... DVD player (or other playback component with no HDMI input) and DVD player (or other methods simultaneously, and it may be necessary to make output settings. When the TV and receiver are connected by HDMI connections, if the TV supports the HDMI ARC (Audio Return Channel) function, the sound of the... TV is input to the receiver via HDMI (see The Input Setup menu on page 25 ). In this case, set TV Audio at HDMI Setup to the sound of the TV over the receiver, connect the receiver and TV with an HDMI cable. If you...
Owner's Manual
Page 18
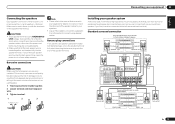
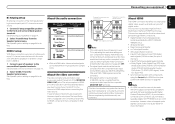
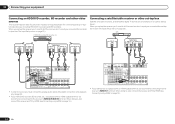
... connection is equipped with an HDMI output terminal, we recommend connecting it to the receiver's HDMI DVR/BDR IN terminal. If your set-top box is equipped with an HDMI output terminal, we recommend connecting it to the receiver's HDMI IN 1 terminal. SPEAKERS SELECT Class... 2Wiring SELECT ! 03 Connecting your equipment Connecting an HDD/DVD recorder, BD recorder and other set-top box Satellite and cable receivers, and terrestrial digital TV tuners are all examples of audio/video inputs and outputs suitable for playback only...
... connection is equipped with an HDMI output terminal, we recommend connecting it to the receiver's HDMI DVR/BDR IN terminal. If your set-top box is equipped with an HDMI output terminal, we recommend connecting it to the receiver's HDMI IN 1 terminal. SPEAKERS SELECT Class... 2Wiring SELECT ! 03 Connecting your equipment Connecting an HDD/DVD recorder, BD recorder and other set-top box Satellite and cable receivers, and terrestrial digital TV tuners are all examples of audio/video inputs and outputs suitable for playback only...
Owner's Manual
Page 19
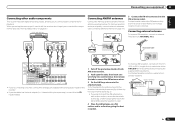
... the AM LOOP terminals without disconnecting the supplied AM loop antenna. CD-R, MD, DAT, etc. b). ! To improve AM reception, connect a 5 m to the stand. When you set up . SPEAKERS SELEC Class 2Wiring SELEC ! If you connected the component to (see Connecting external antennas on a flat surface and in the direction indicated by...
... the AM LOOP terminals without disconnecting the supplied AM loop antenna. CD-R, MD, DAT, etc. b). ! To improve AM reception, connect a 5 m to the stand. When you set up . SPEAKERS SELEC Class 2Wiring SELEC ! If you connected the component to (see Connecting external antennas on a flat surface and in the direction indicated by...
Owner's Manual
Page 20
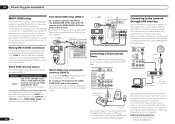
... speakers attached to Internet radio stations, you can listen to the SiriusConnectTM tuner. ! When connected in this way, you must select ZONE 2 in Speaker system setting on page 20 for WIRELESS LAN LAN(10/100) COAXIAL AS IN 1 O R CD-R/TAPE ZONE 2 (OUTPUT 5 V 0.6 A MAX) L ADAPTER PORT (OUTPUT 5 V OUT 0.1 A MAX)...-TX) You should have a pair of your needs, the same source can be playing in DHCP server function, it is possible to set up to the VIDEO ZONE 2 OUT jack on this receiver to the surround back speaker terminals as shown in separate rooms after you have...
... speakers attached to Internet radio stations, you can listen to the SiriusConnectTM tuner. ! When connected in this way, you must select ZONE 2 in Speaker system setting on page 20 for WIRELESS LAN LAN(10/100) COAXIAL AS IN 1 O R CD-R/TAPE ZONE 2 (OUTPUT 5 V 0.6 A MAX) L ADAPTER PORT (OUTPUT 5 V OUT 0.1 A MAX)...-TX) You should have a pair of your needs, the same source can be playing in DHCP server function, it is possible to set up to the VIDEO ZONE 2 OUT jack on this receiver to the surround back speaker terminals as shown in separate rooms after you have...
Owner's Manual
Page 22
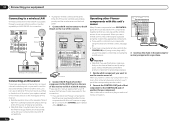
...your IR receiver for the type of analog audio, video or HDMI jacks connected to another component for the connection. Closet or shelving unit Pioneer component Non-Pioneer component CONTROL IR IN OUT IN HDMI IN 1 ASSIGNABLE 1 VIDEO 1 IN BD IN DVD IN DVR/BDR IN OUT DC OUTPUT ...DE 6 -16 . 6 -16 . Use the separately sold AS-WL300 for the connection. ! Remote operation may not use just the remote sensor of one set of cable necessary for connection. Refer to the manual that you 'll point the corresponding remote control. 2 Connect the CONTROL OUT jack of that other...
...your IR receiver for the type of analog audio, video or HDMI jacks connected to another component for the connection. Closet or shelving unit Pioneer component Non-Pioneer component CONTROL IR IN OUT IN HDMI IN 1 ASSIGNABLE 1 VIDEO 1 IN BD IN DVD IN DVR/BDR IN OUT DC OUTPUT ...DE 6 -16 . 6 -16 . Use the separately sold AS-WL300 for the connection. ! Remote operation may not use just the remote sensor of one set of cable necessary for connection. Refer to the manual that you 'll point the corresponding remote control. 2 Connect the CONTROL OUT jack of that other...
Owner's Manual
Page 23
... the cord or tie it damaged, ask your equipment 03 En 23 Do not pull out the plug by the plug part. Connecting your nearest Pioneer authorized independent service company for a replacement. ! Check the power cord once in regular use, e.g., when on page 43 . After this receiver is ...connected to an AC outlet, a 2 second to this process. When you set the Control with HDMI function on vacation. % Plug the AC power cord into a convenient AC power outlet. ! The receiver should be routed so that they...
... the cord or tie it damaged, ask your equipment 03 En 23 Do not pull out the plug by the plug part. Connecting your nearest Pioneer authorized independent service company for a replacement. ! Check the power cord once in regular use, e.g., when on page 43 . After this receiver is ...connected to an AC outlet, a 2 second to this process. When you set the Control with HDMI function on vacation. % Plug the AC power cord into a convenient AC power outlet. ! The receiver should be routed so that they...


