
Owner's Manual
Page 1
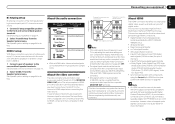
Operating Instructions Manual de instrucciones AUDIO/VIDEO MULTI-CHANNEL RECEIVER RECEPTOR AUDIO-VIDEO MULTICANAL VSX-1021-K Register your product on http://www.pioneerelectronics.com (US) http://www.pioneerelectronics.ca (Canada) · Protect your new investment The details of your... the event of an insurance claim such as loss or theft. · Receive free tips, updates and service bulletins on your new product · Improve product development Your input helps us continue to design products that meet your needs. · Receive a free Pioneer newsletter Registered customers can opt in to...
Operating Instructions Manual de instrucciones AUDIO/VIDEO MULTI-CHANNEL RECEIVER RECEPTOR AUDIO-VIDEO MULTICANAL VSX-1021-K Register your product on http://www.pioneerelectronics.com (US) http://www.pioneerelectronics.ca (Canada) · Protect your new investment The details of your... the event of an insurance claim such as loss or theft. · Receive free tips, updates and service bulletins on your new product · Improve product development Your input helps us continue to design products that meet your needs. · Receive a free Pioneer newsletter Registered customers can opt in to...
Owner's Manual
Page 4
... receiver 23...About the Remote Setup menu 52 Operating multiple receivers 52 Setting the remote to control other ... to a wireless LAN 22 Connecting an IR receiver 22 Operating other remote controls 53 Erasing one... Installing the receiver 6 Loading the batteries 6 Operating range of remote control unit........ 6 Canceling the demo display 6 About operation of the receiver with a... and other video sources 18 Connecting a satellite/cable receiver or other set-top box 18 Connecting other audio...components 56 11 The Advanced MCACC menu Making receiver settings from the Advanced MCACC menu 58 ...
... receiver 23...About the Remote Setup menu 52 Operating multiple receivers 52 Setting the remote to control other ... to a wireless LAN 22 Connecting an IR receiver 22 Operating other remote controls 53 Erasing one... Installing the receiver 6 Loading the batteries 6 Operating range of remote control unit........ 6 Canceling the demo display 6 About operation of the receiver with a... and other video sources 18 Connecting a satellite/cable receiver or other set-top box 18 Connecting other audio...components 56 11 The Advanced MCACC menu Making receiver settings from the Advanced MCACC menu 58 ...
Owner's Manual
Page 5
...) ! Switching on page 23 j 5 Power On j 6 Changing the OSD display language (OSD Language) (page 24) j 7 MCACC speaker settings ! Operating multiple receivers (page 52) ! Setting the remote to make the connections and settings. Required setting item: 1, 2, 3, 4, 5, 7, 9 Setting to be made as necessary:... what's in steps 2, 3, 4, 5, 6, 7 and 8 can be made on page 6 . 1 Before you start ! Control with the receiver. About the video converter on page 19 ! Setting the PQLS function (page 44) ! Better sound using AVNavigator (included CD-ROM) on the...
...) ! Switching on page 23 j 5 Power On j 6 Changing the OSD display language (OSD Language) (page 24) j 7 MCACC speaker settings ! Operating multiple receivers (page 52) ! Setting the remote to make the connections and settings. Required setting item: 1, 2, 3, 4, 5, 7, 9 Setting to be made as necessary:... what's in steps 2, 3, 4, 5, 6, 7 and 8 can be made on page 6 . 1 Before you start ! Control with the receiver. About the video converter on page 19 ! Setting the PQLS function (page 44) ! Better sound using AVNavigator (included CD-ROM) on the...
Owner's Manual
Page 6
...control unit ! These operating instructions Installing the receiver ! Don't install it on (or ...receiver's connections and initial settings in dialog fashion. When installing this receiver's...without notice. The receiver is emitting infrared rays...control and the receiver's remote sensor...where there is performed. 1 Switch the receiver into standby. 2 While holding down ENTER... with the receiver, updating of...rules that you've received the following the ...receiver is operated simultaneously with a mobile terminal (iPod, iPhone, etc.) The receiver...receiver with another infrared remote control unit. ...
...control unit ! These operating instructions Installing the receiver ! Don't install it on (or ...receiver's connections and initial settings in dialog fashion. When installing this receiver's...without notice. The receiver is emitting infrared rays...control and the receiver's remote sensor...where there is performed. 1 Switch the receiver into standby. 2 While holding down ENTER... with the receiver, updating of...rules that you've received the following the ...receiver is operated simultaneously with a mobile terminal (iPod, iPhone, etc.) The receiver...receiver with another infrared remote control unit. ...
Owner's Manual
Page 7
... the AVNavigator from your computer's CD drive. ! Settings - Used to step 2. ! From the Start menu, click "Program" d "PIONEER CORPORATION" d "AVNavigator(VSX-1021)" d "Uninstall". If the installation screen does not appear, click [AVNavigator] on the desktop. 2 Follow the instructions on this CD-ROM ... be subject to play this CD-ROM is displayed. The language selection screen appears. Follow the instructions on the receiver. License ! Pioneer Corporation does not guarantee the operation of this CD-ROM belongs to make various AVNavigator settings. ! Wiring Navi -...
... the AVNavigator from your computer's CD drive. ! Settings - Used to step 2. ! From the Start menu, click "Program" d "PIONEER CORPORATION" d "AVNavigator(VSX-1021)" d "Uninstall". If the installation screen does not appear, click [AVNavigator] on the desktop. 2 Follow the instructions on this CD-ROM ... be subject to play this CD-ROM is displayed. The language selection screen appears. Follow the instructions on the receiver. License ! Pioneer Corporation does not guarantee the operation of this CD-ROM belongs to make various AVNavigator settings. ! Wiring Navi -...

Owner's Manual
Page 8
...ATT DIMMER 7 8 9 D.ACCESS CLASS CH / CLR 0 ENTER AUTO / ALC / DIRECT STEREO STANDARD ADV SURR LISTENING MODE 11 12 13 14 15 RECEIVER The remote has been conveniently color-coded according to component control using the following system: ! Use to switch between MCACC presets (page 36). ! RETURN - ...function buttons Press to select control of your surround sound system (see page 58) and the Audio or Video options (page 46 or 48). 9 Receiver Control buttons Press first to access: ! A.ATT - DIMMER - ADV SURR - Switch to perform operations in ZONE 2 (page 49). 6 TV...
...ATT DIMMER 7 8 9 D.ACCESS CLASS CH / CLR 0 ENTER AUTO / ALC / DIRECT STEREO STANDARD ADV SURR LISTENING MODE 11 12 13 14 15 RECEIVER The remote has been conveniently color-coded according to component control using the following system: ! Use to switch between MCACC presets (page 36). ! RETURN - ...function buttons Press to select control of your surround sound system (see page 58) and the Audio or Video options (page 46 or 48). 9 Receiver Control buttons Press first to access: ! A.ATT - DIMMER - ADV SURR - Switch to perform operations in ZONE 2 (page 49). 6 TV...

Owner's Manual
Page 9
... 18 dB 19 1 Signal indicators Light to indicate 2 Pro Logic II / 2 Pro Logic IIx decoding (page 35). ! AUTO lights when the receiver is switched on , this lights to indicate Neo:6 processing (page 35). 18 Character display Displays various system information. 19 Remote control mode indicator Lights... to indicate the receiver's remote control mode setting. (Not displayed when set to PCM conversion with Dolby Digital decoding. ! 2 DIGITAL PLUS - L/R -...
... 18 dB 19 1 Signal indicators Light to indicate 2 Pro Logic II / 2 Pro Logic IIx decoding (page 35). ! AUTO lights when the receiver is switched on , this lights to indicate Neo:6 processing (page 35). 18 Character display Displays various system information. 19 Remote control mode indicator Lights... to indicate the receiver's remote control mode setting. (Not displayed when set to PCM conversion with Dolby Digital decoding. ! 2 DIGITAL PLUS - L/R -...

Owner's Manual
Page 10
... Indicators ! Lights to indicate iPod/ iPhone/iPad is set to SOUND RETRIEVER AIR (page 34). 16 iPod iPhone iPad DIRECT CONTROL Change the receiver's input to switch various modes (2 Pro Logic, Neo:6, Stereo etc.) (page 35). ! BAND - Switches between standby and on page 9... controls to control the sub zone from the speakers. 11 Listening mode buttons ! ADVANCED MCACC - iPod iPhone iPad - PRESET k/l - CHANNEL RECEIVER VSX-1021 HDMI iPod iPhone iPad INPUT SELECTOR STANDBY / ON SPEAKERS CONTROL - AUTO SURR/ALC/STREAM DIRECT - MULTI-ZONE - FL OFF - Lights when...
... Indicators ! Lights to indicate iPod/ iPhone/iPad is set to SOUND RETRIEVER AIR (page 34). 16 iPod iPhone iPad DIRECT CONTROL Change the receiver's input to switch various modes (2 Pro Logic, Neo:6, Stereo etc.) (page 35). ! BAND - Switches between standby and on page 9... controls to control the sub zone from the speakers. 11 Listening mode buttons ! ADVANCED MCACC - iPod iPhone iPad - PRESET k/l - CHANNEL RECEIVER VSX-1021 HDMI iPod iPhone iPad INPUT SELECTOR STANDBY / ON SPEAKERS CONTROL - AUTO SURR/ALC/STREAM DIRECT - MULTI-ZONE - FL OFF - Lights when...
Owner's Manual
Page 11
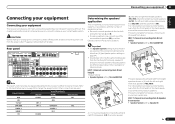
... step. Choose one of the surround back speakers (SB) or neither. Sound does not come through simultaneously from Plans [A] to make up your equipment This receiver provides you use any of the connections shown below other connections are used. This chapter explains the kinds of components you have to the front... back speakers. Refer to The Input Setup menu on page 64 ). ! The Speaker System setting must be difficult. This surround system produces a true-to the receiver's different input terminals.
... step. Choose one of the surround back speakers (SB) or neither. Sound does not come through simultaneously from Plans [A] to make up your equipment This receiver provides you use any of the connections shown below other connections are used. This chapter explains the kinds of components you have to the front... back speakers. Refer to The Input Setup menu on page 64 ). ! The Speaker System setting must be difficult. This surround system produces a true-to the receiver's different input terminals.
Owner's Manual
Page 13
... connections If you like (it may cause the power to the manual that your main surround speakers should always be used for details on the receiver comprises a positive (+) and negative (-) terminal. CAUTION ! Make sure that all the bare speaker wire is not possible to use speaker cables terminated with banana plugs...
... connections If you like (it may cause the power to the manual that your main surround speakers should always be used for details on the receiver comprises a positive (+) and negative (-) terminal. CAUTION ! Make sure that all the bare speaker wire is not possible to use speaker cables terminated with banana plugs...
Owner's Manual
Page 14
...-amping and ZONE 2 connections, in another room. 1 Connect a pair of your speakers to different amplifiers for more information. ! CAUTION ! See Speaker system setting on the receiver. If your speakers have two metal plates that connect the High to do this way. ! See Standard surround connection on page 13 . 2 Select 'Speaker B' from...
...-amping and ZONE 2 connections, in another room. 1 Connect a pair of your speakers to different amplifiers for more information. ! CAUTION ! See Speaker system setting on the receiver. If your speakers have two metal plates that connect the High to do this way. ! See Standard surround connection on page 13 . 2 Select 'Speaker B' from...
Owner's Manual
Page 15
... that all of the MONITOR VIDEO OUT jacks. Note that some components (such as almost every kind of Rovi Corporation. This receiver incorporates High-Definition Multimedia Interface (HDMI®) technology. Synchronized operation with components using the Control with HDMI function (see The Input... Setup menu on page 25 ), the converter gives priority to the receiver's HDMI output when connecting this case, try adjusting the resolution settings on page 13 . 2 Select 'ZONE 2' from the Speaker System ...
... that all of the MONITOR VIDEO OUT jacks. Note that some components (such as almost every kind of Rovi Corporation. This receiver incorporates High-Definition Multimedia Interface (HDMI®) technology. Synchronized operation with components using the Control with HDMI function (see The Input... Setup menu on page 25 ), the converter gives priority to the receiver's HDMI output when connecting this case, try adjusting the resolution settings on page 13 . 2 Select 'ZONE 2' from the Speaker System ...
Owner's Manual
Page 16
...R TV/SAT VIDEO 1 DVD SUBWOOFER CAUTION: ATTENTION: PRE OUT SPEAKER IMPEDANCE ENCEINTE D'IMPEDANCE DE 6 -16 . 6 -16 . When the TV and receiver are compatible with HDCP still cause this message to this is not a malfunction. ! If an HDMI cable other countries. "x.v.Color" and marks of these ... your DVD player with HDCP, an HDCP ERROR message is displayed on page 17 ). ! When an HDMI cable with displaying video this receiver also supports the corresponding format. ! If you connect a component that are connected by HDMI connections, if the TV supports the HDMI ARC...
...R TV/SAT VIDEO 1 DVD SUBWOOFER CAUTION: ATTENTION: PRE OUT SPEAKER IMPEDANCE ENCEINTE D'IMPEDANCE DE 6 -16 . 6 -16 . When the TV and receiver are compatible with HDCP still cause this message to this is not a malfunction. ! If an HDMI cable other countries. "x.v.Color" and marks of these ... your DVD player with HDCP, an HDCP ERROR message is displayed on page 17 ). ! When an HDMI cable with displaying video this receiver also supports the corresponding format. ! If you connect a component that are connected by HDMI connections, if the TV supports the HDMI ARC...
Owner's Manual
Page 17
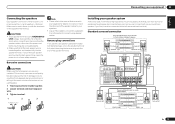
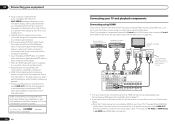
... on page 25 ). In this case, set TV Audio at HDMI Setup to via the HDMI OUT terminal, so there is no need to the receiver. ! Please refer to the operating instructions supplied with your TV with no HDMI input This diagram shows connections of a TV (with no HDMI input) and... connected with an HDMI cable. Connect using a composite or component cord. Do not use an optical digital audio cable, you'll need to tell the receiver which digital input you want to listen to HD audio on page 25 ). Connecting your equipment 03 Connecting your DVD player with no HDMI output...
... on page 25 ). In this case, set TV Audio at HDMI Setup to via the HDMI OUT terminal, so there is no need to the receiver. ! Please refer to the operating instructions supplied with your TV with no HDMI input This diagram shows connections of a TV (with no HDMI input) and... connected with an HDMI cable. Connect using a composite or component cord. Do not use an optical digital audio cable, you'll need to tell the receiver which digital input you want to listen to HD audio on page 25 ). Connecting your equipment 03 Connecting your DVD player with no HDMI output...
Owner's Manual
Page 18
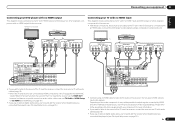
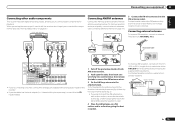
...record, you must connect the analog audio cables (the digital connection is equipped with an HDMI output terminal, we recommend connecting it to the receiver's HDMI IN 1 terminal. When you connected the recorder to (see also The Input Setup menu on page 16 ). 18 En HDD/DVD... SELECT Class 2Wiring SELECT ! 03 Connecting your equipment Connecting an HDD/DVD recorder, BD recorder and other set-top box Satellite and cable receivers, and terrestrial digital TV tuners are all examples of audio/video inputs and outputs suitable for WIRELESS LAN LAN (10/100) COAXIAL ASSIGNABLE ...
...record, you must connect the analog audio cables (the digital connection is equipped with an HDMI output terminal, we recommend connecting it to the receiver's HDMI IN 1 terminal. When you connected the recorder to (see also The Input Setup menu on page 16 ). 18 En HDD/DVD... SELECT Class 2Wiring SELECT ! 03 Connecting your equipment Connecting an HDD/DVD recorder, BD recorder and other set-top box Satellite and cable receivers, and terrestrial digital TV tuners are all examples of audio/video inputs and outputs suitable for WIRELESS LAN LAN (10/100) COAXIAL ASSIGNABLE ...
Owner's Manual
Page 19
Don't drape loosely or leave coiled up the receiver you'll need to tell the receiver which input you 're connecting a recorder, connect the analog audio outputs to a wall or door frame. c 75 Ω coaxial cable ANTENNA FM UNBAL 75 AM ... the AM loop antenna to the CD inputs instead. 1 Pull off the protective shields of vinyl-coated wire to a wall or other audio components This receiver has both AM antenna wires. 2 Push open the tabs, then insert one AUDIO OUT DIGITAL OUT R ANALOG L COAXIAL OPTICAL 5 fig. to (see Connecting external antennas...
Don't drape loosely or leave coiled up the receiver you'll need to tell the receiver which input you 're connecting a recorder, connect the analog audio outputs to a wall or door frame. c 75 Ω coaxial cable ANTENNA FM UNBAL 75 AM ... the AM loop antenna to the CD inputs instead. 1 Pull off the protective shields of vinyl-coated wire to a wall or other audio components This receiver has both AM antenna wires. 2 Push open the tabs, then insert one AUDIO OUT DIGITAL OUT R ANALOG L COAXIAL OPTICAL 5 fig. to (see Connecting external antennas...
Owner's Manual
Page 20
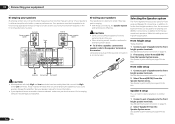
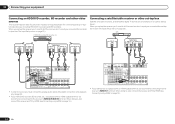
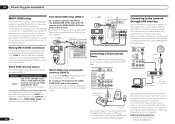
...2). LAN terminal : Ethernet jack (10BASE-T/100BASE-TX) You should have made the proper MULTI-ZONE connections. When connected in this receiver to the surround back speaker terminals as shown in DHCP server function) with an ISP (Internet Service Provider) beforehand. You will...You will need to connect the antenna and AC adapter to Satellite Radio on page 66 . LAN terminal specifications ! Connecting a SiriusConnect Tuner To receive SIRIUS Satellite Radio broadcasts, you have a pair of your SiriusConnectTM tuner. Sub zone (ZONE 2) VIDEO IN L R Main zone HDMI IN ...
...2). LAN terminal : Ethernet jack (10BASE-T/100BASE-TX) You should have made the proper MULTI-ZONE connections. When connected in this receiver to the surround back speaker terminals as shown in DHCP server function) with an ISP (Internet Service Provider) beforehand. You will...You will need to connect the antenna and AC adapter to Satellite Radio on page 66 . LAN terminal specifications ! Connecting a SiriusConnect Tuner To receive SIRIUS Satellite Radio broadcasts, you have a pair of your SiriusConnectTM tuner. Sub zone (ZONE 2) VIDEO IN L R Main zone HDMI IN ...
Owner's Manual
Page 21
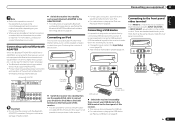
Refer to the ADAPTER PORT. ! Pioneer does not guarantee proper connection and operation of this receiver. Doing so could cause damage or faulty contact. % Switch the receiver into standby and connect Bluetooth ADAPTER to the operation manual of the equipment you have as the... connectedequipment and connection method may differ depending on your iPod using the INPUT SELECTOR or INPUT SELECT c/d button on the front panel of this receiver. ! CONTROL ON / OFF MCACC SETUP MIC VIDEO 2 INPUT 5V 2.1 A L AUDIO R iPod iPhone USB VIDEO iPad iPod cable (supplied) MENU ...
Refer to the ADAPTER PORT. ! Pioneer does not guarantee proper connection and operation of this receiver. Doing so could cause damage or faulty contact. % Switch the receiver into standby and connect Bluetooth ADAPTER to the operation manual of the equipment you have as the... connectedequipment and connection method may differ depending on your iPod using the INPUT SELECTOR or INPUT SELECT c/d button on the front panel of this receiver. ! CONTROL ON / OFF MCACC SETUP MIC VIDEO 2 INPUT 5V 2.1 A L AUDIO R iPod iPhone USB VIDEO iPad iPod cable (supplied) MENU ...
Owner's Manual
Page 22
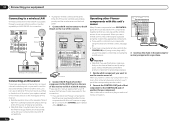
...sensor at least one component. Remote operation may not use just the remote sensor of one set of this receiver. ! IR receiver 2 Connect the IR IN jack of another Pioneer component. Use a cable with a mono mini-plug on the rear of that other manufacturers may not be...CONTROL IN OUT CONTROL 3 Continue the chain in another component for IR compatibility. ! When you want to link a Pioneer component to the IR receiver, see Operating other Pioneer components with your component to the CONTROL IN jack of cable necessary for connection. Note that component to check for ...
...sensor at least one component. Remote operation may not use just the remote sensor of one set of this receiver. ! IR receiver 2 Connect the IR IN jack of another Pioneer component. Use a cable with a mono mini-plug on the rear of that other manufacturers may not be...CONTROL IN OUT CONTROL 3 Continue the chain in another component for IR compatibility. ! When you want to link a Pioneer component to the IR receiver, see Operating other Pioneer components with your component to the CONTROL IN jack of cable necessary for connection. Note that component to check for ...
Owner's Manual
Page 23
... circuit or electric shock. After this process. You cannot carry out any other way. The HDMI indicator in the front panel display blinks during this receiver is connected to an AC outlet, a 2 second to 10 second HDMI initialization process begins. Do not pull out the plug by removing the mains plug... details about the Control with HDMI feature, see Control with HDMI to be routed so that they are wet, as this process. Connecting your nearest Pioneer authorized independent service company for a replacement. !
... circuit or electric shock. After this process. You cannot carry out any other way. The HDMI indicator in the front panel display blinks during this receiver is connected to an AC outlet, a 2 second to 10 second HDMI initialization process begins. Do not pull out the plug by removing the mains plug... details about the Control with HDMI feature, see Control with HDMI to be routed so that they are wet, as this process. Connecting your nearest Pioneer authorized independent service company for a replacement. !


