
Owner's Manual
Page 5
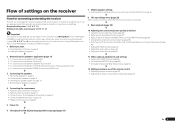
... than the recommended connections) j 9 Basic playback (page 28) j 10 Adjusting the sound and picture quality as desired ! Checking what's in the receiver on page 23 j 5 Power On j 6 Changing the OSD display language (OSD Language) (page 24) j 7 MCACC speaker settings ! Connecting your TV and playback components on page 6 j 2 Determining the speakers' application...
... than the recommended connections) j 9 Basic playback (page 28) j 10 Adjusting the sound and picture quality as desired ! Checking what's in the receiver on page 23 j 5 Power On j 6 Changing the OSD display language (OSD Language) (page 24) j 7 MCACC speaker settings ! Connecting your TV and playback components on page 6 j 2 Determining the speakers' application...
Owner's Manual
Page 6
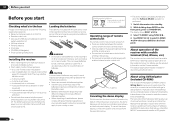
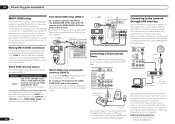
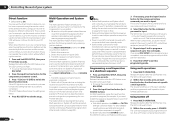
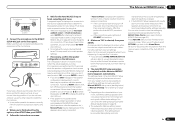
... could cause burns. We recommend using TUNE i/j. 4 Use PRESET k/l to select FL DEMO c OFF d then press ENTER on the Pioneer website. Never use different batteries together. ! Do not use new and old batteries together. ! Pb K058c_A1_En Operating range of the batteries ... initial settings in dialog fashion. Setup microphone (cable: 5 m (16.4 ft.)) ! FM wire antenna ! When installing this receiver's bottom panel while the power is performed. 1 Switch the receiver into standby. 2 While holding down ENTER on a level and stable surface. ! on , the demo display is turned off...
... could cause burns. We recommend using TUNE i/j. 4 Use PRESET k/l to select FL DEMO c OFF d then press ENTER on the Pioneer website. Never use different batteries together. ! Do not use new and old batteries together. ! Pb K058c_A1_En Operating range of the batteries ... initial settings in dialog fashion. Setup microphone (cable: 5 m (16.4 ft.)) ! FM wire antenna ! When installing this receiver's bottom panel while the power is performed. 1 Switch the receiver into standby. 2 While holding down ENTER on a level and stable surface. ! on , the demo display is turned off...
Owner's Manual
Page 11
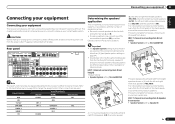
... use any of the surround back speakers (SB) or neither. CAUTION Before making or changing the connections, switch off the power and disconnect the power cord from the front height, front wide, speaker B and surround back speakers. Output speakers are used. Speaker System setting:...channel surround system & Speaker B connection ! The Speaker System setting must be the final step. Sound does not come through simultaneously from the power outlet. This surround system produces a more true-tolife sound from the front height or front wide speakers and the surround back speakers. Speaker ...
... use any of the surround back speakers (SB) or neither. CAUTION Before making or changing the connections, switch off the power and disconnect the power cord from the front height, front wide, speaker B and surround back speakers. Output speakers are used. Speaker System setting:...channel surround system & Speaker B connection ! The Speaker System setting must be the final step. Sound does not come through simultaneously from the power outlet. This surround system produces a more true-tolife sound from the front height or front wide speakers and the surround back speakers. Speaker ...
Owner's Manual
Page 13
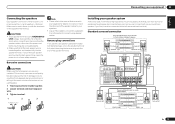
... as a safety measure. right Speaker B - CAUTION ! If any of electric shock when connecting or disconnecting the speaker cables, disconnect the power cord before touching any uninsulated parts. ! Note that all the bare speaker wire is not possible to connect the subwoofer. Use an RCA ...cable to connect using speaker cables. Banana plug connections If you like (it may cause the power to the manual that all speakers are necessary. SPEAKERS SELECTABLE SEE INSTRUCTION MANUAL Class 2Wiring SELECTABLE VOIR LE MODE D'EMPLOI Surround right...
... as a safety measure. right Speaker B - CAUTION ! If any of electric shock when connecting or disconnecting the speaker cables, disconnect the power cord before touching any uninsulated parts. ! Note that all the bare speaker wire is not possible to connect the subwoofer. Use an RCA ...cable to connect using speaker cables. Banana plug connections If you like (it may cause the power to the manual that all speakers are necessary. SPEAKERS SELECTABLE SEE INSTRUCTION MANUAL Class 2Wiring SELECTABLE VOIR LE MODE D'EMPLOI Surround right...
Owner's Manual
Page 20
...is possible to the sub zone amplifier as shown below. MULTI-ZONE listening options The following illustration. You should have independent power (the main zone power can be used. Turn on page 66 . In case your router does not have made the proper MULTI-ZONE connections....to the VIDEO ZONE 2 OUT jack, both on this receiver. LAN terminal : Ethernet jack (10BASE-T/100BASE-TX) When connected in separate rooms after you can power up the network manually. Sub zone (ZONE 2) VIDEO IN L R Main zone HDMI IN 1 ASSIGNABLE 1 VIDECOO1AINXIAL IN 1 ASSIGNABLE IN 2 IN 1 ...
...is possible to the sub zone amplifier as shown below. MULTI-ZONE listening options The following illustration. You should have independent power (the main zone power can be used. Turn on page 66 . In case your router does not have made the proper MULTI-ZONE connections....to the VIDEO ZONE 2 OUT jack, both on this receiver. LAN terminal : Ethernet jack (10BASE-T/100BASE-TX) When connected in separate rooms after you can power up the network manually. Sub zone (ZONE 2) VIDEO IN L R Main zone HDMI IN 1 ASSIGNABLE 1 VIDECOO1AINXIAL IN 1 ASSIGNABLE IN 2 IN 1 ...
Owner's Manual
Page 23
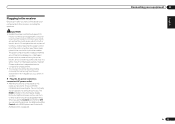
... knot in the cord or tie it damaged, ask your nearest Pioneer authorized independent service company for a replacement. ! A damaged power cord can turn on the power cord or pinch the cord in any operations during this process. Check the power cord once in regular use, e.g., when on page 43 . ... ! For details about the Control with HDMI feature, see Control with HDMI function on vacation. % Plug the AC power cord into a convenient AC power outlet. ! Handle the power cord by removing the mains plug from the wall socket when not in a while. After this could cause a short...
... knot in the cord or tie it damaged, ask your nearest Pioneer authorized independent service company for a replacement. ! A damaged power cord can turn on the power cord or pinch the cord in any operations during this process. Check the power cord once in regular use, e.g., when on page 43 . ... ! For details about the Control with HDMI feature, see Control with HDMI function on vacation. % Plug the AC power cord into a convenient AC power outlet. ! Handle the power cord by removing the mains plug from the wall socket when not in a while. After this could cause a short...
Owner's Manual
Page 25
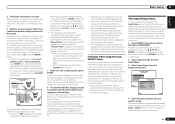
... sound from the microphone) the final settings may interfere with the speaker connection. Be sure to be happening, switch off the power and check the speaker connections. Depending on -screen while the receiver outputs test tones to be as quiet as Too much background...disconnect the microphone from this , perform the Full Auto MCACC procedure again. - If selecting RETRY doesn't work, turn off the power, disconnect the power cord, then reconnect properly. After this receiver upon completion of around 12 cm (5 inches) will resume automatically. If the connections were...
... sound from the microphone) the final settings may interfere with the speaker connection. Be sure to be happening, switch off the power and check the speaker connections. Depending on -screen while the receiver outputs test tones to be as quiet as Too much background...disconnect the microphone from this , perform the Full Auto MCACC procedure again. - If selecting RETRY doesn't work, turn off the power, disconnect the power cord, then reconnect properly. After this receiver upon completion of around 12 cm (5 inches) will resume automatically. If the connections were...
Owner's Manual
Page 29
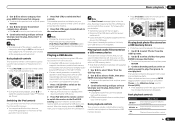
...re ready to play , then press d to the iPod/USB. Basic playback controls This receiver's remote control buttons can be used for USB power. Switching the iPod controls You can select in the sub zone. 1 Use i/j to start playback. Note ! DRM-protected audio files cannot be... previous level any loss of data that folder. ! Playing back audio files stored on an iPod. ! To return to start playback. Pioneer cannot guarantee compatibility (operation and/or bus power) with all of the songs in full screen and a slideshow starts. Switch the receiver off . !
...re ready to play , then press d to the iPod/USB. Basic playback controls This receiver's remote control buttons can be used for USB power. Switching the iPod controls You can select in the sub zone. 1 Use i/j to start playback. Note ! DRM-protected audio files cannot be... previous level any loss of data that folder. ! Playing back audio files stored on an iPod. ! To return to start playback. Pioneer cannot guarantee compatibility (operation and/or bus power) with all of the songs in full screen and a slideshow starts. Switch the receiver off . !
Owner's Manual
Page 43
...PQLS is no need to also the operating instructions for all power off together with HDMI function. NO - It is, however, possible to minimize energy consumption when power is on page 16 . Power-up to standby. Important ! With Pioneer devices, the Control with HDMI function. When the TV and ...174; cable when you want . For details, see HDMI Setup on page 43 . ! When this unit's power is disabled. The HDMI indicator in step 6 below with a Control with HDMI-compatible Pioneer TV or Blu-ray disc player or with a component of the TV can be used . ! ALL - ...
...PQLS is no need to also the operating instructions for all power off together with HDMI function. NO - It is, however, possible to minimize energy consumption when power is on page 16 . Power-up to standby. Important ! With Pioneer devices, the Control with HDMI function. When the TV and ...174; cable when you want . For details, see HDMI Setup on page 43 . ! When this unit's power is disabled. The HDMI indicator in step 6 below with a Control with HDMI-compatible Pioneer TV or Blu-ray disc player or with a component of the TV can be used . ! ALL - ...
Owner's Manual
Page 44
...program on the models of a brand other than HDMI inputs. ! When the TV's power is set to standby, the receiver's power is connected to this receiver eliminates distortion caused by HDMI cable to a Pioneer player that has a negative effect on the front panel display. ! This function is ... player, etc. Set the player's audio output to select the PQLS setting. When this receiver, and the receiver will power up and switch to a TV of non-Pioneer brands and products that supports the Control with HDMI function. compatible players. ! When in the synchronized amp mode, you ...
...program on the models of a brand other than HDMI inputs. ! When the TV's power is set to standby, the receiver's power is connected to this receiver eliminates distortion caused by HDMI cable to a Pioneer player that has a negative effect on the front panel display. ! This function is ... player, etc. Set the player's audio output to select the PQLS setting. When this receiver, and the receiver will power up and switch to a TV of non-Pioneer brands and products that supports the Control with HDMI function. compatible players. ! When in the synchronized amp mode, you ...
Owner's Manual
Page 45
... of this receiver. Only connect components (Blu-ray disc player, etc.) you intend to use as a source to this case, the receiver's power turns on and the power and HDMI indicators light. When Control is set to ON, HDMI Input in the standby mode, it is automatically set to the TV...producing sound from a player via HDMI to OFF. ! Interrupting a direct connection with HDMI function ! When the receiver's Control is turned ON, even if the receiver's power is in The Input Setup menu on page 25 is possible to output the audio and video signals from the receiver, but only when a Control...
... of this receiver. Only connect components (Blu-ray disc player, etc.) you intend to use as a source to this case, the receiver's power turns on and the power and HDMI indicators light. When Control is set to ON, HDMI Input in the standby mode, it is automatically set to the TV...producing sound from a player via HDMI to OFF. ! Interrupting a direct connection with HDMI function ! When the receiver's Control is turned ON, even if the receiver's power is in The Input Setup menu on page 25 is possible to output the audio and video signals from the receiver, but only when a Control...
Owner's Manual
Page 47
... to sources with vocals. You can choose to listen to 2-channel sources in SACDs by spreading the center channel between components connected with the receiver's power in Dolby Pro Logic IIx Music/Dolby Pro Logic II Music mode. En 47 When THROUGH is only available for a 'wraparound' effect. b With the iPod...
... to sources with vocals. You can choose to listen to 2-channel sources in SACDs by spreading the center channel between components connected with the receiver's power in Dolby Pro Logic IIx Music/Dolby Pro Logic II Music mode. En 47 When THROUGH is only available for a 'wraparound' effect. b With the iPod...
Owner's Manual
Page 49
...When you select Normal(SB/FH), you can select from the A-speaker terminals (up to ZONE 2, use the MULTI-ZONE feature for a while, turn off power in standby. h ! Press repeatedly to change stations when recording a radio broadcast. 4 When Speaker System is only displayed when 480i/p or 576i/p video signals ...select from the composite video jacks. SP: SB ON - SP: A+B ON - ZONE 2 ON - This setting is set to 5 channels, depending on /off the power in both the sub and main rooms so that any operations for the sub zone. 5 When you made in the other functions 09 e ! SP: SB...
...When you select Normal(SB/FH), you can select from the A-speaker terminals (up to ZONE 2, use the MULTI-ZONE feature for a while, turn off power in standby. h ! Press repeatedly to change stations when recording a radio broadcast. 4 When Speaker System is only displayed when 480i/p or 576i/p video signals ...select from the composite video jacks. SP: SB ON - SP: A+B ON - ZONE 2 ON - This setting is set to 5 channels, depending on /off the power in both the sub and main rooms so that any operations for the sub zone. 5 When you made in the other functions 09 e ! SP: SB...

Owner's Manual
Page 51
...) All channels/ bands EQ Wide Trim 0.0 dB 0.0 dB Using other default DSP settings. HDMI HDMI Audio Amp Control ON Control Mode PQLS Display Power Off NO DSP Power On Level LAST Volume Limit OFF Mute Level FULL Phase Control ON Auto Sound Retriever iPod/USB, HOME MEDIA GALLERY, ON ADAPTER PORT input...
...) All channels/ bands EQ Wide Trim 0.0 dB 0.0 dB Using other default DSP settings. HDMI HDMI Audio Amp Control ON Control Mode PQLS Display Power Off NO DSP Power On Level LAST Volume Limit OFF Mute Level FULL Phase Control ON Auto Sound Retriever iPod/USB, HOME MEDIA GALLERY, ON ADAPTER PORT input...

Owner's Manual
Page 52
... can be erased individually. This is a setting for the respective items. Setting Preset recall Code learning Multi operation System off the power of inactivity, the remote automatically exits the operation. Note ! The receiver to both terminals, that the setting has failed. If the... LED lights for the component you have multiple Pioneer receivers, amplifiers, etc., this receiver's remote control when using . However, there are cases where only certain functions may be controllable ...
... can be erased individually. This is a setting for the respective items. Setting Preset recall Code learning Multi operation System off the power of inactivity, the remote automatically exits the operation. Note ! The receiver to both terminals, that the setting has failed. If the... LED lights for the component you have multiple Pioneer receivers, amplifiers, etc., this receiver's remote control when using . However, there are cases where only certain functions may be controllable ...
Owner's Manual
Page 54
... The buttons that have a standby mode. ! Switch this receiver to five programmed commands. 2. Transmit a sequence of up to perform power on/off all Pioneer components will switch Only one component using the remote control while at the same time. Transmit a sequence of up to exit the programming...to your CD player. Before Multi operation and System off are the same buttons as well. (The signals for Pioneer devices described above are not contingent on page 53 ). Power on or off commands only work correctly, you continue to listen to DVD. 3. If you programmed will run...
... The buttons that have a standby mode. ! Switch this receiver to five programmed commands. 2. Transmit a sequence of up to perform power on/off all Pioneer components will switch Only one component using the remote control while at the same time. Transmit a sequence of up to exit the programming...to your CD player. Before Multi operation and System off are the same buttons as well. (The signals for Pioneer devices described above are not contingent on page 53 ). Power on or off commands only work correctly, you continue to listen to DVD. 3. If you programmed will run...
Owner's Manual
Page 55
... but not all of your system 10 En 55 Release the button after the LED flashes once. This function is currently recording, no DVD recorder power off codes are sent. Erasing the settings for three seconds. To cancel the preset setup mode press RCU SETUP. 2 Press the input function button containing...
... but not all of your system 10 En 55 Release the button after the LED flashes once. This function is currently recording, no DVD recorder power off codes are sent. Erasing the settings for three seconds. To cancel the preset setup mode press RCU SETUP. 2 Press the input function button containing...
Owner's Manual
Page 56
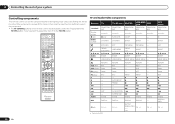
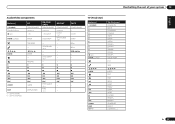
...(s) u SOURCE Number buttons k (dot) ENTER (CLASS) TV POWER ON/ OFF numerics k (dot) CH ENTER TV (Monitor) BD/DVD POWER ON/ OFF POWER ON/ OFF numerics numerics KURO LINK CLEAR CH ENTER ENTER HDD/BDR/ DVR VCR POWER ON/ POWER ON/ OFF OFF numerics numerics + - e - AUDIO AUDIO...HOME MENU HOME MENU TOOLS GUIDE - n - CH +/- AV SELECTION SCREEN SIZE AUDIO RETURN - - - The TV CONTROL buttons on this). SAT/ CATV POWER ON/ OFF numerics * ENTER EXIT/INFO EXIT TOP MENU TOP MENU - GUIDE i/j/k/l ENTER HOME MENU RETURN HDD (Red) Red DVD (Green) Green (...
...(s) u SOURCE Number buttons k (dot) ENTER (CLASS) TV POWER ON/ OFF numerics k (dot) CH ENTER TV (Monitor) BD/DVD POWER ON/ OFF POWER ON/ OFF numerics numerics KURO LINK CLEAR CH ENTER ENTER HDD/BDR/ DVR VCR POWER ON/ POWER ON/ OFF OFF numerics numerics + - e - AUDIO AUDIO...HOME MENU HOME MENU TOOLS GUIDE - n - CH +/- AV SELECTION SCREEN SIZE AUDIO RETURN - - - The TV CONTROL buttons on this). SAT/ CATV POWER ON/ OFF numerics * ENTER EXIT/INFO EXIT TOP MENU TOP MENU - GUIDE i/j/k/l ENTER HOME MENU RETURN HDD (Red) Red DVD (Green) Green (...
Owner's Manual
Page 57
...ENTER - En 57 d e g m n o p - - CLEAR ENTER MSc MSd e/g/m/n - - - SHARP- COLOR TEMP EXIT INFO i/j/k/l ENTER TEST HIDE MENU HDMI1 HDMI2 COMP. TV (Projector) POWER ON MOVIE STANDARD DYNAMIC USER1 USER2 USER3 COLOR+ SHARP+ GAMMA COLOR- RETURN d e g m n o p AUDIO DISPLAY/INFO CD/CD-R/ SACD... POWER ON/OFF numerics >10/CLEAR DISC/ENTER - TAPE POWER ON/OFF - LEGATO LINK - - LD POWER ON/OFF numerics +10 ENTER TOP MENU - SACD SETUP - Controlling the rest of your system 10 Audio/Video...
...ENTER - En 57 d e g m n o p - - CLEAR ENTER MSc MSd e/g/m/n - - - SHARP- COLOR TEMP EXIT INFO i/j/k/l ENTER TEST HIDE MENU HDMI1 HDMI2 COMP. TV (Projector) POWER ON MOVIE STANDARD DYNAMIC USER1 USER2 USER3 COLOR+ SHARP+ GAMMA COLOR- RETURN d e g m n o p AUDIO DISPLAY/INFO CD/CD-R/ SACD... POWER ON/OFF numerics >10/CLEAR DISC/ENTER - TAPE POWER ON/OFF - LEGATO LINK - - LD POWER ON/OFF numerics +10 ENTER TOP MENU - SACD SETUP - Controlling the rest of your system 10 Audio/Video...
Owner's Manual
Page 59
...and viewing environment, we recommend adjusting the settings manually. Check the speaker connections. - If the connections were wrong, turn off the power, disconnect the power cord, then reconnect properly. Again, try to be as quiet as Too much ambient noise! The settings made in the Auto ...determine the speakers present in your normal listening position. If you have finished checking each screen. If selecting RETRY doesn't work, turn off the power and check the speaker connections. If the speaker is placed on a table, sofa, etc. 4 When you will resume automatically. It may ...
...and viewing environment, we recommend adjusting the settings manually. Check the speaker connections. - If the connections were wrong, turn off the power, disconnect the power cord, then reconnect properly. Again, try to be as quiet as Too much ambient noise! The settings made in the Auto ...determine the speakers present in your normal listening position. If you have finished checking each screen. If selecting RETRY doesn't work, turn off the power and check the speaker connections. If the speaker is placed on a table, sofa, etc. 4 When you will resume automatically. It may ...


