Owner's Manual
Page 4
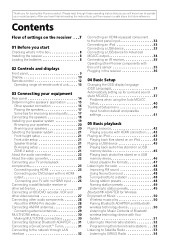
... in the box 8 Installing the receiver 8 Loading the batteries 8 02 Controls and displays Front panel 9 Display 10 Remote control 12 Operating range of settings on a USB memory device 46 About playable file formats 47 Listening to the radio 48... so you have finished reading the instructions, put them away in a safe place for future reference. Contents Flow of remote control unit. . . . . 13 03 Connecting your equipment Rear panel 14 Determining the speakers' application 15 Other...for Advanced MCACC output 34 Connecting an IR receiver 35 Operating other Pioneer components with this...
... in the box 8 Installing the receiver 8 Loading the batteries 8 02 Controls and displays Front panel 9 Display 10 Remote control 12 Operating range of settings on a USB memory device 46 About playable file formats 47 Listening to the radio 48... so you have finished reading the instructions, put them away in a safe place for future reference. Contents Flow of remote control unit. . . . . 13 03 Connecting your equipment Rear panel 14 Determining the speakers' application 15 Other...for Advanced MCACC output 34 Connecting an IR receiver 35 Operating other Pioneer components with this...
Owner's Manual
Page 5
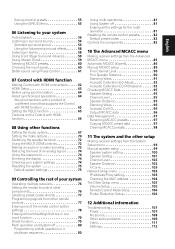
...operation or a shutdown sequence 80 Using multi operations 81 Using System off 81 Erasing all the settings for the multioperation 81 Resetting the remote control presets 82 Default preset codes 82 Controls the components 82 10 The Advanced MCACC menu Making receiver settings from the Advanced MCACC ... Network Setup menu 103 IP address/Proxy setting 103 Checking the MAC address 104 The Other Setup menu 105 Volume Setup 105 Remote Control Mode Setup 106 Flicker Reduction Setup 106 12 Additional information Troubleshooting 107 Power 107 No sound 108 Other audio problems 109 Video...
...operation or a shutdown sequence 80 Using multi operations 81 Using System off 81 Erasing all the settings for the multioperation 81 Resetting the remote control presets 82 Default preset codes 82 Controls the components 82 10 The Advanced MCACC menu Making receiver settings from the Advanced MCACC ... Network Setup menu 103 IP address/Proxy setting 103 Checking the MAC address 104 The Other Setup menu 105 Volume Setup 105 Remote Control Mode Setup 106 Flicker Reduction Setup 106 12 Additional information Troubleshooting 107 Power 107 No sound 108 Other audio problems 109 Video...
Owner's Manual
Page 6
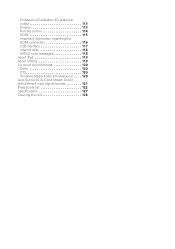
Professional Calibration EQ graphical output 113 Display 113 Remote control 114 HDMI 115 Important information regarding the HDMI connection 116 USB interface 117 Internet radio 118 SIRIUS radio messages 118 About iPod 119 About SIRIUS 119 Surround sound formats 120 Dolby 120 DTS 120 Windows Media Audio 9 Professional . . . . 120 Auto Surround, ALC and Stream Direct with different input signal formats 121 Preset code list 122 Specifications 127 Cleaning the unit 128
Professional Calibration EQ graphical output 113 Display 113 Remote control 114 HDMI 115 Important information regarding the HDMI connection 116 USB interface 117 Internet radio 118 SIRIUS radio messages 118 About iPod 119 About SIRIUS 119 Surround sound formats 120 Dolby 120 DTS 120 Windows Media Audio 9 Professional . . . . 120 Auto Surround, ALC and Stream Direct with different input signal formats 121 Preset code list 122 Specifications 127 Cleaning the unit 128
Owner's Manual
Page 7
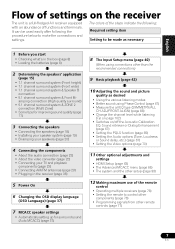
... MCACC menu (page 85) • The system and the other setup (page 99) 12 Making maximum use of the remote control • Operating multiple receivers (page 76) • Setting the remote to make the connections and settings. amping connection (High quality surround) • 5.1 channel surround system & ZONE 2 connection (Multi Zone) &#...used easily after following : Required setting item Setting to be made as desired • Using the various listening modes • Better sound using connections other remote controls (page 77) 7 En The colors of functions and terminals.
... MCACC menu (page 85) • The system and the other setup (page 99) 12 Making maximum use of the remote control • Operating multiple receivers (page 76) • Setting the remote to make the connections and settings. amping connection (High quality surround) • 5.1 channel surround system & ZONE 2 connection (Multi Zone) &#...used easily after following : Required setting item Setting to be made as desired • Using the various listening modes • Better sound using connections other remote controls (page 77) 7 En The colors of functions and terminals.
Owner's Manual
Page 8
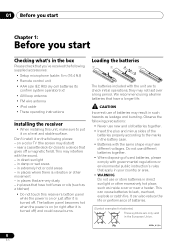
... 1: Before you start Checking what's in the box Please check that you've received the following supplied accessories: • Setup microphone (cable: 5 m (16.4 ft.)) • Remote control unit • AAA size IEC R03 dry cell batteries (to confirm system operation) x2 • AM loop antenna • FM wire antenna • iPod...
... 1: Before you start Checking what's in the box Please check that you've received the following supplied accessories: • Setup microphone (cable: 5 m (16.4 ft.)) • Remote control unit • AAA size IEC R03 dry cell batteries (to confirm system operation) x2 • AM loop antenna • FM wire antenna • iPod...
Owner's Manual
Page 9
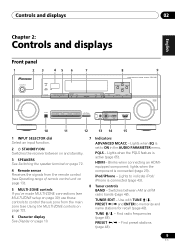
... stations for recall (page 48). Find preset stations (page 48). 9 En Blinks when connecting an HDMIequipped component; CHANNEL RECEIVER VSX-1020 TUNE PRESET PRESET TUNE TUNER EDIT ENTER MASTER VOLUME PHONES AUTO/ALC/DIRECT LISTENING MODE STEREO STANDARD ADV SURROUND iPod iPhone DIRECT CONTROL... 48). Switches between on and standby. 3 SPEAKERS See Switching the speaker terminal on page 72. 4 Remote sensor Receives the signals from the remote control (see Operating range of remote control unit on page 13). 5 MULTI-ZONE controls If you've made MULTI-ZONE connections (see Using...
... stations for recall (page 48). Find preset stations (page 48). 9 En Blinks when connecting an HDMIequipped component; CHANNEL RECEIVER VSX-1020 TUNE PRESET PRESET TUNE TUNER EDIT ENTER MASTER VOLUME PHONES AUTO/ALC/DIRECT LISTENING MODE STEREO STANDARD ADV SURROUND iPod iPhone DIRECT CONTROL... 48). Switches between on and standby. 3 SPEAKERS See Switching the speaker terminal on page 72. 4 Remote sensor Receives the signals from the remote control (see Operating range of remote control unit on page 13). 5 MULTI-ZONE controls If you've made MULTI-ZONE connections (see Using...
Owner's Manual
Page 11
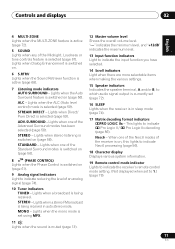
... Dialog Enhancement is switched on , this lights to indicate Neo:6 processing (page 56). 18 Character display Displays various system information. 19 Remote control mode indicator Lights to indicate the receiver's remote control mode setting. (Not displayed when set using MPX. 11 Lights when the sound is selected (page 67). STEREO - Lights when...
... Dialog Enhancement is switched on , this lights to indicate Neo:6 processing (page 56). 18 Character display Displays various system information. 19 Remote control mode indicator Lights to indicate the receiver's remote control mode setting. (Not displayed when set using MPX. 11 Lights when the sound is selected (page 67). STEREO - Lights when...
Owner's Manual
Page 12
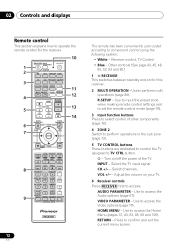
...Adjust the volume on for the receiver. Use to access the Audio options (page 67). 02 Controls and displays Remote control This section explains how to operate the remote control for this receiver. 2 MULTI OPERATION - Select the TV input signal. CH +/- - Use to perform multi... 7 8 9 D.ACCESS CLASS CH / CLR 0 ENTER AUTO / ALC / 9 DIRECT STEREO STANDARD ADV SURR LISTENING MODE RECEIVER 12 En The remote has been conveniently color-coded according to confirm and exit the current menu screen. R.SETUP - Select channels. Press to component control using the following ...
...Adjust the volume on for the receiver. Use to access the Audio options (page 67). 02 Controls and displays Remote control This section explains how to operate the remote control for this receiver. 2 MULTI OPERATION - Select the TV input signal. CH +/- - Use to perform multi... 7 8 9 D.ACCESS CLASS CH / CLR 0 ENTER AUTO / ALC / 9 DIRECT STEREO STANDARD ADV SURR LISTENING MODE RECEIVER 12 En The remote has been conveniently color-coded according to confirm and exit the current menu screen. R.SETUP - Select channels. Press to component control using the following ...
Owner's Manual
Page 13
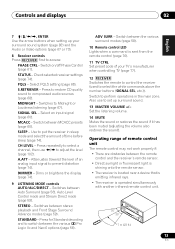
.... • The receiver is located near a device that is emitting infrared rays. • The receiver is operated simultaneously with another infrared remote control unit. 30° 30° 7 m (23 ft.) 13 En Operating range of your surround sound system (page 85) and the Audio ...- SLEEP - Press repeatedly to select a channel, then use to set up your TV's manufacturer when controlling TV (page 77). 12 RECEIVER Switches the remote to control the receiver (used to access: PHASE CTRL - Press for Standard decoding and to prevent distortion (page 74). Set the listening volume. 14 MUTE...
.... • The receiver is located near a device that is emitting infrared rays. • The receiver is operated simultaneously with another infrared remote control unit. 30° 30° 7 m (23 ft.) 13 En Operating range of your surround sound system (page 85) and the Audio ...- SLEEP - Press repeatedly to select a channel, then use to set up your TV's manufacturer when controlling TV (page 77). 12 RECEIVER Switches the remote to control the receiver (used to access: PHASE CTRL - Press for Standard decoding and to prevent distortion (page 74). Set the listening volume. 14 MUTE...
Owner's Manual
Page 30
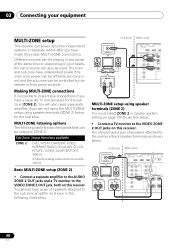
... speakers attached to two independent systems in two zones at the same time or, depending on ) and the sub zone can be controlled by the remote or front panel controls. Different sources can be playing in separate rooms after you have a pair of speakers attached to the sub zone amplifier as...
... speakers attached to two independent systems in two zones at the same time or, depending on ) and the sub zone can be controlled by the remote or front panel controls. Different sources can be playing in separate rooms after you have a pair of speakers attached to the sub zone amplifier as...

Owner's Manual
Page 35
...; Note that came with your component to check for grounding purposes. 1 Decide which you'll point the corresponding remote control. Refer to the manual that other Pioneer components with this unit's sensor below to connect to the CONTROL jacks instead of the IR OUT jack. Connecting ...same time), the IR receiver's remote sensor takes priority over the remote sensor on the front panel. 2 • If you want to link a Pioneer component to the IR receiver, see Setting the remote to control other Pioneer components with this unit's sensor Many Pioneer components have SR CONTROL jacks which ...
...; Note that came with your component to check for grounding purposes. 1 Decide which you'll point the corresponding remote control. Refer to the manual that other Pioneer components with this unit's sensor below to connect to the CONTROL jacks instead of the IR OUT jack. Connecting ...same time), the IR receiver's remote sensor takes priority over the remote sensor on the front panel. 2 • If you want to link a Pioneer component to the IR receiver, see Setting the remote to control other Pioneer components with this unit's sensor Many Pioneer components have SR CONTROL jacks which ...
Owner's Manual
Page 37
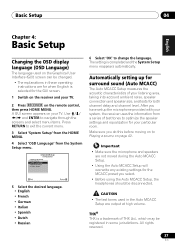
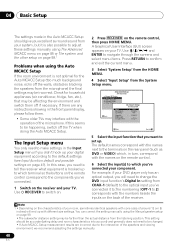
... for when English is completed and the System Setup menu reappears automatically. Automatically setting up the microphone provided with your TV. 2 Press RECEIVER on the remote control, then press HOME MENU. Important • Make sure the microphone and speakers are for the GUI screen. 1 Switch on the receiver and your system...
... for when English is completed and the System Setup menu reappears automatically. Automatically setting up the microphone provided with your TV. 2 Press RECEIVER on the remote control, then press HOME MENU. Important • Make sure the microphone and speakers are for the GUI screen. 1 Switch on the receiver and your system...
Owner's Manual
Page 40
...Setup menu. 4.SystemSetup A/V RECEIVER a. For example, if your DVD player only has an optical output, you will end up with the names on the remote control. 6 Select the input(s) to which you 've connected it is not optimal for household appliances (air conditioner, fridge, fan, etc.), that you ...correspond with the names next to the terminals on the rear panel (such as DVD or VIDEO) which terminal so the buttons on the remote control correspond to the components you want to 2) corresponds with the operation of the speakers and viewing environment, we recommend adjusting the settings...
...Setup menu. 4.SystemSetup A/V RECEIVER a. For example, if your DVD player only has an optical output, you will end up with the names on the remote control. 6 Select the input(s) to which you 've connected it is not optimal for household appliances (air conditioner, fridge, fan, etc.), that you ...correspond with the names next to the terminals on the rear panel (such as DVD or VIDEO) which terminal so the buttons on the remote control correspond to the components you want to 2) corresponds with the operation of the speakers and viewing environment, we recommend adjusting the settings...
Owner's Manual
Page 42
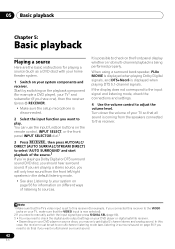
... the playback component (for example a DVD player), your system on page 56 for example, if you connected this receiver to the VIDEO jacks on the remote control, INPUT SELECT, or the front panel INPUT SELECTOR dial.2 3 Press RECEIVER , then press AUTO/ALC/ DIRECT (AUTO SURR/ALC/STREAM DIRECT) to select 'AUTO...
... the playback component (for example a DVD player), your system on page 56 for example, if you connected this receiver to the VIDEO jacks on the remote control, INPUT SELECT, or the front panel INPUT SELECTOR dial.2 3 Press RECEIVER , then press AUTO/ALC/ DIRECT (AUTO SURR/ALC/STREAM DIRECT) to select 'AUTO...
Owner's Manual
Page 43
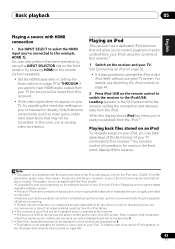
...this receiver.3 You can also perform the same operation by using this receiver, and we recommend switching the equalizer off before connecting. • Pioneer cannot under any inconvenience or loss of recorded material resulting from the iPod failure. 2 • The controls of your iPod and iPhone. Loading... nano (audio only for photos or video clips on the iPod itself, without using the controls of this receiver.1 1 Switch on the remote control repeatedly. • Set the HDMI parameter in the GUI screen while the receiver verifies the connection and retrieves data from the iPod....
...this receiver.3 You can also perform the same operation by using this receiver, and we recommend switching the equalizer off before connecting. • Pioneer cannot under any inconvenience or loss of recorded material resulting from the iPod failure. 2 • The controls of your iPod and iPhone. Loading... nano (audio only for photos or video clips on the iPod itself, without using the controls of this receiver.1 1 Switch on the remote control repeatedly. • Set the HDMI parameter in the GUI screen while the receiver verifies the connection and retrieves data from the iPod....
Owner's Manual
Page 44
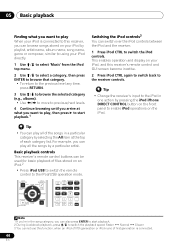
... During Audiobook playback, press / to switch the playback speed: Faster Normal Slower 3 You cannot use this receiver's remote control and GUI screen become inactive. 2 Press iPod CTRL again to switch back to the receiver controls. Tip • Change the receiver's input to...generation or iPod nano of each category list. This enables operation and display on the iPod. Basic playback controls This receiver's remote control buttons can play all the songs by pressing the iPod iPhone DIRECT CONTROL button on the front panel to enable iPod operations...
... During Audiobook playback, press / to switch the playback speed: Faster Normal Slower 3 You cannot use this receiver's remote control and GUI screen become inactive. 2 Press iPod CTRL again to switch back to the receiver controls. Tip • Change the receiver's input to...generation or iPod nano of each category list. This enables operation and display on the iPod. Basic playback controls This receiver's remote control buttons can play all the songs by pressing the iPod iPhone DIRECT CONTROL button on the front panel to enable iPod operations...

Owner's Manual
Page 45
It is not possible to connect this unit to a personal computer for USB playback. • Pioneer cannot guarantee compatibility (operation and/or bus power) with a large capacity is connected, it may occur when connected to this receiver. 2 Make sure the receiver ..., portable flash memory (particularly keydrives) and digital audio players (MP3 players) of files stored on USB memory devices. • Press iPod USB to switch the remote control to the iPod/USB operation mode. Try following the points below ) is 8. Playing back audio files stored on a USB memory device The maximum number...
It is not possible to connect this unit to a personal computer for USB playback. • Pioneer cannot guarantee compatibility (operation and/or bus power) with a large capacity is connected, it may occur when connected to this receiver. 2 Make sure the receiver ..., portable flash memory (particularly keydrives) and digital audio players (MP3 players) of files stored on USB memory devices. • Press iPod USB to switch the remote control to the iPod/USB operation mode. Try following the points below ) is 8. Playing back audio files stored on a USB memory device The maximum number...
Owner's Manual
Page 48
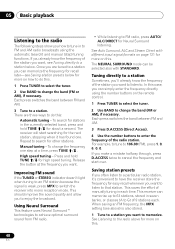
... is also stored. 1 Tune to a station you are three ways to . Once you want to listen to do this . To search for more on the remote control. 1 Press TUNER to select the tuner. 2 Use BAND to enter the frequency of the station you already know the frequency of 9 stations each time...
... is also stored. 1 Tune to a station you are three ways to . Once you want to listen to do this . To search for more on the remote control. 1 Press TUNER to select the tuner. 2 Use BAND to enter the frequency of the station you already know the frequency of 9 stations each time...

Owner's Manual
Page 49
... display shows PRESET MEMORY, then a blinking memory class. 3 Press CLASS to select one of a name. • Once you want. See Saving station presets on the remote control to confirm your station presets. 1 Choose the station preset you can press DISP when listening to a station to name. Tip • To erase a station...
... display shows PRESET MEMORY, then a blinking memory class. 3 Press CLASS to select one of a name. • Once you want. See Saving station presets on the remote control to confirm your station presets. 1 Choose the station preset you can press DISP when listening to a station to name. Tip • To erase a station...
Owner's Manual
Page 50
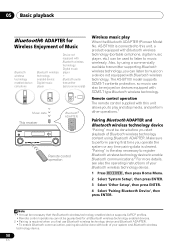
... with Bluetooth wireless technology: Digital music player + Bluetooth audio transmitter (sold commercially) Music data This receiver Bluetooth® ADAPTER Remote control operation Wireless music play and stop media, and perform other operations.1 Pairing Bluetooth ADAPTER and Bluetooth wireless technology device "Pairing... or any time pairing data is the step necessary to register Bluetooth wireless technology device to play When the Bluetooth ADAPTER (Pioneer Model No. The AS-BT100 model supports SCMS-T contents protection, so music can listen to music wirelessly. Also, by ...
... with Bluetooth wireless technology: Digital music player + Bluetooth audio transmitter (sold commercially) Music data This receiver Bluetooth® ADAPTER Remote control operation Wireless music play and stop media, and perform other operations.1 Pairing Bluetooth ADAPTER and Bluetooth wireless technology device "Pairing... or any time pairing data is the step necessary to register Bluetooth wireless technology device to play When the Bluetooth ADAPTER (Pioneer Model No. The AS-BT100 model supports SCMS-T contents protection, so music can listen to music wirelessly. Also, by ...


