Owner's Manual
Page 4
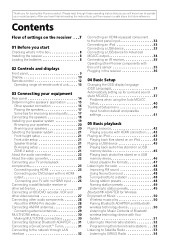
... 28 About the WMA9 Pro decoder 28 Connecting AM/FM antennas 29 Connecting external antennas 29 MULTI-ZONE setup 30 Making MULTI-ZONE connections 30 Connecting Optional Bluetooth ADAPTER . . . 31 Connecting a SiriusConnect™ Tuner 31 Connecting... Bi-wiring your speakers 20 Selecting the Speaker system 21 Front height setup 21 Front wide setup 21 Speaker B setup 21 Bi-Amping setup 21 ZONE 2 setup 21 About the audio connection 22 About the video converter 22 Connecting...place for Advanced MCACC output 34 Connecting an IR receiver 35 Operating other Pioneer components with this...
... 28 About the WMA9 Pro decoder 28 Connecting AM/FM antennas 29 Connecting external antennas 29 MULTI-ZONE setup 30 Making MULTI-ZONE connections 30 Connecting Optional Bluetooth ADAPTER . . . 31 Connecting a SiriusConnect™ Tuner 31 Connecting... Bi-wiring your speakers 20 Selecting the Speaker system 21 Front height setup 21 Front wide setup 21 Speaker B setup 21 Bi-Amping setup 21 ZONE 2 setup 21 About the audio connection 22 About the video converter 22 Connecting...place for Advanced MCACC output 34 Connecting an IR receiver 35 Operating other Pioneer components with this...
Owner's Manual
Page 5
...the input signal 60 Better sound using Phase Control 61 07 Control with HDMI function Making Control with HDMI connections . . . . . 62 HDMI Setup 63 Before using synchronization 64 About synchronized operations 64 About connections with a product of a different brand that supports the Control with HDMI function 65 ...function 66 08 Using other functions Setting the Audio options 67 Setting the Video options 70 Switching the speaker terminal 72 Using the MULTI-ZONE controls 72 Making an audio or a video recording 73 Reducing the level of an analog signal 74 Using the sleep timer 74 ...
...the input signal 60 Better sound using Phase Control 61 07 Control with HDMI function Making Control with HDMI connections . . . . . 62 HDMI Setup 63 Before using synchronization 64 About synchronized operations 64 About connections with a product of a different brand that supports the Control with HDMI function 65 ...function 66 08 Using other functions Setting the Audio options 67 Setting the Video options 70 Switching the speaker terminal 72 Using the MULTI-ZONE controls 72 Making an audio or a video recording 73 Reducing the level of an analog signal 74 Using the sleep timer 74 ...
Owner's Manual
Page 7
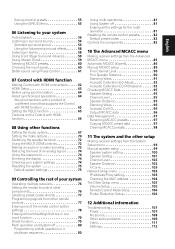
... The Advanced MCACC menu (page 85) • The system and the other setup (page 99) 12 Making maximum use of functions and terminals. amping connection (High quality surround) • 5.1 channel surround system & ZONE 2 connection (Multi Zone) • Some tips for improving sound quality (page 17) 3... (page 37) 7 MCACC speaker settings • Automatically setting up for surround sound (Auto MCACC) (page 37) 8 The Input Setup menu (page 40) (When using Phase Control (page 61) • Measure the all EQ type (SYMMETRY/ALL CH ADJ/FRONT ALIGN) (page 86) ...
... The Advanced MCACC menu (page 85) • The system and the other setup (page 99) 12 Making maximum use of functions and terminals. amping connection (High quality surround) • 5.1 channel surround system & ZONE 2 connection (Multi Zone) • Some tips for improving sound quality (page 17) 3... (page 37) 7 MCACC speaker settings • Automatically setting up for surround sound (Auto MCACC) (page 37) 8 The Input Setup menu (page 40) (When using Phase Control (page 61) • Measure the all EQ type (SYMMETRY/ALL CH ADJ/FRONT ALIGN) (page 86) ...
Owner's Manual
Page 9
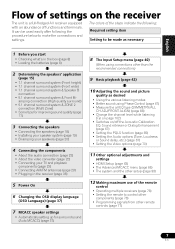
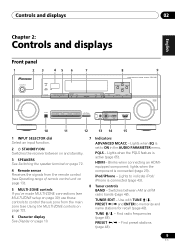
... feature is connected (page 23). TUNER EDIT - CHANNEL RECEIVER VSX-1020 TUNE PRESET PRESET TUNE TUNER EDIT ENTER MASTER VOLUME PHONES AUTO/ALC/DIRECT LISTENING MODE STEREO STANDARD ADV SURROUND iPod iPhone DIRECT CONTROL MCACC SETUP MIC iPod iPhone USB VIDEO CAMERA HDMI 5 10 11 12... on and standby. 3 SPEAKERS See Switching the speaker terminal on page 72. 4 Remote sensor Receives the signals from the main zone (see Using the MULTI-ZONE controls on page 72). 6 Character display See Display on page 10. 7 Indicators ADVANCED MCACC - HDMI - Controls and displays 02...
... feature is connected (page 23). TUNER EDIT - CHANNEL RECEIVER VSX-1020 TUNE PRESET PRESET TUNE TUNER EDIT ENTER MASTER VOLUME PHONES AUTO/ALC/DIRECT LISTENING MODE STEREO STANDARD ADV SURROUND iPod iPhone DIRECT CONTROL MCACC SETUP MIC iPod iPhone USB VIDEO CAMERA HDMI 5 10 11 12... on and standby. 3 SPEAKERS See Switching the speaker terminal on page 72. 4 Remote sensor Receives the signals from the main zone (see Using the MULTI-ZONE controls on page 72). 6 Character display See Display on page 10. 7 Indicators ADVANCED MCACC - HDMI - Controls and displays 02...
Owner's Manual
Page 10
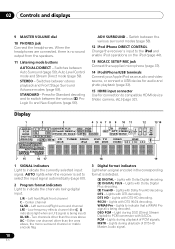
... (page 58). 12 iPod iPhone DIRECT CONTROL Change the receiver's input to the iPod and enable iPod operations on the iPod (page 44). 13 MCACC SETUP MIC jack Connect the supplied microphone (page 37). 14 iPod/iPhone/USB terminals Connect your Apple iPod as an audio and video source, or connect... XL XC LFE AUTO SURROUND STREAM DIRECT 2PROLOGIC x Neo:6 ADV.SURROUND STEREO STANDARD SP AB SLEEP R 2DIGITAL PLUS DSD PCM TUNED SR 2TrueHD WMA9Pro MULTI-ZONE PQLS ALC ATT STEREO DTS HD ES 96/24 S.RTRV SOUND UP MIX OVER MONO XR MSTR CD TUNER SIRIUS CD-R iPod DVD TV VIDEO...
... (page 58). 12 iPod iPhone DIRECT CONTROL Change the receiver's input to the iPod and enable iPod operations on the iPod (page 44). 13 MCACC SETUP MIC jack Connect the supplied microphone (page 37). 14 iPod/iPhone/USB terminals Connect your Apple iPod as an audio and video source, or connect... XL XC LFE AUTO SURROUND STREAM DIRECT 2PROLOGIC x Neo:6 ADV.SURROUND STEREO STANDARD SP AB SLEEP R 2DIGITAL PLUS DSD PCM TUNED SR 2TrueHD WMA9Pro MULTI-ZONE PQLS ALC ATT STEREO DTS HD ES 96/24 S.RTRV SOUND UP MIX OVER MONO XR MSTR CD TUNER SIRIUS CD-R iPod DVD TV VIDEO...
Owner's Manual
Page 12
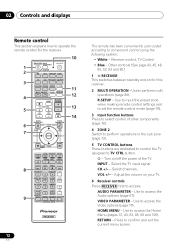
...to perform operations in the sub zone (page 73). 5 TV CONTROL buttons These buttons are dedicated to control the TV assigned to TV CTRL button. - Use to component control using the following system: • White - RECEIVER MULTI OPERATION SOURCE 1 R.SETUP 2 BD DVD DVR/BDR ...HDMI 10 TV CD NET RADIO ADAPTER 3 iPod USB TUNER SIRIUS TV CTRL 11 INPUT SELECT ZONE 2 RECEIVER 4 12 MASTER INPUT VOLUME TV CONTROL 5 13 CH VOL MUTE 14 AUDIO ...
...to perform operations in the sub zone (page 73). 5 TV CONTROL buttons These buttons are dedicated to control the TV assigned to TV CTRL button. - Use to component control using the following system: • White - RECEIVER MULTI OPERATION SOURCE 1 R.SETUP 2 BD DVD DVR/BDR ...HDMI 10 TV CD NET RADIO ADAPTER 3 iPod USB TUNER SIRIUS TV CTRL 11 INPUT SELECT ZONE 2 RECEIVER 4 12 MASTER INPUT VOLUME TV CONTROL 5 13 CH VOL MUTE 14 AUDIO ...
Owner's Manual
Page 14
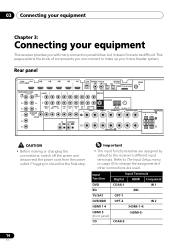
Important • The input functions below are used. Refer to The Input Setup menu on page 40 to change the assignments if other connections are assigned by default to the receiver's different input terminals. Input function Input Terminals ... IN (OUTPUT 5 V 100 mA MAX) COMPONENT VIDEO ASSIGNABLE IN 1 IN 2 (DVD) (DVR/BDR) Y Y AUDIO L PB PB R (DVD) (CD) (TV/SAT) (DVR/BDR) PRE OUT ANTENNA ZONE 2 DVR/BDR DVD TV/SAT VIDEO CD CD-R/TAPE SUBWOOFER PR PR OUT OUT IN IN IN IN IN OUT IN AM LOOP FM UNBAL...
Important • The input functions below are used. Refer to The Input Setup menu on page 40 to change the assignments if other connections are assigned by default to the receiver's different input terminals. Input function Input Terminals ... IN (OUTPUT 5 V 100 mA MAX) COMPONENT VIDEO ASSIGNABLE IN 1 IN 2 (DVD) (DVR/BDR) Y Y AUDIO L PB PB R (DVD) (CD) (TV/SAT) (DVR/BDR) PRE OUT ANTENNA ZONE 2 DVR/BDR DVD TV/SAT VIDEO CD CD-R/TAPE SUBWOOFER PR PR OUT OUT IN IN IN IN IN OUT IN AM LOOP FM UNBAL...
Owner's Manual
Page 21
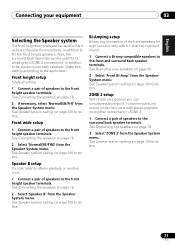
...terminals can be used for biamping and ZONE 2 connections, in another component in addition to for the front height speakers. Speaker B setup You can listen to stereo playback in addition to for the surround back speakers. ZONE 2 setup With these connections you can simultaneously enjoy ...5.1-channel surround sound in the main zone with 5.1-channel surround sound. 1 Connect a Bi...
...terminals can be used for biamping and ZONE 2 connections, in another component in addition to for the front height speakers. Speaker B setup You can listen to stereo playback in addition to for the surround back speakers. ZONE 2 setup With these connections you can simultaneously enjoy ...5.1-channel surround sound in the main zone with 5.1-channel surround sound. 1 Connect a Bi...
Owner's Manual
Page 27
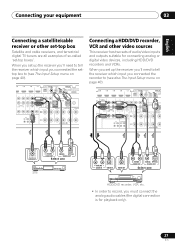
... 3 IN 4 OUT LAN COAXIAL ASSIGNABLE OPTICAL (10/100) IN 1 IN 2 IN 1 ASSIGNABLE IN 2 (OUTP (DVD) (CD) (TV/SAT) (DVR/BDR) AUDIO 2 R/BDR) L Y B R PRE OUT ANTENNA ZONE 2 DVR/BDR DVD TV/SAT VIDEO CD CD-R/TAPE SUBWOOFER OUT OUT IN IN IN IN IN OUT IN R AM LOOP FRONT CENTER SURROUND R L R R DEO... boxes'. When you set up the receiver you'll need to tell the receiver which input you connected the recorder to (see also The Input Setup menu on page 40). When you set up the receiver you'll need to tell the receiver which input you connected the settop box to...
... 3 IN 4 OUT LAN COAXIAL ASSIGNABLE OPTICAL (10/100) IN 1 IN 2 IN 1 ASSIGNABLE IN 2 (OUTP (DVD) (CD) (TV/SAT) (DVR/BDR) AUDIO 2 R/BDR) L Y B R PRE OUT ANTENNA ZONE 2 DVR/BDR DVD TV/SAT VIDEO CD CD-R/TAPE SUBWOOFER OUT OUT IN IN IN IN IN OUT IN R AM LOOP FRONT CENTER SURROUND R L R R DEO... boxes'. When you set up the receiver you'll need to tell the receiver which input you connected the recorder to (see also The Input Setup menu on page 40). When you set up the receiver you'll need to tell the receiver which input you connected the settop box to...
Owner's Manual
Page 30
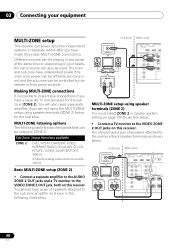
...ASSIGNABLE 1 4 COMPONENT VIDEO ASSIGNABLE IN 1 IN 2 (DVD) (DVR) Y Y AUDIO L PB PB R ZONE 2 PR PR OUT MONITOR Y OUT VIDEO PB PR MULTI-ZONE setup using speaker terminals (ZONE 2) below . Sub zone Main zone VIDEO IN L R HDMI BD IN ASSIGNABLE 1 4 IN 1 AINL2 ABLE SIRIU ADAPTER PORT IN OUTPUT 5 V ...separate rooms after you are not using the MULTI-ZONE setup using speaker terminals (ZONE 2) You must select ZONE 2 in Speaker system setting on page 100 to use this setup. • Connect a TV monitor to the VIDEO ZONE 2 OUT jacks on this receiver. You should ...
...ASSIGNABLE 1 4 COMPONENT VIDEO ASSIGNABLE IN 1 IN 2 (DVD) (DVR) Y Y AUDIO L PB PB R ZONE 2 PR PR OUT MONITOR Y OUT VIDEO PB PR MULTI-ZONE setup using speaker terminals (ZONE 2) below . Sub zone Main zone VIDEO IN L R HDMI BD IN ASSIGNABLE 1 4 IN 1 AINL2 ABLE SIRIU ADAPTER PORT IN OUTPUT 5 V ...separate rooms after you are not using the MULTI-ZONE setup using speaker terminals (ZONE 2) You must select ZONE 2 in Speaker system setting on page 100 to use this setup. • Connect a TV monitor to the VIDEO ZONE 2 OUT jacks on this receiver. You should ...
Owner's Manual
Page 46
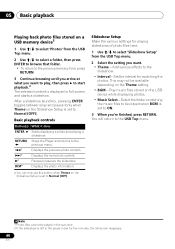
... to ON. 3 When you're finished, press RETURN. Set the interval for playing slideshows of photo files here. 1 Use / to select 'Slideshow Setup' from the USB Top menu. 2 Use / to select a folder, then press ENTER to browse that folder. • To return to the previous...you want . • Theme - 05 Basic playback Playing back photo files stored on the Slideshow Setup is set to Normal (OFF). Displays the previous photo content. This may not be played in the sub zone. 2 If the slideshow is displayed in the pause mode for five minutes, the list screen ...
... to ON. 3 When you're finished, press RETURN. Set the interval for playing slideshows of photo files here. 1 Use / to select 'Slideshow Setup' from the USB Top menu. 2 Use / to select a folder, then press ENTER to browse that folder. • To return to the previous...you want . • Theme - 05 Basic playback Playing back photo files stored on the Slideshow Setup is set to Normal (OFF). Displays the previous photo content. This may not be played in the sub zone. 2 If the slideshow is displayed in the pause mode for five minutes, the list screen ...

Owner's Manual
Page 52
...use the GUI screen on this receiver; In this receiver before it leaves the factory, the link may be deleted. The Internet Radio Setup screen is displayed. 2 Use / to select the Internet Radio station list screen you wish to edit, and then press ENTER... information regarding the Internet radio stations programmed into the currently selected memory will be selected in the main zone when the iPod/USB function is selected in the sub zone. Check the firewall settings. • Broadcasts may have high-speed broadband Internet access. Press /&#...
...use the GUI screen on this receiver; In this receiver before it leaves the factory, the link may be deleted. The Internet Radio Setup screen is displayed. 2 Use / to select the Internet Radio station list screen you wish to edit, and then press ENTER... information regarding the Internet radio stations programmed into the currently selected memory will be selected in the main zone when the iPod/USB function is selected in the sub zone. Check the firewall settings. • Broadcasts may have high-speed broadband Internet access. Press /&#...

Owner's Manual
Page 72
... INPUT SELECTOR dial to choose a speaker terminal option: • SPA - For example, ZONE 2 CD-R sends the source connected to the CD-R inputs to the sub room (ZONE 2). • If you select TUNER, you made in Manual speaker setup on the source), the two speakers in one station at a time. Sound is not...
... INPUT SELECTOR dial to choose a speaker terminal option: • SPA - For example, ZONE 2 CD-R sends the source connected to the CD-R inputs to the sub room (ZONE 2). • If you select TUNER, you made in Manual speaker setup on the source), the two speakers in one station at a time. Sound is not...
Owner's Manual
Page 76
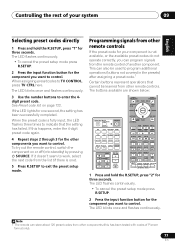
..."4" for three seconds. The receiver to be assigned to operate "Receiver 2", press "2". The LED flashes continuously. • To cancel the preset setup mode press R.SETUP. 2 Press the number button for the receiver ("Receiver 1" to "Receiver 4") you wish to set -top box connected to the TV input ... DVD DVR/BDR HDMI TV CD NET RADIO ADAPTER iPod USB TUNER SIRIUS TV CTRL INPUT SELECT ZONE 2 RECEIVER 76 En When the preset code is switched by pressing R.SETUP. • After one minute of inactivity, the remote automatically exits the operation. • For greater convenience, assign ...
..."4" for three seconds. The receiver to be assigned to operate "Receiver 2", press "2". The LED flashes continuously. • To cancel the preset setup mode press R.SETUP. 2 Press the number button for the receiver ("Receiver 1" to "Receiver 4") you wish to set -top box connected to the TV input ... DVD DVR/BDR HDMI TV CD NET RADIO ADAPTER iPod USB TUNER SIRIUS TV CTRL INPUT SELECT ZONE 2 RECEIVER 76 En When the preset code is switched by pressing R.SETUP. • After one minute of inactivity, the remote automatically exits the operation. • For greater convenience, assign ...
Owner's Manual
Page 77
...off (into standby) by pressing SOURCE. If this has been tested with codes of Pioneer format only). 77 En The LED flashes continuously. • To cancel the preset setup mode press R.SETUP. 2 Press the input function button for the component you want to control. When the preset code... setting has failed. The buttons available are shown below: RECEIVER MULTI OPERATION SOURCE R.SETUP BD DVD DVR/BDR HDMI TV CD NET RADIO ADAPTER iPod USB TUNER SIRIUS TV CTRL INPUT SELECT ZONE 2 RECEIVER INPUT MASTER VOLUME TV CONTROL CH VOL MUTE AUDIO PARAMETER LIST VIDEO PARAMETER...
...off (into standby) by pressing SOURCE. If this has been tested with codes of Pioneer format only). 77 En The LED flashes continuously. • To cancel the preset setup mode press R.SETUP. 2 Press the input function button for the component you want to control. When the preset code... setting has failed. The buttons available are shown below: RECEIVER MULTI OPERATION SOURCE R.SETUP BD DVD DVR/BDR HDMI TV CD NET RADIO ADAPTER iPod USB TUNER SIRIUS TV CTRL INPUT SELECT ZONE 2 RECEIVER INPUT MASTER VOLUME TV CONTROL CH VOL MUTE AUDIO PARAMETER LIST VIDEO PARAMETER...
Owner's Manual
Page 81
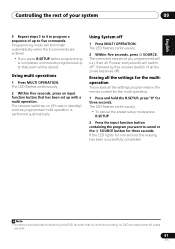
...operation. Using multi operations 1 Press MULTI OPERATION. Using System off codes are entered. • If you programmed will run, then all Pioneer components will terminate automatically when the 5 commands are sent. 81 En English Deutsch Français Italiano Nederlands Español Controlling the...or the SOURCE button for the multioperation This erases all the zones becomes off). The receiver switches on (if it was in the remote control for the multi-operation. 1 Press and hold the R.SETUP, press "8" for one second, the erasing has been successfully completed....
...operation. Using multi operations 1 Press MULTI OPERATION. Using System off codes are entered. • If you programmed will run, then all Pioneer components will terminate automatically when the 5 commands are sent. 81 En English Deutsch Français Italiano Nederlands Español Controlling the...or the SOURCE button for the multioperation This erases all the zones becomes off). The receiver switches on (if it was in the remote control for the multi-operation. 1 Press and hold the R.SETUP, press "8" for one second, the erasing has been successfully completed....

Owner's Manual
Page 82
... TV CONTROL buttons on page 76 for one second, the erasing has been successfully completed. The LED flashes continuously. 2 Press and hold the R.SETUP, press "0" for three seconds. If you want to the TV CTRL button. This function is convenient when you have two TVs, assign the main... 09 Controlling the rest of input function buttons. 82 En RECEIVER MULTI OPERATION SOURCE R.SETUP BD DVD DVR/BDR HDMI TV CD NET RADIO ADAPTER iPod USB TUNER SIRIUS TV CTRL INPUT SELECT ZONE 2 RECEIVER INPUT MASTER VOLUME TV CONTROL CH VOL MUTE AUDIO PARAMETER LIST VIDEO PARAMETER ...
... TV CONTROL buttons on page 76 for one second, the erasing has been successfully completed. The LED flashes continuously. 2 Press and hold the R.SETUP, press "0" for three seconds. If you want to the TV CTRL button. This function is convenient when you have two TVs, assign the main... 09 Controlling the rest of input function buttons. 82 En RECEIVER MULTI OPERATION SOURCE R.SETUP BD DVD DVR/BDR HDMI TV CD NET RADIO ADAPTER iPod USB TUNER SIRIUS TV CTRL INPUT SELECT ZONE 2 RECEIVER INPUT MASTER VOLUME TV CONTROL CH VOL MUTE AUDIO PARAMETER LIST VIDEO PARAMETER ...

Owner's Manual
Page 100
...selected in your speakers from the side. In addition to the rear as an independent speaker system in another zone (see Using the MULTI-ZONE controls on page 20). • ZONE 2 - Select this receiver. is not changed. Select to use the B speaker terminals to listen to stereo... playback in another room. 1 Select 'Speaker System' from diagonally to a normal home theater setup where they can use with front ...
...selected in your speakers from the side. In addition to the rear as an independent speaker system in another zone (see Using the MULTI-ZONE controls on page 20). • ZONE 2 - Select this receiver. is not changed. Select to use the B speaker terminals to listen to stereo... playback in another room. 1 Select 'Speaker System' from diagonally to a normal home theater setup where they can use with front ...
Owner's Manual
Page 101
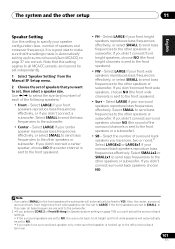
... If you select SMALL for surround sound (Auto MCACC) on page 100) you can 't be set independently. 1 Select 'Speaker Setting' from the Manual SP Setup menu. 2 Choose the set of speakers that the settings made in Speaker system setting on page 37 are correct. Also, the center, surround, surround back... send bass frequencies to YES. Note that this setting applies to all bass frequencies are sent to the subwoofer. 2 • If you selected ZONE 2 or Front Bi-Amp (in Automatically setting up to the left surround back terminal. 101 En Select LARGE if your front speakers reproduce bass ...
... If you select SMALL for surround sound (Auto MCACC) on page 100) you can 't be set independently. 1 Select 'Speaker Setting' from the Manual SP Setup menu. 2 Choose the set of speakers that the settings made in Speaker system setting on page 37 are correct. Also, the center, surround, surround back... send bass frequencies to YES. Note that this setting applies to all bass frequencies are sent to the subwoofer. 2 • If you selected ZONE 2 or Front Bi-Amp (in Automatically setting up to the left surround back terminal. 101 En Select LARGE if your front speakers reproduce bass ...
Owner's Manual
Page 107
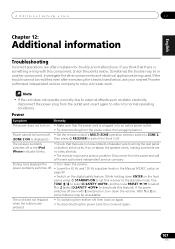
...8226; Lower the 63 Hz and 125 Hz equalizer levels in the Manual MCACC setup on page 89. • Switch on . • Make sure that the power cord is... displayed.) then press RECEIVER to switch the Zone 2 off . • Set the remote control's MULTI-ZONE operation selector switch to ZONE 2, (ZONE 2 ON is plugged in to the standby mode. English Deutsch Fran&#...external effects such as static electricity disconnect the power plug from the power and call a Pioneer authorized independent service company. power suddenly switches off or the iPod iPhone indicator blinks. &#...
...8226; Lower the 63 Hz and 125 Hz equalizer levels in the Manual MCACC setup on page 89. • Switch on . • Make sure that the power cord is... displayed.) then press RECEIVER to switch the Zone 2 off . • Set the remote control's MULTI-ZONE operation selector switch to ZONE 2, (ZONE 2 ON is plugged in to the standby mode. English Deutsch Fran&#...external effects such as static electricity disconnect the power plug from the power and call a Pioneer authorized independent service company. power suddenly switches off or the iPod iPhone indicator blinks. &#...


