
Owner's Manual
Page 2
... near this unit should be disconnected by qualified service personnel. Product Name: AUDIO/VIDEO MULTI-CHANNEL RECEIVER Model Number: VSX-1020 Responsible Party Name: PIONEER ELECTRONICS (USA) INC. Phone: 1-800-421-1404 URL: http://www.pioneerelectronics.com D8-10-4*_C1_En Be sure that...connectors for a long period of the following two conditions: (1) This device may cause harmful interference to use in a particular installation. To prevent electromagnetic interference with part 15 of this product or cords associated with accessories sold with the instructions, may not cause...
... near this unit should be disconnected by qualified service personnel. Product Name: AUDIO/VIDEO MULTI-CHANNEL RECEIVER Model Number: VSX-1020 Responsible Party Name: PIONEER ELECTRONICS (USA) INC. Phone: 1-800-421-1404 URL: http://www.pioneerelectronics.com D8-10-4*_C1_En Be sure that...connectors for a long period of the following two conditions: (1) This device may cause harmful interference to use in a particular installation. To prevent electromagnetic interference with part 15 of this product or cords associated with accessories sold with the instructions, may not cause...
Owner's Manual
Page 3
... of the polarized or grounding-type plug. Servicing is required when the apparatus has been damaged in accordance with the manufacturer's instructions. 8) Do not install near water. 6) Clean only with dry cloth. 7) Do not block any heat sources such as the main disconnect device for the unit, you...do not place any way, such as power-supply cord or plug is damaged, liquid has been spilled or objects have fallen into your safety. Install in any naked flame sources (such as newspapers, table-cloths, curtains) or by the manufacturer, or sold with the apparatus. A polarized plug has...
... of the polarized or grounding-type plug. Servicing is required when the apparatus has been damaged in accordance with the manufacturer's instructions. 8) Do not install near water. 6) Clean only with dry cloth. 7) Do not block any heat sources such as the main disconnect device for the unit, you...do not place any way, such as power-supply cord or plug is damaged, liquid has been spilled or objects have fallen into your safety. Install in any naked flame sources (such as newspapers, table-cloths, curtains) or by the manufacturer, or sold with the apparatus. A polarized plug has...
Owner's Manual
Page 4
... instructions, put them away in a safe place for buying this unit's sensor 35 Plugging in the box 8 Installing the receiver 8 Loading the batteries 8 02 Controls and displays Front panel 9 Display 10 Remote control 12 Operating ...16 Placing the speakers 17 Some tips for improving sound quality . . . . . 17 Connecting the speakers 18 Installing your speaker system 19 Bi-amping your speakers 20 Bi-wiring your speakers 20 Selecting the Speaker system 21 Front height ...USB device for Advanced MCACC output 34 Connecting an IR receiver 35 Operating other Pioneer components with this...
... instructions, put them away in a safe place for buying this unit's sensor 35 Plugging in the box 8 Installing the receiver 8 Loading the batteries 8 02 Controls and displays Front panel 9 Display 10 Remote control 12 Operating ...16 Placing the speakers 17 Some tips for improving sound quality . . . . . 17 Connecting the speakers 18 Installing your speaker system 19 Bi-amping your speakers 20 Bi-wiring your speakers 20 Selecting the Speaker system 21 Front height ...USB device for Advanced MCACC output 34 Connecting an IR receiver 35 Operating other Pioneer components with this...
Owner's Manual
Page 7
...) 7 MCACC speaker settings • Automatically setting up for improving sound quality (page 17) 3 Connecting the speakers • Connecting the speakers (page 18) • Installing your speaker system (page 19) • Bi-amping your speakers (page 20) 4 Connecting the components • About the audio connection (page 22) • About...
...) 7 MCACC speaker settings • Automatically setting up for improving sound quality (page 17) 3 Connecting the speakers • Connecting the speakers (page 18) • Installing your speaker system (page 19) • Bi-amping your speakers (page 20) 4 Connecting the components • About the audio connection (page 22) • About...
Owner's Manual
Page 8
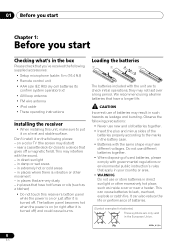
...batteries (to confirm system operation) x2 • AM loop antenna • FM wire antenna • iPod cable • These operating instructions Installing the receiver • When installing this receiver's bottom panel while the power is on or just after it on the following precautions: • Never use of batteries. (... - The bottom panel becomes hot when the power is on (or right after it on a level and stable surface. near a heater. Don't install it is vibration or other excessively hot place, such as leakage and bursting. This may have a longer life.
...batteries (to confirm system operation) x2 • AM loop antenna • FM wire antenna • iPod cable • These operating instructions Installing the receiver • When installing this receiver's bottom panel while the power is on or just after it on the following precautions: • Never use of batteries. (... - The bottom panel becomes hot when the power is on (or right after it on a level and stable surface. near a heater. Don't install it is vibration or other excessively hot place, such as leakage and bursting. This may have a longer life.
Owner's Manual
Page 18
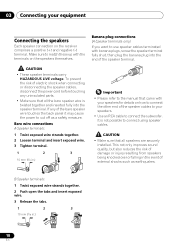
... wire. 3 Tighten terminal. 1 2 3 10 mm (3/8 in .) 18 En 03 Connecting your speakers. • Use an RCA cable to the manual that all speakers are securely installed.
... wire. 3 Tighten terminal. 1 2 3 10 mm (3/8 in .) 18 En 03 Connecting your speakers. • Use an RCA cable to the manual that all speakers are securely installed.

Owner's Manual
Page 19
... surround setting Surround back right Surround back left ZONE 2 setting ZONE 2 - Connecting your equipment 03 English Deutsch Français Italiano Nederlands Español Installing your main surround speakers should always be connected as a pair, but you can connect just one surround back speaker if you like (it must be...
... surround setting Surround back right Surround back left ZONE 2 setting ZONE 2 - Connecting your equipment 03 English Deutsch Français Italiano Nederlands Español Installing your main surround speakers should always be connected as a pair, but you can connect just one surround back speaker if you like (it must be...

Owner's Manual
Page 34
... of the reverb characteristics in the computer. If you have any questions regarding, please contact the Customer Support Division of the Pioneer website (http://www.pioneerelectronics.com/PUSA/ Home+Entertainment+Custom+Install). 03 Connecting your equipment Connecting a USB device for Advanced MCACC output When using the software are not cleared when the... your listening room (before and after calibration) can also be checked on the computer. MCACC data and parameters are transferred from the support area of Pioneer.
... of the reverb characteristics in the computer. If you have any questions regarding, please contact the Customer Support Division of the Pioneer website (http://www.pioneerelectronics.com/PUSA/ Home+Entertainment+Custom+Install). 03 Connecting your equipment Connecting a USB device for Advanced MCACC output When using the software are not cleared when the... your listening room (before and after calibration) can also be checked on the computer. MCACC data and parameters are transferred from the support area of Pioneer.
Owner's Manual
Page 38
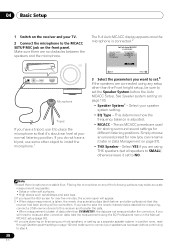
... now (you can rename it later in the Manual MCACC setup (page 92). 4 If you do not have a tripod, use some other object to install the microphone.1 The Full Auto MCACC display appears once the microphone is adjusted. • MCACC - Select your front speakers, or setting up a separate speaker...any of data other than the Front height setup, be overwritten. The six MCACC presets are no obstacles between the speakers and the microphone. Note 1 Install the microphone on page 97). • THX Speaker - 04 Basic Setup 1 Switch on the receiver and your TV. 2 Connect the microphone to the...
... now (you can rename it later in the Manual MCACC setup (page 92). 4 If you do not have a tripod, use some other object to install the microphone.1 The Full Auto MCACC display appears once the microphone is adjusted. • MCACC - Select your front speakers, or setting up a separate speaker...any of data other than the Front height setup, be overwritten. The six MCACC presets are no obstacles between the speakers and the microphone. Note 1 Install the microphone on page 97). • THX Speaker - 04 Basic Setup 1 Switch on the receiver and your TV. 2 Connect the microphone to the...
Owner's Manual
Page 54
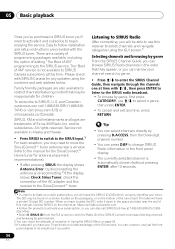
... rights reserved. To subscribe to the SiriusConnect™ tuner. 05 Basic playback Once you've purchased a SIRIUS tuner you prefer. 54 En Easy to follow installation and setup instructions are also available to the manual for the SiriusConnect™ Home tuner for any time, press RETURN. Service not available in the...
... rights reserved. To subscribe to the SiriusConnect™ tuner. 05 Basic playback Once you've purchased a SIRIUS tuner you prefer. 54 En Easy to follow installation and setup instructions are also available to the manual for the SiriusConnect™ Home tuner for any time, press RETURN. Service not available in the...
Owner's Manual
Page 87
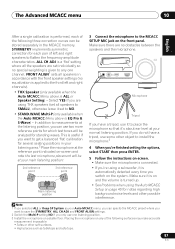
...iPod iPhone USB VIDEO CAMERA HDMI 5 Microphone Tripod If you have a tripod, use one channel. Placing the microphone on any one listening position. 3 Install the microphone on a stable floor. FRONT ALIGN1 sets all speakers to SMALL), otherwise leave it is EQ Pro & S-Wave) - The Advanced MCACC menu..., ALL CH ADJ and FRONT ALIGN settings. 2 Switch the Multi-P setting NO if you can specify the MCACC preset where you want to install the microphone.3 4 When you're finished setting the options, select START then press ENTER. 5 Follow the instructions on -screen and note the...
...iPod iPhone USB VIDEO CAMERA HDMI 5 Microphone Tripod If you have a tripod, use one channel. Placing the microphone on any one listening position. 3 Install the microphone on a stable floor. FRONT ALIGN1 sets all speakers to SMALL), otherwise leave it is EQ Pro & S-Wave) - The Advanced MCACC menu..., ALL CH ADJ and FRONT ALIGN settings. 2 Switch the Multi-P setting NO if you can specify the MCACC preset where you want to install the microphone.3 4 When you're finished setting the options, select START then press ENTER. 5 Follow the instructions on -screen and note the...
Owner's Manual
Page 112
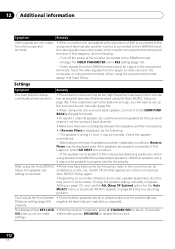
... is connected to the component terminal and another monitor is a recurring problem. properly. Remedy • When a monitor only compatible with resolutions of speakers and their installation conditions, Reverse Phase may not be possible to the microphone (listening position) or when using the component terminal, assign it to disable the key lock...
... is connected to the component terminal and another monitor is a recurring problem. properly. Remedy • When a monitor only compatible with resolutions of speakers and their installation conditions, Reverse Phase may not be possible to the microphone (listening position) or when using the component terminal, assign it to disable the key lock...
Owner's Manual
Page 259
...OBLIGATIONS OR CONDITIONS, IMPLIED, STATUTORY OR OTHERWISE, APPLICABLE TO THIS PRODUCT. The Complaint Resolution Program is available to you and Pioneer, Pioneer makes available its Complaint Resolution Program to resolve the dispute; Within 40 days of the Magnuson-Moss Warranty-Federal Trade Commission ... The original container is first put into use due to a manufacturing defect when installed and operated according to your rental contract showing place and date of PUSA or POC. PIONEER ELECTRONICS (USA) INC. PUSA OR POC, AS APPROPRIATE, WILL PAY TO RETURN ...
...OBLIGATIONS OR CONDITIONS, IMPLIED, STATUTORY OR OTHERWISE, APPLICABLE TO THIS PRODUCT. The Complaint Resolution Program is available to you and Pioneer, Pioneer makes available its Complaint Resolution Program to resolve the dispute; Within 40 days of the Magnuson-Moss Warranty-Federal Trade Commission ... The original container is first put into use due to a manufacturing defect when installed and operated according to your rental contract showing place and date of PUSA or POC. PIONEER ELECTRONICS (USA) INC. PUSA OR POC, AS APPROPRIATE, WILL PAY TO RETURN ...


