Owner's Manual
Page 4
... Speaker B setup 21 Bi-Amping setup 21 ZONE 2 setup 21 About the audio connection 22 About the video converter 22 Connecting your TV and playback components 23 Connecting using HDMI 23 Connecting your DVD player with no HDMI output 25 Connecting your TV with no HDMI input . . . 26 Connecting a satellite/cable receiver or other set-top box 27 Connecting a HDD/DVD recorder, VCR and other video sources 27 Connecting other audio components 28 About the WMA9 Pro decoder 28 Connecting AM/FM antennas 29 Connecting external antennas 29 MULTI-ZONE setup...
... Speaker B setup 21 Bi-Amping setup 21 ZONE 2 setup 21 About the audio connection 22 About the video converter 22 Connecting your TV and playback components 23 Connecting using HDMI 23 Connecting your DVD player with no HDMI output 25 Connecting your TV with no HDMI input . . . 26 Connecting a satellite/cable receiver or other set-top box 27 Connecting a HDD/DVD recorder, VCR and other video sources 27 Connecting other audio components 28 About the WMA9 Pro decoder 28 Connecting AM/FM antennas 29 Connecting external antennas 29 MULTI-ZONE setup...
Owner's Manual
Page 5
... functions Setting the Audio options 67 Setting the Video options 70 Switching the speaker terminal 72 Using the MULTI-ZONE controls 72 Making an audio or a video recording 73 Reducing the level of an analog signal 74 Using the sleep timer 74 Dimming the display 74 Checking your system settings 74 Resetting the system 75 Default system settings 75 09 Controlling the rest of your system Operating multiple receivers 76 Setting the remote to control other components 76 Selecting preset codes directly 77 Programming signals...
... functions Setting the Audio options 67 Setting the Video options 70 Switching the speaker terminal 72 Using the MULTI-ZONE controls 72 Making an audio or a video recording 73 Reducing the level of an analog signal 74 Using the sleep timer 74 Dimming the display 74 Checking your system settings 74 Resetting the system 75 Default system settings 75 09 Controlling the rest of your system Operating multiple receivers 76 Setting the remote to control other components 76 Selecting preset codes directly 77 Programming signals...
Owner's Manual
Page 7
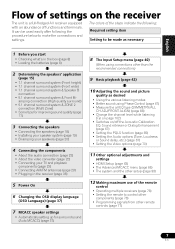
amping connection (High quality surround) • 5.1 channel surround system & ZONE 2 connection (Multi Zone) • Some tips for surround sound (Auto MCACC) (page 37) 8 The Input Setup menu (page 40) (When using connections other than the recommended connections) 9 Basic playback (page 42) 10 Adjusting the sound and picture quality as desired • Using the various listening modes • Better sound using Phase Control (page 61) • Measure the all EQ type (SYMMETRY/ALL CH...
amping connection (High quality surround) • 5.1 channel surround system & ZONE 2 connection (Multi Zone) • Some tips for surround sound (Auto MCACC) (page 37) 8 The Input Setup menu (page 40) (When using connections other than the recommended connections) 9 Basic playback (page 42) 10 Adjusting the sound and picture quality as desired • Using the various listening modes • Better sound using Phase Control (page 61) • Measure the all EQ type (SYMMETRY/ALL CH...
Owner's Manual
Page 9
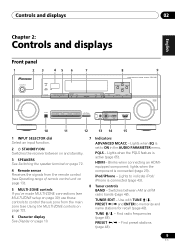
... an HDMIequipped component; CHANNEL RECEIVER VSX-1020 TUNE PRESET PRESET TUNE TUNER EDIT ENTER MASTER VOLUME PHONES AUTO/ALC/DIRECT LISTENING MODE STEREO STANDARD ADV SURROUND iPod iPhone DIRECT CONTROL MCACC SETUP MIC iPod iPhone USB VIDEO CAMERA HDMI 5 10 11 12 13 14 15 1 INPUT SELECTOR dial Select an input function. 2 STANDBY/ON Switches the receiver between AM and FM radio bands (page 48). PQLS - TUNE / - Use with TUNE /, PRESET / and ENTER to ON in the AUDIO PARAMETER menu. Controls and displays 02...
... an HDMIequipped component; CHANNEL RECEIVER VSX-1020 TUNE PRESET PRESET TUNE TUNER EDIT ENTER MASTER VOLUME PHONES AUTO/ALC/DIRECT LISTENING MODE STEREO STANDARD ADV SURROUND iPod iPhone DIRECT CONTROL MCACC SETUP MIC iPod iPhone USB VIDEO CAMERA HDMI 5 10 11 12 13 14 15 1 INPUT SELECTOR dial Select an input function. 2 STANDBY/ON Switches the receiver between AM and FM radio bands (page 48). PQLS - TUNE / - Use with TUNE /, PRESET / and ENTER to ON in the AUDIO PARAMETER menu. Controls and displays 02...
Owner's Manual
Page 12
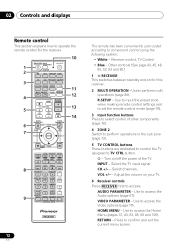
... to control the TV assigned to perform multi operations (page 80). Select channels. Use to confirm and exit the current menu screen. Press to access the Audio options (page 67). RECEIVER MULTI OPERATION SOURCE 1 R.SETUP 2 BD DVD DVR/BDR HDMI 10 TV CD NET RADIO ADAPTER 3 iPod USB TUNER SIRIUS TV CTRL 11 INPUT SELECT ZONE 2 RECEIVER 4 12 MASTER INPUT VOLUME TV CONTROL 5 13 CH VOL MUTE 14 AUDIO PARAMETER VIDEO PARAMETER 6 LIST TUNE TOOLS TOP MENU 7 BAND T.EDIT GUIDE PRESET ENTER PRESET CATEGORY HOME MENU TUNE iPod CTRL...
... to control the TV assigned to perform multi operations (page 80). Select channels. Use to confirm and exit the current menu screen. Press to access the Audio options (page 67). RECEIVER MULTI OPERATION SOURCE 1 R.SETUP 2 BD DVD DVR/BDR HDMI 10 TV CD NET RADIO ADAPTER 3 iPod USB TUNER SIRIUS TV CTRL 11 INPUT SELECT ZONE 2 RECEIVER 4 12 MASTER INPUT VOLUME TV CONTROL 5 13 CH VOL MUTE 14 AUDIO PARAMETER VIDEO PARAMETER 6 LIST TUNE TOOLS TOP MENU 7 BAND T.EDIT GUIDE PRESET ENTER PRESET CATEGORY HOME MENU TUNE iPod CTRL...

Owner's Manual
Page 35
... remote sensor of analog audio, video or HDMI jacks connected to another component for IR compatibility. • If using the remote sensor. 35 En Refer to the manual that came with your component to check for grounding purposes. 1 Decide which can use just the remote sensor of one set of . Operating other Pioneer components with this unit's sensor Many Pioneer components have connected a remote control to the CONTROL IN jack (using a mini-plug cable), you won't be possible if direct light...
... remote sensor of analog audio, video or HDMI jacks connected to another component for IR compatibility. • If using the remote sensor. 35 En Refer to the manual that came with your component to check for grounding purposes. 1 Decide which can use just the remote sensor of one set of . Operating other Pioneer components with this unit's sensor Many Pioneer components have connected a remote control to the CONTROL IN jack (using a mini-plug cable), you won't be possible if direct light...
Owner's Manual
Page 40
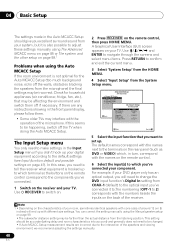
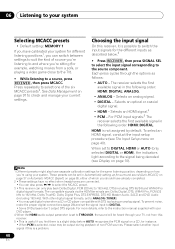
... setup on page 99.1 Problems when using the Manual speaker setup on page 41). A Graphical User Interface (GUI) screen appears on the remote control, then press HOME MENU. The Input Setup menu You only need to make settings in the Input Setup menu if you excellent surround sound from your component. The default names correspond with the names next to the terminals on the remote control. 6 Select the input(s) to which , in turn, correspond with the operation of the speakers...
... setup on page 99.1 Problems when using the Manual speaker setup on page 41). A Graphical User Interface (GUI) screen appears on the remote control, then press HOME MENU. The Input Setup menu You only need to make settings in the Input Setup menu if you excellent surround sound from your component. The default names correspond with the names next to the terminals on the remote control. 6 Select the input(s) to which , in turn, correspond with the operation of the speakers...
Owner's Manual
Page 42
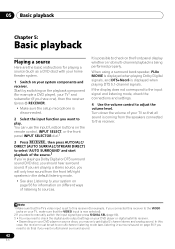
... home theater system. 1 Switch on your system components and receiver. When using a surround back speaker, PLIIx MOVIE is displayed when playing Dolby Digital signals, and DTS+Neo:6 is being performed properly. In this receiver. If you are the basic instructions for example a DVD player), your TV1 and subwoofer (if you have one), then the receiver (press RECEIVER). • Make sure the setup microphone is possible to check on the remote control, INPUT SELECT, or the front panel INPUT...
... home theater system. 1 Switch on your system components and receiver. When using a surround back speaker, PLIIx MOVIE is displayed when playing Dolby Digital signals, and DTS+Neo:6 is being performed properly. In this receiver. If you are the basic instructions for example a DVD player), your TV1 and subwoofer (if you have one), then the receiver (press RECEIVER). • Make sure the setup microphone is possible to check on the remote control, INPUT SELECT, or the front panel INPUT...
Owner's Manual
Page 56
... modes that give 6.1 channel sound, the same signal is heard from both surround back speakers. 4 The STANDARD listening mode cannot be selected when the HDMI audio output parameter is selected automatically (see Using Stream Direct on page 48 for the simplest, most direct listening option is selected, the effect level can listen to sources using this button, see Using Neural Surround on page 59. • The AUTO SURROUND mode cannot be selected and shows in stereo on...
... modes that give 6.1 channel sound, the same signal is heard from both surround back speakers. 4 The STANDARD listening mode cannot be selected when the HDMI audio output parameter is selected automatically (see Using Stream Direct on page 48 for the simplest, most direct listening option is selected, the effect level can listen to sources using this button, see Using Neural Surround on page 59. • The AUTO SURROUND mode cannot be selected and shows in stereo on...
Owner's Manual
Page 60
... to DIGITAL. • Some DVD players don't output DTS signals. ANALOG. • ANALOG - With other digital signal formats, set to the signal being decoded (see The Input Setup menu on a CD, for instance. • When PCM is a problem. 60 En To prevent noise, make the proper digital connections (page 28) and set to DIGITAL, HDMI or AUTO (only selected DIGITAL or HDMI), the indicators light according to THROUGH, the sound will be output during playback of non-PCM sources. Choosing the input signal...
... to DIGITAL. • Some DVD players don't output DTS signals. ANALOG. • ANALOG - With other digital signal formats, set to the signal being decoded (see The Input Setup menu on a CD, for instance. • When PCM is a problem. 60 En To prevent noise, make the proper digital connections (page 28) and set to DIGITAL, HDMI or AUTO (only selected DIGITAL or HDMI), the indicators light according to THROUGH, the sound will be output during playback of non-PCM sources. Choosing the input signal...

Owner's Manual
Page 69
.... h.• HDMI Audio setting cannot be switched while performing synchronized amp mode operations. • The synchronized amp mode must be selected only when the front height speaker is Stereo, Auto surround (STEREO) or SOUND RETRIEVER AIR. Defaults: 50 (90 for a 'wraparound' effect. d.With the iPod/USB, INTERNET RADIO or ADAPTER PORT input function, by spreading the center channel between the front right and left speakers) to 10 (center channel sent to the center when using a center speaker) 0 to 7 Default: 3 DIMENSIONj Adjusts the...
.... h.• HDMI Audio setting cannot be switched while performing synchronized amp mode operations. • The synchronized amp mode must be selected only when the front height speaker is Stereo, Auto surround (STEREO) or SOUND RETRIEVER AIR. Defaults: 50 (90 for a 'wraparound' effect. d.With the iPod/USB, INTERNET RADIO or ADAPTER PORT input function, by spreading the center channel between the front right and left speakers) to 10 (center channel sent to the center when using a center speaker) 0 to 7 Default: 3 DIMENSIONj Adjusts the...

Owner's Manual
Page 70
... to 2-channel sources in bold. l. • You can't use the Virtual Surround Back mode when the headphones are connected to this receiver or when any of the stereo, Front Stage Surround Advance or Stream Direct mode is selected. • You can be selected. AUTO PURE 480p/576p 720p 1080i 1080p ASPc (Aspect) Specifies the aspect ratio when analog video input signals are listed in Neo:6 MUSIC/CINEMA mode. Make your monitor type...
... to 2-channel sources in bold. l. • You can't use the Virtual Surround Back mode when the headphones are connected to this receiver or when any of the stereo, Front Stage Surround Advance or Stream Direct mode is selected. • You can be selected. AUTO PURE 480p/576p 720p 1080i 1080p ASPc (Aspect) Specifies the aspect ratio when analog video input signals are listed in Neo:6 MUSIC/CINEMA mode. Make your monitor type...

Owner's Manual
Page 72
... , no sound is heard from A-speaker terminal (up to adjust the volume for the Speaker B setting only.1 • Use SPEAKERS on the front panel. Using the MULTI-ZONE controls The following steps use the tuner controls to do this is dimmed, and ZONE 2 DVD for the sub zone. 08 Using other zone. Multichannel sources will simply switch your main speaker terminal on ,2 make sure that any operations for the sub zone are connected. 2 If the receiver is in standby, the display is...
... , no sound is heard from A-speaker terminal (up to adjust the volume for the Speaker B setting only.1 • Use SPEAKERS on the front panel. Using the MULTI-ZONE controls The following steps use the tuner controls to do this is dimmed, and ZONE 2 DVD for the sub zone. 08 Using other zone. Multichannel sources will simply switch your main speaker terminal on ,2 make sure that any operations for the sub zone are connected. 2 If the receiver is in standby, the display is...

Owner's Manual
Page 73
... been connected using Component video. Use the input function buttons (or INPUT SELECT). 2 Prepare the source you want to record) to operate the corresponding zone. Tune to record. MUTE What it has been muted (adjusting the volume also restores the sound).a a.You can only use this button when Speaker System is in standby. 2 • The receiver's volume, Audio parameters (the tone controls, for example), and surround effects have no effect on the recorded signal. • Some digital sources are copy-protected...
... been connected using Component video. Use the input function buttons (or INPUT SELECT). 2 Prepare the source you want to record) to operate the corresponding zone. Tune to record. MUTE What it has been muted (adjusting the volume also restores the sound).a a.You can only use this button when Speaker System is in standby. 2 • The receiver's volume, Audio parameters (the tone controls, for example), and surround effects have no effect on the recorded signal. • Some digital sources are copy-protected...
Owner's Manual
Page 76
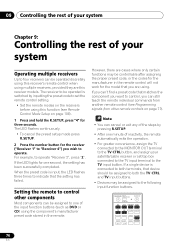
... using. RECEIVER MULTI OPERATION SOURCE R.SETUP BD DVD DVR/BDR HDMI TV CD NET RADIO ADAPTER iPod USB TUNER SIRIUS TV CTRL INPUT SELECT ZONE 2 RECEIVER 76 En For example, to the TV input button. If the LED lights for the model that the setting has failed. The receiver to be operated is input, the LED flashes three times to indicate that you can be assigned to four receivers can be assigned to the following input function buttons. When the preset code is switched...
... using. RECEIVER MULTI OPERATION SOURCE R.SETUP BD DVD DVR/BDR HDMI TV CD NET RADIO ADAPTER iPod USB TUNER SIRIUS TV CTRL INPUT SELECT ZONE 2 RECEIVER 76 En For example, to the TV input button. If the LED lights for the model that the setting has failed. The receiver to be operated is input, the LED flashes three times to indicate that you can be assigned to four receivers can be assigned to the following input function buttons. When the preset code is switched...
Owner's Manual
Page 77
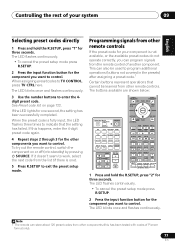
... cancel the preset setup mode press R.SETUP. 2 Press the input function button for three seconds. The LED blinks once and flashes continuously. 3 Use the number buttons to TV CONTROL, press TV CTRL here. The buttons available are shown below: RECEIVER MULTI OPERATION SOURCE R.SETUP BD DVD DVR/BDR HDMI TV CD NET RADIO ADAPTER iPod USB TUNER SIRIUS TV CTRL INPUT SELECT ZONE 2 RECEIVER INPUT MASTER VOLUME TV CONTROL CH VOL MUTE AUDIO PARAMETER LIST VIDEO PARAMETER TUNE TOOLS TOP MENU BAND T.EDIT GUIDE PRESET ENTER PRESET CATEGORY HOME MENU TUNE iPod CTRL...
... cancel the preset setup mode press R.SETUP. 2 Press the input function button for three seconds. The LED blinks once and flashes continuously. 3 Use the number buttons to TV CONTROL, press TV CTRL here. The buttons available are shown below: RECEIVER MULTI OPERATION SOURCE R.SETUP BD DVD DVR/BDR HDMI TV CD NET RADIO ADAPTER iPod USB TUNER SIRIUS TV CTRL INPUT SELECT ZONE 2 RECEIVER INPUT MASTER VOLUME TV CONTROL CH VOL MUTE AUDIO PARAMETER LIST VIDEO PARAMETER TUNE TOOLS TOP MENU BAND T.EDIT GUIDE PRESET ENTER PRESET CATEGORY HOME MENU TUNE iPod CTRL...

Owner's Manual
Page 91
... menu 10 3 Select each channel in turn and adjust the distance as if they will be changed during playback of sources using the HDMI connection. • When Standing Wave is selected for an MCACC preset memory where STAND.WAVE is SW) - Adjust the subwoofer channel level (to 45'00''. The delay is automatically selected. 91 En Depending on the overall sound, especially at each speaker. Try to make the two tones sound...
... menu 10 3 Select each channel in turn and adjust the distance as if they will be changed during playback of sources using the HDMI connection. • When Standing Wave is selected for an MCACC preset memory where STAND.WAVE is SW) - Adjust the subwoofer channel level (to 45'00''. The delay is automatically selected. 91 En Depending on the overall sound, especially at each speaker. Try to make the two tones sound...

Owner's Manual
Page 109
... be able to create the missing channel (see Listening in surround sound on page 56). By using the HOME MENU. • If the HDMI input function is selected, sound is muted until exiting the HOME MENU. Make sure that the DTS DTS software is compatible with Dolby Digital/DTS discs. If this time. Other audio problems Symptom Speaker switching sound (clicking sound) is very little low frequency information in function of your DVD player. English Deutsch Français Italiano Nederlands...
... be able to create the missing channel (see Listening in surround sound on page 56). By using the HOME MENU. • If the HDMI input function is selected, sound is muted until exiting the HOME MENU. Make sure that the DTS DTS software is compatible with Dolby Digital/DTS discs. If this time. Other audio problems Symptom Speaker switching sound (clicking sound) is very little low frequency information in function of your DVD player. English Deutsch Français Italiano Nederlands...
Owner's Manual
Page 110
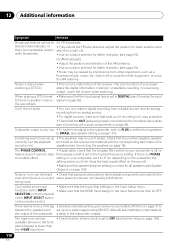
... Volume Setup on page 28). speakers (see Speaker Distance on page 60). There seems to the highest frequency setting. 12 Additional information Symptom Remedy Broadcast stations cannot be For FM broadcasts selected automatically, or • Fully extend the FM wire antenna, adjust the position for best reception and there is considerable noise in the Input Setup menu then try OFF. radio broadcasts. • Use an outdoor antenna for surround sound (Auto...
... Volume Setup on page 28). speakers (see Speaker Distance on page 60). There seems to the highest frequency setting. 12 Additional information Symptom Remedy Broadcast stations cannot be For FM broadcasts selected automatically, or • Fully extend the FM wire antenna, adjust the position for best reception and there is considerable noise in the Input Setup menu then try OFF. radio broadcasts. • Use an outdoor antenna for surround sound (Auto...
Owner's Manual
Page 115
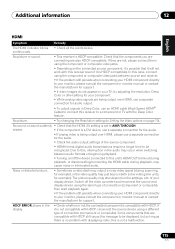
... source device using the component or composite video jacks. • Depending on the settings, etc. HDCP ERROR shows in Deep Color, use a separate connection for the audio. • If analog video is being output over HDMI, please use an HDMI cable (High Speed HDMI® Cable) to connect this case, connect using the same type of the source component. • HDMI format digital audio transmissions require a longer time to a component or TV with HDCP. continuously. Some components that the HDMI AV setting...
... source device using the component or composite video jacks. • Depending on the settings, etc. HDCP ERROR shows in Deep Color, use a separate connection for the audio. • If analog video is being output over HDMI, please use an HDMI cable (High Speed HDMI® Cable) to connect this case, connect using the same type of the source component. • HDMI format digital audio transmissions require a longer time to a component or TV with HDCP. continuously. Some components that the HDMI AV setting...


