
Owner's Manual
Page 1
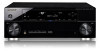
Operating Instructions Manual de instrucciones AUDIO/VIDEO MULTI-CHANNEL RECEIVER RECEPTOR AUDIO-VIDEO MULTICANAL VSX-1020 Register your product on http://www.pioneerelectronics.com (US) http://www.pioneerelectronics.ca (Canada) · Protect your new investment The details of your purchase will ... service bulletins on your new product · Improve product development Your input helps us continue to design products that meet your needs. · Receive a free Pioneer newsletter Registered customers can opt in to receive a monthly newsletter.
Operating Instructions Manual de instrucciones AUDIO/VIDEO MULTI-CHANNEL RECEIVER RECEPTOR AUDIO-VIDEO MULTICANAL VSX-1020 Register your product on http://www.pioneerelectronics.com (US) http://www.pioneerelectronics.ca (Canada) · Protect your new investment The details of your purchase will ... service bulletins on your new product · Improve product development Your input helps us continue to design products that meet your needs. · Receive a free Pioneer newsletter Registered customers can opt in to receive a monthly newsletter.

Owner's Manual
Page 2
...-10-2_A1_En NOTE: This equipment has been tested and found to use for other equipment. Product Name: AUDIO/VIDEO MULTI-CHANNEL RECEIVER Model Number: VSX-1020 Responsible Party Name: PIONEER ELECTRONICS (USA) INC. Phone: 1-800-421-1404 URL: http://www.pioneerelectronics.com D8-10-4*_C1_En Make sure it to use in a car or...
...-10-2_A1_En NOTE: This equipment has been tested and found to use for other equipment. Product Name: AUDIO/VIDEO MULTI-CHANNEL RECEIVER Model Number: VSX-1020 Responsible Party Name: PIONEER ELECTRONICS (USA) INC. Phone: 1-800-421-1404 URL: http://www.pioneerelectronics.com D8-10-4*_C1_En Make sure it to use in a car or...
Owner's Manual
Page 3
D3-4-2-1-1_A1_En 1) Read these instructions. 2) Keep these instructions. 3) Heed all warnings. 4) Follow all power from overheating. A grounding type plug has two blades and a third grounding prong. VENTILATION CAUTION When installing this unit will need to unplug it from the AC outlet. WARNING Slots and openings in the cabinet are provided for the unit, you will not completely shut off all instructions. 5) Do not use attachments/accessories specified by the manufacturer. 12) Use only with the cart, stand, tripod, bracket, or table specified by operating the equipment on thick ...
D3-4-2-1-1_A1_En 1) Read these instructions. 2) Keep these instructions. 3) Heed all warnings. 4) Follow all power from overheating. A grounding type plug has two blades and a third grounding prong. VENTILATION CAUTION When installing this unit will need to unplug it from the AC outlet. WARNING Slots and openings in the cabinet are provided for the unit, you will not completely shut off all instructions. 5) Do not use attachments/accessories specified by the manufacturer. 12) Use only with the cart, stand, tripod, bracket, or table specified by operating the equipment on thick ...
Owner's Manual
Page 4
...50 Listening to Music Contents of Bluetooth wireless technology device with this unit's sensor 35 Plugging in a safe place for buying this Pioneer product. Please read through LAN interface 32 Connecting an HDMI-equipped component to the front panel input 32 Connecting an iPod 33 ...Connecting a USB device 33 Connecting a USB device for Advanced MCACC output 34 Connecting an IR receiver 35 Operating other Pioneer components with Your System 51 Listening to Internet radio stations 52 Programming the Internet radio stations . . . 52 Listening to Satellite Radio...
...50 Listening to Music Contents of Bluetooth wireless technology device with this unit's sensor 35 Plugging in a safe place for buying this Pioneer product. Please read through LAN interface 32 Connecting an HDMI-equipped component to the front panel input 32 Connecting an iPod 33 ...Connecting a USB device 33 Connecting a USB device for Advanced MCACC output 34 Connecting an IR receiver 35 Operating other Pioneer components with Your System 51 Listening to Internet radio stations 52 Programming the Internet radio stations . . . 52 Listening to Satellite Radio...
Owner's Manual
Page 5
Saving channel presets 55 Using the SIRIUS Menu 55 06 Listening to your system Auto playback 56 Listening in surround sound 56 Standard surround sound 56 Using the Advanced surround effects. . . . . . 58 Listening in stereo 58 Using Front Stage Surround Advance 59 Using Stream Direct 59 Selecting MCACC presets 60 Choosing the input signal 60 Better sound using Phase Control 61 07 Control with HDMI function Making Control with HDMI connections . . . . . 62 HDMI Setup 63 Before using synchronization 64 About synchronized operations 64 About connections with a product of a different...
Saving channel presets 55 Using the SIRIUS Menu 55 06 Listening to your system Auto playback 56 Listening in surround sound 56 Standard surround sound 56 Using the Advanced surround effects. . . . . . 58 Listening in stereo 58 Using Front Stage Surround Advance 59 Using Stream Direct 59 Selecting MCACC presets 60 Choosing the input signal 60 Better sound using Phase Control 61 07 Control with HDMI function Making Control with HDMI connections . . . . . 62 HDMI Setup 63 Before using synchronization 64 About synchronized operations 64 About connections with a product of a different...
Owner's Manual
Page 6
Professional Calibration EQ graphical output 113 Display 113 Remote control 114 HDMI 115 Important information regarding the HDMI connection 116 USB interface 117 Internet radio 118 SIRIUS radio messages 118 About iPod 119 About SIRIUS 119 Surround sound formats 120 Dolby 120 DTS 120 Windows Media Audio 9 Professional . . . . 120 Auto Surround, ALC and Stream Direct with different input signal formats 121 Preset code list 122 Specifications 127 Cleaning the unit 128
Professional Calibration EQ graphical output 113 Display 113 Remote control 114 HDMI 115 Important information regarding the HDMI connection 116 USB interface 117 Internet radio 118 SIRIUS radio messages 118 About iPod 119 About SIRIUS 119 Surround sound formats 120 Dolby 120 DTS 120 Windows Media Audio 9 Professional . . . . 120 Auto Surround, ALC and Stream Direct with different input signal formats 121 Preset code list 122 Specifications 127 Cleaning the unit 128
Owner's Manual
Page 7
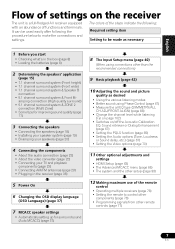
The colors of the remote control • Operating multiple receivers (page 76) • Setting the remote to make the connections and settings. amping connection (High quality surround) • 5.1 channel surround system & ZONE 2 connection (Multi Zone) • Some tips for surround sound (Auto MCACC) (page 37) 8 The Input Setup menu (page 40) (When using connections other than the recommended connections) 9 Basic playback (page 42) 10 Adjusting the sound and picture quality as desired • Using the various listening modes • Better sound using ...
The colors of the remote control • Operating multiple receivers (page 76) • Setting the remote to make the connections and settings. amping connection (High quality surround) • 5.1 channel surround system & ZONE 2 connection (Multi Zone) • Some tips for surround sound (Auto MCACC) (page 37) 8 The Input Setup menu (page 40) (When using connections other than the recommended connections) 9 Basic playback (page 42) 10 Adjusting the sound and picture quality as desired • Using the various listening modes • Better sound using ...
Owner's Manual
Page 8
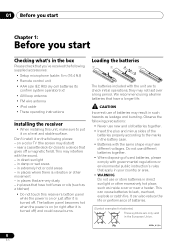
Don't install it on a level and stable surface. in such hazards as leakage and bursting. CAUTION Incorrect use of batteries may result in damp or wet areas - Pb K058c_A1_En 8 En on a color TV (the screen may interfere with governmental regulations or environmental public instruction's rules that apply in your country or area. • WARNING Do not use new and old batteries together. • Insert the plus and minus sides of batteries. (Symbol examples for batteries) These symbols are only valid in places that gives off a magnetic field). This may distort) - in places ...
Don't install it on a level and stable surface. in such hazards as leakage and bursting. CAUTION Incorrect use of batteries may result in damp or wet areas - Pb K058c_A1_En 8 En on a color TV (the screen may interfere with governmental regulations or environmental public instruction's rules that apply in your country or area. • WARNING Do not use new and old batteries together. • Insert the plus and minus sides of batteries. (Symbol examples for batteries) These symbols are only valid in places that gives off a magnetic field). This may distort) - in places ...
Owner's Manual
Page 9
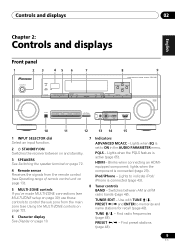
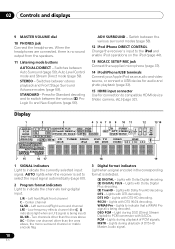
... made MULTI-ZONE connections (see Using the MULTI-ZONE controls on page 72). 6 Character display See Display on page 10. 7 Indicators ADVANCED MCACC - CHANNEL RECEIVER VSX-1020 TUNE PRESET PRESET TUNE TUNER EDIT ENTER MASTER VOLUME PHONES AUTO/ALC/DIRECT LISTENING MODE STEREO STANDARD ADV SURROUND iPod iPhone DIRECT CONTROL MCACC SETUP...
... made MULTI-ZONE connections (see Using the MULTI-ZONE controls on page 72). 6 Character display See Display on page 10. 7 Indicators ADVANCED MCACC - CHANNEL RECEIVER VSX-1020 TUNE PRESET PRESET TUNE TUNER EDIT ENTER MASTER VOLUME PHONES AUTO/ALC/DIRECT LISTENING MODE STEREO STANDARD ADV SURROUND iPod iPhone DIRECT CONTROL MCACC SETUP...
Owner's Manual
Page 10
STEREO - ADV SURROUND - Either one channel other than the ones above XC - DTS HD - Lights to PCM conversion with SACDs. Light during playback of DTS-HD Master Audio signal. 10 En Lights during DSD (Direct Stream Digital) to indicate that a WMA9 Pro signal is being input) XL/XR - Switches between Auto Surround (page 56), Auto Level Control mode and Stream Direct mode (page 59). Press for connection to switch between the various 2 Pro Logic IIx and Neo:6 options (page 56). Switch between the various surround modes (page 58). 12 iPod iPhone DIRECT CONTROL Change the ...
STEREO - ADV SURROUND - Either one channel other than the ones above XC - DTS HD - Lights to PCM conversion with SACDs. Light during playback of DTS-HD Master Audio signal. 10 En Lights during DSD (Direct Stream Digital) to indicate that a WMA9 Pro signal is being input) XL/XR - Switches between Auto Surround (page 56), Auto Level Control mode and Stream Direct mode (page 59). Press for connection to switch between the various 2 Pro Logic IIx and Neo:6 options (page 56). Switch between the various surround modes (page 58). 12 iPod iPhone DIRECT CONTROL Change the ...
Owner's Manual
Page 11
Lights when the ALC (Auto level control) mode is muted (page 13). 12 Master volume level Shows the overall volume level. ADV.SURROUND - Lights when one of the Neo:6 modes of the receiver is active (page 68). 7 Listening mode indicators AUTO SURROUND - STANDARD - Lights when the mono mode is set using MPX. 11 Lights when the sound is selected (page 59). Controls and displays 02 English Deutsch Français Italiano Nederlands Español 4 MULTI-ZONE Lights when the MULTI-ZONE feature is active (page 72). 5 SOUND Lights when any of the Midnight, Loudness or tone controls ...
Lights when the ALC (Auto level control) mode is muted (page 13). 12 Master volume level Shows the overall volume level. ADV.SURROUND - Lights when one of the Neo:6 modes of the receiver is active (page 68). 7 Listening mode indicators AUTO SURROUND - STANDARD - Lights when the mono mode is set using MPX. 11 Lights when the sound is selected (page 59). Controls and displays 02 English Deutsch Français Italiano Nederlands Español 4 MULTI-ZONE Lights when the MULTI-ZONE feature is active (page 72). 5 SOUND Lights when any of the Midnight, Loudness or tone controls ...
Owner's Manual
Page 12
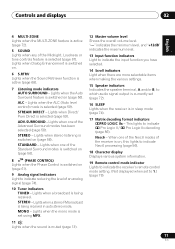
Use to TV CTRL button. - Use to input the preset code when making remote control settings and to set the remote control mode (page 76). 3 Input function buttons Press to select control of the TV. HOME MENU - Turn on for the receiver. INPUT - VOL +/- - Use to access the Audio options (page 67). RETURN - Other controls (See page 43, 45, 48, 50, 52, 53 and 82.) 1 RECEIVER This switches between standby and on /off the power of other components (page 76). 4 ZONE 2 Switch to perform operations in the sub zone (page 73). 5 TV CONTROL buttons These ...
Use to TV CTRL button. - Use to input the preset code when making remote control settings and to set the remote control mode (page 76). 3 Input function buttons Press to select control of the TV. HOME MENU - Turn on for the receiver. INPUT - VOL +/- - Use to access the Audio options (page 67). RETURN - Other controls (See page 43, 45, 48, 50, 52, 53 and 82.) 1 RECEIVER This switches between standby and on /off the power of other components (page 76). 4 ZONE 2 Switch to perform operations in the sub zone (page 73). 5 TV CONTROL buttons These ...
Owner's Manual
Page 13
Press to restore CD quality sound to adjust the level (page 102). Switch between stereo playback and Front Stage Surround Advance modes (page 59). Press repeatedly to select a channel, then use to put the receiver in the main zone. Dims or brightens the display (page 74). 9 LISTENING MODE controls AUTO/ALC/DIRECT - Switches between MCACC presets (page 60). PQLS - A.ATT - DIMMER - Also use / to compressed audio sources (page 68). Operating range of an analog input signal to Midnight or Loudness listening (page 67). Check selected receiver ...
Press to restore CD quality sound to adjust the level (page 102). Switch between stereo playback and Front Stage Surround Advance modes (page 59). Press repeatedly to select a channel, then use to put the receiver in the main zone. Dims or brightens the display (page 74). 9 LISTENING MODE controls AUTO/ALC/DIRECT - Switches between MCACC presets (page 60). PQLS - A.ATT - DIMMER - Also use / to compressed audio sources (page 68). Operating range of an analog input signal to Midnight or Loudness listening (page 67). Check selected receiver ...
Owner's Manual
Page 14
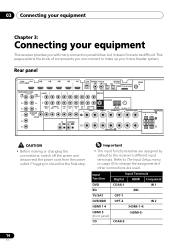
This page explains the kinds of components you with many connection possibilities, but it doesn't have to be the final step. Refer to The Input Setup menu on page 40 to change the assignments if other connections are assigned by default to the receiver's different input terminals. Important • The input functions below are used. Rear panel HDMI BD IN IN 1 ASSIGNABLE 1 4 IN 2 IN 3 IN 4 OUT LAN COAXIAL ASSIGNABLE (10/100) IN 1 IN 2 IN 1 OPTICAL ASSIGNABLE IN 2 ADAPTER PORT SIRIUS IN (OUTPUT 5 V 100 mA MAX) COMPONENT VIDEO ASSIGNABLE IN 1 IN 2 (DVD) (DVR/...
This page explains the kinds of components you with many connection possibilities, but it doesn't have to be the final step. Refer to The Input Setup menu on page 40 to change the assignments if other connections are assigned by default to the receiver's different input terminals. Important • The input functions below are used. Rear panel HDMI BD IN IN 1 ASSIGNABLE 1 4 IN 2 IN 3 IN 4 OUT LAN COAXIAL ASSIGNABLE (10/100) IN 1 IN 2 IN 1 OPTICAL ASSIGNABLE IN 2 ADAPTER PORT SIRIUS IN (OUTPUT 5 V 100 mA MAX) COMPONENT VIDEO ASSIGNABLE IN 1 IN 2 (DVD) (DVR/...

Owner's Manual
Page 15
Connecting your equipment 03 English Deutsch Français Italiano Nederlands Español Determining the speakers' application This unit permits you to build various surround systems, in accordance with the number of speakers you can simultaneously enjoy 5.1-channel surround sound in the main zone with the left and right front wide speakers (FWL/FWR).1 This surround system produces a true-to-life sound over a wider area. [C] 7.1 channel surround system & Speaker B connection • Speaker System setting: Speaker B SL SBR SBL R A 7.1 ch surround system connects the left and right ...
Connecting your equipment 03 English Deutsch Français Italiano Nederlands Español Determining the speakers' application This unit permits you to build various surround systems, in accordance with the number of speakers you can simultaneously enjoy 5.1-channel surround sound in the main zone with the left and right front wide speakers (FWL/FWR).1 This surround system produces a true-to-life sound over a wider area. [C] 7.1 channel surround system & Speaker B connection • Speaker System setting: Speaker B SL SBR SBL R A 7.1 ch surround system connects the left and right ...

Owner's Manual
Page 16
SR SL Sub zone R L Plan E ZONE 2 16 En Output speakers are different depending on the input signal or listening mode. Other speaker connection • Your favorite speaker connections can simultaneously enjoy 5.1-channel surround sound in the main zone with stereo playback on another component in ZONE 2 (The selection of input devices is limited.) Main zone R L C SW Important • The Speaker System setting must be sure to the front channel. (The subwoofer's low frequency component is played from the front height, front wide, speaker B and surround back speakers. Plan D ...
SR SL Sub zone R L Plan E ZONE 2 16 En Output speakers are different depending on the input signal or listening mode. Other speaker connection • Your favorite speaker connections can simultaneously enjoy 5.1-channel surround sound in the main zone with stereo playback on another component in ZONE 2 (The selection of input devices is limited.) Main zone R L C SW Important • The Speaker System setting must be sure to the front channel. (The subwoofer's low frequency component is played from the front height, front wide, speaker B and surround back speakers. Plan D ...
Owner's Manual
Page 17
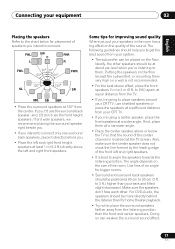
If not, place them at equal distance from the TV. • If you're going to place speakers around your CRT TV, use the front height speakers / front wide speakers, we recommend placing the surround speaker right beside you. • If you intend to connect only one surround back speakers, place it directly behind the listener than for home theater playback. • Try not to place the surround speakers farther away from your system. • The subwoofer can weaken the surround sound effect. 17 En Use less of an angle for bigger rooms. • Surround and surround back speakers ...
If not, place them at equal distance from the TV. • If you're going to place speakers around your CRT TV, use the front height speakers / front wide speakers, we recommend placing the surround speaker right beside you. • If you intend to connect only one surround back speakers, place it directly behind the listener than for home theater playback. • Try not to place the surround speakers farther away from your system. • The subwoofer can weaken the surround sound effect. 17 En Use less of an angle for bigger rooms. • Surround and surround back speakers ...
Owner's Manual
Page 18
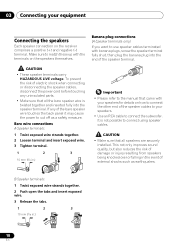
Banana plug connections (A-Speaker terminals only) If you want to use speaker cables terminated with the terminals on the speakers themselves. CAUTION • Make sure that came with your speakers. • Use an RCA cable to connect the subwoofer. If any uninsulated parts. • Make sure that all speakers are securely installed. Bare wire connections A-Speaker terminals: 1 Twist exposed wire strands together. 2 Loosen terminal and insert exposed wire. 3 Tighten terminal. 1 2 3 10 mm (3/8 in.) Important • Please refer to the manual that all the bare speaker...
Banana plug connections (A-Speaker terminals only) If you want to use speaker cables terminated with the terminals on the speakers themselves. CAUTION • Make sure that came with your speakers. • Use an RCA cable to connect the subwoofer. If any uninsulated parts. • Make sure that all speakers are securely installed. Bare wire connections A-Speaker terminals: 1 Twist exposed wire strands together. 2 Loosen terminal and insert exposed wire. 3 Tighten terminal. 1 2 3 10 mm (3/8 in.) Important • Please refer to the manual that all the bare speaker...

Owner's Manual
Page 19
Note that your speaker system At the very least, front left surround back terminal). Connecting your equipment 03 English Deutsch Français Italiano Nederlands Español Installing your main surround speakers should always be connected as a pair, but you can connect just one surround back speaker if you like (it must be connected to the left and right speakers only are necessary. right ZONE 2 - The front height terminals can also be used for the front wide and Speaker B. right Speaker B - Front height setting Front height right Front height left Front wide ...
Note that your speaker system At the very least, front left surround back terminal). Connecting your equipment 03 English Deutsch Français Italiano Nederlands Español Installing your main surround speakers should always be connected as a pair, but you can connect just one surround back speaker if you like (it must be connected to the left and right speakers only are necessary. right ZONE 2 - The front height terminals can also be used for the front wide and Speaker B. right Speaker B - Front height setting Front height right Front height left Front wide ...
Owner's Manual
Page 20
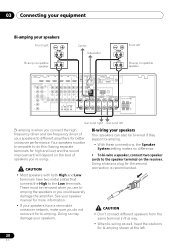
CAUTION • Most speakers with both High and Low terminals have a removable crossover network, make sure you could severely damage the amplifier. Bi-wiring your speakers Your speakers can also be bi-wired if they support bi-amping. • With these connections, the Speaker System setting makes no difference. • To bi-wire a speaker, connect two speaker cords to the speaker terminal on the kind of speakers you connect the high frequency driver and low frequency driver of your speakers to different amplifiers for more information. • If your speakers have two metal plates ...
CAUTION • Most speakers with both High and Low terminals have a removable crossover network, make sure you could severely damage the amplifier. Bi-wiring your speakers Your speakers can also be bi-wired if they support bi-amping. • With these connections, the Speaker System setting makes no difference. • To bi-wire a speaker, connect two speaker cords to the speaker terminal on the kind of speakers you connect the high frequency driver and low frequency driver of your speakers to different amplifiers for more information. • If your speakers have two metal plates ...
