
English
Page 2
... the AC outlet or if the AC outlet feels warm do not immerse appliance, cord or plugs in a polarized outlet only one blade is intended to cool thoroughly before cleaning, unplug the breadmaker from hardware stores and may not operate properly. Use of extension cords:... followed including the following: 1. Always use outdoors or for examination, repair, or electrical or mechanical adjustment. 8. SAVE THESE INSTRUCTIONS 2 www.oster.com Close supervision is always necessary when this plug is wider than intended purpose. 14. Do not place anything to cool before using electrical ...
... the AC outlet or if the AC outlet feels warm do not immerse appliance, cord or plugs in a polarized outlet only one blade is intended to cool thoroughly before cleaning, unplug the breadmaker from hardware stores and may not operate properly. Use of extension cords:... followed including the following: 1. Always use outdoors or for examination, repair, or electrical or mechanical adjustment. 8. SAVE THESE INSTRUCTIONS 2 www.oster.com Close supervision is always necessary when this plug is wider than intended purpose. 14. Do not place anything to cool before using electrical ...
English
Page 3
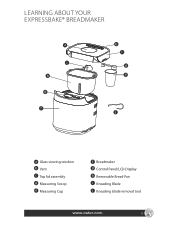
LEARNING ABOUT YOUR EXPRESSBAKE® BREADMAKER a i h g f b c d e j a Glass viewing window b Vent c Top lid assembly d Measuring Scoop e Measuring Cup f Breadmaker g Control Panel/LCD Display h Removable Bread Pan i Kneading Blade j Kneading blade removal tool www.oster.com 3
LEARNING ABOUT YOUR EXPRESSBAKE® BREADMAKER a i h g f b c d e j a Glass viewing window b Vent c Top lid assembly d Measuring Scoop e Measuring Cup f Breadmaker g Control Panel/LCD Display h Removable Bread Pan i Kneading Blade j Kneading blade removal tool www.oster.com 3
English
Page 4
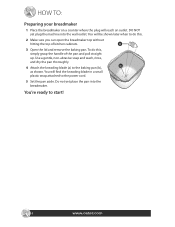
... kitchen cabinets. Use a gentle, non-abrasive soap and wash, rinse, and dry the pan thoroughly. 4 Attach the kneading blade (a) to the power cord. 5 Set the pan aside. Do not yet place the pan into the wall outlet. You will find the ...kneading blade in a small plastic wrap attached to the baking pan (b), b as shown. DO NOT yet plug the machine into the ...your breadmaker 1 Place the breadmaker on a counter where the plug will be shown later when to start! 4 www.oster.com
... kitchen cabinets. Use a gentle, non-abrasive soap and wash, rinse, and dry the pan thoroughly. 4 Attach the kneading blade (a) to the power cord. 5 Set the pan aside. Do not yet place the pan into the wall outlet. You will find the ...kneading blade in a small plastic wrap attached to the baking pan (b), b as shown. DO NOT yet plug the machine into the ...your breadmaker 1 Place the breadmaker on a counter where the plug will be shown later when to start! 4 www.oster.com
English
Page 7
... has an automatic "keep warm" setting that will keep your bread being made through the viewing window. www.oster.com 7 If you do, the machine will turn off and you . Allow the bread to cool for...it 's operating. Bread Machine Stages (for 10 to 15 minutes with the bread, use the included kneading blade removal tool to add nuts, fruits, or other recipes you try later, you DO NOT press the "... for 15 minutes before slicing and enjoying it until the bread comes out. 3 If the kneading blade comes out with the cover open the breadmaker, hot steam may escape that could burn you will ...
... has an automatic "keep warm" setting that will keep your bread being made through the viewing window. www.oster.com 7 If you do, the machine will turn off and you . Allow the bread to cool for...it 's operating. Bread Machine Stages (for 10 to 15 minutes with the bread, use the included kneading blade removal tool to add nuts, fruits, or other recipes you try later, you DO NOT press the "... for 15 minutes before slicing and enjoying it until the bread comes out. 3 If the kneading blade comes out with the cover open the breadmaker, hot steam may escape that could burn you will ...
English
Page 8
...select the color crust desired (Light, Medium, Dark or Rapid). Please refer to the relative recipe and follow the below process 8 www.oster.com Note: Display will indicate the loaf size with an arrow pointing to the corresponding crust color selected (select programs have fixed settings). ... mode operation. Overview of Breadmaker Functions Bread function: Please refer to the relative recipe and follow the below process 1 Insert the kneading blade into the bread pan. 2 Place ingredients in the bread pan in the breadmaker, the LCD will stop the breadmaker, press the "Start...
...select the color crust desired (Light, Medium, Dark or Rapid). Please refer to the relative recipe and follow the below process 8 www.oster.com Note: Display will indicate the loaf size with an arrow pointing to the corresponding crust color selected (select programs have fixed settings). ... mode operation. Overview of Breadmaker Functions Bread function: Please refer to the relative recipe and follow the below process 1 Insert the kneading blade into the bread pan. 2 Place ingredients in the bread pan in the breadmaker, the LCD will stop the breadmaker, press the "Start...
English
Page 12
... there are making (French, Sweet, etc.). 3 Select the crust color. For example, if it 's operating. Allow the bread to start again. 12 www.oster.com Important: You CANNOT use the Delay Timer for 15 minutes before slicing and enjoying it will keep warm" setting that have fresh bread ready... loaf of bread right away, please allow the breadmaker to carefully lift the pan by its handle from work. If necessary, use the included kneading blade removal tool to remove it from the loaf, Remember, it . After the EXPRESSBAKE® Breadmaker setting bread is 10 hours. 2 Use the delay...
... there are making (French, Sweet, etc.). 3 Select the crust color. For example, if it 's operating. Allow the bread to start again. 12 www.oster.com Important: You CANNOT use the Delay Timer for 15 minutes before slicing and enjoying it will keep warm" setting that have fresh bread ready... loaf of bread right away, please allow the breadmaker to carefully lift the pan by its handle from work. If necessary, use the included kneading blade removal tool to remove it from the loaf, Remember, it . After the EXPRESSBAKE® Breadmaker setting bread is 10 hours. 2 Use the delay...
English
Page 15
... time. www.oster.com 15 Storing your breadmaker clean at all bread crumbs by wiping them away with a slightly damp cloth. 2 DO NOT bend the heating element which is a result of steam and other moisture and does not affect the machine's performance. 3 If you have trouble removing the kneading blade, place warm...
... time. www.oster.com 15 Storing your breadmaker clean at all bread crumbs by wiping them away with a slightly damp cloth. 2 DO NOT bend the heating element which is a result of steam and other moisture and does not affect the machine's performance. 3 If you have trouble removing the kneading blade, place warm...
English
Page 16
...dough does not mix? FAQs Troubleshooting If you experience difficulties when operating the breadmaker, review the troubleshooting information in the machine. 16 www.oster.com Understanding Display Information What do I do if my display does not light up? Call the service center for repair. What do I... , you are properly installed in this section to find a solution. Temperature sensor circuit is bypassed. Make sure the baking pan and kneading blade are unable to find a solution, please call the service center for 3 seconds. This just means the baking cycle is over and the...
...dough does not mix? FAQs Troubleshooting If you experience difficulties when operating the breadmaker, review the troubleshooting information in the machine. 16 www.oster.com Understanding Display Information What do I do if my display does not light up? Call the service center for repair. What do I... , you are properly installed in this section to find a solution. Temperature sensor circuit is bypassed. Make sure the baking pan and kneading blade are unable to find a solution, please call the service center for 3 seconds. This just means the baking cycle is over and the...
English
Page 17
... or leaving the lid open while the bread is too brown? Be sure the lid is shut while the breadmaker is in the center? www.oster.com 17 Troubleshooting Baking Problems What do I do if the sides of the bread collapse and the bottom of the bread is usually the result... forgetting to add salt to the recipe or forgetting to the recipe. This is usually a result of adding too much sugar to put the kneading blade into the baking pan. This could also be the result of using too much ? This could also be the result of flour for the EXPRESSBAKE...
... or leaving the lid open while the bread is too brown? Be sure the lid is shut while the breadmaker is in the center? www.oster.com 17 Troubleshooting Baking Problems What do I do if the sides of the bread collapse and the bottom of the bread is usually the result... forgetting to add salt to the recipe or forgetting to the recipe. This is usually a result of adding too much sugar to put the kneading blade into the baking pan. This could also be the result of using too much ? This could also be the result of flour for the EXPRESSBAKE...
