User's Guide
Page 3
... port and the Quick Connect laptop port (selected models only)...34 Installing the printer on a wireless network (selected models only 36 Wireless network compatibility...36 Information you will need to set up the printer on a wireless network 36 Installing the printer on a wireless network...37 Wireless installation instructions (France only)...37 Configuring an IP address manually...38 Interpreting the...
... port and the Quick Connect laptop port (selected models only)...34 Installing the printer on a wireless network (selected models only 36 Wireless network compatibility...36 Information you will need to set up the printer on a wireless network 36 Installing the printer on a wireless network...37 Wireless installation instructions (France only)...37 Configuring an IP address manually...38 Interpreting the...
User's Guide
Page 5
Saving and deleting print settings...68 Managing print jobs...69 Pausing print jobs...69 Resuming print jobs...70 Canceling print jobs...71 Working with photos 73 Inserting a memory card...73 ... Making copies...84 Copying photos...84 Enlarging or reducing images...84 Adjusting copy quality...85 Making a copy lighter or darker...85 Collating copies using the printer control panel...85 Repeating an image on one page...86 Copying multiple pages on one sheet (N-Up)...86 Canceling a copy job...87 Scanning 88 Scanning...
Saving and deleting print settings...68 Managing print jobs...69 Pausing print jobs...69 Resuming print jobs...70 Canceling print jobs...71 Working with photos 73 Inserting a memory card...73 ... Making copies...84 Copying photos...84 Enlarging or reducing images...84 Adjusting copy quality...85 Making a copy lighter or darker...85 Collating copies using the printer control panel...85 Repeating an image on one page...86 Copying multiple pages on one sheet (N-Up)...86 Canceling a copy job...87 Scanning 88 Scanning...

User's Guide
Page 6
... the printer 95 Maintaining print cartridges...95 Installing print cartridges...95 Removing a used print cartridge ...96 Refilling print cartridges...97 Using genuine Lexmark print...printer...101 Ordering supplies...102 Ordering print cartridges ...102 Ordering paper and other supplies...103 Resetting to factory settings...103 Troubleshooting 104 Using the printer...printer power problems ...109 Removing and reinstalling the software ...109 Enabling the USB port in Windows ...110 Wireless troubleshooting...111 Wireless troubleshooting checklist ...111 Printing a network setup page ...112 Wireless...
... the printer 95 Maintaining print cartridges...95 Installing print cartridges...95 Removing a used print cartridge ...96 Refilling print cartridges...97 Using genuine Lexmark print...printer...101 Ordering supplies...102 Ordering print cartridges ...102 Ordering paper and other supplies...103 Resetting to factory settings...103 Troubleshooting 104 Using the printer...printer power problems ...109 Removing and reinstalling the software ...109 Enabling the USB port in Windows ...110 Wireless troubleshooting...111 Wireless troubleshooting checklist ...111 Printing a network setup page ...112 Wireless...
User's Guide
Page 7
Wi-Fi indicator light is blinking orange during installation (Macintosh only 121 Wi-Fi indicator light is still orange ...123 Wireless print server not installed ...125 "Communication not available" message displays when printing wirelessly 125 Communication with printer lost when connected to Virtual Private Network (VPN 125 Resetting the internal wireless print server to factory default settings 125 Notices 127 Product information...127 Edition notice...127 European EC directives conformity statement for radio products 130 Power consumption...133 Networking glossary 138 Index 140 7
Wi-Fi indicator light is blinking orange during installation (Macintosh only 121 Wi-Fi indicator light is still orange ...123 Wireless print server not installed ...125 "Communication not available" message displays when printing wirelessly 125 Communication with printer lost when connected to Virtual Private Network (VPN 125 Resetting the internal wireless print server to factory default settings 125 Notices 127 Product information...127 Edition notice...127 European EC directives conformity statement for radio products 130 Power consumption...133 Networking glossary 138 Index 140 7
User's Guide
Page 9
...the power supply cord or telephone, during a lightning storm. Refer service or repairs, other replacement parts. The safety features of misuse. Lexmark is designed, tested, and approved to an electrical outlet that is misused, a risk of fire or electrical shock results. Do not ...subject the power cord to a professional service person. CAUTION-SHOCK HAZARD: Do not set up this product or the manufacturer's authorized replacement power supply and power supply cord. SAVE THESE INSTRUCTIONS. 9 CAUTION-POTENTIAL INJURY: Do not...
...the power supply cord or telephone, during a lightning storm. Refer service or repairs, other replacement parts. The safety features of misuse. Lexmark is designed, tested, and approved to an electrical outlet that is misused, a risk of fire or electrical shock results. Do not ...subject the power cord to a professional service person. CAUTION-SHOCK HAZARD: Do not set up this product or the manufacturer's authorized replacement power supply and power supply cord. SAVE THESE INSTRUCTIONS. 9 CAUTION-POTENTIAL INJURY: Do not...
User's Guide
Page 12
... to find (USA) Where to view the warranty. original date of purchase. 2 Click Warranty Information. 3 Click Statement of defects in printer, or set forth at printer. period of Warranty information varies by Lexmark International, Inc. Record the following information (located on the store receipt and the back of country or region. materials and workmanship...
... to find (USA) Where to view the warranty. original date of purchase. 2 Click Warranty Information. 3 Click Statement of defects in printer, or set forth at printer. period of Warranty information varies by Lexmark International, Inc. Record the following information (located on the store receipt and the back of country or region. materials and workmanship...
User's Guide
Page 13
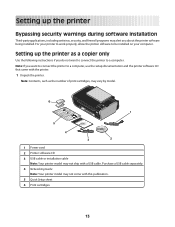
... Use the following instructions if you do not want to connect the printer to a computer, use the setup documentation and the printer software CD that came with the printer. 1 Unpack the printer. Note: If you about the printer software being installed. Setting up the printer as the number of print cartridges, may vary by model. 6 1 2 3 WI F I PRINTING...
... Use the following instructions if you do not want to connect the printer to a computer, use the setup documentation and the printer software CD that came with the printer. 1 Unpack the printer. Note: If you about the printer software being installed. Setting up the printer as the number of print cartridges, may vary by model. 6 1 2 3 WI F I PRINTING...
User's Guide
Page 15
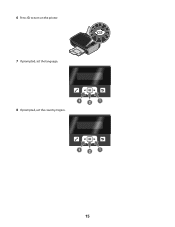
6 Press to turn on the printer. WI F I PRINTING 7 If prompted, set the language. 8 If prompted, set the country/region. 1 2 1 1 2 1 15
6 Press to turn on the printer. WI F I PRINTING 7 If prompted, set the language. 8 If prompted, set the country/region. 1 2 1 1 2 1 15

User's Guide
Page 22
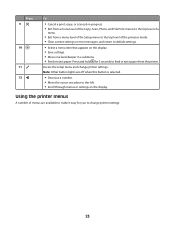
...Saver mode. Press and hold off the printer. for two seconds to the right. • Scroll through menus or settings on the display. Using the printer control panel buttons and menus Using the printer control panel The printer control panel contains: • Power on/...off button • Two-line display that shows the printer status, messages, and menus • 11 buttons Press...
...Saver mode. Press and hold off the printer. for two seconds to the right. • Scroll through menus or settings on the display. Using the printer control panel buttons and menus Using the printer control panel The printer control panel contains: • Power on/...off button • Two-line display that shows the printer status, messages, and menus • 11 buttons Press...
User's Guide
Page 23
... a menu level of the Copy, Scan, Photo, and File Print menus to the top level of a menu. • Exit from the printer. Press and hold for 3 seconds to feed or eject paper from a menu level of the Setup menu to the top level of menus are...• Scroll through menus or settings on the display. • Save settings. • Move one place to change printer settings. Access the setup menu and change printer settings: 23 Using the printer menus A number of the previous mode. • Clear current settings or error messages, and return to default settings. • Select a menu item...
... a menu level of the Copy, Scan, Photo, and File Print menus to the top level of a menu. • Exit from the printer. Press and hold for 3 seconds to feed or eject paper from a menu level of the Setup menu to the top level of menus are...• Scroll through menus or settings on the display. • Save settings. • Move one place to change printer settings. Access the setup menu and change printer settings: 23 Using the printer menus A number of the previous mode. • Clear current settings or error messages, and return to default settings. • Select a menu item...
User's Guide
Page 24
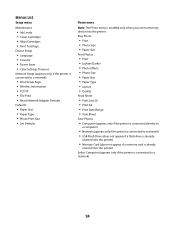
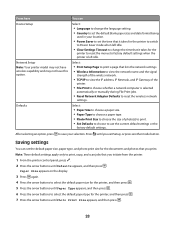
...; Align Cartridges • Print Test Page Device Setup • Language • Country • Power Saver • Clear Settings Timeout Network Setup (appears only if the printer is connected to a network) • Print Setup Page • Wireless Information • TCP/IP • File Print • Reset Network Adapter Defaults Defaults • Paper Size •...
...; Align Cartridges • Print Test Page Device Setup • Language • Country • Power Saver • Clear Settings Timeout Network Setup (appears only if the printer is connected to a network) • Print Setup Page • Wireless Information • TCP/IP • File Print • Reset Network Adapter Defaults Defaults • Paper Size •...
User's Guide
Page 25
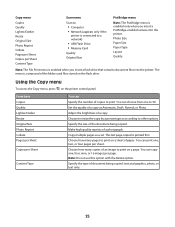
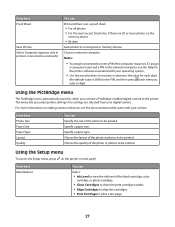
... Size Photo Reprint Collate Pages per Sheet Copies per Sheet Content Type Scan menu Scan to • Computer • Network (appears only if the printer is connected to a network) • USB Flash Drive • Memory Card Quality Original Size PictBridge menu Note: The PictBridge menu is enabled only... when you insert a flash drive that contains document files into the printer. Using the Copy menu To access the Copy menu, press on a sheet of paper. Set the quality of the document being copied: text and graphics, photo, or text only. 25 Specify the...
... Size Photo Reprint Collate Pages per Sheet Copies per Sheet Content Type Scan menu Scan to • Computer • Network (appears only if the printer is connected to a network) • USB Flash Drive • Memory Card Quality Original Size PictBridge menu Note: The PictBridge menu is enabled only... when you insert a flash drive that contains document files into the printer. Using the Copy menu To access the Copy menu, press on a sheet of paper. Set the quality of the document being copied: text and graphics, photo, or text only. 25 Specify the...
User's Guide
Page 26
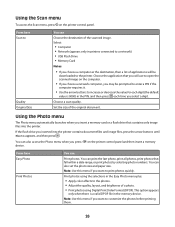
Set the size of the scanned image. Using the Photo menu The Photo menu automatically launches when you press on the printer control panel and then insert a memory device. Note: Use this menu if you want to Quality Original Size You can Print photos. From here ...Scan to customize the photos before printing them. 26 You can also set the photo size and paper size. ...
Set the size of the scanned image. Using the Photo menu The Photo menu automatically launches when you press on the printer control panel and then insert a memory device. Note: Use this menu if you want to Quality Original Size You can Print photos. From here ...Scan to customize the photos before printing them. 26 You can also set the photo size and paper size. ...
User's Guide
Page 27
The menu lets you select printer settings if no settings are 20 or more information on the printer control panel. Choose the quality of the photo or ...only in the PIN, and then press each time you connect a PictBridge-enabled digital camera to the printer. Choose a network computer. Using the PictBridge menu The PictBridge menu automatically launches when you select a ... from your operating system. • Use the arrow buttons to increase or decrease the value for the printer software associated with your camera. Notes: • You may be printed. For more photos on the ...
The menu lets you select printer settings if no settings are 20 or more information on the printer control panel. Choose the quality of the photo or ...only in the PIN, and then press each time you connect a PictBridge-enabled digital camera to the printer. Choose a network computer. Using the PictBridge menu The PictBridge menu automatically launches when you select a ... from your operating system. • Use the arrow buttons to increase or decrease the value for the printer software associated with your camera. Notes: • You may be printed. For more photos on the ...
User's Guide
Page 28
.... From here Device Setup Network Setup Note: Your printer model may not have wireless capability and may not have this option. Select: • Print Setup Page to choose whether a network computer is left idle. • Clear Settings Timeout to change the language setting. • Country to set the default blank paper size and date format...
.... From here Device Setup Network Setup Note: Your printer model may not have wireless capability and may not have this option. Select: • Print Setup Page to choose whether a network computer is left idle. • Clear Settings Timeout to change the language setting. • Country to set the default blank paper size and date format...
User's Guide
Page 29
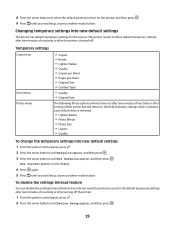
... Photo Size • Layout • Quality To change the temporary settings into new default settings The printer has default temporary settings for the menus. To disable the settings timeout feature You can disable the settings timeout feature if you exit Setup, or press another mode button. Use... appears on the display. 4 Press again. 5 Press until Set Defaults appears, and then press . The printer reverts to these default temporary settings after two minutes of inactivity or after the printer is turned off: Temporary settings Copy menu Scan menu Photo menu • Copies • ...
... Photo Size • Layout • Quality To change the temporary settings into new default settings The printer has default temporary settings for the menus. To disable the settings timeout feature You can disable the settings timeout feature if you exit Setup, or press another mode button. Use... appears on the display. 4 Press again. 5 Press until Set Defaults appears, and then press . The printer reverts to these default temporary settings after two minutes of inactivity or after the printer is turned off: Temporary settings Copy menu Scan menu Photo menu • Copies • ...

User's Guide
Page 30
...until you exit Setup, or press another mode button. Using the World Wide Web 1 Go to Power Saver mode when the printer is left idle. 3 Press the arrow buttons until Clear Settings Timeout appears, and then press . 4 Press the arrow buttons until Never appears, and then press . 5 Press until you...-click the Install icon. 5 Follow the instructions on the screens. The Power Saver timeout is the time it takes for the printer to switch to the Lexmark Web site at www.lexmark.com. 2 From the home page, navigate through the menu selection, and then click Drivers & Downloads. 30 Note: If you...
...until you exit Setup, or press another mode button. Using the World Wide Web 1 Go to Power Saver mode when the printer is left idle. 3 Press the arrow buttons until Clear Settings Timeout appears, and then press . 4 Press the arrow buttons until Never appears, and then press . 5 Press until you...-click the Install icon. 5 Follow the instructions on the screens. The Power Saver timeout is the time it takes for the printer to switch to the Lexmark Web site at www.lexmark.com. 2 From the home page, navigate through the menu selection, and then click Drivers & Downloads. 30 Note: If you...
User's Guide
Page 32
... installed automatically with a word-processing program. • Set up the printer using the printer software CD, all the necessary software was installed. Access your own photos. • Adjust settings for Office Lexmark Fax Solutions Abbyy Sprint OCR Lexmark Wireless Setup Utility To • Scan, copy, fax, ...in-one printers. • Add, edit, or delete contacts in the built-in phone book. • Access the Lexmark Fax Setup Utility in four-in-one printers. Note: Your printer may have chosen to set the Speed Dial and Group Dial numbers, set up the wireless printer on the...
... installed automatically with a word-processing program. • Set up the printer using the printer software CD, all the necessary software was installed. Access your own photos. • Adjust settings for Office Lexmark Fax Solutions Abbyy Sprint OCR Lexmark Wireless Setup Utility To • Scan, copy, fax, ...in-one printers. • Add, edit, or delete contacts in the built-in phone book. • Access the Lexmark Fax Setup Utility in four-in-one printers. Note: Your printer may have chosen to set the Speed Dial and Group Dial numbers, set up the wireless printer on the...
User's Guide
Page 33
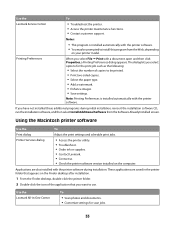
... and then click Properties, a Printing Preferences dialog appears. Using the Macintosh printer software Use the Print dialog Printer Services dialog To Adjust the print settings and schedule print jobs. • Access the printer utility. • Troubleshoot. • Order ink or supplies. • Contact Lexmark. • Contact us. • Check the printer software version installed on your...
... and then click Properties, a Printing Preferences dialog appears. Using the Macintosh printer software Use the Print dialog Printer Services dialog To Adjust the print settings and schedule print jobs. • Access the printer utility. • Troubleshoot. • Order ink or supplies. • Contact Lexmark. • Contact us. • Check the printer software version installed on your...
User's Guide
Page 34
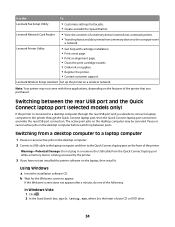
Lexmark Wireless Setup Assistant Set up the printer on the laptop, then install it. Switching between ports. Warning-Potential Damage: Do not plug in or remove the USB cable from the Quick Connect laptop port while a memory device is being accessed by the printer. 3 If you have not yet installed the printer software on a wireless network. If the...
Lexmark Wireless Setup Assistant Set up the printer on the laptop, then install it. Switching between ports. Warning-Potential Damage: Do not plug in or remove the USB cable from the Quick Connect laptop port while a memory device is being accessed by the printer. 3 If you have not yet installed the printer software on a wireless network. If the...


