User's Guide
Page 4
... What is an SSID? ...51 How do I find out what type of security my network is using 51 Can I use my printer on a USB and a wireless connection at the same time 51 What is a MAC address?...52 How do I find the MAC address? ...52 What is an ...Using the automatic paper type sensor...60 Printing 61 Printing basic documents...61 Printing a document...61 Printing Web pages...61 Printing multiple copies of a document...62 Collating printed copies...62 Printing the last page first (reverse page order)...63 Printing multiple pages on one sheet (N-Up)...63 Printing documents from a memory card or flash...
... What is an SSID? ...51 How do I find out what type of security my network is using 51 Can I use my printer on a USB and a wireless connection at the same time 51 What is a MAC address?...52 How do I find the MAC address? ...52 What is an ...Using the automatic paper type sensor...60 Printing 61 Printing basic documents...61 Printing a document...61 Printing Web pages...61 Printing multiple copies of a document...62 Collating printed copies...62 Printing the last page first (reverse page order)...63 Printing multiple pages on one sheet (N-Up)...63 Printing documents from a memory card or flash...
User's Guide
Page 5
... Transferring photos from a memory card to a flash drive 77 Printing photos...77 Printing photos using the printer control panel ...77 Printing photos from the computer using the printer software 78 Printing photos from a memory device using the printer software 79 Applying color effects to photos using the printer control panel 80 Printing photos from a PictBridge-enabled digital camera 81...
... Transferring photos from a memory card to a flash drive 77 Printing photos...77 Printing photos using the printer control panel ...77 Printing photos from the computer using the printer software 78 Printing photos from a memory device using the printer software 79 Applying color effects to photos using the printer control panel 80 Printing photos from a PictBridge-enabled digital camera 81...

User's Guide
Page 6
... Receiving a fax...93 Maintaining the printer 95 Maintaining print cartridges...95 Installing print cartridges...95 Removing a used print cartridge ...96 Refilling print cartridges...97 Using genuine Lexmark print cartridges...97 Aligning print cartridges ...98 Cleaning the print cartridge nozzles...98 Checking ink levels...99 Wiping the print cartridge nozzles and contacts ...100 Preserving the print cartridges ...101 Cleaning the scanner glass...
... Receiving a fax...93 Maintaining the printer 95 Maintaining print cartridges...95 Installing print cartridges...95 Removing a used print cartridge ...96 Refilling print cartridges...97 Using genuine Lexmark print cartridges...97 Aligning print cartridges ...98 Cleaning the print cartridge nozzles...98 Checking ink levels...99 Wiping the print cartridge nozzles and contacts ...100 Preserving the print cartridges ...101 Cleaning the scanner glass...
User's Guide
Page 7
Wi-Fi indicator light is blinking orange during installation (Macintosh only 121 Wi-Fi indicator light is still orange ...123 Wireless print server not installed ...125 "Communication not available" message displays when printing wirelessly 125 Communication with printer lost when connected to Virtual Private Network (VPN 125 Resetting the internal wireless print server to factory default settings 125 Notices 127 Product information...127 Edition notice...127 European EC directives conformity statement for radio products 130 Power consumption...133 Networking glossary 138 Index 140 7
Wi-Fi indicator light is blinking orange during installation (Macintosh only 121 Wi-Fi indicator light is still orange ...123 Wireless print server not installed ...125 "Communication not available" message displays when printing wirelessly 125 Communication with printer lost when connected to Virtual Private Network (VPN 125 Resetting the internal wireless print server to factory default settings 125 Notices 127 Product information...127 Edition notice...127 European EC directives conformity statement for radio products 130 Power consumption...133 Networking glossary 138 Index 140 7
User's Guide
Page 10
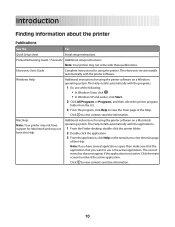
... make it the active application. Windows Help Additional instructions for using the printer. Note: If you want to view the main page of the Help. Printed Networking Guide / Fax Guide Additional setup instructions. Electronic User's Guide Complete instructions for using the printer software on a Macintosh operating system. Click the main screen to make...
... make it the active application. Windows Help Additional instructions for using the printer. Note: If you want to view the main page of the Help. Printed Networking Guide / Fax Guide Additional setup instructions. Electronic User's Guide Complete instructions for using the printer software on a Macintosh operating system. Click the main screen to make...
User's Guide
Page 11
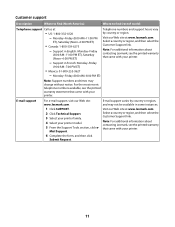
Mail Support. 6 Complete the form, and then click Submit Request. Note: For additional information about contacting Lexmark, see the printed warranty that came with your printer model. 5 From the Support Tools section, click e- Select a country or region, and then select the Customer Support link.... select the Customer Support link. For the most recent telephone numbers available, see the printed warranty that came with your printer. Support in some instances. Visit our Web site at www.lexmark.com. Monday-Friday (8:00 AM-8:00 PM ET) Note: Support numbers and times ...
Mail Support. 6 Complete the form, and then click Submit Request. Note: For additional information about contacting Lexmark, see the printed warranty that came with your printer model. 5 From the Support Tools section, click e- Select a country or region, and then select the Customer Support link.... select the Customer Support link. For the most recent telephone numbers available, see the printed warranty that came with your printer. Support in some instances. Visit our Web site at www.lexmark.com. Monday-Friday (8:00 AM-8:00 PM ET) Note: Support numbers and times ...
User's Guide
Page 12
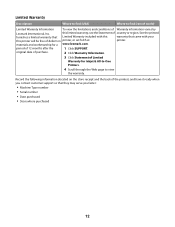
... to view the warranty. See the printed furnishes a limited warranty that Limited Warranty included with your this printer will be free of the printer), and have it ready when you contact customer support so that came with this limited warranty, see the Statement of Limited Warranty for a www.lexmark.com. Record the following information...
... to view the warranty. See the printed furnishes a limited warranty that Limited Warranty included with your this printer will be free of the printer), and have it ready when you contact customer support so that came with this limited warranty, see the Statement of Limited Warranty for a www.lexmark.com. Record the following information...
User's Guide
Page 13
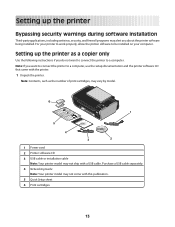
Note: Contents, such as a copier only Use the following instructions if you about the printer software being installed. Setting up the printer as the number of print cartridges, may vary by model. 6 1 2 3 WI F I PRINTING 1 5 4 3 2 1 Power cord 2 Printer software CD 3 USB cable or installation cable Note: Your printer model may not come with this publication. 5 Quick Setup sheet...
Note: Contents, such as a copier only Use the following instructions if you about the printer software being installed. Setting up the printer as the number of print cartridges, may vary by model. 6 1 2 3 WI F I PRINTING 1 5 4 3 2 1 Power cord 2 Printer software CD 3 USB cable or installation cable Note: Your printer model may not come with this publication. 5 Quick Setup sheet...

User's Guide
Page 14
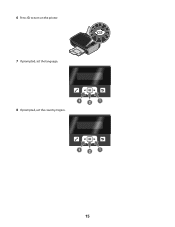
W I F I PRINTING 4 Extend the paper guides. 2 1 W I F I PRINTING 3 Raise the paper support, and then extend the paper exit tray. 2 Remove all tape and packing material from all areas of the printer. WI F I PRINTING 5 Connect the power cord to the printer, and then to an electrical outlet that is easily accessible and near the printer. 2 1 14
W I F I PRINTING 4 Extend the paper guides. 2 1 W I F I PRINTING 3 Raise the paper support, and then extend the paper exit tray. 2 Remove all tape and packing material from all areas of the printer. WI F I PRINTING 5 Connect the power cord to the printer, and then to an electrical outlet that is easily accessible and near the printer. 2 1 14
User's Guide
Page 15
WI F I PRINTING 7 If prompted, set the language. 8 If prompted, set the country/region. 1 2 1 1 2 1 15 6 Press to turn on the printer.
WI F I PRINTING 7 If prompted, set the language. 8 If prompted, set the country/region. 1 2 1 1 2 1 15 6 Press to turn on the printer.

User's Guide
Page 16
9 Open the printer, and then press down on the print cartridge carrier levers. 10 Open the color cartridge foil, and then remove the cartridge from the pack. 11 If a storage unit is included, remove the color cartridge from the storage unit. 2 1 16
9 Open the printer, and then press down on the print cartridge carrier levers. 10 Open the color cartridge foil, and then remove the cartridge from the pack. 11 If a storage unit is included, remove the color cartridge from the storage unit. 2 1 16

User's Guide
Page 17
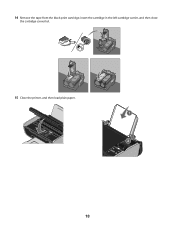
12 Remove the tape from the color print cartridge, insert the cartridge in the right carrier, and then close the color cartridge lid. 13 If a black print cartridge is included in the box contents, open the black cartridge foil, and then remove the cartridge from the pack. Note: You may need to purchase a black print cartridge separately. 17
12 Remove the tape from the color print cartridge, insert the cartridge in the right carrier, and then close the color cartridge lid. 13 If a black print cartridge is included in the box contents, open the black cartridge foil, and then remove the cartridge from the pack. Note: You may need to purchase a black print cartridge separately. 17
User's Guide
Page 18
14 Remove the tape from the black print cartridge, insert the cartridge in the left cartridge carrier, and then close the cartridge carrier lid. 15 Close the printer, and then load plain paper. 1 2 18
14 Remove the tape from the black print cartridge, insert the cartridge in the left cartridge carrier, and then close the cartridge carrier lid. 15 Close the printer, and then load plain paper. 1 2 18
User's Guide
Page 19
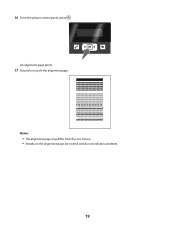
Notes: • The alignment page may differ from the one shown. • Streaks on the alignment page are normal and do not indicate a problem. 19 16 From the printer control panel, press . An alignment page prints. 17 Discard or recycle the alignment page.
Notes: • The alignment page may differ from the one shown. • Streaks on the alignment page are normal and do not indicate a problem. 19 16 From the printer control panel, press . An alignment page prints. 17 Discard or recycle the alignment page.
User's Guide
Page 20
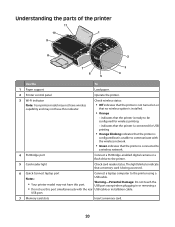
... reader light Check card reader status. Understanding the parts of the printer 11 10 1 9 8 WI F I PRINTING 2 7 6 5 3 4 Use the To 1 Paper support Load paper. 2 Printer control panel Operate the printer. 3 Wi-Fi indicator Note: Your printer model may not have wireless capability and may not have this port. USB port. 7 Memory card slots Insert a memory card. 20...
... reader light Check card reader status. Understanding the parts of the printer 11 10 1 9 8 WI F I PRINTING 2 7 6 5 3 4 Use the To 1 Paper support Load paper. 2 Printer control panel Operate the printer. 3 Wi-Fi indicator Note: Your printer model may not have wireless capability and may not have this port. USB port. 7 Memory card slots Insert a memory card. 20...

User's Guide
Page 21
... may not have this port simultaneously with port Connect the printer to a power source. 6 Internal wireless print server Connect the printer to a desktop computer using a Note: Do not use this print server. 21 Warning-Potential Damage: Do not touch the ...WI F I PRINTING 4 WI F I PRINTING 6 5 Use the To 1 Scanner glass Scan and copy photos and documents. 2 Scanner unit • Access the print cartridges. • Remove paper jams. 3 Print cartridge carrier Install, replace, or remove a print cartridge. 4 Rear USB port Connect the printer to a wireless network. Quick ...
... may not have this port simultaneously with port Connect the printer to a power source. 6 Internal wireless print server Connect the printer to a desktop computer using a Note: Do not use this print server. 21 Warning-Potential Damage: Do not touch the ...WI F I PRINTING 4 WI F I PRINTING 6 5 Use the To 1 Scanner glass Scan and copy photos and documents. 2 Scanner unit • Access the print cartridges. • Remove paper jams. 3 Print cartridge carrier Install, replace, or remove a print cartridge. 4 Rear USB port Connect the printer to a wireless network. Quick ...

User's Guide
Page 22
..., or copy job, depending on the display. Press and hold off . • Switch to Power Saver mode. Access the photo menu and print photos. for two seconds to Power Saver mode. Note: Press to switch to turn Access the copy menu and make copies. 22 Switch to color... mode or black-and-white mode. Using the printer control panel buttons and menus Using the printer control panel The printer control panel contains: • Power on/off button • Two-line display that shows the...
..., or copy job, depending on the display. Press and hold off . • Switch to Power Saver mode. Access the photo menu and print photos. for two seconds to Power Saver mode. Note: Press to switch to turn Access the copy menu and make copies. 22 Switch to color... mode or black-and-white mode. Using the printer control panel buttons and menus Using the printer control panel The printer control panel contains: • Power on/off button • Two-line display that shows the...
User's Guide
Page 23
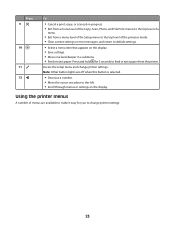
...for 3 seconds to feed or eject paper from a menu level of the Setup menu to the top level of a menu. • Exit from the printer. Using the printer menus A number of menus are off when this button is selected. • Decrease a number. • Move the cursor one place to the left.... top level of the previous mode. • Clear current settings or error messages, and return to change printer settings. Access the setup menu and change printer settings: 23 Press 9 10 11 12 To • Cancel a print, copy, or scan job in a submenu. • Feed or eject paper. Press and hold for...
...for 3 seconds to feed or eject paper from a menu level of the Setup menu to the top level of a menu. • Exit from the printer. Using the printer menus A number of menus are off when this button is selected. • Decrease a number. • Move the cursor one place to the left.... top level of the previous mode. • Clear current settings or error messages, and return to change printer settings. Access the setup menu and change printer settings: 23 Press 9 10 11 12 To • Cancel a print, copy, or scan job in a submenu. • Feed or eject paper. Press and hold for...
User's Guide
Page 24
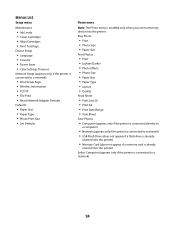
... if a flash drive is already inserted into the printer) • Memory Card (does not appear if a memory card is already inserted into the printer) Select Computer (appears only if the printer is connected to a network) • Print Setup Page • Wireless Information • TCP/IP • File Print • Reset Network Adapter Defaults Defaults • Paper...
... if a flash drive is already inserted into the printer) • Memory Card (does not appear if a memory card is already inserted into the printer) Select Computer (appears only if the printer is connected to a network) • Print Setup Page • Wireless Information • TCP/IP • File Print • Reset Network Adapter Defaults Defaults • Paper...
User's Guide
Page 25
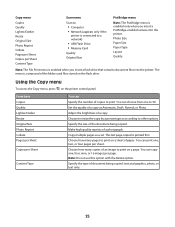
...Using the Copy menu To access the Copy menu, press on a sheet of an image to print on the flash drive. Make high-quality reprints of a copy. Choose how many pages to print on the printer control panel. You can choose from one , four, nine, or 16 images per page.... only when you insert a flash drive that contains document files into the printer. Photo Size Paper Size Paper Type Layout Quality Note: The File Print menu is enabled when you insert a PictBridge-enabled camera into the printer. Adjust the brightness of a photograph. Specify the size of document being copied...
...Using the Copy menu To access the Copy menu, press on a sheet of an image to print on the flash drive. Make high-quality reprints of a copy. Choose how many pages to print on the printer control panel. You can choose from one , four, nine, or 16 images per page.... only when you insert a flash drive that contains document files into the printer. Photo Size Paper Size Paper Type Layout Quality Note: The File Print menu is enabled when you insert a PictBridge-enabled camera into the printer. Adjust the brightness of a photograph. Specify the size of document being copied...


