User's Guide
Page 3
... need to set up the printer on a wireless network 36 Installing the printer on a wireless network...37 Wireless installation instructions (France only)...37 Configuring an IP address manually...38 Interpreting the colors of the Wi-Fi indicator light 38 Changing wireless settings after installation...39 Using the Network Setup menu...39 Installing the printer on other computers...40 3
... need to set up the printer on a wireless network 36 Installing the printer on a wireless network...37 Wireless installation instructions (France only)...37 Configuring an IP address manually...38 Interpreting the colors of the Wi-Fi indicator light 38 Changing wireless settings after installation...39 Using the Network Setup menu...39 Installing the printer on other computers...40 3
User's Guide
Page 4
Advanced wireless setup...41 Creating an ad hoc wireless network ...41 Adding a printer to an existing ad hoc wireless network 44 Frequently asked questions...45 What is a network? ...45 How are...is the difference between infrastructure and ad hoc networks 48 Finding the signal strength...49 How can I improve wireless signal strength? ...50 What is an SSID? ...51 How do I find out what type of security ...my network is using 51 Can I use my printer on a USB and a wireless connection at the same time 51 What is a MAC address?...52 How do I find the MAC ...
Advanced wireless setup...41 Creating an ad hoc wireless network ...41 Adding a printer to an existing ad hoc wireless network 44 Frequently asked questions...45 What is a network? ...45 How are...is the difference between infrastructure and ad hoc networks 48 Finding the signal strength...49 How can I improve wireless signal strength? ...50 What is an SSID? ...51 How do I find out what type of security ...my network is using 51 Can I use my printer on a USB and a wireless connection at the same time 51 What is a MAC address?...52 How do I find the MAC ...

User's Guide
Page 6
... the computer...92 Receiving a fax...93 Maintaining the printer 95 Maintaining print cartridges...95 Installing print cartridges...95 Removing a used print cartridge ...96 Refilling print cartridges...97 Using genuine Lexmark print cartridges...97 Aligning print cartridges ...98 Cleaning the... does not print...106 Solving printer power problems ...109 Removing and reinstalling the software ...109 Enabling the USB port in Windows ...110 Wireless troubleshooting...111 Wireless troubleshooting checklist ...111 Printing a network setup page ...112 Wireless configuration does not continue after the...
... the computer...92 Receiving a fax...93 Maintaining the printer 95 Maintaining print cartridges...95 Installing print cartridges...95 Removing a used print cartridge ...96 Refilling print cartridges...97 Using genuine Lexmark print cartridges...97 Aligning print cartridges ...98 Cleaning the... does not print...106 Solving printer power problems ...109 Removing and reinstalling the software ...109 Enabling the USB port in Windows ...110 Wireless troubleshooting...111 Wireless troubleshooting checklist ...111 Printing a network setup page ...112 Wireless configuration does not continue after the...
User's Guide
Page 10
... active application. Mac Help Note: Your printer may not come with the printer software. Note: If you want to view...with the applications. 1 From the Finder desktop, double-click the printer folder. 2 Double-click the application. 3 From the application, ... instructions for using the printer software on the menu bar to make sure that... of the Help. Note: Your printer may not have support for using the printer. The correct menu bar does not... or Programs, and then select the printer program folder from the list. 3 From the program, click Help...
... active application. Mac Help Note: Your printer may not come with the printer software. Note: If you want to view...with the applications. 1 From the Finder desktop, double-click the printer folder. 2 Double-click the application. 3 From the application, ... instructions for using the printer software on the menu bar to make sure that... of the Help. Note: Your printer may not have support for using the printer. The correct menu bar does not... or Programs, and then select the printer program folder from the list. 3 From the program, click Help...
User's Guide
Page 13
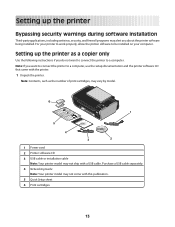
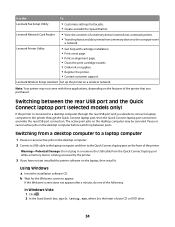
..., including antivirus, security, and firewall programs may alert you want to connect the printer to a computer. Purchase a USB cable separately. 4 Networking Guide Note: Your printer model may not ship with this publication. 5 Quick Setup sheet 6 Print cartridges 13 Setting up the printer as the number of print cartridges, may vary by model. 6 1 2 3 WI F I PRINTING...
..., including antivirus, security, and firewall programs may alert you want to connect the printer to a computer. Purchase a USB cable separately. 4 Networking Guide Note: Your printer model may not ship with this publication. 5 Quick Setup sheet 6 Print cartridges 13 Setting up the printer as the number of print cartridges, may vary by model. 6 1 2 3 WI F I PRINTING...
User's Guide
Page 23
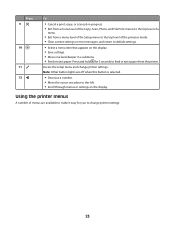
... progress. • Exit from a menu level of the Copy, Scan, Photo, and File Print menus to the top level of a menu. • Exit from the printer. Note: Other button lights are available to make it easy for 3 seconds to feed or eject paper from a menu level of the... or error messages, and return to default settings. • Select a menu item that appears on the display. Access the setup menu and change printer settings: 23 Press and hold for you to change printer settings. Press 9 10 11 12 To • Cancel a print, copy, or scan job in a submenu. • Feed or eject...
... progress. • Exit from a menu level of the Copy, Scan, Photo, and File Print menus to the top level of a menu. • Exit from the printer. Note: Other button lights are available to make it easy for 3 seconds to feed or eject paper from a menu level of the... or error messages, and return to default settings. • Select a menu item that appears on the display. Access the setup menu and change printer settings: 23 Press and hold for you to change printer settings. Press 9 10 11 12 To • Cancel a print, copy, or scan job in a submenu. • Feed or eject...
User's Guide
Page 24
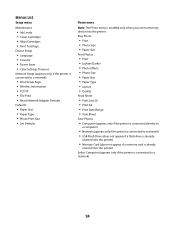
...• Power Saver • Clear Settings Timeout Network Setup (appears only if the printer is enabled only when you insert a memory device into the printer) Select Computer (appears only if the printer is connected to a network) • Print Setup Page • Wireless Information • TCP/IP • File Print &#...All • Print Date Range • Scan Sheet Save Photos • Computer (appears only if the printer is connected directly to a computer) • Network (appears only if the printer is connected to a network) • USB Flash Drive (does not appear if a flash drive is...
...• Power Saver • Clear Settings Timeout Network Setup (appears only if the printer is enabled only when you insert a memory device into the printer) Select Computer (appears only if the printer is connected to a network) • Print Setup Page • Wireless Information • TCP/IP • File Print &#...All • Print Date Range • Scan Sheet Save Photos • Computer (appears only if the printer is connected directly to a computer) • Network (appears only if the printer is connected to a network) • USB Flash Drive (does not appear if a flash drive is...
User's Guide
Page 27
... Size Paper Size Paper Type Layout Quality You can Select: • Ink Level to view the ink level of the photo or photos to the printer. Choose the quality of the black cartridge, color cartridge, or photo cartridge. • Clean Cartridges to clean the print cartridge nozzles. • Align ...the size of the photo or photos to enter a PIN if the computer requires it. The menu lets you select a digit. Using the Setup menu To access the Setup menu, press on the memory device • By date Save photos to a computer or memory device. Notes: • You may be prompted...
... Size Paper Size Paper Type Layout Quality You can Select: • Ink Level to view the ink level of the photo or photos to the printer. Choose the quality of the black cartridge, color cartridge, or photo cartridge. • Clean Cartridges to clean the print cartridge nozzles. • Align ...the size of the photo or photos to enter a PIN if the computer requires it. The menu lets you select a digit. Using the Setup menu To access the Setup menu, press on the memory device • By date Save photos to a computer or memory device. Notes: • You may be prompted...
User's Guide
Page 28
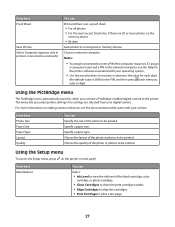
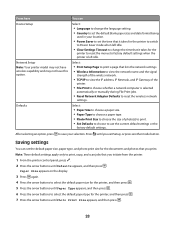
From here Device Setup Network Setup Note: Your printer model may not have wireless capability and may not have this option. Press until you initiate from the printer. 1 From the printer control panel, press . 2 Press the arrow buttons until Defaults appears, and then press . Note: These default settings apply ...to set the time that you exit Setup, or press another mode button. Paper Size appears on the display. 3 Press again. 4 Press the arrow buttons to select the default paper size for the printer to reset the menus to reset the wireless network settings. Saving settings You can ...
From here Device Setup Network Setup Note: Your printer model may not have wireless capability and may not have this option. Press until you initiate from the printer. 1 From the printer control panel, press . 2 Press the arrow buttons until Defaults appears, and then press . Note: These default settings apply ...to set the time that you exit Setup, or press another mode button. Paper Size appears on the display. 3 Press again. 4 Press the arrow buttons to select the default paper size for the printer to reset the menus to reset the wireless network settings. Saving settings You can ...
User's Guide
Page 29
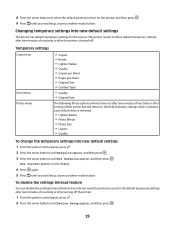
...Photo Size • Layout • Quality To change the temporary settings into new default settings The printer has default temporary settings for the printer, and then press . 9 Press until you exit Setup, or press another mode button. 8 Press the arrow buttons to the default factory settings when a...following Photo options will not time out after two minutes of inactivity or after turning off the printer. 1 From the printer control panel, press . 2 Press the arrow buttons until Device Setup appears, and then press . 29 To disable the settings timeout feature You can disable the ...
...Photo Size • Layout • Quality To change the temporary settings into new default settings The printer has default temporary settings for the printer, and then press . 9 Press until you exit Setup, or press another mode button. 8 Press the arrow buttons to the default factory settings when a...following Photo options will not time out after two minutes of inactivity or after turning off the printer. 1 From the printer control panel, press . 2 Press the arrow buttons until Device Setup appears, and then press . 29 To disable the settings timeout feature You can disable the ...

User's Guide
Page 30
...the instructions on the screens. Change the Power Saver timeout to avoid interruptions when doing multiple jobs on your printer. 1 From the printer control panel, press . 2 Press the arrow buttons until Device Setup appears, and then press . 3 Press the arrow buttons until you do not want to be efficient on ... the Install icon. 5 Follow the instructions on the screens. The Power Saver timeout is the time it takes for the printer to switch to the Lexmark Web site at www.lexmark.com. 2 From the home page, navigate through the menu selection, and then click Drivers & Downloads. 30 3 Press ...
...the instructions on the screens. Change the Power Saver timeout to avoid interruptions when doing multiple jobs on your printer. 1 From the printer control panel, press . 2 Press the arrow buttons until Device Setup appears, and then press . 3 Press the arrow buttons until you do not want to be efficient on ... the Install icon. 5 Follow the instructions on the screens. The Power Saver timeout is the time it takes for the printer to switch to the Lexmark Web site at www.lexmark.com. 2 From the home page, navigate through the menu selection, and then click Drivers & Downloads. 30 3 Press ...
User's Guide
Page 31
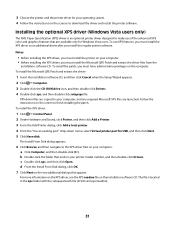
... then double-click Drivers. To install the Microsoft QFE Patch and extract the driver: 1 Insert the installation software CD, and then click Cancel when the Setup Wizard appears. 2 Click Œ Computer. 3 Double-click the CD-ROM drive icon, and then double-click Drivers. 4 Double-click xps, and ... setupxps file. Notes: • Before installing the XPS driver, you must install the XPS driver as an additional driver after you must install the printer on the installation software CD. d From the Install From Disk dialog, click OK. 7 Click Next on the two additional dialogs that ends in...
... then double-click Drivers. To install the Microsoft QFE Patch and extract the driver: 1 Insert the installation software CD, and then click Cancel when the Setup Wizard appears. 2 Click Œ Computer. 3 Double-click the CD-ROM drive icon, and then double-click Drivers. 4 Double-click xps, and ... setupxps file. Notes: • Before installing the XPS driver, you must install the XPS driver as an additional driver after you must install the printer on the installation software CD. d From the Install From Disk dialog, click OK. 7 Click Next on the two additional dialogs that ends in...
User's Guide
Page 32
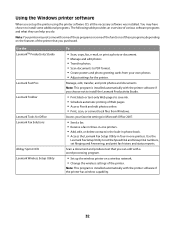
...built-in phone book. • Access the Lexmark Fax Setup Utility in four-in-one printers. Using the Windows printer software When you purchased. Access your own photos. • Adjust settings for Office Lexmark Fax Solutions Abbyy Sprint OCR Lexmark Wireless Setup Utility To • Scan, copy, fax..., e-mail, or print a photo or document. • Manage and edit photos. • Transfer photos. • Scan documents to set the Speed Dial and Group Dial numbers, set up the wireless printer...
...built-in phone book. • Access the Lexmark Fax Setup Utility in four-in-one printers. Using the Windows printer software When you purchased. Access your own photos. • Adjust settings for Office Lexmark Fax Solutions Abbyy Sprint OCR Lexmark Wireless Setup Utility To • Scan, copy, fax..., e-mail, or print a photo or document. • Manage and edit photos. • Transfer photos. • Scan documents to set the Speed Dial and Group Dial numbers, set up the wireless printer...
User's Guide
Page 34
... of the following: In Windows Vista 1 Click . 2 In the Start Search box, type D:\setup.exe, where D is being accessed by the printer. 3 If you have not yet installed the printer software on the features of the printer. Lexmark Wireless Setup Assistant Set up the printer on the desktop computer before switching between the rear USB port and the...
... of the following: In Windows Vista 1 Click . 2 In the Start Search box, type D:\setup.exe, where D is being accessed by the printer. 3 If you have not yet installed the printer software on the features of the printer. Lexmark Wireless Setup Assistant Set up the printer on the desktop computer before switching between the rear USB port and the...

User's Guide
Page 35
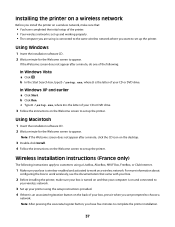
In Windows XP and earlier 1 Click Start. 2 Click Run. 3 Type D:\setup.exe, where D is the letter of your CD or DVD drive. Note: If the Welcome screen does not appear after a minute, then click the CD icon on the computer screen. Using Macintosh a Insert the installation software CD. b Wait for the Welcome screen to appear. c Double-click Install. c Follow the instructions on the desktop. d Follow the instructions on the computer screen. 35
In Windows XP and earlier 1 Click Start. 2 Click Run. 3 Type D:\setup.exe, where D is the letter of your CD or DVD drive. Note: If the Welcome screen does not appear after a minute, then click the CD icon on the computer screen. Using Macintosh a Insert the installation software CD. b Wait for the Welcome screen to appear. c Double-click Install. c Follow the instructions on the desktop. d Follow the instructions on the computer screen. 35
User's Guide
Page 37
...FreeBox, or Club Internet. 1 Make sure your box is wireless-enabled and activated to work on a wireless network. Note: After pressing the associate/register button, you have completed the initial setup of the printer. • Your wireless network is set up and working properly. • The computer... you are prompted to choose a network. Installing the printer on a wireless network Before you install the printer on a wireless network, make sure your box is...
...FreeBox, or Club Internet. 1 Make sure your box is wireless-enabled and activated to work on a wireless network. Note: After pressing the associate/register button, you have completed the initial setup of the printer. • Your wireless network is set up and working properly. • The computer... you are prompted to choose a network. Installing the printer on a wireless network Before you install the printer on a wireless network, make sure your box is...
User's Guide
Page 38
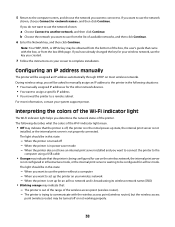
Configuring an IP address manually The printer will be assigned an IP address automatically through DHCP on most wireless networks. During wireless setup, you determine the network status of the printer. The following situations: • You manually assigned IP addresses for the ...other network devices. • You want to assign a specific IP address. • You moved the printer to a remote subnet. When the printer...
Configuring an IP address manually The printer will be assigned an IP address automatically through DHCP on most wireless networks. During wireless setup, you determine the network status of the printer. The following situations: • You manually assigned IP addresses for the ...other network devices. • You want to assign a specific IP address. • You moved the printer to a remote subnet. When the printer...

User's Guide
Page 39
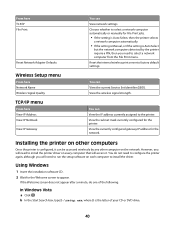
... XP and earlier, click Start. 2 Click All Programs or Programs, and then select the printer program folder from the list. 3 Click Tools ΠLexmark Wireless Setup Utility. Using Macintosh 1 From the Finder desktop, double-click the printer folder. 2 Double-click Lexmark Wireless Setup Assistant. 3 Follow the instructions on the computer screen to reinstall the software, and then make...
... XP and earlier, click Start. 2 Click All Programs or Programs, and then select the printer program folder from the list. 3 Click Tools ΠLexmark Wireless Setup Utility. Using Macintosh 1 From the Finder desktop, double-click the printer folder. 2 Double-click Lexmark Wireless Setup Assistant. 3 Follow the instructions on the computer screen to reinstall the software, and then make...
User's Guide
Page 40
...software CD. 2 Wait for the printer. View the wireless signal strength. If the Welcome screen does not appear after a minute, do not need to configure the printer again, although you need to run the setup software on the network. b In the Start Search box, type D:\setup.exe, where D is Auto ...or manually for the network. Reset the internal wireless print server to the printer. You do one of your CD or DVD drive. 40 From here TCP/IP File Print Reset Network Adapter Defaults Wireless Setup menu From here Network Name Wireless Signal Quality TCP/IP menu From here View ...
...software CD. 2 Wait for the printer. View the wireless signal strength. If the Welcome screen does not appear after a minute, do not need to configure the printer again, although you need to run the setup software on the network. b In the Start Search box, type D:\setup.exe, where D is Auto ...or manually for the network. Reset the internal wireless print server to the printer. You do one of your CD or DVD drive. 40 From here TCP/IP File Print Reset Network Adapter Defaults Wireless Setup menu From here Network Name Wireless Signal Quality TCP/IP menu From here View ...
User's Guide
Page 41
.... 5 In the Connect to a Network dialog, click Set up a wireless ad hoc network" wizard. c Type D:\setup.exe, where D is the letter of the setup: a Create a network name or SSID for installing a configured printer on -screen instructions for the network between your printer and a computer with a wireless network adapter, then you can refer to set up an...
.... 5 In the Connect to a Network dialog, click Set up a wireless ad hoc network" wizard. c Type D:\setup.exe, where D is the letter of the setup: a Create a network name or SSID for installing a configured printer on -screen instructions for the network between your printer and a computer with a wireless network adapter, then you can refer to set up an...


