
User's Guide
Page 6
...Maintaining the printer 95 Maintaining print cartridges...95 Installing print cartridges...95 Removing a used print cartridge ...96 Refilling print cartridges...97 Using genuine Lexmark print cartridges...97 Aligning print cartridges ...98 Cleaning the print cartridge nozzles...98 Checking ink levels......Enabling the USB port in Windows ...110 Wireless troubleshooting...111 Wireless troubleshooting checklist ...111 Printing a network setup page ...112 Wireless configuration does not continue after the USB cable is attached 112 Cannot print over wireless network...113 Cannot print and there is ...
...Maintaining the printer 95 Maintaining print cartridges...95 Installing print cartridges...95 Removing a used print cartridge ...96 Refilling print cartridges...97 Using genuine Lexmark print cartridges...97 Aligning print cartridges ...98 Cleaning the print cartridge nozzles...98 Checking ink levels......Enabling the USB port in Windows ...110 Wireless troubleshooting...111 Wireless troubleshooting checklist ...111 Printing a network setup page ...112 Wireless configuration does not continue after the USB cable is attached 112 Cannot print over wireless network...113 Cannot print and there is ...
User's Guide
Page 24
...USB Flash Drive (does not appear if a flash drive is already inserted into the printer) • Memory Card (does not appear if a memory card is connected to a network) • Print Setup Page • Wireless Information • TCP/IP • File Print • Reset Network Adapter Defaults ...: The Photo menu is enabled only when you insert a memory device into the printer) Select Computer (appears only if the printer is already inserted into the printer. Menus List Setup menu Maintenance • Ink Levels • Clean Cartridges • Align Cartridges • Print Test Page Device...
...USB Flash Drive (does not appear if a flash drive is already inserted into the printer) • Memory Card (does not appear if a memory card is connected to a network) • Print Setup Page • Wireless Information • TCP/IP • File Print • Reset Network Adapter Defaults ...: The Photo menu is enabled only when you insert a memory device into the printer) Select Computer (appears only if the printer is already inserted into the printer. Menus List Setup menu Maintenance • Ink Levels • Clean Cartridges • Align Cartridges • Print Test Page Device...
User's Guide
Page 27
...from your camera. From here Photo Size Paper Size Paper Type Layout Quality You can Select: • Ink Level to view the ink level of the photo or photos to be prompted to the printer. Choose the quality of the photo to a computer or memory device. Using the PictBridge menu The ...PictBridge menu automatically launches when you select printer settings if no settings are 20 or more information on making...
...from your camera. From here Photo Size Paper Size Paper Type Layout Quality You can Select: • Ink Level to view the ink level of the photo or photos to be prompted to the printer. Choose the quality of the photo to a computer or memory device. Using the PictBridge menu The ...PictBridge menu automatically launches when you select printer settings if no settings are 20 or more information on making...
User's Guide
Page 32
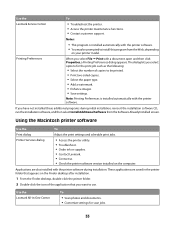
... have chosen to save ink. • Schedule automatic printing of the printer that you can help you do. Note: This program is installed automatically with the printer software if the printer has wireless capability. 32 Using the Windows printer software When you set Ringing and Answering, and ...can edit with some of these programs or some of the functions of these programs, depending on a wireless network. • Change the wireless settings of the printer. Use the Lexmark Fax Setup Utility to PDF format. • Create posters and photo greeting cards from Windows. Access ...
... have chosen to save ink. • Schedule automatic printing of the printer that you can help you do. Note: This program is installed automatically with the printer software if the printer has wireless capability. 32 Using the Windows printer software When you set Ringing and Answering, and ...can edit with some of these programs or some of the functions of these programs, depending on a wireless network. • Change the wireless settings of the printer. Use the Lexmark Fax Setup Utility to PDF format. • Create posters and photo greeting cards from Windows. Access ...
User's Guide
Page 33
... the print settings and schedule print jobs. • Access the printer utility. • Troubleshoot. • Order ink or supplies. • Contact Lexmark. • Contact us. • Check the printer software version installed on your printer model. Use the Lexmark Service Center To • Troubleshoot the printer. • Access the printer maintenance functions. • Contact customer support. Use the...
... the print settings and schedule print jobs. • Access the printer utility. • Troubleshoot. • Order ink or supplies. • Contact Lexmark. • Contact us. • Check the printer software version installed on your printer model. Use the Lexmark Service Center To • Troubleshoot the printer. • Access the printer maintenance functions. • Contact customer support. Use the...
User's Guide
Page 34
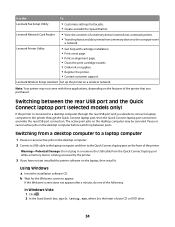
...Lexmark Wireless Setup Assistant Set up the printer on the desktop computer may not come with cartridge installation. • Print a test page. • Print an alignment page. • Clean the print cartridge nozzles. • Order ink or supplies. • Register the printer. • Contact customer support. Switching between ports. The active print jobs on a wireless... port while a memory device is being accessed by the printer. 3 If you purchased. Lexmark Network Card Reader • View the contents of the printer. Warning-Potential Damage: Do not plug in or remove ...
...Lexmark Wireless Setup Assistant Set up the printer on the desktop computer may not come with cartridge installation. • Print a test page. • Print an alignment page. • Clean the print cartridge nozzles. • Order ink or supplies. • Register the printer. • Contact customer support. Switching between ports. The active print jobs on a wireless... port while a memory device is being accessed by the printer. 3 If you purchased. Lexmark Network Card Reader • View the contents of the printer. Warning-Potential Damage: Do not plug in or remove ...

User's Guide
Page 56
...loaded in the center of the paper support. • The paper guides rest against the edges of the paper. Partial sheets (with inkjet printers. • The envelopes are designed for use envelopes that have exposed flap adhesive. • Envelopes require more drying time. Transparencies You can... load up to avoid ink smudging. Labels You can load up to 10 envelopes. 1 Make sure: • The print side of the envelopes faces you . •...
...loaded in the center of the paper support. • The paper guides rest against the edges of the paper. Partial sheets (with inkjet printers. • The envelopes are designed for use envelopes that have exposed flap adhesive. • Envelopes require more drying time. Transparencies You can... load up to avoid ink smudging. Labels You can load up to 10 envelopes. 1 Make sure: • The print side of the envelopes faces you . •...

User's Guide
Page 57
...cards. Iron-on the thickness). Custom-size paper You can load up to 100 sheets (depending on transfers You can load up to avoid ink smudging. Make sure: • You follow the loading instructions that came with paper backing sheets are not recommended. • Transparencies require more ... side of the transparencies faces you. • If the transparencies have a removable strip, each strip faces away from you and down toward the printer. • The transparencies are loaded in the center of the paper support. • The paper guides rest against the edges of the transfers....
...cards. Iron-on the thickness). Custom-size paper You can load up to 100 sheets (depending on transfers You can load up to avoid ink smudging. Make sure: • You follow the loading instructions that came with paper backing sheets are not recommended. • Transparencies require more ... side of the transparencies faces you. • If the transparencies have a removable strip, each strip faces away from you and down toward the printer. • The transparencies are loaded in the center of the paper support. • The paper guides rest against the edges of the transfers....

User's Guide
Page 65
...the document is saved in an album, or shared with friends and family. • Lexmark PerfectFinishTM Photo Paper-A high-quality photo paper specifically designed for use the programs that are fade- Wireless connection (selected models only) a Wait for those special photos to be framed, placed... Lexmark inkjet printers, but compatible with a glossy finish. b Press , and then press to start printing the document. b Press the arrow buttons to select the file name of the document that you want to print or the folder where the document is used with genuine Lexmark evercolor 2 ink,...
...the document is saved in an album, or shared with friends and family. • Lexmark PerfectFinishTM Photo Paper-A high-quality photo paper specifically designed for use the programs that are fade- Wireless connection (selected models only) a Wait for those special photos to be framed, placed... Lexmark inkjet printers, but compatible with a glossy finish. b Press , and then press to start printing the document. b Press the arrow buttons to select the file name of the document that you want to print or the folder where the document is used with genuine Lexmark evercolor 2 ink,...

User's Guide
Page 67
...OK or Print. b Customize the settings as needed in the Page Setup dialog. 1 With a document open , click File ΠPrint. 2 From the Printer pop-up menu, choose a paper size that matches the size of the Print Setup tab, choose a paper size that you want to use . 3 From ... from the "Paper size" list, select Custom Size. The Define Custom Paper Size dialog appears. 67 Printing on the labels does not extend to avoid ink smudging. Note: Labels require more information, see the "Loading Paper" chapter. Using Windows 1 With a document open , click File ΠPrint. b ...
...OK or Print. b Customize the settings as needed in the Page Setup dialog. 1 With a document open , click File ΠPrint. 2 From the Printer pop-up menu, choose a paper size that matches the size of the Print Setup tab, choose a paper size that you want to use . 3 From ... from the "Paper size" list, select Custom Size. The Define Custom Paper Size dialog appears. 67 Printing on the labels does not extend to avoid ink smudging. Note: Labels require more information, see the "Loading Paper" chapter. Using Windows 1 With a document open , click File ΠPrint. b ...
User's Guide
Page 97
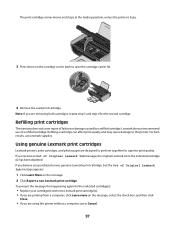
... busy. 3 Press down on the cartridge carrier latch to the printer. For best results, use of failures or damage caused by a refilled cartridge. If you purchased a new, genuine Lexmark print cartridge, but the Out of Original Lexmark Ink message, the original Lexmark ink in the indicated cartridge (s) has been depleted. WI F I PRINTING 4 Remove the used print...
... busy. 3 Press down on the cartridge carrier latch to the printer. For best results, use of failures or damage caused by a refilled cartridge. If you purchased a new, genuine Lexmark print cartridge, but the Out of Original Lexmark Ink message, the original Lexmark ink in the indicated cartridge (s) has been depleted. WI F I PRINTING 4 Remove the used print...

User's Guide
Page 98
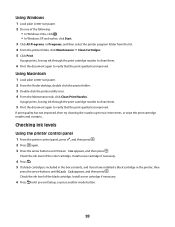
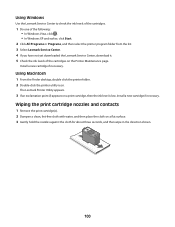
... and then press . Using Macintosh 1 Load plain Letter-size paper. 2 From the Finder desktop, double-click the printer folder. 3 Double-click the printer utility icon. 4 From the Maintenance tab, click Print Alignment Page. 5 Follow the instructions on the computer screen. ...Click All Programs or Programs, and then select the printer program folder from the list. 4 From the printer folder, click Maintenance ΠAlign Cartridges. 5 Click Print. 6 Follow the instructions on the computer screen. Lexmark's warranty does not cover damage caused by non-Lexmark ink or print cartridges.
... and then press . Using Macintosh 1 Load plain Letter-size paper. 2 From the Finder desktop, double-click the printer folder. 3 Double-click the printer utility icon. 4 From the Maintenance tab, click Print Alignment Page. 5 Follow the instructions on the computer screen. ...Click All Programs or Programs, and then select the printer program folder from the list. 4 From the printer folder, click Maintenance ΠAlign Cartridges. 5 Click Print. 6 Follow the instructions on the computer screen. Lexmark's warranty does not cover damage caused by non-Lexmark ink or print cartridges.
User's Guide
Page 99
... then press . Using Macintosh 1 Load plain Letter-size paper. 2 From the Finder desktop, double click the printer folder. 3 Double-click the printer utility icon. 4 From the Maintenance tab, click Clean Print Nozzles. A page prints, forcing ink through the print cartridge nozzles to clean them . 5 Print the document again to verify that the print...
... then press . Using Macintosh 1 Load plain Letter-size paper. 2 From the Finder desktop, double click the printer folder. 3 Double-click the printer utility icon. 4 From the Maintenance tab, click Clean Print Nozzles. A page prints, forcing ink through the print cartridge nozzles to clean them . 5 Print the document again to verify that the print...
User's Guide
Page 100
... cartridge if necessary. Using Macintosh 1 From the Finder desktop, double click the printer folder. 2 Double-click the printer utility icon. Install a new cartridge if necessary. Using Windows Use the Lexmark Service Center to check the ink levels of the cartridges. 1 Do one of the following: • In ...; In Windows XP and earlier, click Start. 2 Click All Programs or Programs, and then select the printer program folder from the list. 3 Select Lexmark Service Center. 4 If you have not yet downloaded the Lexmark Service Center, download it. 5 Check the ink levels of the cartridges on the...
... cartridge if necessary. Using Macintosh 1 From the Finder desktop, double click the printer folder. 2 Double-click the printer utility icon. Install a new cartridge if necessary. Using Windows Use the Lexmark Service Center to check the ink levels of the cartridges. 1 Do one of the following: • In ...; In Windows XP and earlier, click Start. 2 Click All Programs or Programs, and then select the printer program folder from the list. 3 Select Lexmark Service Center. 4 If you have not yet downloaded the Lexmark Service Center, download it. 5 Check the ink levels of the cartridges on the...
User's Guide
Page 101
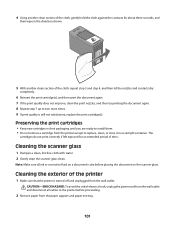
...replace, clean, or store it in their packaging until you are ready to the printer before placing the document on a document is still not satisfactory, replace the print cartridge(s). Cleaning the exterior of the... printer 1 Make sure that the printer is turned off and unplugged from the printer except to two more times. 9 If print quality is dry before proceeding. 2...shock, unplug the power cord from the wall outlet and disconnect all ink or corrective fluid on the scanner glass.
...replace, clean, or store it in their packaging until you are ready to the printer before placing the document on a document is still not satisfactory, replace the print cartridge(s). Cleaning the exterior of the... printer 1 Make sure that the printer is turned off and unplugged from the printer except to two more times. 9 If print quality is dry before proceeding. 2...shock, unplug the power cord from the wall outlet and disconnect all ink or corrective fluid on the scanner glass.

User's Guide
Page 102
...cartridge 36XL 37A Page yield values available at www.lexmark.com/pageyields. Warning-Potential Damage: Using a damp cloth to clean the interior may damage the finish of the printer. 4 Wipe only the outside of the printer, making sure to your printer. 5 Make sure the paper support and paper ... to1 Black cartridge 4A Black cartridge2 4 Color cartridge 5A Page yield values available at www.lexmark.com/pageyields. Warning-Potential Damage: Do not use household cleaners or detergents, as they may cause damage to remove any ink residue that has accumulated on the paper exit tray.
...cartridge 36XL 37A Page yield values available at www.lexmark.com/pageyields. Warning-Potential Damage: Using a damp cloth to clean the interior may damage the finish of the printer. 4 Wipe only the outside of the printer, making sure to your printer. 5 Make sure the paper support and paper ... to1 Black cartridge 4A Black cartridge2 4 Color cartridge 5A Page yield values available at www.lexmark.com/pageyields. Warning-Potential Damage: Do not use household cleaners or detergents, as they may cause damage to remove any ink residue that has accumulated on the paper exit tray.
User's Guide
Page 106
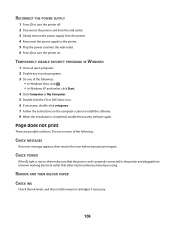
..., double-click setup.exe. 7 Follow the instructions on the computer screen to install the software. 8 When the installation is properly connected to the printer and plugged into the wall outlet. 6 Press to turn the printer off. 2 Disconnect the power cord from the wall outlet. 3 Gently remove the power supply from the...POWER If the light is not on, then make sure that other electrical devices have been using. RECONNECT THE POWER SUPPLY 1 Press to turn the printer on. REMOVE AND THEN RELOAD PAPER CHECK INK Check the ink levels, and then install new print cartridges if necessary. 106
..., double-click setup.exe. 7 Follow the instructions on the computer screen to install the software. 8 When the installation is properly connected to the printer and plugged into the wall outlet. 6 Press to turn the printer off. 2 Disconnect the power cord from the wall outlet. 3 Gently remove the power supply from the...POWER If the light is not on, then make sure that other electrical devices have been using. RECONNECT THE POWER SUPPLY 1 Press to turn the printer on. REMOVE AND THEN RELOAD PAPER CHECK INK Check the ink levels, and then install new print cartridges if necessary. 106
User's Guide
Page 140
...removing 96 using genuine Lexmark 97 wiping 100 changing default settings 28 Power Saver timeout 28 temporary settings 28 changing wireless settings after installation (Mac) 39 changing wireless settings after installation (Windows) 39 checking ink levels 99 cleaning exterior of the printer 101 cleaning print cartridge...129, 130, 131, 132 enlarging an image 84 envelopes loading 55, 66 printing 66 exterior of the printer cleaning 101 F factory default settings resetting internal wireless print server 125 factory default settings, resetting to 103 fax receiving 93 faxing using the software 92 FCC ...
...removing 96 using genuine Lexmark 97 wiping 100 changing default settings 28 Power Saver timeout 28 temporary settings 28 changing wireless settings after installation (Mac) 39 changing wireless settings after installation (Windows) 39 checking ink levels 99 cleaning exterior of the printer 101 cleaning print cartridge...129, 130, 131, 132 enlarging an image 84 envelopes loading 55, 66 printing 66 exterior of the printer cleaning 101 F factory default settings resetting internal wireless print server 125 factory default settings, resetting to 103 fax receiving 93 faxing using the software 92 FCC ...
User's Guide
Page 141
...printer on wireless network 36 information, finding 10 ink levels, checking 99 inserting flash drives 74 memory cards 73 installation cable 47, 48 installing network printer 54 print cartridges 95 printer software 30, 109 installing printer on wireless network (Mac) 37 on wireless network (Windows) 37 installing wireless printer additional computers 40 interference wireless network 50 internal wireless...address 52 MAC address filtering 52 MAC address, finding 52 Mac printer software using 33 Macintosh installing printer on wireless network 37 magazine articles, loading on the scanner glass 59 ...
...printer on wireless network 36 information, finding 10 ink levels, checking 99 inserting flash drives 74 memory cards 73 installation cable 47, 48 installing network printer 54 print cartridges 95 printer software 30, 109 installing printer on wireless network (Mac) 37 on wireless network (Windows) 37 installing wireless printer additional computers 40 interference wireless network 50 internal wireless...address 52 MAC address filtering 52 MAC address, finding 52 Mac printer software using 33 Macintosh installing printer on wireless network 37 magazine articles, loading on the scanner glass 59 ...


