User's Guide
Page 5
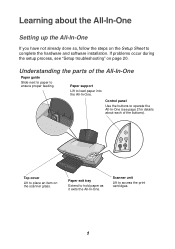
...cover Lift to hold paper as it exits the All-In-One. Paper exit tray Extend to place an item on the scanner glass. If problems occur during the setup process, see page 2 for details about the All-In-One Setting up the... All-In-One If you have not already done so, follow the steps on page 20. Scanner unit Lift to load paper into the All-In-One. Paper support Lift to access the print cartridges. 1 Understanding the parts ... operate the All-In-One (see "Setup troubleshooting" on the Setup Sheet to complete the hardware and software installation.
...cover Lift to hold paper as it exits the All-In-One. Paper exit tray Extend to place an item on the scanner glass. If problems occur during the setup process, see page 2 for details about the All-In-One Setting up the... All-In-One If you have not already done so, follow the steps on page 20. Scanner unit Lift to load paper into the All-In-One. Paper support Lift to access the print cartridges. 1 Understanding the parts ... operate the All-In-One (see "Setup troubleshooting" on the Setup Sheet to complete the hardware and software installation.
User's Guide
Page 12
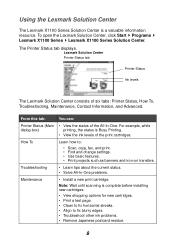
... • View the status of six tabs: Printer Status, How To, Troubleshooting, Maintenance, Contact Information, and Advanced. To open the Lexmark Solution Center, click Start Programs Lexmark X1100 Series Lexmark X1100 Series Solution Center. Using the Lexmark Solution Center The Lexmark X1100 Series Solution Center is complete before installing new cartridges. • View shopping options for new...
... • View the status of six tabs: Printer Status, How To, Troubleshooting, Maintenance, Contact Information, and Advanced. To open the Lexmark Solution Center, click Start Programs Lexmark X1100 Series Lexmark X1100 Series Solution Center. Using the Lexmark Solution Center The Lexmark X1100 Series Solution Center is complete before installing new cartridges. • View shopping options for new...

User's Guide
Page 21
...remove the stickers and transparent tape from the bottom of them. 5 If you install new or replacement print cartridges, remove the used cartridges. 1 Make sure the...and stops at the loading position unless the All-In-One is on. 2 Lift the scanner unit until the scanner support keeps it open. Store them in an air-tight container or dispose of the cartridges.... lids, and then lift the lids. 4 Remove the old cartridges. Maintenance Replacing the print cartridges The Lexmark X1100 Series has been designed to print using only the color cartridge, or with both a color cartridge and...
...remove the stickers and transparent tape from the bottom of them. 5 If you install new or replacement print cartridges, remove the used cartridges. 1 Make sure the...and stops at the loading position unless the All-In-One is on. 2 Lift the scanner unit until the scanner support keeps it open. Store them in an air-tight container or dispose of the cartridges.... lids, and then lift the lids. 4 Remove the old cartridges. Maintenance Replacing the print cartridges The Lexmark X1100 Series has been designed to print using only the color cartridge, or with both a color cartridge and...

User's Guide
Page 22
...Lexmark supplies. 18 6 Insert the new cartridge. Make sure the color print cartridge is completely closed . If you are installing a black print cartridge, make sure that it is secure in the right carrier, and then snap the lid closed. 7 Lift the scanner unit and push the scanner support back while lowering the scanner... unit until it is secure in the left carrier and then snap the lid closed . Refilling cartridges can affect print quality and cause damage to the All-In-One. Lexmark's All-In-One ...
...Lexmark supplies. 18 6 Insert the new cartridge. Make sure the color print cartridge is completely closed . If you are installing a black print cartridge, make sure that it is secure in the right carrier, and then snap the lid closed. 7 Lift the scanner unit and push the scanner support back while lowering the scanner... unit until it is secure in the left carrier and then snap the lid closed . Refilling cartridges can affect print quality and cause damage to the All-In-One. Lexmark's All-In-One ...
User's Guide
Page 23
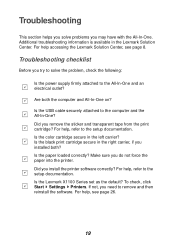
... you do not force the paper into the printer. For help , see page 8. Is the USB cable securely attached to remove and then reinstall the software. Is the color cartridge secure in the Lexmark Solution Center. Make sure you installed both the computer and All-In-One on?... Did you install the printer software correctly? To check, click Start Settings Printers. Is the paper loaded correctly? Is the Lexmark X1100 Series set as the default? Additional ...
... you do not force the paper into the printer. For help , see page 8. Is the USB cable securely attached to remove and then reinstall the software. Is the color cartridge secure in the Lexmark Solution Center. Make sure you installed both the computer and All-In-One on?... Did you install the printer software correctly? To check, click Start Settings Printers. Is the paper loaded correctly? Is the Lexmark X1100 Series set as the default? Additional ...
User's Guide
Page 24
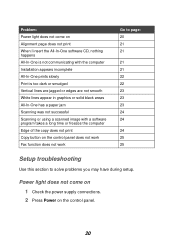
... on Alignment page does not print When I insert the All-In-One software CD, nothing happens All-In-One is not communicating with the computer Installation appears incomplete All-In-One prints slowly Print is too dark or smudged Vertical lines are jagged or edges are not smooth White lines appear...
... on Alignment page does not print When I insert the All-In-One software CD, nothing happens All-In-One is not communicating with the computer Installation appears incomplete All-In-One prints slowly Print is too dark or smudged Vertical lines are jagged or edges are not smooth White lines appear...
User's Guide
Page 25
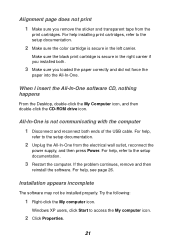
...Computer icon, and then double-click the CD-ROM drive icon. If the problem continues, remove and then reinstall the software. Installation appears incomplete The software may not be installed properly. Alignment page does not print 1 Make sure you loaded the paper correctly and did not force the paper into the ...All-In-One. For help , refer to the setup documentation. 2 Make sure the color cartridge is secure in the right carrier if you installed both ends of the USB cable. For help , see page 26. Windows XP users, click Start to the setup documentation. 2 Unplug the All-In-...
...Computer icon, and then double-click the CD-ROM drive icon. If the problem continues, remove and then reinstall the software. Installation appears incomplete The software may not be installed properly. Alignment page does not print 1 Make sure you loaded the paper correctly and did not force the paper into the ...All-In-One. For help , refer to the setup documentation. 2 Make sure the color cartridge is secure in the right carrier if you installed both ends of the USB cable. For help , see page 26. Windows XP users, click Start to the setup documentation. 2 Unplug the All-In-...
User's Guide
Page 26
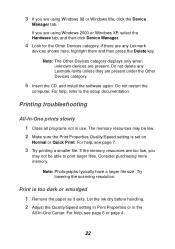
... Other Devices category displays only when unknown devices are present under the Other Devices category. 5 Insert the CD, and install the software again. Do not delete any Lexmark devices shown here, highlight them and then press the Delete key. Note: Photographs typically have a larger file size. ...using Windows 98 or Windows Me, click the Device Manager tab. Try lowering the scanning resolution. If you are too low, you are any Lexmark items unless they are present. Do not restart the computer. For help , see page 7. 3 Try printing a smaller file. Consider purchasing more...
... Other Devices category displays only when unknown devices are present under the Other Devices category. 5 Insert the CD, and install the software again. Do not delete any Lexmark devices shown here, highlight them and then press the Delete key. Note: Photographs typically have a larger file size. ...using Windows 98 or Windows Me, click the Device Manager tab. Try lowering the scanning resolution. If you are too low, you are any Lexmark items unless they are present. Do not restart the computer. For help , see page 7. 3 Try printing a smaller file. Consider purchasing more...
User's Guide
Page 28
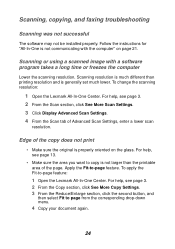
...larger than printing resolution and is much lower. Apply the Fit-to -page feature: 1 Open the Lexmark All-In-One Center. Scanning, copying, and faxing troubleshooting Scanning was not successful The software may not be installed properly. To apply the Fit-to -page feature. For help , see page 3. 2 From ...the printable area of the page. Scanning or using a scanned image with the computer" on the glass. To change the scanning resolution: 1 Open the Lexmark All-In-One Center. Follow the instructions for "All-In-One is properly oriented on page 21. For help , see page 13. • ...
...larger than printing resolution and is much lower. Apply the Fit-to -page feature: 1 Open the Lexmark All-In-One Center. Scanning, copying, and faxing troubleshooting Scanning was not successful The software may not be installed properly. To apply the Fit-to -page feature. For help , see page 3. 2 From ...the printable area of the page. Scanning or using a scanned image with the computer" on the glass. To change the scanning resolution: 1 Open the Lexmark All-In-One Center. Follow the instructions for "All-In-One is properly oriented on page 21. For help , see page 13. • ...

User's Guide
Page 29
Wait until the faxes in order for the copier to work . • Make sure you properly installed the software. The software must be full. Fax function does not work • Make sure the computer is on. Copy button on the control panel ...; Make sure the computer and the All-In-One are on. • Make sure the computer is connected to a phone line. The computer must be installed for the All-In-One to work . A phone connection is required for faxing to the setup documentation. For help, refer to function. • The memory...
Wait until the faxes in order for the copier to work . • Make sure you properly installed the software. The software must be full. Fax function does not work • Make sure the computer is on. Copy button on the control panel ...; Make sure the computer and the All-In-One are on. • Make sure the computer is connected to a phone line. The computer must be installed for the All-In-One to work . A phone connection is required for faxing to the setup documentation. For help, refer to function. • The memory...
User's Guide
Page 30
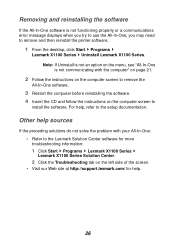
... Series Solution Center. 2 Click the Troubleshooting tab on the computer screen to remove and then reinstall the printer software. 1 From the desktop, click Start Programs Lexmark X1100 Series Uninstall Lexmark X1100 Series. Note: If Uninstall is not an option on the menu, see "All-In-One is not functioning ...properly or a communications error message displays when you try to use the All-In-One, you may need to install the software. ...
... Series Solution Center. 2 Click the Troubleshooting tab on the computer screen to remove and then reinstall the printer software. 1 From the desktop, click Start Programs Lexmark X1100 Series Uninstall Lexmark X1100 Series. Note: If Uninstall is not an option on the menu, see "All-In-One is not functioning ...properly or a communications error message displays when you try to use the All-In-One, you may need to install the software. ...
User's Guide
Page 31
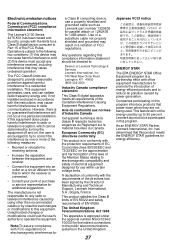
... (EC) directives conformity This product is not responsible for any interference received, including interference that to : Director of Lexmark Technology & Services Lexmark International, Inc. 740 West New Circle Road Lexington, KY 40550 (859) 232-3000 Industry Canada compliance statement This Class...should be directed to which can radiate radio frequency energy and, if not installed and used by up to provide reasonable protection against harmful interference in a particular installation. Unauthorized changes or modifications could void the user's authority to be determined...
... (EC) directives conformity This product is not responsible for any interference received, including interference that to : Director of Lexmark Technology & Services Lexmark International, Inc. 740 West New Circle Road Lexington, KY 40550 (859) 232-3000 Industry Canada compliance statement This Class...should be directed to which can radiate radio frequency energy and, if not installed and used by up to provide reasonable protection against harmful interference in a particular installation. Unauthorized changes or modifications could void the user's authority to be determined...


