User's Guide
Page 3
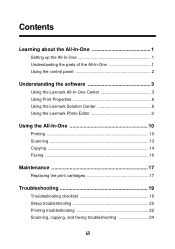
Contents Learning about the All-In-One 1 Setting up the All-In-One 1 Understanding the parts of the All-In-One 1 Using the control panel 2 Understanding the software 3 Using the Lexmark All-In-One Center 3 Using Print Properties 6 Using the Lexmark Solution Center 8 Using the Lexmark Photo Editor 9 Using the All-In-One 10 Printing 10 Scanning 13 Copying 14 Faxing 16 Maintenance 17 Replacing the print cartridges 17 Troubleshooting 19 Troubleshooting checklist 19 Setup troubleshooting 20 Printing troubleshooting 22 Scanning, copying, and faxing troubleshooting 24 iii
Contents Learning about the All-In-One 1 Setting up the All-In-One 1 Understanding the parts of the All-In-One 1 Using the control panel 2 Understanding the software 3 Using the Lexmark All-In-One Center 3 Using Print Properties 6 Using the Lexmark Solution Center 8 Using the Lexmark Photo Editor 9 Using the All-In-One 10 Printing 10 Scanning 13 Copying 14 Faxing 16 Maintenance 17 Replacing the print cartridges 17 Troubleshooting 19 Troubleshooting checklist 19 Setup troubleshooting 20 Printing troubleshooting 22 Scanning, copying, and faxing troubleshooting 24 iii
User's Guide
Page 5
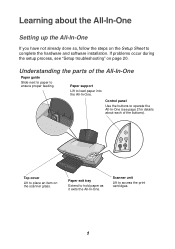
...each of the All-In-One Paper guide Slide next to paper to load paper into the All-In-One. Scanner unit Lift to hold paper as it exits the All-In-One. Top cover Lift to place an item on...-One (see "Setup troubleshooting" on page 20. Control panel Use the buttons to complete the hardware and software installation. Understanding the parts of the buttons). Paper exit tray Extend to access the print cartridges. 1 Paper support Lift to ensure proper feeding. If problems ... Setting up the All-In-One If you have not already done so, follow the steps on the scanner glass.
...each of the All-In-One Paper guide Slide next to paper to load paper into the All-In-One. Scanner unit Lift to hold paper as it exits the All-In-One. Top cover Lift to place an item on...-One (see "Setup troubleshooting" on page 20. Control panel Use the buttons to complete the hardware and software installation. Understanding the parts of the buttons). Paper exit tray Extend to access the print cartridges. 1 Paper support Lift to ensure proper feeding. If problems ... Setting up the All-In-One If you have not already done so, follow the steps on the scanner glass.
User's Guide
Page 11
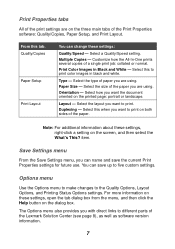
... images in Black and White - For more information on the printed page: portrait or landscape. The Options menu also provides you want to different parts of the Lexmark Solution Center (see page 8), as well as software version information. 7 Customize how the All-In-One prints several copies of a single print job: collated...
... images in Black and White - For more information on the printed page: portrait or landscape. The Options menu also provides you want to different parts of the Lexmark Solution Center (see page 8), as well as software version information. 7 Customize how the All-In-One prints several copies of a single print job: collated...
User's Guide
Page 21
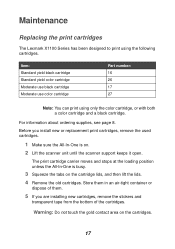
... until the scanner support keeps it open. For information about ordering supplies, see page 8. Item: Standard yield black cartridge Standard yield color cartridge Moderate use black cartridge Moderate use color cartridge Part number: 16 26 17 27 Note: You can print using the following cartridges. Store them in...cartridges. 1 Make sure the All-In-One is busy. 3 Squeeze the tabs on the cartridges. 17 Maintenance Replacing the print cartridges The Lexmark X1100 Series has been designed to print using only the color cartridge, or with both a color cartridge and a black cartridge.
... until the scanner support keeps it open. For information about ordering supplies, see page 8. Item: Standard yield black cartridge Standard yield color cartridge Moderate use black cartridge Moderate use color cartridge Part number: 16 26 17 27 Note: You can print using the following cartridges. Store them in...cartridges. 1 Make sure the All-In-One is busy. 3 Squeeze the tabs on the cartridges. 17 Maintenance Replacing the print cartridges The Lexmark X1100 Series has been designed to print using only the color cartridge, or with both a color cartridge and a black cartridge.
User's Guide
Page 31
...digital device, pursuant to Part 15 of the FCC Rules. The FCC Class B limits are not being used by up to 50 percent. The manufacturer is in this program introduce products that this equipment. As an ENERGY STAR Partner, Lexmark International, Inc. Companies participating... equipment into an outlet on electromagnetic interference for a Class B computing device, use a properly shielded and grounded cable such as Lexmark part number 1329605 for parallel attach or 12A2405 for use within certain voltage limits. Any questions regarding this compliance information statement should be ...
...digital device, pursuant to Part 15 of the FCC Rules. The FCC Class B limits are not being used by up to 50 percent. The manufacturer is in this program introduce products that this equipment. As an ENERGY STAR Partner, Lexmark International, Inc. Companies participating... equipment into an outlet on electromagnetic interference for a Class B computing device, use a properly shielded and grounded cable such as Lexmark part number 1329605 for parallel attach or 12A2405 for use within certain voltage limits. Any questions regarding this compliance information statement should be ...
User's Guide
Page 34
acceptable types of 10 loading 10 paper exit tray 1 Paper Feed button 2 paper guide adjusting 11 Paper Setup tab 7 parts of your All-In-One 1 photo paper 10 photos printing 6 scanning 13 poor quality printing 22 posters printing 6 Power button 2 Preview Now ...of 9 Q Quality/Copies tab 7 R reinstalling software 26 removing software 26 S safety information ii Save Settings menu 7 saved images viewing 5 Scan button 2 scan settings 4 scanner unit 1 scanning 13 placing an item on or off 9 30 section 5 Print a Copy...section 5 voice notification turning on the glass 13 settings, saving for future...
acceptable types of 10 loading 10 paper exit tray 1 Paper Feed button 2 paper guide adjusting 11 Paper Setup tab 7 parts of your All-In-One 1 photo paper 10 photos printing 6 scanning 13 poor quality printing 22 posters printing 6 Power button 2 Preview Now ...of 9 Q Quality/Copies tab 7 R reinstalling software 26 removing software 26 S safety information ii Save Settings menu 7 saved images viewing 5 Scan button 2 scan settings 4 scanner unit 1 scanning 13 placing an item on or off 9 30 section 5 Print a Copy...section 5 voice notification turning on the glass 13 settings, saving for future...


