
User's Guide
Page 2
... service that product, program, or service may be illegal to copy certain materials without incurring any existing intellectual property right may not apply to you have permission, seek legal advice. Lexmark and Lexmark with diamond design are trademarks of publications related to this product ... may be used instead. If you are the property of express or implied warranties in later editions. You can purchase additional copies of Lexmark International, Inc., registered in the products or the programs described may be used . Other trademarks are not sure whether you ...
... service that product, program, or service may be illegal to copy certain materials without incurring any existing intellectual property right may not apply to you have permission, seek legal advice. Lexmark and Lexmark with diamond design are trademarks of publications related to this product ... may be used instead. If you are the property of express or implied warranties in later editions. You can purchase additional copies of Lexmark International, Inc., registered in the products or the programs described may be used . Other trademarks are not sure whether you ...
User's Guide
Page 3
Contents Learning about the All-In-One 1 Setting up the All-In-One 1 Understanding the parts of the All-In-One 1 Using the control panel 2 Understanding the software 3 Using the Lexmark All-In-One Center 3 Using Print Properties 6 Using the Lexmark Solution Center 8 Using the Lexmark Photo Editor 9 Using the All-In-One 10 Printing 10 Scanning 13 Copying 14 Faxing 16 Maintenance 17 Replacing the print cartridges 17 Troubleshooting 19 Troubleshooting checklist 19 Setup troubleshooting 20 Printing troubleshooting 22 Scanning, copying, and faxing troubleshooting 24 iii
Contents Learning about the All-In-One 1 Setting up the All-In-One 1 Understanding the parts of the All-In-One 1 Using the control panel 2 Understanding the software 3 Using the Lexmark All-In-One Center 3 Using Print Properties 6 Using the Lexmark Solution Center 8 Using the Lexmark Photo Editor 9 Using the All-In-One 10 Printing 10 Scanning 13 Copying 14 Faxing 16 Maintenance 17 Replacing the print cartridges 17 Troubleshooting 19 Troubleshooting checklist 19 Setup troubleshooting 20 Printing troubleshooting 22 Scanning, copying, and faxing troubleshooting 24 iii

User's Guide
Page 4
iv This guide tells you for purchasing a Lexmark X1100 Series All-In-One! The Lexmark™ X1100 Series All-In-One combines the functionality of an inkjet printer, a scanner, a copier, and a fax machine all into a single, multifunction device, making it one of the most exciting products on your purchase. Congratulations on the market today. Also included are sections describing the All-In-One software and troubleshooting information. Removing and reinstalling the software 26 Other help sources 26 Thank you how to perform printing, copying, scanning, and faxing tasks.
iv This guide tells you for purchasing a Lexmark X1100 Series All-In-One! The Lexmark™ X1100 Series All-In-One combines the functionality of an inkjet printer, a scanner, a copier, and a fax machine all into a single, multifunction device, making it one of the most exciting products on your purchase. Congratulations on the market today. Also included are sections describing the All-In-One software and troubleshooting information. Removing and reinstalling the software 26 Other help sources 26 Thank you how to perform printing, copying, scanning, and faxing tasks.
User's Guide
Page 6
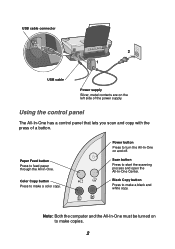
... scanning process and open the All-In-One Center. Using the control panel The All-In-One has a control panel that lets you scan and copy with the press of the power supply. Power button Press to turn the All-In-One on to make... copies. 2 Black Copy button Press to make a black and white copy. Note: Both the computer and the All-In-One must be turned on and off. Scan button Press to feed paper through the All...
... scanning process and open the All-In-One Center. Using the control panel The All-In-One has a control panel that lets you scan and copy with the press of the power supply. Power button Press to turn the All-In-One on to make... copies. 2 Black Copy button Press to make a black and white copy. Note: Both the computer and the All-In-One must be turned on and off. Scan button Press to feed paper through the All...
User's Guide
Page 7
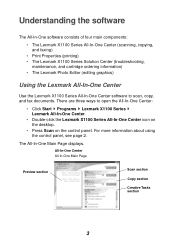
... four main components: • The Lexmark X1100 Series All-In-One Center (scanning, copying, and faxing) • Print Properties (printing) • The Lexmark X1100 Series Solution Center (troubleshooting, maintenance, and cartridge ordering information) • The Lexmark Photo Editor (editing graphics) Using the Lexmark All-In-One Center Use the Lexmark X1100 Series All-In-One Center...
... four main components: • The Lexmark X1100 Series All-In-One Center (scanning, copying, and faxing) • Print Properties (printing) • The Lexmark X1100 Series Solution Center (troubleshooting, maintenance, and cartridge ordering information) • The Lexmark Photo Editor (editing graphics) Using the Lexmark All-In-One Center Use the Lexmark X1100 Series All-In-One Center...
User's Guide
Page 8
...(OCR). • Modify an image with a photo editor. • Select a region of the preview image to . • Choose what will be printed or copied. Choose from a variety of creative ideas. • Enlarge or reduce an image. • Repeat an image several times on my computer. • Edit text found... Select a program to send the scanned image to scan. • View an image of what type of the scanned area. • Lighten or darken your copies. • Enlarge or reduce your computer's modem. • Save an image on one page. • Print an image as a multi-page poster. &#...
...(OCR). • Modify an image with a photo editor. • Select a region of the preview image to . • Choose what will be printed or copied. Choose from a variety of creative ideas. • Enlarge or reduce an image. • Repeat an image several times on my computer. • Edit text found... Select a program to send the scanned image to scan. • View an image of what type of the scanned area. • Lighten or darken your copies. • Enlarge or reduce your computer's modem. • Save an image on one page. • Print an image as a multi-page poster. &#...

User's Guide
Page 9
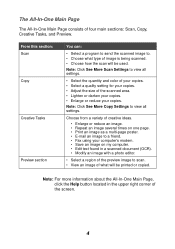
... upper right corner of the screen. 5 For help, see page 8. The View Saved Images page consists of the screen. Note: Click See More Copy Settings to . • Choose the quantity and color of creative ideas. Creative Tasks You can: Select a program to send the saved image to... view all settings. Note: For more information about the Lexmark Solution Center, see page 4. From this page, click the Help button located in the upper right corner of three sections. Maintain/Troubleshoot page ...
... upper right corner of the screen. 5 For help, see page 8. The View Saved Images page consists of the screen. Note: Click See More Copy Settings to . • Choose the quantity and color of creative ideas. Creative Tasks You can: Select a program to send the saved image to... view all settings. Note: For more information about the Lexmark Solution Center, see page 4. From this page, click the Help button located in the upper right corner of three sections. Maintain/Troubleshoot page ...
User's Guide
Page 10
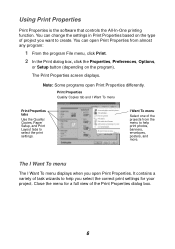
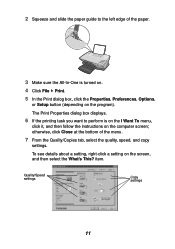
... a variety of the Print Properties dialog box. 6 The I Want To menu The I Want To menu Print Properties tabs Use the Quality/ Copies, Paper Setup, and Print Layout tabs to help you open Print Properties. You can open Print Properties differently. You can change the settings in Print... Properties based on the program). Print Properties Quality Copies tab and I Want To menu displays when you select the correct print settings for a full view of task wizards to create. The ...
... a variety of the Print Properties dialog box. 6 The I Want To menu The I Want To menu Print Properties tabs Use the Quality/ Copies, Paper Setup, and Print Layout tabs to help you open Print Properties. You can open Print Properties differently. You can change the settings in Print... Properties based on the program). Print Properties Quality Copies tab and I Want To menu displays when you select the correct print settings for a full view of task wizards to create. The ...
User's Guide
Page 11
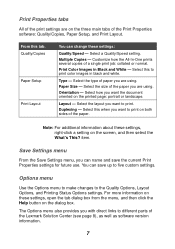
... on the printed page: portrait or landscape. Customize how the All-In-One prints several copies of paper you with direct links to print color images in Black and White - Select this to different parts of the Lexmark Solution Center (see page 8), as well as software version information. 7 Options menu Use the...
... on the printed page: portrait or landscape. Customize how the All-In-One prints several copies of paper you with direct links to print color images in Black and White - Select this to different parts of the Lexmark Solution Center (see page 8), as well as software version information. 7 Options menu Use the...
User's Guide
Page 12
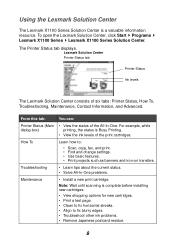
To open the Lexmark Solution Center, click Start Programs Lexmark X1100 Series Lexmark X1100 Series Solution Center. From this tab: You can: Printer Status (Main • View the status of six tabs: Printer Status, How To, Troubleshooting, Maintenance, Contact Information, and Advanced. Troubleshooting...; Scan, copy, fax, and print. • Find and change settings. • Use basic features. • Print projects such as banners and iron-on transfers. The Printer Status tab displays. Lexmark Solution Center Printer Status tab Printer Status Ink levels The Lexmark Solution Center ...
To open the Lexmark Solution Center, click Start Programs Lexmark X1100 Series Lexmark X1100 Series Solution Center. From this tab: You can: Printer Status (Main • View the status of six tabs: Printer Status, How To, Troubleshooting, Maintenance, Contact Information, and Advanced. Troubleshooting...; Scan, copy, fax, and print. • Find and change settings. • Use basic features. • Print projects such as banners and iron-on transfers. The Printer Status tab displays. Lexmark Solution Center Printer Status tab Printer Status Ink levels The Lexmark Solution Center ...
User's Guide
Page 14
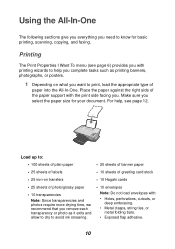
... to know for your document. Using the All-In-One The following sections give you everything you select the paper size for basic printing, scanning, copying, and faxing. Make sure you need to print, load the appropriate type of the paper support with : • Holes, perforations, cutouts, or deep embossing. •...
... to know for your document. Using the All-In-One The following sections give you everything you select the paper size for basic printing, scanning, copying, and faxing. Make sure you need to print, load the appropriate type of the paper support with : • Holes, perforations, cutouts, or deep embossing. •...
User's Guide
Page 15
... on the program). The Print Properties dialog box displays. 6 If the printing task you want to the left edge of the menu. 7 From the Quality/Copies tab, select the quality, speed, and copy settings. item. Quality/Speed settings...
... on the program). The Print Properties dialog box displays. 6 If the printing task you want to the left edge of the menu. 7 From the Quality/Copies tab, select the quality, speed, and copy settings. item. Quality/Speed settings...
User's Guide
Page 18
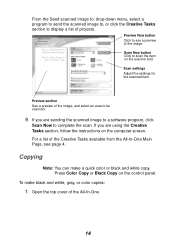
... to be scanned. 9 If you are sending the scanned image to a software program, click Scan Now to complete the scan. Copying Note: You can make black and white, gray, or color copies: 1 Open the top cover of projects. Scan Now button Click to see page 4. Scan settings Adjust the settings for the... or black and white copy. From the Send scanned image to: drop-down menu, select a program to send the scanned image to, or click the Creative Tasks section to display a list of the All-In-One. 14 Preview Now button Click to scan the item on the scanner bed. If you are...
... to be scanned. 9 If you are sending the scanned image to a software program, click Scan Now to complete the scan. Copying Note: You can make black and white, gray, or color copies: 1 Open the top cover of projects. Scan Now button Click to see page 4. Scan settings Adjust the settings for the... or black and white copy. From the Send scanned image to: drop-down menu, select a program to send the scanned image to, or click the Creative Tasks section to display a list of the All-In-One. 14 Preview Now button Click to scan the item on the scanner bed. If you are...
User's Guide
Page 19
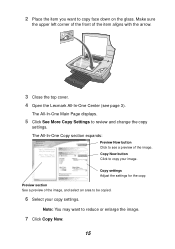
... Click to reduce or enlarge the image. 7 Click Copy Now. 15 Note: You may want to review and change the copy settings. Make sure the upper left corner of the front of the item aligns with the arrow. 3 Close the top cover. 4 Open the Lexmark All-In-One Center (see a preview of the... image, and select an area to see page 3). The All-In-One Copy section expands: Preview Now button Click to be copied. 6 Select your image. Copy settings Adjust the settings for the...
... Click to reduce or enlarge the image. 7 Click Copy Now. 15 Note: You may want to review and change the copy settings. Make sure the upper left corner of the front of the item aligns with the arrow. 3 Close the top cover. 4 Open the Lexmark All-In-One Center (see a preview of the... image, and select an area to see page 3). The All-In-One Copy section expands: Preview Now button Click to be copied. 6 Select your image. Copy settings Adjust the settings for the...
User's Guide
Page 24
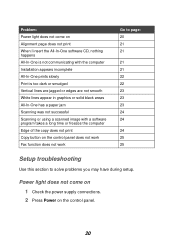
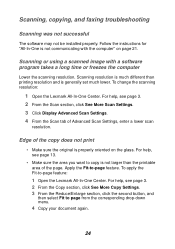
... a paper jam Scanning was not successful Scanning or using a scanned image with a software program takes a long time or freezes the computer Edge of the copy does not print Copy button on the control panel. 20 Problem: Power light does not come on 1 Check the power supply connections. 2 Press Power on the control...
... a paper jam Scanning was not successful Scanning or using a scanned image with a software program takes a long time or freezes the computer Edge of the copy does not print Copy button on the control panel. 20 Problem: Power light does not come on 1 Check the power supply connections. 2 Press Power on the control...
User's Guide
Page 28
...image with the computer" on the glass. To change the scanning resolution: 1 Open the Lexmark All-In-One Center. To apply the Fit-to -page feature. Apply the Fit-to -page feature: 1 Open the Lexmark All-In-One Center. Follow the instructions for "All-In-One is properly oriented on ...page 21. Edge of the copy does not print • Make sure the original is not communicating with a software program takes...
...image with the computer" on the glass. To change the scanning resolution: 1 Open the Lexmark All-In-One Center. To apply the Fit-to -page feature. Apply the Fit-to -page feature: 1 Open the Lexmark All-In-One Center. Follow the instructions for "All-In-One is properly oriented on ...page 21. Edge of the copy does not print • Make sure the original is not communicating with a software program takes...
User's Guide
Page 29
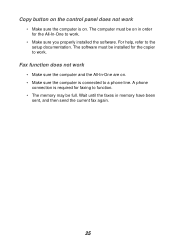
...-In-One are on . Wait until the faxes in order for the All-In-One to work. • Make sure you properly installed the software. Copy button on the control panel does not work • Make sure the computer is on . • Make sure the computer is required for faxing to...
...-In-One are on . Wait until the faxes in order for the All-In-One to work. • Make sure you properly installed the software. Copy button on the control panel does not work • Make sure the computer is on . • Make sure the computer is required for faxing to...
User's Guide
Page 33
...printing 6 black and white, printing in 7 Black Copy button 2 both sides, printing on, see duplexing C card stock 10 cartridges viewing ink levels of 8 Color Copy button 2 Contact Information tab 9 control panel 2 copies 7 copy settings 4 copying 14 copyright advisory ii D duplexing 7 E edition ...inkjet paper 10 iron-on transfers 10 printing 6 L labels 10 Lexmark All-In-One Center 3 opening 3 using 3 Lexmark Solution Center 8 Advanced tab 9 Contact Information tab 9 How To tab 8 Maintenance tab 8 opening 8 Printer Status tab 8 Troubleshooting tab 8 loading paper 10 M Maintain/Troubleshoot...
...printing 6 black and white, printing in 7 Black Copy button 2 both sides, printing on, see duplexing C card stock 10 cartridges viewing ink levels of 8 Color Copy button 2 Contact Information tab 9 control panel 2 copies 7 copy settings 4 copying 14 copyright advisory ii D duplexing 7 E edition ...inkjet paper 10 iron-on transfers 10 printing 6 L labels 10 Lexmark All-In-One Center 3 opening 3 using 3 Lexmark Solution Center 8 Advanced tab 9 Contact Information tab 9 How To tab 8 Maintenance tab 8 opening 8 Printer Status tab 8 Troubleshooting tab 8 loading paper 10 M Maintain/Troubleshoot...
User's Guide
Page 34
...10 photos printing 6 scanning 13 poor quality printing 22 posters printing 6 Power button 2 Preview Now button 13 Preview section Preview Now button 13 Print/Copy preview 4 Scan preview 4 print cartridges viewing ink levels of 8 Print Layout tab 7 Print Properties 6 I Want To menu 6 opening 6 ... 26 S safety information ii Save Settings menu 7 saved images viewing 5 Scan button 2 scan settings 4 scanner unit 1 scanning 13 placing an item on or off 9 30 section 5 Print a Copy...section 5 voice notification turning on the glass 13 settings, saving for future use 7 setup 1 setup troubleshooting...
...10 photos printing 6 scanning 13 poor quality printing 22 posters printing 6 Power button 2 Preview Now button 13 Preview section Preview Now button 13 Print/Copy preview 4 Scan preview 4 print cartridges viewing ink levels of 8 Print Layout tab 7 Print Properties 6 I Want To menu 6 opening 6 ... 26 S safety information ii Save Settings menu 7 saved images viewing 5 Scan button 2 scan settings 4 scanner unit 1 scanning 13 placing an item on or off 9 30 section 5 Print a Copy...section 5 voice notification turning on the glass 13 settings, saving for future use 7 setup 1 setup troubleshooting...


