Firmware Installation Guide (English)
Page 1
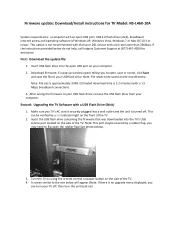
... is not recommended with dial‐up window opens telling you to the one below do not help, call Insignia Customer Support at (877) 467‐4289 for TV Model: NS‐L46X‐10A System requirements: a computer with an open the rubber flap (See photo below). 3. Insert the USB flash... and save the file to flip open USB port, USB 2.0 flash drive (stick), broadband internet access and operating software of the TV. 2. Turn the TV on using the remote control or power button on the root directory. Firmware update: Download/Install instructions for assistance. This option is turned...
... is not recommended with dial‐up window opens telling you to the one below do not help, call Insignia Customer Support at (877) 467‐4289 for TV Model: NS‐L46X‐10A System requirements: a computer with an open the rubber flap (See photo below). 3. Insert the USB flash... and save the file to flip open USB port, USB 2.0 flash drive (stick), broadband internet access and operating software of the TV. 2. Turn the TV on using the remote control or power button on the root directory. Firmware update: Download/Install instructions for assistance. This option is turned...

Firmware Installation Guide (English)
Page 2
5. The software update will then begin Note: DO NOT TURN THE POWER OFF OR UNPLUG DURING THE UPDATE Note: During the software update, a progress bar will appear: 7. Remove the USB flash drive (stick) from the TV. 8. Once the update has completed, a screen similar to the one (1) minute. 6. Press the Enter/OK key on the remote. this update takes approximately one shown below will appear displaying the progress of the update; Using your remote control arrow keys, make sure the "Yes" button is highlighted and press enter/OK on the remote control, TV will then restart.
5. The software update will then begin Note: DO NOT TURN THE POWER OFF OR UNPLUG DURING THE UPDATE Note: During the software update, a progress bar will appear: 7. Remove the USB flash drive (stick) from the TV. 8. Once the update has completed, a screen similar to the one (1) minute. 6. Press the Enter/OK key on the remote. this update takes approximately one shown below will appear displaying the progress of the update; Using your remote control arrow keys, make sure the "Yes" button is highlighted and press enter/OK on the remote control, TV will then restart.
Firmware Installation Guide (English)
Page 3
... drive using your computer prior to reprogram your favorite channels and any issues while performing this upgrade, call Insignia Customer Support at (877) 467‐4289 for assistance. 9. Verify TV Powered off the TV; If the TV did not then, power off then Powered back on . Note: It is complete. April 2010 Note: You...
... drive using your computer prior to reprogram your favorite channels and any issues while performing this upgrade, call Insignia Customer Support at (877) 467‐4289 for assistance. 9. Verify TV Powered off the TV; If the TV did not then, power off then Powered back on . Note: It is complete. April 2010 Note: You...

Warranty (English)
Page 1
... to you. The Warranty Period lasts for 2 years (730 days) from the date you notify Insignia during the Warranty Period. This warranty is determined to be loaned to you until your TV is repaired and returned, at a retail store location, take your original receipt and the Product to... the Product. If service of Products or parts are not returned to you sell or otherwise transfer the Product. Two-year limited warranty Insignia Products ("Insignia") warrants to you must be free of defects in the original manufacture of the material or workmanship for a period of two (2) years...
... to you. The Warranty Period lasts for 2 years (730 days) from the date you notify Insignia during the Warranty Period. This warranty is determined to be loaned to you until your TV is repaired and returned, at a retail store location, take your original receipt and the Product to... the Product. If service of Products or parts are not returned to you sell or otherwise transfer the Product. Two-year limited warranty Insignia Products ("Insignia") warrants to you must be free of defects in the original manufacture of the material or workmanship for a period of two (2) years...
What is Firmware? (English)
Page 1
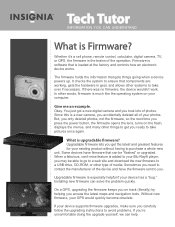
... to a USB drive, CD-ROM, or other words, firmware is the brains of the operation. Okay. Whether it's a cell phone, remote control, calculator, digital camera, TV, or GPS, the firmware is much like the operating system on the flash, displays the menus, and many other systems to take over if necessary...
... to a USB drive, CD-ROM, or other words, firmware is the brains of the operation. Okay. Whether it's a cell phone, remote control, calculator, digital camera, TV, or GPS, the firmware is much like the operating system on the flash, displays the menus, and many other systems to take over if necessary...
User Manual (English)
Page 3
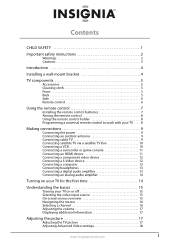
... 8 Using the remote control holder 8 Programming a universal remote control to work with your TV . . . . 8 Making connections 9 Connecting the power 9 Connecting an outdoor antenna 9 Connecting cable TV 9 Connecting satellite TV via a satellite TV box 10 Connecting a VCR 10 Connecting a camcorder or game console 11 Connecting an HDMI ...13 Connecting a digital audio amplifier 13 Connecting an analog audio amplifier 14 Turning on your TV for the first time 14 Understanding the basics 15 Turning your TV on or off 15 Selecting the video input source 15 On-screen menu overview 15 ...
... 8 Using the remote control holder 8 Programming a universal remote control to work with your TV . . . . 8 Making connections 9 Connecting the power 9 Connecting an outdoor antenna 9 Connecting cable TV 9 Connecting satellite TV via a satellite TV box 10 Connecting a VCR 10 Connecting a camcorder or game console 11 Connecting an HDMI ...13 Connecting a digital audio amplifier 13 Connecting an analog audio amplifier 14 Turning on your TV for the first time 14 Understanding the basics 15 Turning your TV on or off 15 Selecting the video input source 15 On-screen menu overview 15 ...
User Manual (English)
Page 4
... the DTV signal strength 23 Setting parental controls 23 Setting or changing the password 23 Setting parental control levels 24 Blocking unrated TV 25 Downloading rating information 26 Locking control buttons 27 Using closed captioning 27 Viewing closed captioning 27 Selecting the closed captioning mode... 29 Adjusting menu settings 30 Selecting the menu language 30 Changing the menu transparency 30 Labeling an input source 31 Adjusting the INSIGNIA logo brightness 32 Turning Auto Input Sensing on or off 32 Resetting settings to the defaults 33 Programming your remote control 33...
... the DTV signal strength 23 Setting parental controls 23 Setting or changing the password 23 Setting parental control levels 24 Blocking unrated TV 25 Downloading rating information 26 Locking control buttons 27 Using closed captioning 27 Viewing closed captioning 27 Selecting the closed captioning mode... 29 Adjusting menu settings 30 Selecting the menu language 30 Changing the menu transparency 30 Labeling an input source 31 Adjusting the INSIGNIA logo brightness 32 Turning Auto Input Sensing on or off 32 Resetting settings to the defaults 33 Programming your remote control 33...

User Manual (English)
Page 5
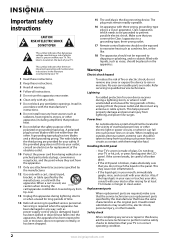
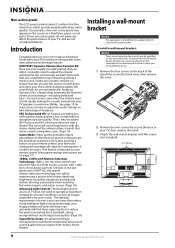
...The issue The home theater entertainment experience is appropriate. Tune into safety • One size of TV stand does not fit all . Use only a TV stand rated for the weight of your TV. • Carefully read and understand all enclosed instructions for your new product, keep these safety ...or knocked down. • Make sure that you route all instructions supplied by curious children. Wall mounting If you decide to wall mount your TV, get help from a professional installer. • Make sure that children can easily be heavy. Some wall mounts are committed to making home ...
...The issue The home theater entertainment experience is appropriate. Tune into safety • One size of TV stand does not fit all . Use only a TV stand rated for the weight of your TV. • Carefully read and understand all enclosed instructions for your new product, keep these safety ...or knocked down. • Make sure that you route all instructions supplied by curious children. Wall mounting If you decide to wall mount your TV, get help from a professional installer. • Make sure that children can easily be heavy. Some wall mounts are committed to making home ...
User Manual (English)
Page 6
...been spilled or objects have the same characteristics as vases, should not be exposed to dripping or splashing, and no objects filled with your TV. 1 Read these instructions. 2 Keep these instructions. 3 Heed all warnings. 4 Follow all servicing to qualified service technicians. This helps ...13 Unplug this apparatus near any antenna or cable system. The wide blade or the third prong are required, make absolutely sure that your TV is in accordance with the manufacturer's instructions. 8 Do not install near water. 6 Clean only with three-prong, grounding-type plug is...
...been spilled or objects have the same characteristics as vases, should not be exposed to dripping or splashing, and no objects filled with your TV. 1 Read these instructions. 2 Keep these instructions. 3 Heed all warnings. 4 Follow all servicing to qualified service technicians. This helps ...13 Unplug this apparatus near any antenna or cable system. The wide blade or the third prong are required, make absolutely sure that your TV is in accordance with the manufacturer's instructions. 8 Do not install near water. 6 Clean only with three-prong, grounding-type plug is...
User Manual (English)
Page 7
...cordless and cellular telephones away from the type of mercury. Outdoor antenna grounding If an outside antenna or cable system is connected to your TV, make sure that are not sure of the type of power supplied to CATV system installer Article 820 of other controls may be ... or objects have fallen into a warm room or if the temperature of the building as practical. www.insigniaproducts.com 3 End of life directives Your TV contains tin-lead solder and a fluorescent lamp containing a small amount of power source indicated on the marking label. If you are covered by a ...
...cordless and cellular telephones away from the type of mercury. Outdoor antenna grounding If an outside antenna or cable system is connected to your TV, make sure that are not sure of the type of power supplied to CATV system installer Article 820 of other controls may be ... or objects have fallen into a warm room or if the temperature of the building as practical. www.insigniaproducts.com 3 End of life directives Your TV contains tin-lead solder and a fluorescent lamp containing a small amount of power source indicated on the marking label. If you are covered by a ...
User Manual (English)
Page 8
...reduced motion blurring, particularly when watching fast-motion sports and action scenes. (Page 18) Advanced Light Control: The backlight used in your LCD TV does not need to adjust the volume: wishing that the commercials wouldn't blare and that movie viewers and games crave. (Page 19) ... page 19 for instructions on how to adjust the audio settings to get the maximum experience. Using intelligent light sensing technology, your Insignia Advanced Series television can automatically find these opportunities to your remote control. To reduce the risk of hazards, do not perform any servicing...
...reduced motion blurring, particularly when watching fast-motion sports and action scenes. (Page 18) Advanced Light Control: The backlight used in your LCD TV does not need to adjust the volume: wishing that the commercials wouldn't blare and that movie viewers and games crave. (Page 19) ... page 19 for instructions on how to adjust the audio settings to get the maximum experience. Using intelligent light sensing technology, your Insignia Advanced Series television can automatically find these opportunities to your remote control. To reduce the risk of hazards, do not perform any servicing...
User Manual (English)
Page 9
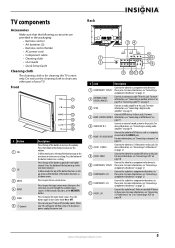
... input source menu, then press the arrow keys to decrease a setting. For more information, see "Connecting an analog audio amplifier" on -screen menu. TV components Accessories Make sure that the following accessories are provided in the packaging: • Remote control • AA batteries (2) • Remote control holder ... of the button to clean any other part of the button to cycle through the available input sources. Press the bottom of your TV on page 10. Press to open the on page 14. In Menu mode, functions as the down arrow. Press to turn Game...
... input source menu, then press the arrow keys to decrease a setting. For more information, see "Connecting an analog audio amplifier" on -screen menu. TV components Accessories Make sure that the following accessories are provided in the packaging: • Remote control • AA batteries (2) • Remote control holder ... of the button to clean any other part of the button to cycle through the available input sources. Press the bottom of your TV on page 10. Press to open the on page 14. In Menu mode, functions as the down arrow. Press to turn Game...
User Manual (English)
Page 10
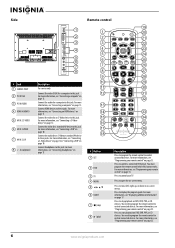
... remote control" on page 10. Connect the audio for a computer to control your remote control" on page 13. For more information, see "Programming your TV. You must program the remote control before this jack. Press to this button works. Side # Jack 1 SERVICE PORT 2 PC IN VGA 3 PC IN...7 26 8 27 9 28 10 29 11 30 12 31 32 13 14 33 15 34 16 GAME 35 DYN VOL 17 36 18 NS-RC02U-10A 37 # Button 1 SET 2 DVD 3 TV 4 MENU 5 6 GUIDE 7 (stop playback on page 13. Press to control connected devices. Press to control connected devices. For more information...
... remote control" on page 10. Connect the audio for a computer to control your remote control" on page 13. For more information, see "Programming your TV. You must program the remote control before this jack. Press to this button works. Side # Jack 1 SERVICE PORT 2 PC IN VGA 3 PC IN...7 26 8 27 9 28 10 29 11 30 12 31 32 13 14 33 15 34 16 GAME 35 DYN VOL 17 36 18 NS-RC02U-10A 37 # Button 1 SET 2 DVD 3 TV 4 MENU 5 6 GUIDE 7 (stop playback on page 13. Press to control connected devices. Press to control connected devices. For more information...
User Manual (English)
Page 11
...to control connected devices. Press to begin recording. For more information, see "Programming your remote control" on page 21. Press to display TV status information, such as the video source. For more information, see "Programming your remote control" on page 29. VIDEO- For more information...VIDEO, AV 2 VIDEO, or S-VIDEO jack. You need to program the remote control to control connected devices. You may damage the TV screen. 31 CH /CH Press to the previous channel. Press again to control a connected device. To disconnect power, unplug the power ...
...to control connected devices. Press to begin recording. For more information, see "Programming your remote control" on page 21. Press to display TV status information, such as the video source. For more information, see "Programming your remote control" on page 29. VIDEO- For more information...VIDEO, AV 2 VIDEO, or S-VIDEO jack. You need to program the remote control to control connected devices. You may damage the TV screen. 31 CH /CH Press to the previous channel. Press again to control a connected device. To disconnect power, unplug the power ...
User Manual (English)
Page 12
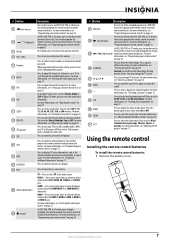
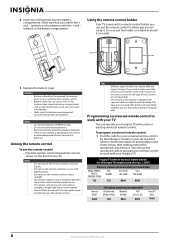
...Replace the battery cover. Make sure that you want to be exposed to work with separate adhesive tape for all types of your Insignia TV with all Insignia TVs manufactured after Jan. 1, 2007) Universal remote control manufacturers and models Philips PHDVD5, PH5DSS, PMDVR8, PDVR8 RCA RCU807 One for ...your universal remote control by identifying its model (or your TV You can put the holder on a table or mount it . Insignia TV codes for universal remote controls (for wall mounting. If the remote control is not going to wall...
...Replace the battery cover. Make sure that you want to be exposed to work with separate adhesive tape for all types of your Insignia TV with all Insignia TVs manufactured after Jan. 1, 2007) Universal remote control manufacturers and models Philips PHDVD5, PH5DSS, PMDVR8, PDVR8 RCA RCU807 One for ...your universal remote control by identifying its model (or your TV You can put the holder on a table or mount it . Insignia TV codes for universal remote controls (for wall mounting. If the remote control is not going to wall...
User Manual (English)
Page 13
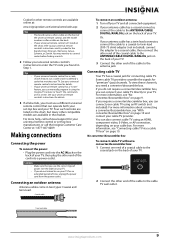
... cable to your universal remote control's instructions and try several codes before finding a match. 2 Follow your universal remote control's instructions to enter the TV code you can also connect cable TV using the Insignia TV remote to "teach" the commands one end of a coaxial cable to the coaxial jack on the back of your... TV. 2 Connect the other end of the cord into the AC IN jack on the back of your TV, then plug the other end of ...
... cable to your universal remote control's instructions and try several codes before finding a match. 2 Follow your universal remote control's instructions to enter the TV code you can also connect cable TV using the Insignia TV remote to "teach" the commands one end of a coaxial cable to the coaxial jack on the back of your... TV. 2 Connect the other end of the cord into the AC IN jack on the back of your TV, then plug the other end of ...
User Manual (English)
Page 14
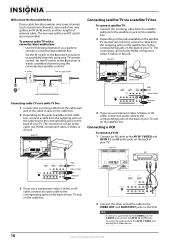
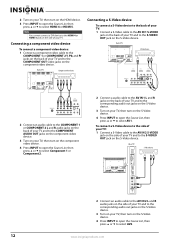
... If your cable box descrambles only some channels (such as a guide to the VIDEO OUT and AUDIO OUT jacks on the VCR. To connect cable TV with a converter/descrambler box: • Use the following illustration as premium channels), you use a component video, S-Video, or AV cable, connect an ...audio cable to the corresponding jacks on the back of your TV. Back of TV VCR HDMI Video or S-Video Component 3 If you need a two-way splitter, an RF (A/B) switch, and four lengths of antenna cable. The ...
... If your cable box descrambles only some channels (such as a guide to the VIDEO OUT and AUDIO OUT jacks on the VCR. To connect cable TV with a converter/descrambler box: • Use the following illustration as premium channels), you use a component video, S-Video, or AV cable, connect an ...audio cable to the corresponding jacks on the back of your TV. Back of TV VCR HDMI Video or S-Video Component 3 If you need a two-way splitter, an RF (A/B) switch, and four lengths of antenna cable. The ...
User Manual (English)
Page 15
... R audio jacks on the side of the cable to the VIDEO OUT and AUDIO OUT jacks on the camcorder or game console. 3 Turn on your TV, then turn on the camcorder or game console. 4 Press INPUT to open the Source List, then press or to select HDMI 1, HDMI 2, or HDMI 3. Back... jack controls the AV IN 2 L and R audio jacks. Connecting an HDMI device You can connect a DVI device to the HDMI 3 jack on the back of TV HDMI device www.insigniaproducts.com 11 Next connect an audio cable to the HDMI 3 PC AUDIO INPUT jack and to Game or Custom Game, pressing...
... R audio jacks on the side of the cable to the VIDEO OUT and AUDIO OUT jacks on the camcorder or game console. 3 Turn on your TV, then turn on the camcorder or game console. 4 Press INPUT to open the Source List, then press or to select HDMI 1, HDMI 2, or HDMI 3. Back... jack controls the AV IN 2 L and R audio jacks. Connecting an HDMI device You can connect a DVI device to the HDMI 3 jack on the back of TV HDMI device www.insigniaproducts.com 11 Next connect an audio cable to the HDMI 3 PC AUDIO INPUT jack and to Game or Custom Game, pressing...
User Manual (English)
Page 16
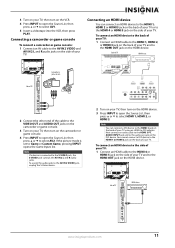
... select Component 1 or Component 2. 2 Connect a audio cable to the AV IN 1 L and R jacks on the back of your TV and to the corresponding audio out jacks on the S-Video device. 3 Turn on your TV, then turn on the S-Video device. 4 Press INPUT to open the Source List, then press or to select... a component video device: 1 Connect a component video cable to the COMPONENT 1 or COMPONENT 2 Y, Pb, and Pr jacks on the back of your TV and to select AV1. 2 Turn on your TV, then turn on the HDMI device. 3 Press INPUT to open the Source List, then press or to the COMPONENT OUT video jacks...
... select Component 1 or Component 2. 2 Connect a audio cable to the AV IN 1 L and R jacks on the back of your TV and to the corresponding audio out jacks on the S-Video device. 3 Turn on your TV, then turn on the S-Video device. 4 Press INPUT to open the Source List, then press or to select... a component video device: 1 Connect a component video cable to the COMPONENT 1 or COMPONENT 2 Y, Pb, and Pr jacks on the back of your TV and to select AV1. 2 Turn on your TV, then turn on the HDMI device. 3 Press INPUT to open the Source List, then press or to the COMPONENT OUT video jacks...

User Manual (English)
Page 17
...headphones: • Plug headphones into the jack on the computer. Note When headphones are plugged in, the sound from your TV turns off. If your TV does not turn on your TV or remote control. Connecting a digital audio amplifier To connect a digital audio amplifier: • Connect a digital audio cable ...press (power) on the amplifier. Note When the computer enters standby mode, your TV's speakers is muted. Connecting a computer Note If the computer has an HDMI jack, you "wake" your TV. Side of TV Side of TV 2 Connect an audio cable to the PC IN AUDIO jack on the side of...
...headphones: • Plug headphones into the jack on the computer. Note When headphones are plugged in, the sound from your TV turns off. If your TV does not turn on your TV or remote control. Connecting a digital audio amplifier To connect a digital audio amplifier: • Connect a digital audio cable ...press (power) on the amplifier. Note When the computer enters standby mode, your TV's speakers is muted. Connecting a computer Note If the computer has an HDMI jack, you "wake" your TV. Side of TV Side of TV 2 Connect an audio cable to the PC IN AUDIO jack on the side of...


