
Firmware Installation Guide (English)
Page 1
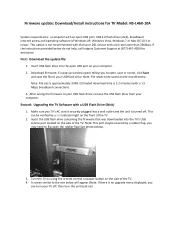
...firmware that was downloaded into the TV's USB service port located on the front of Windows XP, Windows Vista, Windows 7 or Mac OS 10.3 or newer. Firmware update: Download/Install instructions for assistance. if a pop‐up or DSL service with a 1.5 Mbps broadband connection). ... Estimated download time is approximately 3 MB. After saving the firmware to the one below do not help, call Insignia Customer Support at (877) 467‐4289 for TV Model: NS‐L46X‐10A System requirements: a computer with a USB Flash Drive (Stick) 1. Note: File size is 1‐2 minutes ...
...firmware that was downloaded into the TV's USB service port located on the front of Windows XP, Windows Vista, Windows 7 or Mac OS 10.3 or newer. Firmware update: Download/Install instructions for assistance. if a pop‐up or DSL service with a 1.5 Mbps broadband connection). ... Estimated download time is approximately 3 MB. After saving the firmware to the one below do not help, call Insignia Customer Support at (877) 467‐4289 for TV Model: NS‐L46X‐10A System requirements: a computer with a USB Flash Drive (Stick) 1. Note: File size is 1‐2 minutes ...
User Manual (English)
Page 3
... to work with your TV . . . . 8 Making connections 9 Connecting the power 9 Connecting an outdoor antenna 9 Connecting cable TV 9 Connecting satellite TV via a satellite TV box 10 Connecting a VCR 10 Connecting a camcorder or game console 11 Connecting an HDMI device 11 Connecting a component video device 12 Connecting a S-Video device 12 Connecting a computer 13 Connecting...
... to work with your TV . . . . 8 Making connections 9 Connecting the power 9 Connecting an outdoor antenna 9 Connecting cable TV 9 Connecting satellite TV via a satellite TV box 10 Connecting a VCR 10 Connecting a camcorder or game console 11 Connecting an HDMI device 11 Connecting a component video device 12 Connecting a S-Video device 12 Connecting a computer 13 Connecting...
User Manual (English)
Page 6
... other electric light or power circuits, or where it can fall into such power lines or circuits. Install in the vicinity of the obsolete outlet. 10 Protect the power cord from touching such power lines or circuits as vases, should not be grounded to this apparatus during a lightning storm, or when...
... other electric light or power circuits, or where it can fall into such power lines or circuits. Install in the vicinity of the obsolete outlet. 10 Protect the power cord from touching such power lines or circuits as vases, should not be grounded to this apparatus during a lightning storm, or when...
User Manual (English)
Page 9
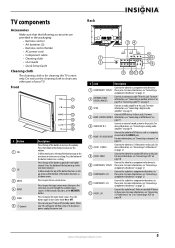
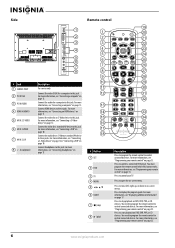
...channel. For more information, see "Connecting an analog audio amplifier" on -screen menu. For more information, see "Connecting a component video device" on page 10. For more 4 HDMI 1/HDMI 2/HDMI 3 information, see "Connecting a S-Video device" on 12 or "Connecting a VCR" on page 12. 11 ...DIGITAL/ANALOG Connect an antenna or cable TV to these jacks. For more information, see "Connecting a component video device" on page 12. 10 COMPONENT 2 L/R Connect the audio for a component video device to decrease a setting. Press to turn Game mode On or Off. For...
...channel. For more information, see "Connecting an analog audio amplifier" on -screen menu. For more information, see "Connecting a component video device" on page 10. For more 4 HDMI 1/HDMI 2/HDMI 3 information, see "Connecting a S-Video device" on 12 or "Connecting a VCR" on page 12. 11 ...DIGITAL/ANALOG Connect an antenna or cable TV to these jacks. For more information, see "Connecting a component video device" on page 12. 10 COMPONENT 2 L/R Connect the audio for a component video device to decrease a setting. Press to turn Game mode On or Off. For...
User Manual (English)
Page 10
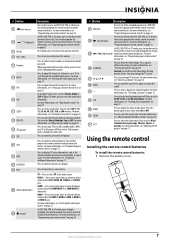
... 19 1 20 2 21 3 22 4 23 5 24 6 TV VIDEO COMP HDMI 25 7 26 8 27 9 28 10 29 11 30 12 31 32 13 14 33 15 34 16 GAME 35 DYN VOL 17 36 18 NS-RC02U-10A 37 # Button 1 SET 2 DVD 3 TV 4 MENU 5 6 GUIDE 7 (stop playback on page 17. Press to ...stop ) 8 (play) Description Press to program the remote control to control your remote control" on page 10. For more information, see "Displaying additional information" ...
... 19 1 20 2 21 3 22 4 23 5 24 6 TV VIDEO COMP HDMI 25 7 26 8 27 9 28 10 29 11 30 12 31 32 13 14 33 15 34 16 GAME 35 DYN VOL 17 36 18 NS-RC02U-10A 37 # Button 1 SET 2 DVD 3 TV 4 MENU 5 6 GUIDE 7 (stop playback on page 17. Press to ...stop ) 8 (play) Description Press to program the remote control to control your remote control" on page 10. For more information, see "Displaying additional information" ...
User Manual (English)
Page 11
.... In DVD, DVR, PVR, or CD mode, press to skip forward to control connected devices. Press again to the previous channel. You can select Off, 5, 10, 15, 30, 60, 90, 120, 180, or 240 minutes. www.insigniaproducts.com 7 In TV mode, press to return to unfreeze the image. When programming the... screen. 31 CH /CH Press to enter a digital sub-channel number. Caution: Do not freeze the video image for Audyssey Dynamic Volume. # Button 9 (fast reverse) 10 / (skip back) 11 RECALL 12 VOL+/VOL- 13 Numbers 14 INPUT 15 FAV 16 SAP 17 SLEEP 18 DYN VOL 19 (power) 20 STB 21...
.... In DVD, DVR, PVR, or CD mode, press to skip forward to control connected devices. Press again to the previous channel. You can select Off, 5, 10, 15, 30, 60, 90, 120, 180, or 240 minutes. www.insigniaproducts.com 7 In TV mode, press to return to unfreeze the image. When programming the... screen. 31 CH /CH Press to enter a digital sub-channel number. Caution: Do not freeze the video image for Audyssey Dynamic Volume. # Button 9 (fast reverse) 10 / (skip back) 11 RECALL 12 VOL+/VOL- 13 Numbers 14 INPUT 15 FAV 16 SAP 17 SLEEP 18 DYN VOL 19 (power) 20 STB 21...
User Manual (English)
Page 13
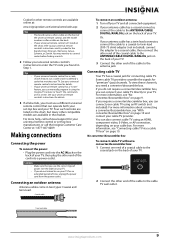
...See your universal remote control's instructions for details. • If your universal remote control or set -top box and your cable TV using the Insignia TV remote to "teach" the commands one end of a coaxial cable to the coaxial jack on the chart, refer to your universal remote control...3 If all connected equipment. 2 If your antenna cable has a coaxial connector, connect the cable to the ANTENNA/CABLE DIGITAL/ANALOG jack on page 10. Some cable TV providers scramble the signals for connecting cable TV. If you require a converter/descrambler box, you found in two types: Coaxial and...
...See your universal remote control's instructions for details. • If your universal remote control or set -top box and your cable TV using the Insignia TV remote to "teach" the commands one end of a coaxial cable to the coaxial jack on the chart, refer to your universal remote control...3 If all connected equipment. 2 If your antenna cable has a coaxial connector, connect the cable to the ANTENNA/CABLE DIGITAL/ANALOG jack on page 10. Some cable TV providers scramble the signals for connecting cable TV. If you require a converter/descrambler box, you found in two types: Coaxial and...
User Manual (English)
Page 14
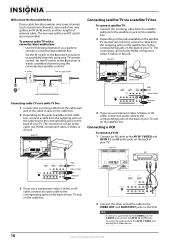
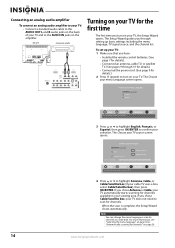
... to tune to unscrambled channels using the converter/descrambler controls. Note If a device is connected to the AV IN 1 VIDEO jack, unplug the S-Video device. 10 www.insigniaproducts.com To assign the audio jacks to the S-VIDEO jack, the S-VIDEO jack controls the AV IN 1 L and R jacks. Back of TV Cable...
... to tune to unscrambled channels using the converter/descrambler controls. Note If a device is connected to the AV IN 1 VIDEO jack, unplug the S-Video device. 10 www.insigniaproducts.com To assign the audio jacks to the S-VIDEO jack, the S-VIDEO jack controls the AV IN 1 L and R jacks. Back of TV Cable...
User Manual (English)
Page 18
... time you have: • Installed the remote control batteries. (See page 7 for details). • Connected an antenna, cable TV, or satellite TV. (See pages 9 through 10 for details.) • Connected the power cord. (See page 9 for channels" on your TV, the Setup Wizard opens.
... time you have: • Installed the remote control batteries. (See page 7 for details). • Connected an antenna, cable TV, or satellite TV. (See pages 9 through 10 for details.) • Connected the power cord. (See page 9 for channels" on your TV, the Setup Wizard opens.
User Manual (English)
Page 25
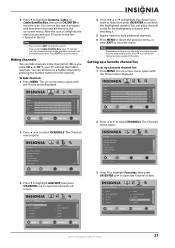
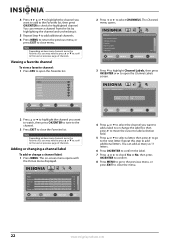
... menu, or press EXIT to the next or previous page of channels. Channels Add/Skip Channel PICTURE AUDIO CHANNELS SETTINGS Ch 5-0 Ch 9-1 WWOR DT Ch 10-0 Ch 60-2 Ch 60-4 Ch 9-0 Ch 9-2 WNYW DT Ch 60-1 Ch 60-3 Ch 60-7 MOVE OK ENTER SELECT MENU PREVIOUS Manually add and skip channels... uncheck the highlighted channel. After the scan is complete, the menu closes and your program list EXIT EXIT Channels Favorites Ch 5-0 Ch 9-1 WWOR DT Ch 10-0 Ch 60-2 Ch 60-4 PICTURE AUDIO CHANNELS SETTINGS Ch 9-0 Ch 9-2 WNYW DT Ch 60-1 Ch 60-3 Ch 60-7 MOVE OK ENTER SELECT Add channels to...
... menu, or press EXIT to the next or previous page of channels. Channels Add/Skip Channel PICTURE AUDIO CHANNELS SETTINGS Ch 5-0 Ch 9-1 WWOR DT Ch 10-0 Ch 60-2 Ch 60-4 Ch 9-0 Ch 9-2 WNYW DT Ch 60-1 Ch 60-3 Ch 60-7 MOVE OK ENTER SELECT MENU PREVIOUS Manually add and skip channels... uncheck the highlighted channel. After the scan is complete, the menu closes and your program list EXIT EXIT Channels Favorites Ch 5-0 Ch 9-1 WWOR DT Ch 10-0 Ch 60-2 Ch 60-4 PICTURE AUDIO CHANNELS SETTINGS Ch 9-0 Ch 9-2 WNYW DT Ch 60-1 Ch 60-3 Ch 60-7 MOVE OK ENTER SELECT Add channels to...
User Manual (English)
Page 26
... or to scroll to the next or previous page of channels. Note Depending on -screen menu opens with the Picture menu displayed. Favorites Ch 5-0 Ch 10-0 Ch 60-3 Ch 60-8 Ch 60-11 Ch 60-12 MOVE OK ENTER SELECT Add channels to create a favorites list MENU PREVIOUS EXIT EXIT 2 Press...
... or to scroll to the next or previous page of channels. Note Depending on -screen menu opens with the Picture menu displayed. Favorites Ch 5-0 Ch 10-0 Ch 60-3 Ch 60-8 Ch 60-11 Ch 60-12 MOVE OK ENTER SELECT Add channels to create a favorites list MENU PREVIOUS EXIT EXIT 2 Press...
User Manual (English)
Page 34
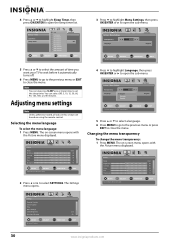
... in this section are based on -screen menu opens with the Picture menu displayed. Settings Time Date/Time Sleep Timer PICTUREOff AUDIO CHANNELS SETTINGS 5 minutes 10 minutes 15 minutes 30 minutes Off 60 minutes 90 minutes 120 minutes 180 minutes 240 minutes MOVE OK ENTER SELECT MENU PREVIOUS EXIT EXIT Settings... OK ENTER SELECT Adjust settings to affect picture quality MENU PREVIOUS EXIT EXIT 2 Press or to open the sub-menu. Note You can select Off, 5, 10, 15, 30, 60, 90, 120, 180, or 240 minutes. The on-screen menu opens with the Picture menu displayed.
... in this section are based on -screen menu opens with the Picture menu displayed. Settings Time Date/Time Sleep Timer PICTUREOff AUDIO CHANNELS SETTINGS 5 minutes 10 minutes 15 minutes 30 minutes Off 60 minutes 90 minutes 120 minutes 180 minutes 240 minutes MOVE OK ENTER SELECT MENU PREVIOUS EXIT EXIT Settings... OK ENTER SELECT Adjust settings to affect picture quality MENU PREVIOUS EXIT EXIT 2 Press or to open the sub-menu. Note You can select Off, 5, 10, 15, 30, 60, 90, 120, 180, or 240 minutes. The on-screen menu opens with the Picture menu displayed.
User Manual (English)
Page 38
...Enter 9 7 5. Precautions • Your original remote controls must be learned. Programming a learned key To program a learned key: 1 Place your Insignia remote control head-to check. Continue holding the key on the remote you wish to keep in the appropriate code listing at Step 1. 6 Repeat ... a memory fault. Once you have completed programming all data learned. Note If more than 10 seconds pass between key presses, the remote exits programming. Note If more than 10 seconds pass between key presses, the remote exits programming. Checking the codes If you have...
...Enter 9 7 5. Precautions • Your original remote controls must be learned. Programming a learned key To program a learned key: 1 Place your Insignia remote control head-to check. Continue holding the key on the remote you wish to keep in the appropriate code listing at Step 1. 6 Repeat ... a memory fault. Once you have completed programming all data learned. Note If more than 10 seconds pass between key presses, the remote exits programming. Note If more than 10 seconds pass between key presses, the remote exits programming. Checking the codes If you have...
User Manual (English)
Page 39
...controls the volume regardless of each selected device (global volume unlock). To unlock all learned keys in a specific mode Note If more than 10 seconds pass between key presses, the remote exits programming. To unlock channel locks: 1 Press and hold SET until the red LED blinks ...hold SET until the mode LED blinks twice, then release. 3 Enter 9 7 3.The mode LED blinks twice. 4 Press CH once. Using keymover Your Insignia universal remote control includes a keymover feature that lets you want to control (for independent operation or global volume unlock to remove all other modes. The...
...controls the volume regardless of each selected device (global volume unlock). To unlock all learned keys in a specific mode Note If more than 10 seconds pass between key presses, the remote exits programming. To unlock channel locks: 1 Press and hold SET until the red LED blinks ...hold SET until the mode LED blinks twice, then release. 3 Enter 9 7 3.The mode LED blinks twice. 4 Press CH once. Using keymover Your Insignia universal remote control includes a keymover feature that lets you want to control (for independent operation or global volume unlock to remove all other modes. The...


