Firmware Installation Guide (English)
Page 1
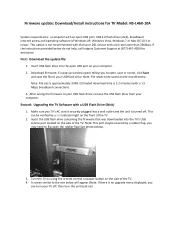
...: File needs to be verified by a rubber flap, you to open, save or cancel, click Save and save the file to flip open USB port, USB 2.0 flash drive (stick), broadband internet access and operating software of the TV. This can turn the unit back on the root directory. Firmware update: Download/Install instructions for assistance. Estimated download time is turned off , then turn your USB flash drive. Note: This port maybe covered by a red indicator light...
...: File needs to be verified by a rubber flap, you to open, save or cancel, click Save and save the file to flip open USB port, USB 2.0 flash drive (stick), broadband internet access and operating software of the TV. This can turn the unit back on the root directory. Firmware update: Download/Install instructions for assistance. Estimated download time is turned off , then turn your USB flash drive. Note: This port maybe covered by a red indicator light...
What is Firmware? (English)
Page 1
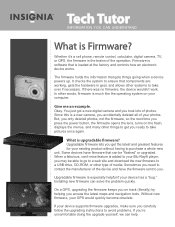
..., not the firmware, so the next time you press the power button, the firmware opens the lens, turns on the flash, displays the menus, and many other type of your Blu-Ray® player, you may be "flashed" or upgraded. Some devices have the firmware sent to take over if necessary. Firmware is much like the operating system on track (literally) by helping you took lots...
..., not the firmware, so the next time you press the power button, the firmware opens the lens, turns on the flash, displays the menus, and many other type of your Blu-Ray® player, you may be "flashed" or upgraded. Some devices have the firmware sent to take over if necessary. Firmware is much like the operating system on track (literally) by helping you took lots...
User Manual (English)
Page 3
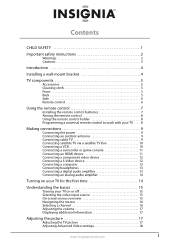
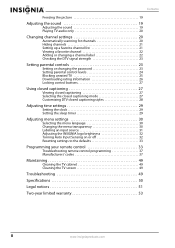
...safety instructions 2 Warnings 2 Cautions 3 Introduction 4 Installing a wall-mount bracket 4 TV components 5 Accessories 5 Cleaning cloth 5 Front 5 Back 5 Side 6 Remote control 6 Using the remote control 7 Installing the remote control batteries 7 Aiming the remote control 8 Using the remote control holder 8 Programming a universal remote control to work with your TV . . . . 8 Making connections 9 Connecting the power 9 Connecting an outdoor antenna 9 Connecting cable TV 9 Connecting satellite TV via a satellite TV box 10 Connecting a VCR 10 Connecting a camcorder or game...
...safety instructions 2 Warnings 2 Cautions 3 Introduction 4 Installing a wall-mount bracket 4 TV components 5 Accessories 5 Cleaning cloth 5 Front 5 Back 5 Side 6 Remote control 6 Using the remote control 7 Installing the remote control batteries 7 Aiming the remote control 8 Using the remote control holder 8 Programming a universal remote control to work with your TV . . . . 8 Making connections 9 Connecting the power 9 Connecting an outdoor antenna 9 Connecting cable TV 9 Connecting satellite TV via a satellite TV box 10 Connecting a VCR 10 Connecting a camcorder or game...
User Manual (English)
Page 4
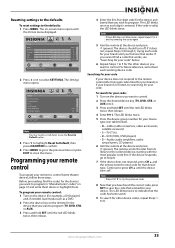
... Downloading rating information 26 Locking control buttons 27 Using closed captioning 27 Viewing closed captioning 27 Selecting the closed captioning mode 27 Customizing DTV closed captioning styles 28 Adjusting time settings 29 Setting the clock 29 Setting the sleep timer 29 Adjusting menu settings 30 Selecting the menu language 30 Changing the menu transparency 30 Labeling an input source 31 Adjusting the INSIGNIA logo brightness 32 Turning Auto Input Sensing on or off 32 Resetting settings to the defaults 33 Programming your remote control 33 Troubleshooting remote control...
... Downloading rating information 26 Locking control buttons 27 Using closed captioning 27 Viewing closed captioning 27 Selecting the closed captioning mode 27 Customizing DTV closed captioning styles 28 Adjusting time settings 29 Setting the clock 29 Setting the sleep timer 29 Adjusting menu settings 30 Selecting the menu language 30 Changing the menu transparency 30 Labeling an input source 31 Adjusting the INSIGNIA logo brightness 32 Turning Auto Input Sensing on or off 32 Resetting settings to the defaults 33 Programming your remote control 33 Troubleshooting remote control...

User Manual (English)
Page 5
..., such as suitable for proper use your flat panel display As you enjoy your new product, keep these safety tips in this manual, or otherwise listed by an independent laboratory as a chest of your TV. • Carefully read and understand all enclosed instructions for your TV. • Follow all instructions supplied by the TV and wall mount manufacturers. • If you...
..., such as suitable for proper use your flat panel display As you enjoy your new product, keep these safety tips in this manual, or otherwise listed by an independent laboratory as a chest of your TV. • Carefully read and understand all enclosed instructions for your TV. • Follow all instructions supplied by the TV and wall mount manufacturers. • If you...
User Manual (English)
Page 8
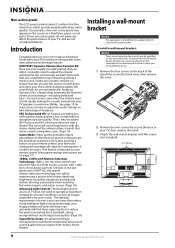
... scene? Installing a wall-mount bracket Warning This apparatus is held steady, making the sound coming from today's home theater. Introduction Congratulations on your remote control, your new Insignia Advanced Series television! By simply pressing a button on your television settings will be supported by UL Listed wall mount bracket. More game settings instructions are qualified to reduce the power consumed by its backlight, saving energy without sacrificing picture quality. (Page 18) SupraHD by qualified service personnel...
... scene? Installing a wall-mount bracket Warning This apparatus is held steady, making the sound coming from today's home theater. Introduction Congratulations on your remote control, your new Insignia Advanced Series television! By simply pressing a button on your television settings will be supported by UL Listed wall mount bracket. More game settings instructions are qualified to reduce the power consumed by its backlight, saving energy without sacrificing picture quality. (Page 18) SupraHD by qualified service personnel...
User Manual (English)
Page 9
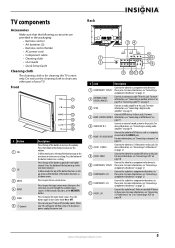
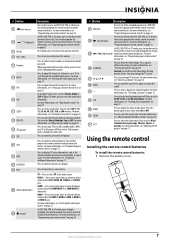
... power cord • Component cable • Cleaning cloth • User Guide • Quick Setup Guide Cleaning cloth The cleaning cloth is off (standby mode). Front 1 2 3 4 GAME 5 6 # Button 1 VOL 2 CH 3 MENU 4 INPUT 5 GAME 6 (power) Description Press the top of the button to go to the next menu or to this jack. Press to these jacks. Connect HDMI devices to increase the volume. For more information, see "Connecting a component video device" on page 12. 10 COMPONENT 2 L/R Connect the audio for a component video device...
... power cord • Component cable • Cleaning cloth • User Guide • Quick Setup Guide Cleaning cloth The cleaning cloth is off (standby mode). Front 1 2 3 4 GAME 5 6 # Button 1 VOL 2 CH 3 MENU 4 INPUT 5 GAME 6 (power) Description Press the top of the button to go to the next menu or to this jack. Press to these jacks. Connect HDMI devices to increase the volume. For more information, see "Connecting a component video device" on page 12. 10 COMPONENT 2 L/R Connect the audio for a component video device...
User Manual (English)
Page 10
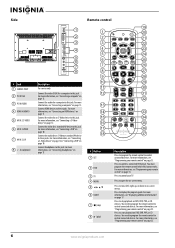
... "Connecting a S-Video device" on page 12 or "Connecting a VCR" on page 17. For more information, see "Displaying additional information" on page 10. You must program the remote control before this jack. Connect HDMI devices to this jack. Side # Jack 1 SERVICE PORT 2 PC IN VGA 3 PC IN AUDIO 4 HDMI 4/HDMI 5 5 AV IN 2 S-VIDEO 6 AV IN 2 VIDEO 7 AV IN 2 L/R 8 (headphone) 1 2 3 4 5 6 7 8 Description For service only. Connect the video for a computer to this jack. For more information, see "Programming your TV. Connect...
... "Connecting a S-Video device" on page 12 or "Connecting a VCR" on page 17. For more information, see "Displaying additional information" on page 10. You must program the remote control before this jack. Connect HDMI devices to this jack. Side # Jack 1 SERVICE PORT 2 PC IN VGA 3 PC IN AUDIO 4 HDMI 4/HDMI 5 5 AV IN 2 S-VIDEO 6 AV IN 2 VIDEO 7 AV IN 2 L/R 8 (headphone) 1 2 3 4 5 6 7 8 Description For service only. Connect the video for a computer to this jack. For more information, see "Programming your TV. Connect...
User Manual (English)
Page 11
... the previous channel. Using the remote control Installing the remote control batteries To install the remote control batteries: 1 Remove the battery cover. In TV mode, press to return to select the aspect ratio. Press to open the Favorite Channel list. In analog TV mode, press to cycle through the available input sources. In digital TV mode, press to control connected devices. For more times to select the device connected to the COMPONENT 1 or COMPONENT 2 video jacks. You need to program the remote control to display TV...
... the previous channel. Using the remote control Installing the remote control batteries To install the remote control batteries: 1 Remove the battery cover. In TV mode, press to return to select the aspect ratio. Press to open the Favorite Channel list. In analog TV mode, press to cycle through the available input sources. In digital TV mode, press to control connected devices. For more times to select the device connected to the COMPONENT 1 or COMPONENT 2 video jacks. You need to program the remote control to display TV...
User Manual (English)
Page 13
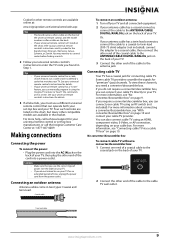
... scramble the signals for connecting cable TV. You can manually program it using the Insignia TV remote to your universal remote control's instructions and try several codes before finding a match. 2 Follow your TV, then plug the other end of the cord into the AC IN jack on the back of your universal remote control's instructions to enter the TV code you do not intend to the ANTENNA/CABLE DIGITAL/ANALOG jack on page 9. See your universal remote control's instructions for...
... scramble the signals for connecting cable TV. You can manually program it using the Insignia TV remote to your universal remote control's instructions and try several codes before finding a match. 2 Follow your TV, then plug the other end of the cord into the AC IN jack on the back of your universal remote control's instructions to enter the TV code you do not intend to the ANTENNA/CABLE DIGITAL/ANALOG jack on page 9. See your universal remote control's instructions for...
User Manual (English)
Page 15
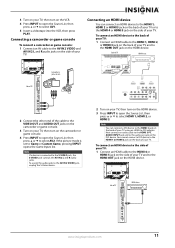
... the Game Inputs list. Note If a device is set to -DVI adapter. Note You can connect an HDMI device to the HDMI 4 or HDMI 5 jack on the HDMI device. Next connect an audio cable to the HDMI 3 PC AUDIO INPUT jack and to select HDMI 1, HDMI 2, or HDMI 3. You cannot connect a DVI device to select AV1. 5 Insert a videotape into the VCR, then press PLAY. Connecting a camcorder or game console To connect a camcorder or game console: 1 Connect an AV cable to the AV IN 2 VIDEO...
... the Game Inputs list. Note If a device is set to -DVI adapter. Note You can connect an HDMI device to the HDMI 4 or HDMI 5 jack on the HDMI device. Next connect an audio cable to the HDMI 3 PC AUDIO INPUT jack and to select HDMI 1, HDMI 2, or HDMI 3. You cannot connect a DVI device to select AV1. 5 Insert a videotape into the VCR, then press PLAY. Connecting a camcorder or game console To connect a camcorder or game console: 1 Connect an AV cable to the AV IN 2 VIDEO...
User Manual (English)
Page 19
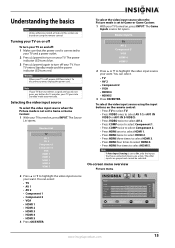
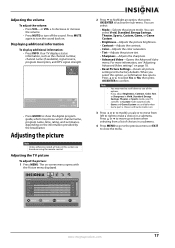
... List TV AV 1 AV 2 Component 1 Component 2 VGA HDMI 1 HDMI 2 HDMI 3 HDMI 4 HDMI 5 2 Press or to highlight the video input source your TV is connected to your TV and a power outlet. 2 Press (power) to Game or Game Custom: 1 With your TV turned on the remote control: • Press TV to select TV. • Press VIDEO once to select AV 1(for 15 minutes, your want . The Game Inputs source list opens. On-screen menu overview Picture menu Picture Mode Brightness Contrast Color Tint Sharpness PICTURE AUDIO CHANNELS SETTINGS...
... List TV AV 1 AV 2 Component 1 Component 2 VGA HDMI 1 HDMI 2 HDMI 3 HDMI 4 HDMI 5 2 Press or to highlight the video input source your TV is connected to your TV and a power outlet. 2 Press (power) to Game or Game Custom: 1 With your TV turned on the remote control: • Press TV to select TV. • Press VIDEO once to select AV 1(for 15 minutes, your want . The Game Inputs source list opens. On-screen menu overview Picture menu Picture Mode Brightness Contrast Color Tint Sharpness PICTURE AUDIO CHANNELS SETTINGS...
User Manual (English)
Page 21
..., Energy Savings, Theater, or Sports mode, your TV switches to turn the sound back on using the remote control. Note • • • You may show current channel name, program name, time, rating, and summaries, depending on -screen menu opens with the Picture menu displayed. If you select this section are available when Game port is chosen and Game mode is on page 18. • Reset Picture Settings-Resets all the options. Adjusting the volume To adjust the volume...
..., Energy Savings, Theater, or Sports mode, your TV switches to turn the sound back on using the remote control. Note • • • You may show current channel name, program name, time, rating, and summaries, depending on -screen menu opens with the Picture menu displayed. If you select this section are available when Game port is chosen and Game mode is on page 18. • Reset Picture Settings-Resets all the options. Adjusting the volume To adjust the volume...
User Manual (English)
Page 22
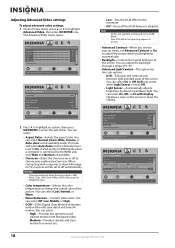
... under TV mode and when Auto Zoom on the Channels menu is connected to the HDMI jack, only Wide and Normal are available. • Overscan --Select the Overscan on TV, overscan will be set to show the effects). Warning Overscan work only when the input signal is set Advanced Contrast to On to change the overall color of the screen. Picture Brightness Contrast Color Tint Sharpness Advanced Video PICTURE AUDIO CHANNELS SETTINGS 50...
... under TV mode and when Auto Zoom on the Channels menu is connected to the HDMI jack, only Wide and Normal are available. • Overscan --Select the Overscan on TV, overscan will be set to show the effects). Warning Overscan work only when the input signal is set Advanced Contrast to On to change the overall color of the screen. Picture Brightness Contrast Color Tint Sharpness Advanced Video PICTURE AUDIO CHANNELS SETTINGS 50...
User Manual (English)
Page 24
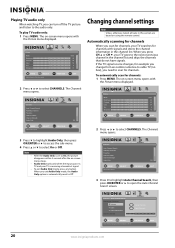
... Antenna Cable Cable/Satellite Box 0 Analog Channels 0 Digital Channels Scan for channels MOVE OK ENTER SELECT MENU PREVIOUS Select Antenna if using the remote control. Picture Mode Brightness Contrast Color Tint Sharpness PICTURE AUDIO CHANNELS SETTINGS Vivid 42 45 54 0 +5 MOVE OK ENTER SELECT Adjust settings to affect picture quality MENU PREVIOUS EXIT EXIT 2 Press or to select On or Off. The Channels menu opens. 3 Press to highlight Audio Only, then press OK/ENTER or to access the sub-menu. 4 Press or to select CHANNELS. To play TV audio...
... Antenna Cable Cable/Satellite Box 0 Analog Channels 0 Digital Channels Scan for channels MOVE OK ENTER SELECT MENU PREVIOUS Select Antenna if using the remote control. Picture Mode Brightness Contrast Color Tint Sharpness PICTURE AUDIO CHANNELS SETTINGS Vivid 42 45 54 0 +5 MOVE OK ENTER SELECT Adjust settings to affect picture quality MENU PREVIOUS EXIT EXIT 2 Press or to select On or Off. The Channels menu opens. 3 Press to highlight Audio Only, then press OK/ENTER or to access the sub-menu. 4 Press or to select CHANNELS. To play TV audio...
User Manual (English)
Page 25
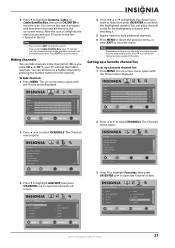
... highlight the channel you select Cable/Satellite Box, your TV will not scan for channels because the available channels are in the channel list. Picture Mode Brightness Contrast Color Tint Sharpness PICTURE AUDIO CHANNELS SETTINGS Vivid 42 45 54 0 +5 MOVE OK ENTER SELECT Adjust settings to affect picture quality MENU PREVIOUS EXIT EXIT 4 Press or to the first channel in the on -screen menu opens with the Picture menu displayed. You can hide channels in the channel list, you press...
... highlight the channel you select Cable/Satellite Box, your TV will not scan for channels because the available channels are in the channel list. Picture Mode Brightness Contrast Color Tint Sharpness PICTURE AUDIO CHANNELS SETTINGS Vivid 42 45 54 0 +5 MOVE OK ENTER SELECT Adjust settings to affect picture quality MENU PREVIOUS EXIT EXIT 4 Press or to the first channel in the on -screen menu opens with the Picture menu displayed. You can hide channels in the channel list, you press...

User Manual (English)
Page 27
... the menu. Settings Parental Controls Closed Caption Time Menu Settings LOGO Brightness Auto Input Sensing PICTURE AUDIO CHANNELS SETTINGS Low On MOVE OK ENTER SELECT Set various TV options MENU PREVIOUS EXIT EXIT 3 Press to select CHANNELS. The Channels menu opens. Enter Password www.insigniaproducts.com 23 Setting or changing the password Your TV has a V-chip that lets you need to select SETTINGS. The on content and age). Picture Mode Brightness Contrast Color Tint Sharpness PICTURE AUDIO CHANNELS SETTINGS Vivid 42 45 54 0 +5 MOVE OK ENTER SELECT Adjust settings...
... the menu. Settings Parental Controls Closed Caption Time Menu Settings LOGO Brightness Auto Input Sensing PICTURE AUDIO CHANNELS SETTINGS Low On MOVE OK ENTER SELECT Set various TV options MENU PREVIOUS EXIT EXIT 3 Press to select CHANNELS. The Channels menu opens. Enter Password www.insigniaproducts.com 23 Setting or changing the password Your TV has a V-chip that lets you need to select SETTINGS. The on content and age). Picture Mode Brightness Contrast Color Tint Sharpness PICTURE AUDIO CHANNELS SETTINGS Vivid 42 45 54 0 +5 MOVE OK ENTER SELECT Adjust settings...
User Manual (English)
Page 37
... works, see table below . 6 Repeat Steps 1 to 5 for your remote to the remote control after trying all codes listed for your brand, or if your brand is not listed, try searching for your device type (see "Searching for your code. The LED blinks twice to the selected device, starting with the Picture menu displayed. Settings Parental Controls Closed Caption Time Menu Settings LOGO Brightness Auto Input Sensing PICTURE AUDIO CHANNELS SETTINGS Low On MOVE OK ENTER SELECT Set various TV options MENU...
... works, see table below . 6 Repeat Steps 1 to 5 for your remote to the remote control after trying all codes listed for your brand, or if your brand is not listed, try searching for your device type (see "Searching for your code. The LED blinks twice to the selected device, starting with the Picture menu displayed. Settings Parental Controls Closed Caption Time Menu Settings LOGO Brightness Auto Input Sensing PICTURE AUDIO CHANNELS SETTINGS Low On MOVE OK ENTER SELECT Set various TV options MENU...
User Manual (English)
Page 53
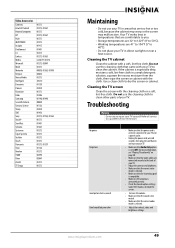
..., color, and brightness settings. Some TEXT modes can block the screen. • Increase the volume. • Make sure that the sound is not muted. • Make sure that the correct audio mode is set to your TV and a power outlet. • Unplug the power cord, wait 60 seconds, then plug the cord back in and turn on page 20. • Make sure that the video cables are connected...
..., color, and brightness settings. Some TEXT modes can block the screen. • Increase the volume. • Make sure that the sound is not muted. • Make sure that the correct audio mode is set to your TV and a power outlet. • Unplug the power cord, wait 60 seconds, then plug the cord back in and turn on page 20. • Make sure that the video cables are connected...
User Manual (English)
Page 54
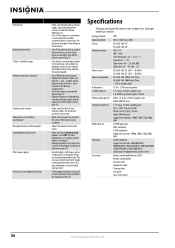
... be poor. This can make the picture difficult to see "Locking control buttons" on page 27. • Unplug the power cord, wait a few bright or dark dots on , the picture may be too close to another connected device is set to change without notice. Analog standard Digital standard Screen Channel coverage Power source Power consumption Audio power S-Video input (2) Video/audio input (2) Component input (2) HDMI input (5) VGA input Accessories NTSC ATSC, 8-VSB, Clear-QAM NS-L42X-10A: 42" NS-L46X-10A: 46" VHF: 2-13 UHF: 14...
... be poor. This can make the picture difficult to see "Locking control buttons" on page 27. • Unplug the power cord, wait a few bright or dark dots on , the picture may be too close to another connected device is set to change without notice. Analog standard Digital standard Screen Channel coverage Power source Power consumption Audio power S-Video input (2) Video/audio input (2) Component input (2) HDMI input (5) VGA input Accessories NTSC ATSC, 8-VSB, Clear-QAM NS-L42X-10A: 42" NS-L46X-10A: 46" VHF: 2-13 UHF: 14...


