
Firmware Installation Guide (English)
Page 1
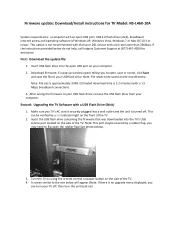
... update: Download/Install instructions for assistance. Download firmware; remove the USB flash drive from your TV off . Turn the TV on using the remote control or power button on ): Note: This port maybe covered by a rubber flap, you can be saved on the front of the TV... USB port on the side of the TV. 2. A screen similar to the one below do not help, call Insignia Customer Support at (877) 467‐4289 for TV Model: NS‐L46X‐10A System requirements: a computer with an open USB port, USB 2.0 flash drive (stick), broadband internet access and operating...
... update: Download/Install instructions for assistance. Download firmware; remove the USB flash drive from your TV off . Turn the TV on using the remote control or power button on ): Note: This port maybe covered by a rubber flap, you can be saved on the front of the TV... USB port on the side of the TV. 2. A screen similar to the one below do not help, call Insignia Customer Support at (877) 467‐4289 for TV Model: NS‐L46X‐10A System requirements: a computer with an open USB port, USB 2.0 flash drive (stick), broadband internet access and operating...

Firmware Installation Guide (English)
Page 2
Using your remote control arrow keys, make sure the "Yes" button is highlighted and press enter/OK on the remote control, TV will then restart. Remove the USB flash drive (stick) from the TV. 8. Press the Enter/OK key on the remote. this update takes approximately one shown below will appear displaying the progress of the update; 5. Once the update has completed, a screen similar to the one (1) minute. 6. The software update will then begin Note: DO NOT TURN THE POWER OFF OR UNPLUG DURING THE UPDATE Note: During the software update, a progress bar will appear: 7.
Using your remote control arrow keys, make sure the "Yes" button is highlighted and press enter/OK on the remote control, TV will then restart. Remove the USB flash drive (stick) from the TV. 8. Press the Enter/OK key on the remote. this update takes approximately one shown below will appear displaying the progress of the update; 5. Once the update has completed, a screen similar to the one (1) minute. 6. The software update will then begin Note: DO NOT TURN THE POWER OFF OR UNPLUG DURING THE UPDATE Note: During the software update, a progress bar will appear: 7.
What is Firmware? (English)
Page 1
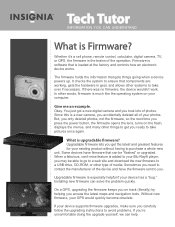
.... When a fabulous, can solve the problem quickly. On a GPS, upgrading the firmware keeps you on your GPS would quickly become obsolete. Whether it's a cell phone, remote control, calculator, digital camera, TV, or GPS, the firmware is much like the operating system on track (literally) by helping you accidentally deleted all of...
.... When a fabulous, can solve the problem quickly. On a GPS, upgrading the firmware keeps you on your GPS would quickly become obsolete. Whether it's a cell phone, remote control, calculator, digital camera, TV, or GPS, the firmware is much like the operating system on track (literally) by helping you accidentally deleted all of...
User Manual (English)
Page 3
... instructions 2 Warnings 2 Cautions 3 Introduction 4 Installing a wall-mount bracket 4 TV components 5 Accessories 5 Cleaning cloth 5 Front 5 Back 5 Side 6 Remote control 6 Using the remote control 7 Installing the remote control batteries 7 Aiming the remote control 8 Using the remote control holder 8 Programming a universal remote control to work with your TV . . . . 8 Making connections 9 Connecting the power 9 Connecting an outdoor antenna 9 Connecting cable...
... instructions 2 Warnings 2 Cautions 3 Introduction 4 Installing a wall-mount bracket 4 TV components 5 Accessories 5 Cleaning cloth 5 Front 5 Back 5 Side 6 Remote control 6 Using the remote control 7 Installing the remote control batteries 7 Aiming the remote control 8 Using the remote control holder 8 Programming a universal remote control to work with your TV . . . . 8 Making connections 9 Connecting the power 9 Connecting an outdoor antenna 9 Connecting cable...
User Manual (English)
Page 4
... language 30 Changing the menu transparency 30 Labeling an input source 31 Adjusting the INSIGNIA logo brightness 32 Turning Auto Input Sensing on or off 32 Resetting settings to the defaults 33 Programming your remote control 33 Troubleshooting remote control programming 37 Manufacturers' codes 37 Maintaining 49 Cleaning the TV cabinet 49 Cleaning...
... language 30 Changing the menu transparency 30 Labeling an input source 31 Adjusting the INSIGNIA logo brightness 32 Turning Auto Input Sensing on or off 32 Resetting settings to the defaults 33 Programming your remote control 33 Troubleshooting remote control programming 37 Manufacturers' codes 37 Maintaining 49 Cleaning the TV cabinet 49 Cleaning...
User Manual (English)
Page 6
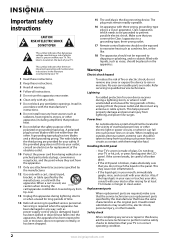
... or longer in fire, electric shock, personal injury, or other . Make sure that you connect the Class I apparatus to a grounding-type, three-prong outlet. 17 Remote control batteries should not be exposed to excessive heat such as vases, should be located in your eyes or touches your skin, consult with your...
... or longer in fire, electric shock, personal injury, or other . Make sure that you connect the Class I apparatus to a grounding-type, three-prong outlet. 17 Remote control batteries should not be exposed to excessive heat such as vases, should be located in your eyes or touches your skin, consult with your...
User Manual (English)
Page 8
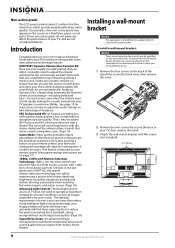
... More game settings instructions are for you could better hear whispering during a movie scene? SRS TruSurround HD: At Insignia, providing you put the remote control down and enjoy your screen. These non-active pixels do so. 1 Remove the four screws on how to... added SRS TruSurround HD, which provide exceptionally sharp video quality. Using intelligent light sensing technology, your new Insignia Advanced Series television! Introduction Congratulations on your remote control, your television settings will be easier. (The button is intended to get the maximum experience. See...
... More game settings instructions are for you could better hear whispering during a movie scene? SRS TruSurround HD: At Insignia, providing you put the remote control down and enjoy your screen. These non-active pixels do so. 1 Remove the four screws on how to... added SRS TruSurround HD, which provide exceptionally sharp video quality. Using intelligent light sensing technology, your new Insignia Advanced Series television! Introduction Congratulations on your remote control, your television settings will be easier. (The button is intended to get the maximum experience. See...
User Manual (English)
Page 9
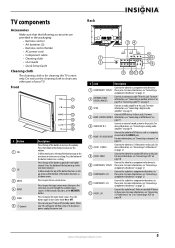
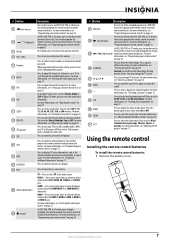
..., then press the arrow keys to these jacks. TV components Accessories Make sure that the following accessories are provided in the packaging: • Remote control • AA batteries (2) • Remote control holder • AC power cord • Component cable • Cleaning cloth • User Guide • Quick Setup Guide Cleaning cloth The...
..., then press the arrow keys to these jacks. TV components Accessories Make sure that the following accessories are provided in the packaging: • Remote control • AA batteries (2) • Remote control holder • AC power cord • Component cable • Cleaning cloth • User Guide • Quick Setup Guide Cleaning cloth The...
User Manual (English)
Page 10
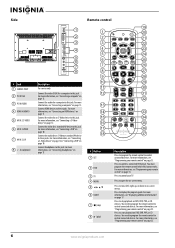
...31 32 13 14 33 15 34 16 GAME 35 DYN VOL 17 36 18 NS-RC02U-10A 37 # Button 1 SET 2 DVD 3 TV 4 MENU 5 6 GUIDE 7 (stop playback on page 13. Press to control your remote control" on page 33. 6 www.insigniaproducts.com For more information, see "...Programming your remote control" on page 13. For more information, see "Connecting an HDMI device" on page 17....
...31 32 13 14 33 15 34 16 GAME 35 DYN VOL 17 36 18 NS-RC02U-10A 37 # Button 1 SET 2 DVD 3 TV 4 MENU 5 6 GUIDE 7 (stop playback on page 13. Press to control your remote control" on page 33. 6 www.insigniaproducts.com For more information, see "...Programming your remote control" on page 13. For more information, see "Connecting an HDMI device" on page 17....
User Manual (English)
Page 11
...codes. You can select Off, 5, 10, 15, 30, 60, 90, 120, 180, or 240 minutes. www.insigniaproducts.com 7 When programming the remote control, press to enter a digital sub-channel number. For more information, see "Displaying additional information" on page 33. In digital TV mode, press... device. Press to control a connected set the sleep timer. Press to control connected devices. HDMI-Press one or more information, see "Programming your remote control" on page 17. For more times to select the device connected the AV 1 VIDEO, AV 2 VIDEO, or S-VIDEO jack. For more...
...codes. You can select Off, 5, 10, 15, 30, 60, 90, 120, 180, or 240 minutes. www.insigniaproducts.com 7 When programming the remote control, press to enter a digital sub-channel number. For more information, see "Displaying additional information" on page 33. In digital TV mode, press... device. Press to control a connected set the sleep timer. Press to control connected devices. HDMI-Press one or more information, see "Programming your remote control" on page 17. For more times to select the device connected the AV 1 VIDEO, AV 2 VIDEO, or S-VIDEO jack. For more...
User Manual (English)
Page 12
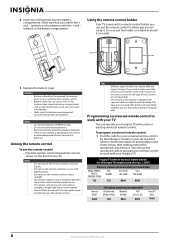
... when the charge is not going to work with a new or existing universal remote control. The remote control may not work with your Insignia TV with all Insignia TVs manufactured after Jan. 1, 2007) Universal remote control manufacturers and models Philips PHDVD5, PH5DSS, PMDVR8, PDVR8 RCA RCU807 One for... wall. (Screws are not using it. symbols in direct sunlight. Make sure that you can operate your Insignia TV. Using the remote control holder Your TV comes with a remote control holder you match the + and - Screws Tape 3 Replace the battery cover. Notes Do not mix...
... when the charge is not going to work with a new or existing universal remote control. The remote control may not work with your Insignia TV with all Insignia TVs manufactured after Jan. 1, 2007) Universal remote control manufacturers and models Philips PHDVD5, PH5DSS, PMDVR8, PDVR8 RCA RCU807 One for... wall. (Screws are not using it. symbols in direct sunlight. Make sure that you can operate your Insignia TV. Using the remote control holder Your TV comes with a remote control holder you match the + and - Screws Tape 3 Replace the battery cover. Notes Do not mix...
User Manual (English)
Page 13
...converter/descrambler box, see "With converter/descrambler box" on page 10 and contact your TV. You can manually program it using the Insignia TV remote to "teach" the commands one end of a coaxial cable to the coaxial jack on the front of your cable TV provider. Four such... Turn off your TV. For more help, call the Insignia Customer Care Center at a time. Twin-lead cable www.insigniaproducts.com 9 Tips • If your universal remote control has a code search feature, run a code search to use a different universal remote control that can connect your cable TV using an HDMI...
...converter/descrambler box, see "With converter/descrambler box" on page 10 and contact your TV. You can manually program it using the Insignia TV remote to "teach" the commands one end of a coaxial cable to the coaxial jack on the front of your cable TV provider. Four such... Turn off your TV. For more help, call the Insignia Customer Care Center at a time. Twin-lead cable www.insigniaproducts.com 9 Tips • If your universal remote control has a code search feature, run a code search to use a different universal remote control that can connect your cable TV using an HDMI...
User Manual (English)
Page 14
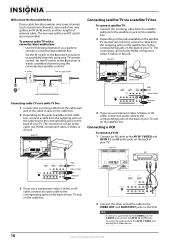
Set the RF switch to the B position to watch scrambled channels using your TV remote control. Back of TV Satellite receiver HDMI Video or S-Video Component 3 If you use a component video, S-Video, or AV cable, connect an audio cable to ...
Set the RF switch to the B position to watch scrambled channels using your TV remote control. Back of TV Satellite receiver HDMI Video or S-Video Component 3 If you use a component video, S-Video, or AV cable, connect an audio cable to ...

User Manual (English)
Page 17
... audio jack on the computer. Connecting a computer Note If the computer has an HDMI jack, you "wake" your computer, press (power) on your TV or remote control. Note When headphones are plugged in, the sound from your TV turns off. Side of TV Side of TV 2 Connect an audio cable to...
... audio jack on the computer. Connecting a computer Note If the computer has an HDMI jack, you "wake" your computer, press (power) on your TV or remote control. Note When headphones are plugged in, the sound from your TV turns off. Side of TV Side of TV 2 Connect an audio cable to...
User Manual (English)
Page 18
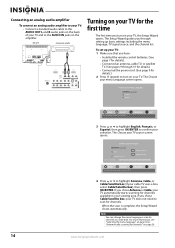
... through 10 for details.) • Connected the power cord. (See page 9 for channels at a later date. The Setup Wizard guides you have: • Installed the remote control batteries. (See page 7 for channels available in your menu Language screen opens. Choose your menu Language English Français Español MOVE...
... through 10 for details.) • Connected the power cord. (See page 9 for channels at a later date. The Setup Wizard guides you have: • Installed the remote control batteries. (See page 7 for channels available in your menu Language screen opens. Choose your menu Language English Français Español MOVE...
User Manual (English)
Page 19
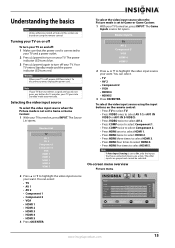
... 2 VGA HDMI 4 HDMI 5 2 Press or to Game or Game Custom: 1 With your TV turned on your TV turned on using the input buttons on the remote control: • Press TV to select TV. • Press VIDEO once to select AV 1(for 15 minutes, your TV. You can select. • TV •... not set to turn off : 1 Make sure that have connected devices are grayed and cannot be selected. To select the video input source using the remote control.
... 2 VGA HDMI 4 HDMI 5 2 Press or to Game or Game Custom: 1 With your TV turned on your TV turned on using the input buttons on the remote control: • Press TV to select TV. • Press VIDEO once to select AV 1(for 15 minutes, your TV. You can select. • TV •... not set to turn off : 1 Make sure that have connected devices are grayed and cannot be selected. To select the video input source using the remote control.
User Manual (English)
Page 21
..., Contrast, Color, Tint, or Sharpness in a submenu. 4 Press MENU to go to the previous menu or EXIT to turn the sound back on using the remote control. or VOL + to decrease or increase the volume. • Press MUTE to close the menu. The on the information provided by the broadcaster.
..., Contrast, Color, Tint, or Sharpness in a submenu. 4 Press MENU to go to the previous menu or EXIT to turn the sound back on using the remote control. or VOL + to decrease or increase the volume. • Press MUTE to close the menu. The on the information provided by the broadcaster.
User Manual (English)
Page 23
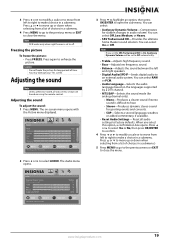
... the SRS TruSurround HD to On, Audyssey Dynamic Volume will be set to off. Note If you select this section are based on using the remote control. Press or to move from left and right speakers. • Digital Audio/SPDIF-Sends digital audio to unfreeze the picture.
... the SRS TruSurround HD to On, Audyssey Dynamic Volume will be set to off. Note If you select this section are based on using the remote control. Press or to move from left and right speakers. • Digital Audio/SPDIF-Sends digital audio to unfreeze the picture.
User Manual (English)
Page 24
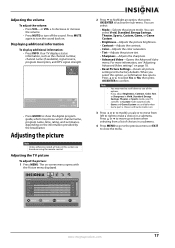
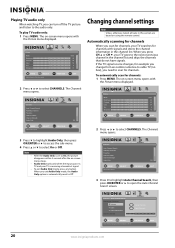
... TV source Antenna Cable Cable/Satellite Box 0 Analog Channels 0 Digital Channels Scan for channels MOVE OK ENTER SELECT MENU PREVIOUS Select Antenna if using the remote control. Picture Mode Brightness Contrast Color Tint Sharpness PICTURE AUDIO CHANNELS SETTINGS Vivid 42 45 54 0 +5 MOVE OK ENTER SELECT Adjust settings to affect picture...
... TV source Antenna Cable Cable/Satellite Box 0 Analog Channels 0 Digital Channels Scan for channels MOVE OK ENTER SELECT MENU PREVIOUS Select Antenna if using the remote control. Picture Mode Brightness Contrast Color Tint Sharpness PICTURE AUDIO CHANNELS SETTINGS Vivid 42 45 54 0 +5 MOVE OK ENTER SELECT Adjust settings to affect picture...

User Manual (English)
Page 27
... 54 0 +5 MOVE OK ENTER SELECT Adjust settings to affect picture quality MENU PREVIOUS EXIT EXIT 2 Press or to close the menu. The on using the remote control.
... 54 0 +5 MOVE OK ENTER SELECT Adjust settings to affect picture quality MENU PREVIOUS EXIT EXIT 2 Press or to close the menu. The on using the remote control.


