
User Manual (English)
Page 3
... input source 15 On-screen menu overview 15 Navigating the menus 16 Selecting a channel 16 Adjusting the volume 17 Displaying additional information 17 Adjusting the picture 17 Adjusting the TV picture 17 Adjusting Advanced Video settings 18 www.insigniaproducts.com i
... input source 15 On-screen menu overview 15 Navigating the menus 16 Selecting a channel 16 Adjusting the volume 17 Displaying additional information 17 Adjusting the picture 17 Adjusting the TV picture 17 Adjusting Advanced Video settings 18 www.insigniaproducts.com i
User Manual (English)
Page 4
...picture 19 Adjusting the sound 19 Adjusting the sound 19 Playing TV audio only 20 Changing channel settings 20 Automatically scanning for channels 20 Hiding channels 21 Setting up a favorite channel list 21 Viewing a favorite channel 22 Adding or changing a channel label 22 Checking the DTV signal strength 23 Setting...30 Changing the menu transparency 30 Labeling an input source 31 Adjusting the INSIGNIA logo brightness 32 Turning Auto Input Sensing on or off 32 Resetting settings to the defaults 33 Programming your remote control 33 Troubleshooting remote control programming ...
...picture 19 Adjusting the sound 19 Adjusting the sound 19 Playing TV audio only 20 Changing channel settings 20 Automatically scanning for channels 20 Hiding channels 21 Setting up a favorite channel list 21 Viewing a favorite channel 22 Adding or changing a channel label 22 Checking the DTV signal strength 23 Setting...30 Changing the menu transparency 30 Labeling an input source 31 Adjusting the INSIGNIA logo brightness 32 Turning Auto Input Sensing on or off 32 Resetting settings to the defaults 33 Programming your remote control 33 Troubleshooting remote control programming ...
User Manual (English)
Page 8
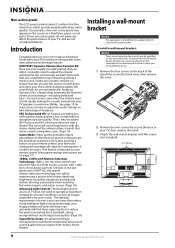
...wall-mount bracket: Warning These servicing instructions are qualified to do so. 1 Remove the four screws on the screen as exceptional picture quality. This television incorporates some scenes are lower than that contained in the operating instructions unless you are for instructions on page... the back cover, then remove the cover. 2 Remove the two screws the secure the base to your new Insignia Advanced Series television! More game settings instructions are not considered defects. That's why we added SRS TruSurround HD, which provide exceptionally sharp video quality. ...
...wall-mount bracket: Warning These servicing instructions are qualified to do so. 1 Remove the four screws on the screen as exceptional picture quality. This television incorporates some scenes are lower than that contained in the operating instructions unless you are for instructions on page... the back cover, then remove the cover. 2 Remove the two screws the secure the base to your new Insignia Advanced Series television! More game settings instructions are not considered defects. That's why we added SRS TruSurround HD, which provide exceptionally sharp video quality. ...
User Manual (English)
Page 11
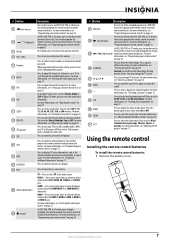
...STB. For more information, see "Adjusting the sound" on page 16. 32 MUTE Press to set -top box. For more information, see "Freezing the picture" on page 17. For more information, see "Adjusting the TV picture" on page19. # Button 9 (fast reverse) 10 / (skip back) 11 RECALL 12 ...Using the remote control Installing the remote control batteries To install the remote control batteries: 1 Remove the battery cover. For more information, see "Setting up a favorite channel list" on page 19. For more information, see "Adjusting the sound" on page 21. For more information, see ...
...STB. For more information, see "Adjusting the sound" on page 16. 32 MUTE Press to set -top box. For more information, see "Freezing the picture" on page 17. For more information, see "Adjusting the TV picture" on page19. # Button 9 (fast reverse) 10 / (skip back) 11 RECALL 12 ...Using the remote control Installing the remote control batteries To install the remote control batteries: 1 Remove the battery cover. For more information, see "Setting up a favorite channel list" on page 19. For more information, see "Adjusting the sound" on page 21. For more information, see ...
User Manual (English)
Page 15
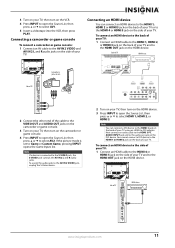
Back of TV HDMI device Side of TV Camcorder or game console 2 Connect the other end of your TV. Note If a device is set to select AV1. 5 Insert a videotape into the VCR, then press PLAY. Side of your TV and to the HDMI OUT jack on the HDMI device. ... the AV IN 2 L and R audio jacks. You cannot connect a DVI device to the HDMI 1 or HDMI 2 jack on the back of your TV. If the picture mode is connected to the audio out jack on the DVI device. 3 Turn on your TV, then turn on the HDMI device. 3 Press INPUT to...
Back of TV HDMI device Side of TV Camcorder or game console 2 Connect the other end of your TV. Note If a device is set to select AV1. 5 Insert a videotape into the VCR, then press PLAY. Side of your TV and to the HDMI OUT jack on the HDMI device. ... the AV IN 2 L and R audio jacks. You cannot connect a DVI device to the HDMI 1 or HDMI 2 jack on the back of your TV. If the picture mode is connected to the audio out jack on the DVI device. 3 Turn on your TV, then turn on the HDMI device. 3 Press INPUT to...
User Manual (English)
Page 19
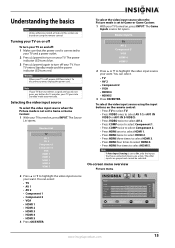
...highlight the video input source your want . The other inputs are active. On-screen menu overview Picture menu Picture Mode Brightness Contrast Color Tint Sharpness PICTURE AUDIO CHANNELS SETTINGS Vivid 42 45 54 0 +5 MOVE OK ENTER SELECT Adjust settings to turn on , press INPUT. You can select. • TV • AV 2...• Press HDMI five times to select HDMI 5. To select the video input source when the Picture mode is set to On, only the inputs that the power cord is set to Game or Game Custom: 1 With your TV turned on, press INPUT. Understanding the basics ...
...highlight the video input source your want . The other inputs are active. On-screen menu overview Picture menu Picture Mode Brightness Contrast Color Tint Sharpness PICTURE AUDIO CHANNELS SETTINGS Vivid 42 45 54 0 +5 MOVE OK ENTER SELECT Adjust settings to turn on , press INPUT. You can select. • TV • AV 2...• Press HDMI five times to select HDMI 5. To select the video input source when the Picture mode is set to On, only the inputs that the power cord is set to Game or Game Custom: 1 With your TV turned on, press INPUT. Understanding the basics ...
User Manual (English)
Page 20
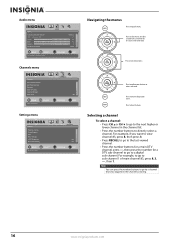
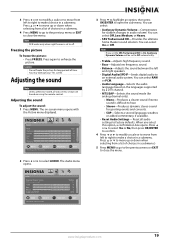
... Audio Audyssey Dynamic Volume SRS TruSurround HD Treble Bass Balance Digital Audio/SPDIF PICTURE AUDIO CHANNELS SETTINGS Medium Off 32 32 0 RAW MOVE OK ENTER SELECT Adjust settings to affect sound quality MENU PREVIOUS EXIT EXIT Channels menu Channels Auto Channel Search... Audio Only PICTURE AUDIO CHANNELS SETTINGS Off MOVE OK ENTER SELECT Adjust channel options MENU PREVIOUS EXIT EXIT Settings menu Settings Parental Controls Closed Caption Time Menu Settings LOGO Brightness Auto Input Sensing PICTURE AUDIO CHANNELS SETTINGS Low On MOVE OK ENTER SELECT Set various TV ...
... Audio Audyssey Dynamic Volume SRS TruSurround HD Treble Bass Balance Digital Audio/SPDIF PICTURE AUDIO CHANNELS SETTINGS Medium Off 32 32 0 RAW MOVE OK ENTER SELECT Adjust settings to affect sound quality MENU PREVIOUS EXIT EXIT Channels menu Channels Auto Channel Search... Audio Only PICTURE AUDIO CHANNELS SETTINGS Off MOVE OK ENTER SELECT Adjust channel options MENU PREVIOUS EXIT EXIT Settings menu Settings Parental Controls Closed Caption Time Menu Settings LOGO Brightness Auto Input Sensing PICTURE AUDIO CHANNELS SETTINGS Low On MOVE OK ENTER SELECT Set various TV ...
User Manual (English)
Page 21
... all the options. Note • • • You may show current channel name, program name, time, rating, and summaries, depending on page 18. • Reset Picture Settings-Resets all tasks in a submenu. 4 Press MENU to go to the previous menu or EXIT to turn off the sound. Displaying additional information To display...
... all the options. Note • • • You may show current channel name, program name, time, rating, and summaries, depending on page 18. • Reset Picture Settings-Resets all tasks in a submenu. 4 Press MENU to go to the previous menu or EXIT to turn off the sound. Displaying additional information To display...
User Manual (English)
Page 22
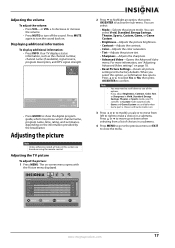
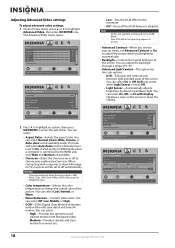
... aspect ratio. Note • • DCM is disabled. DCR only works when Light Sensor is set to off automatically. Picture Brightness Contrast Color Tint Sharpness Advanced Video PICTURE AUDIO CHANNELS SETTINGS 50 50 64 0 0 MOVE OK ENTER SELECT MENU PREVIOUS Adjust advanced video features to fine tune the...8226; Overscan --Select the Overscan on the Channels menu is 480i, 480p, 720p, 1080i, and 1080p in picture. • Advanced Contrast-When you see the pop-up menu, set to show the effects). You can select: • High-Provides the smoothest and clearest motion from film based...
... aspect ratio. Note • • DCM is disabled. DCR only works when Light Sensor is set to off automatically. Picture Brightness Contrast Color Tint Sharpness Advanced Video PICTURE AUDIO CHANNELS SETTINGS 50 50 64 0 0 MOVE OK ENTER SELECT MENU PREVIOUS Adjust advanced video features to fine tune the...8226; Overscan --Select the Overscan on the Channels menu is 480i, 480p, 720p, 1080i, and 1080p in picture. • Advanced Contrast-When you see the pop-up menu, set to show the effects). You can select: • High-Provides the smoothest and clearest motion from film based...
User Manual (English)
Page 23
.... You may damage your TV's screen. Audio Audyssey Dynamic Volume SRS TruSurround HD Treble Bass Balance Digital Audio/SPDIF PICTURE AUDIO CHANNELS SETTINGS Medium Off 32 32 0 RAW MOVE OK ENTER SELECT Adjust settings to affect sound quality MENU PREVIOUS EXIT EXIT 3 Press to highlight an option, then press OK/ENTER to an...
.... You may damage your TV's screen. Audio Audyssey Dynamic Volume SRS TruSurround HD Treble Bass Balance Digital Audio/SPDIF PICTURE AUDIO CHANNELS SETTINGS Medium Off 32 32 0 RAW MOVE OK ENTER SELECT Adjust settings to affect sound quality MENU PREVIOUS EXIT EXIT 3 Press to highlight an option, then press OK/ENTER to an...
User Manual (English)
Page 24
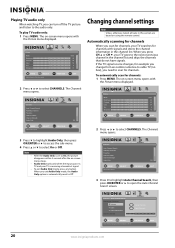
... scan for standard or HD TV EXIT EXIT 20 www.insigniaproducts.com Picture Mode Brightness Contrast Color Tint Sharpness PICTURE AUDIO CHANNELS SETTINGS Vivid 42 45 54 0 +5 MOVE OK ENTER SELECT Adjust settings to affect picture quality MENU PREVIOUS EXIT EXIT 2 Press or to open the Auto ...Press to highlight Audio Only, then press OK/ENTER or to access the sub-menu. 4 Press or to select CHANNELS. PICTURE AUDIO CHANNELS SETTINGS Channels Auto Channel Search Choose your TV searches for channels with signals and stores the channel information in this section are based on...
... scan for standard or HD TV EXIT EXIT 20 www.insigniaproducts.com Picture Mode Brightness Contrast Color Tint Sharpness PICTURE AUDIO CHANNELS SETTINGS Vivid 42 45 54 0 +5 MOVE OK ENTER SELECT Adjust settings to affect picture quality MENU PREVIOUS EXIT EXIT 2 Press or to open the Auto ...Press to highlight Audio Only, then press OK/ENTER or to access the sub-menu. 4 Press or to select CHANNELS. PICTURE AUDIO CHANNELS SETTINGS Channels Auto Channel Search Choose your TV searches for channels with signals and stores the channel information in this section are based on...
User Manual (English)
Page 25
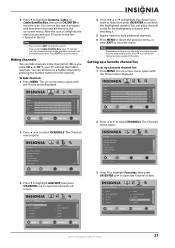
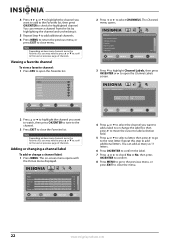
...menu. The Channels menu opens. Channels Auto Channel Search Add/Skip Channels Favorites Channel Labels Channel Strength Audio Only PICTURE AUDIO CHANNELS SETTINGS Off MOVE OK ENTER SELECT Adjust channel options MENU PREVIOUS EXIT EXIT Channels Auto Channel Search Add/Skip Channels Favorites... Channel Labels Channel Strength Audio Only PICTURE AUDIO CHANNELS SETTINGS Off MOVE OK ENTER SELECT Adjust channel options MENU PREVIOUS EXIT EXIT 3 Press to highlight Favorites, then press ...
...menu. The Channels menu opens. Channels Auto Channel Search Add/Skip Channels Favorites Channel Labels Channel Strength Audio Only PICTURE AUDIO CHANNELS SETTINGS Off MOVE OK ENTER SELECT Adjust channel options MENU PREVIOUS EXIT EXIT Channels Auto Channel Search Add/Skip Channels Favorites... Channel Labels Channel Strength Audio Only PICTURE AUDIO CHANNELS SETTINGS Off MOVE OK ENTER SELECT Adjust channel options MENU PREVIOUS EXIT EXIT 3 Press to highlight Favorites, then press ...
User Manual (English)
Page 26
... list, you may need to press or to scroll to close menu. Picture Mode Brightness Contrast Color Tint Sharpness PICTURE AUDIO CHANNELS SETTINGS Vivid 42 45 54 0 +5 MOVE OK ENTER SELECT Adjust settings to affect picture quality MENU PREVIOUS EXIT EXIT 2 Press or to open the Channel Labels screen...the previous menu, or press EXIT to or change a channel label: 1 Press MENU. The Channels menu opens. Channels Channels Labels PICTURE AUDIO CHANNELS SETTINGS Ch 5-0 ABC MOVE OK ENTER SELECT MENU PREVIOUS EXIT EXIT 4 Press or to select the channel you want to add a label...
... list, you may need to press or to scroll to close menu. Picture Mode Brightness Contrast Color Tint Sharpness PICTURE AUDIO CHANNELS SETTINGS Vivid 42 45 54 0 +5 MOVE OK ENTER SELECT Adjust settings to affect picture quality MENU PREVIOUS EXIT EXIT 2 Press or to open the Channel Labels screen...the previous menu, or press EXIT to or change a channel label: 1 Press MENU. The Channels menu opens. Channels Channels Labels PICTURE AUDIO CHANNELS SETTINGS Ch 5-0 ABC MOVE OK ENTER SELECT MENU PREVIOUS EXIT EXIT 4 Press or to select the channel you want to add a label...

User Manual (English)
Page 27
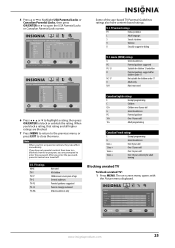
... press OK/ENTER or . The on using the remote control. Picture Mode Brightness Contrast Color Tint Sharpness PICTURE AUDIO CHANNELS SETTINGS Vivid 42 45 54 0 +5 MOVE OK ENTER SELECT Adjust settings to affect picture quality MENU PREVIOUS EXIT EXIT 2 Press or to open the DTV... highlight Channel Strength, then press OK/ENTER or to select CHANNELS. Settings Parental Controls Closed Caption Time Menu Settings LOGO Brightness Auto Input Sensing PICTURE AUDIO CHANNELS SETTINGS Low On MOVE OK ENTER SELECT Set various TV options MENU PREVIOUS EXIT EXIT 3 Press to close the ...
... press OK/ENTER or . The on using the remote control. Picture Mode Brightness Contrast Color Tint Sharpness PICTURE AUDIO CHANNELS SETTINGS Vivid 42 45 54 0 +5 MOVE OK ENTER SELECT Adjust settings to affect picture quality MENU PREVIOUS EXIT EXIT 2 Press or to open the DTV... highlight Channel Strength, then press OK/ENTER or to select CHANNELS. Settings Parental Controls Closed Caption Time Menu Settings LOGO Brightness Auto Input Sensing PICTURE AUDIO CHANNELS SETTINGS Low On MOVE OK ENTER SELECT Set various TV options MENU PREVIOUS EXIT EXIT 3 Press to close the ...

User Manual (English)
Page 28
... to highlight Parental Controls, then press OK/ENTER or . If you have not set a password, enter 0000. The Enter Password screen opens. Settings Parental Controls PICTURE AUDIO CHANNELS SETTINGS Button Lock Off Block Unrated TV Off USA Parental Locks Canadian Parental Locks Change Password...password, enter 9999 as the password. If you forget your password. The Enter New Password screen opens. Settings Parental Controls PICTURE AUDIO CHANNELS SETTINGS Button Lock Off Block Unrated TV Off USA Parental Locks Canadian Parental Locks Change Password MOVE OK ENTER SELECT...
... to highlight Parental Controls, then press OK/ENTER or . If you have not set a password, enter 0000. The Enter Password screen opens. Settings Parental Controls PICTURE AUDIO CHANNELS SETTINGS Button Lock Off Block Unrated TV Off USA Parental Locks Canadian Parental Locks Change Password...password, enter 9999 as the password. If you forget your password. The Enter New Password screen opens. Settings Parental Controls PICTURE AUDIO CHANNELS SETTINGS Button Lock Off Block Unrated TV Off USA Parental Locks Canadian Parental Locks Change Password MOVE OK ENTER SELECT...
User Manual (English)
Page 29
...over seven years of the age-based TV Parental Guidelines ratings also have set parental controls, they take effect immediately. The on-screen menu opens with the Picture menu displayed. U.S. PICTURE AUDIO CHANNELS SETTINGS Settings Parental Controls USA Parental Locks Movie Rating None G PG NC-17 PG...TV-G TV-PG TV-14 TV-MA MOVE OK ENTER SELECT Restrict movie and TV programs by US Ratings MENU PREVIOUS EXIT EXIT PICTURE AUDIO CHANNELS SETTINGS Settings Parental Controls Canadian Parental Locks English Rating French Rating E E C G C8+ 8 ans+ G 13 ans+ PG 16 ans...
...over seven years of the age-based TV Parental Guidelines ratings also have set parental controls, they take effect immediately. The on-screen menu opens with the Picture menu displayed. U.S. PICTURE AUDIO CHANNELS SETTINGS Settings Parental Controls USA Parental Locks Movie Rating None G PG NC-17 PG...TV-G TV-PG TV-14 TV-MA MOVE OK ENTER SELECT Restrict movie and TV programs by US Ratings MENU PREVIOUS EXIT EXIT PICTURE AUDIO CHANNELS SETTINGS Settings Parental Controls Canadian Parental Locks English Rating French Rating E E C G C8+ 8 ans+ G 13 ans+ PG 16 ans...

User Manual (English)
Page 30
... EXIT EXIT 26 www.insigniaproducts.com The Parental Controls menu opens. The Parental Controls menu opens. Settings Parental Controls PICTURE AUDIO CHANNELS SETTINGS Button Lock Off Block Unrated TV Off USA Parental Locks Canadian Parental Locks Change Password MOVE OK ENTER... close the menu. 4 Press the number buttons to select SETTINGS. Settings Parental Controls Closed Caption Time Menu Settings LOGO Brightness Auto Input Sensing PICTURE AUDIO CHANNELS SETTINGS Low On MOVE OK ENTER SELECT Set various TV options MENU PREVIOUS EXIT EXIT 3 Press to highlight...
... EXIT EXIT 26 www.insigniaproducts.com The Parental Controls menu opens. The Parental Controls menu opens. Settings Parental Controls PICTURE AUDIO CHANNELS SETTINGS Button Lock Off Block Unrated TV Off USA Parental Locks Canadian Parental Locks Change Password MOVE OK ENTER... close the menu. 4 Press the number buttons to select SETTINGS. Settings Parental Controls Closed Caption Time Menu Settings LOGO Brightness Auto Input Sensing PICTURE AUDIO CHANNELS SETTINGS Low On MOVE OK ENTER SELECT Set various TV options MENU PREVIOUS EXIT EXIT 3 Press to highlight...
User Manual (English)
Page 31
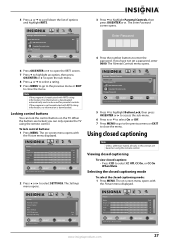
...Parental Controls menu opens. When the buttons are based on using the remote control. The on the TV. Settings Parental Controls PICTURE AUDIO CHANNELS SETTINGS Button Lock Off Block Unrated TV Off USA Parental Locks Canadian Parental Locks Change Password MOVE OK ENTER SELECT ...OK/ENTER or . Viewing closed captioning To view closed captions: • Press CCD to close the menu. Settings Parental Controls PICTURE AUDIO CHANNELS SETTINGS Block Unrated TV Off USA Parental Locks Canadian Parental Locks Change Password RRT5 MOVE OK ENTER SELECT MENU PREVIOUS Display...
...Parental Controls menu opens. When the buttons are based on using the remote control. The on the TV. Settings Parental Controls PICTURE AUDIO CHANNELS SETTINGS Button Lock Off Block Unrated TV Off USA Parental Locks Canadian Parental Locks Change Password MOVE OK ENTER SELECT ...OK/ENTER or . Viewing closed captioning To view closed captions: • Press CCD to close the menu. Settings Parental Controls PICTURE AUDIO CHANNELS SETTINGS Block Unrated TV Off USA Parental Locks Canadian Parental Locks Change Password RRT5 MOVE OK ENTER SELECT MENU PREVIOUS Display...
User Manual (English)
Page 32
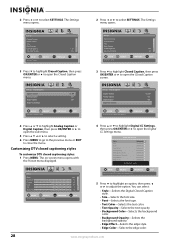
...edge color. 28 www.insigniaproducts.com 2 Press or to select SETTINGS. Settings Parental Controls Closed Caption Time Menu Settings LOGO Brightness Auto Input Sensing PICTURE AUDIO CHANNELS SETTINGS Low On MOVE OK ENTER SELECT Set various TV options MENU PREVIOUS EXIT EXIT 2 Press or to...DECIDED BY AUTO MOVE OK ENTER SELECT MENU PREVIOUS Set the look of digital CC. The Settings menu opens. Settings Closed Caption Caption Control Analog Caption Digital Caption Digital CC Settings PICTURE AUDIO CHANNELS SETTINGS CC Off CC1 CS1 MOVE OK ENTER SELECT ...
...edge color. 28 www.insigniaproducts.com 2 Press or to select SETTINGS. Settings Parental Controls Closed Caption Time Menu Settings LOGO Brightness Auto Input Sensing PICTURE AUDIO CHANNELS SETTINGS Low On MOVE OK ENTER SELECT Set various TV options MENU PREVIOUS EXIT EXIT 2 Press or to...DECIDED BY AUTO MOVE OK ENTER SELECT MENU PREVIOUS Set the look of digital CC. The Settings menu opens. Settings Closed Caption Caption Control Analog Caption Digital Caption Digital CC Settings PICTURE AUDIO CHANNELS SETTINGS CC Off CC1 CS1 MOVE OK ENTER SELECT ...
User Manual (English)
Page 33
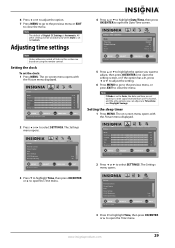
....insigniaproducts.com 29 Note The default of Digital CC Settings is set by TV source EXIT EXIT 5 Press or to select SETTINGS. Setting the clock To set based on -screen menu opens with the Picture menu displayed. Note If Mode is set to Auto, the date and time are Time Zone... EXIT 3 Press to highlight Time, then press OK/ENTER or to select SETTINGS. Picture Mode Brightness Contrast Color Tint Sharpness PICTURE AUDIO CHANNELS SETTINGS Vivid 42 45 54 0 +5 MOVE OK ENTER SELECT Adjust settings to affect picture quality MENU PREVIOUS EXIT EXIT 4 Press or to highlight Date/Time, then ...
....insigniaproducts.com 29 Note The default of Digital CC Settings is set by TV source EXIT EXIT 5 Press or to select SETTINGS. Setting the clock To set based on -screen menu opens with the Picture menu displayed. Note If Mode is set to Auto, the date and time are Time Zone... EXIT 3 Press to highlight Time, then press OK/ENTER or to select SETTINGS. Picture Mode Brightness Contrast Color Tint Sharpness PICTURE AUDIO CHANNELS SETTINGS Vivid 42 45 54 0 +5 MOVE OK ENTER SELECT Adjust settings to affect picture quality MENU PREVIOUS EXIT EXIT 4 Press or to highlight Date/Time, then ...


