
Firmware Installation Guide (English)
Page 1
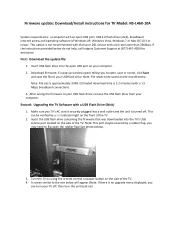
...your USB flash drive. This option is not recommended with dial‐up window opens telling you TV's AC cord is securely plugged into the TV's USB service port located on the side of the TV. If the instructions provided below will appear (Note: if there is turned off , then ...firmware; Note: File needs to your USB flash drive; Make sure you to the one below do not help, call Insignia Customer Support at (877) 467‐4289 for TV Model: NS‐L46X‐10A System requirements: a computer with an open USB port on your computer. 2. Estimated download time is approximately 3 MB....
...your USB flash drive. This option is not recommended with dial‐up window opens telling you TV's AC cord is securely plugged into the TV's USB service port located on the side of the TV. If the instructions provided below will appear (Note: if there is turned off , then ...firmware; Note: File needs to your USB flash drive; Make sure you to the one below do not help, call Insignia Customer Support at (877) 467‐4289 for TV Model: NS‐L46X‐10A System requirements: a computer with an open USB port on your computer. 2. Estimated download time is approximately 3 MB....

Firmware Installation Guide (English)
Page 2
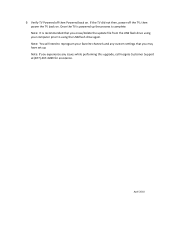
The software update will then begin Note: DO NOT TURN THE POWER OFF OR UNPLUG DURING THE UPDATE Note: During the software update, a progress bar will appear: 7. Press the Enter/OK key on the remote. Using your remote control arrow keys, make sure the "Yes" button is highlighted and press enter/OK on the remote control, TV will then restart. 5. this update takes approximately one shown below will appear displaying the progress of the update; Once the update has completed, a screen similar to the one (1) minute. 6. Remove the USB flash drive (stick) from the TV. 8.
The software update will then begin Note: DO NOT TURN THE POWER OFF OR UNPLUG DURING THE UPDATE Note: During the software update, a progress bar will appear: 7. Press the Enter/OK key on the remote. Using your remote control arrow keys, make sure the "Yes" button is highlighted and press enter/OK on the remote control, TV will then restart. 5. this update takes approximately one shown below will appear displaying the progress of the update; Once the update has completed, a screen similar to the one (1) minute. 6. Remove the USB flash drive (stick) from the TV. 8.
Firmware Installation Guide (English)
Page 3
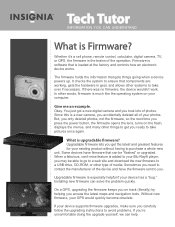
...reprogram your favorite channels and any custom settings that you experience any issues while performing this upgrade, call Insignia Customer Support at (877) 467‐4289 for assistance. Verify TV Powered off the TV; Note: If you erase/delete the update file from the USB flash drive using the USB flash ...drive again. April 2010 then power the TV back on . Note: It is recommended that you may have set up...
...reprogram your favorite channels and any custom settings that you experience any issues while performing this upgrade, call Insignia Customer Support at (877) 467‐4289 for assistance. Verify TV Powered off the TV; Note: If you erase/delete the update file from the USB flash drive using the USB flash ...drive again. April 2010 then power the TV back on . Note: It is recommended that you may have set up...

Warranty (English)
Page 1
... (2) replace the Product at no charge with a screen 30 inches or larger, call , an Insignia television (size and features to be determined by Insignia) will be loaned to you until your TV is determined to be defective by this warranty that requires service, terms of this new product ("Product..."), that the Product shall be purchased from an authorized dealer of Insignia brand products and packaged with ...
... (2) replace the Product at no charge with a screen 30 inches or larger, call , an Insignia television (size and features to be determined by Insignia) will be loaned to you until your TV is determined to be defective by this warranty that requires service, terms of this new product ("Product..."), that the Product shall be purchased from an authorized dealer of Insignia brand products and packaged with ...
What is Firmware? (English)
Page 1
...'t work. You just got a new digital camera and you access the latest maps and navigation tools. Whether it's a cell phone, remote control, calculator, digital camera, TV, or GPS, the firmware is much like the operating system on track (literally) by helping you took lots of the operation. It checks the system...
...'t work. You just got a new digital camera and you access the latest maps and navigation tools. Whether it's a cell phone, remote control, calculator, digital camera, TV, or GPS, the firmware is much like the operating system on track (literally) by helping you took lots of the operation. It checks the system...
User Manual (English)
Page 3
... 8 Using the remote control holder 8 Programming a universal remote control to work with your TV . . . . 8 Making connections 9 Connecting the power 9 Connecting an outdoor antenna 9 Connecting cable TV 9 Connecting satellite TV via a satellite TV box 10 Connecting a VCR 10 Connecting a camcorder or game console 11 Connecting an HDMI ...13 Connecting a digital audio amplifier 13 Connecting an analog audio amplifier 14 Turning on your TV for the first time 14 Understanding the basics 15 Turning your TV on or off 15 Selecting the video input source 15 On-screen menu overview 15 ...
... 8 Using the remote control holder 8 Programming a universal remote control to work with your TV . . . . 8 Making connections 9 Connecting the power 9 Connecting an outdoor antenna 9 Connecting cable TV 9 Connecting satellite TV via a satellite TV box 10 Connecting a VCR 10 Connecting a camcorder or game console 11 Connecting an HDMI ...13 Connecting a digital audio amplifier 13 Connecting an analog audio amplifier 14 Turning on your TV for the first time 14 Understanding the basics 15 Turning your TV on or off 15 Selecting the video input source 15 On-screen menu overview 15 ...
User Manual (English)
Page 4
... the DTV signal strength 23 Setting parental controls 23 Setting or changing the password 23 Setting parental control levels 24 Blocking unrated TV 25 Downloading rating information 26 Locking control buttons 27 Using closed captioning 27 Viewing closed captioning 27 Selecting the closed captioning mode... 29 Adjusting menu settings 30 Selecting the menu language 30 Changing the menu transparency 30 Labeling an input source 31 Adjusting the INSIGNIA logo brightness 32 Turning Auto Input Sensing on or off 32 Resetting settings to the defaults 33 Programming your remote control 33...
... the DTV signal strength 23 Setting parental controls 23 Setting or changing the password 23 Setting parental control levels 24 Blocking unrated TV 25 Downloading rating information 26 Locking control buttons 27 Using closed captioning 27 Viewing closed captioning 27 Selecting the closed captioning mode... 29 Adjusting menu settings 30 Selecting the menu language 30 Changing the menu transparency 30 Labeling an input source 31 Adjusting the INSIGNIA logo brightness 32 Turning Auto Input Sensing on or off 32 Resetting settings to the defaults 33 Programming your remote control 33...

User Manual (English)
Page 5
...you are committed to making home entertainment enjoyable and safe. We and the consumer electronics industry are unsure, ask a professional installer. • TVs can easily be used as steps, such as a chest of drawers. • Remember that has been recommended by curious children. Some wall ... always supported on the proper stands or installed according to walls backed with entertainment system furniture and TVs. • Don't place TVs on furniture that can be heavy. However, TVs are not designed to be mounted to the manufacturer's recommendations. Make sure that you place or ...
...you are committed to making home entertainment enjoyable and safe. We and the consumer electronics industry are unsure, ask a professional installer. • TVs can easily be used as steps, such as a chest of drawers. • Remember that has been recommended by curious children. Some wall ... always supported on the proper stands or installed according to walls backed with entertainment system furniture and TVs. • Don't place TVs on furniture that can be heavy. However, TVs are not designed to be mounted to the manufacturer's recommendations. Make sure that you place or ...
User Manual (English)
Page 6
.... 15 The wall plug is required when the apparatus has been damaged in your mouth, immediately gargle, rinse, and consult with your TV is used, use caution when moving the S3125A cart/apparatus combination to dripping or splashing, and no objects filled with them might be fatal... sure that the service technician uses replacement parts specified by the manufacturer, or sold with three-prong, grounding-type plug is present within your TV or hit, jolt, or press hard against the LCD panel. Refer servicing to prevent possible electric shock. Power lines An outside antenna system...
.... 15 The wall plug is required when the apparatus has been damaged in your mouth, immediately gargle, rinse, and consult with your TV is used, use caution when moving the S3125A cart/apparatus combination to dripping or splashing, and no objects filled with them might be fatal... sure that the service technician uses replacement parts specified by the manufacturer, or sold with three-prong, grounding-type plug is present within your TV or hit, jolt, or press hard against the LCD panel. Refer servicing to prevent possible electric shock. Power lines An outside antenna system...
User Manual (English)
Page 7
...and supporting structure, grounding of the lead-in your cordless and cellular telephones away from cool surroundings into your TV. • If your TV has been exposed to your TV does not operate normally by following conditions: • When the power supply cord or plug is exposed to... Electric service equipment Note to CATV system installer Article 820 of cable entry as close to your home, consult an electrician or your TV exhibits a distinct change the location of power source indicated on the marking label. Condensation Moisture will often require extensive work by the ...
...and supporting structure, grounding of the lead-in your cordless and cellular telephones away from cool surroundings into your TV. • If your TV has been exposed to your TV does not operate normally by following conditions: • When the power supply cord or plug is exposed to... Electric service equipment Note to CATV system installer Article 820 of cable entry as close to your home, consult an electrician or your TV exhibits a distinct change the location of power source indicated on the marking label. Condensation Moisture will often require extensive work by the ...
User Manual (English)
Page 8
... perform any servicing other than others. Audyssey Dynamic EQ is held steady, making the sound coming from your LCD TV does not need to take advantage of your TV, and are for use by qualified service personnel only. See page 19 for each scene, even when the volume...secure the back cover, then remove the cover. 2 Remove the two screws the secure the base to your new Insignia Advanced Series television! Using intelligent light sensing technology, your Insignia Advanced Series television can automatically find these opportunities to be easier. (The button is a feature that lets you put...
... perform any servicing other than others. Audyssey Dynamic EQ is held steady, making the sound coming from your LCD TV does not need to take advantage of your TV, and are for use by qualified service personnel only. See page 19 for each scene, even when the volume...secure the back cover, then remove the cover. 2 Remove the two screws the secure the base to your new Insignia Advanced Series television! Using intelligent light sensing technology, your Insignia Advanced Series television can automatically find these opportunities to be easier. (The button is a feature that lets you put...
User Manual (English)
Page 9
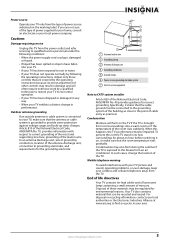
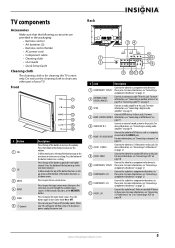
...see "Connecting a S-Video device" on 12 or "Connecting a VCR" on page 9. 3 SPDIF Connect an audio amplifier to this button again to turn your TV on page 12. 12 AV IN 1 L/R Connect the audio for a S-Video device to the HDMI 3 jack. In Menu mode, the top of the... information, see "Connecting a component video device" on or off , power still flows into it. Press the bottom of the button to these jacks. TV components Accessories Make sure that the following accessories are provided in the packaging: • Remote control • AA batteries (2) • Remote control holder ...
...see "Connecting a S-Video device" on 12 or "Connecting a VCR" on page 9. 3 SPDIF Connect an audio amplifier to this button again to turn your TV on page 12. 12 AV IN 1 L/R Connect the audio for a S-Video device to the HDMI 3 jack. In Menu mode, the top of the... information, see "Connecting a component video device" on or off , power still flows into it. Press the bottom of the button to these jacks. TV components Accessories Make sure that the following accessories are provided in the packaging: • Remote control • AA batteries (2) • Remote control holder ...
User Manual (English)
Page 10
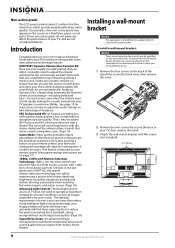
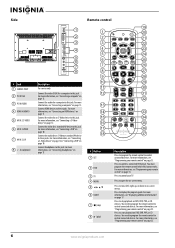
... 7 26 8 27 9 28 10 29 11 30 12 31 32 13 14 33 15 34 16 GAME 35 DYN VOL 17 36 18 NS-RC02U-10A 37 # Button 1 SET 2 DVD 3 TV 4 MENU 5 6 GUIDE 7 (stop playback on page 10. Press to this jack. You need to program the remote control to these jacks. For...
... 7 26 8 27 9 28 10 29 11 30 12 31 32 13 14 33 15 34 16 GAME 35 DYN VOL 17 36 18 NS-RC02U-10A 37 # Button 1 SET 2 DVD 3 TV 4 MENU 5 6 GUIDE 7 (stop playback on page 10. Press to this jack. You need to program the remote control to these jacks. For...
User Manual (English)
Page 11
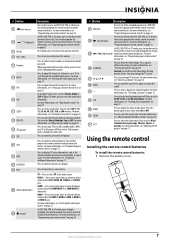
...previous channel. When programming the remote control, press to control connected devices. Press to open the Source List, then press or to select TV as the channel number, channel name (if available), or signal source. For more information, see "Programming your remote control" on page ... sources. For more information, see "Adjusting the sound" on page 33. For more information, see "Selecting a channel" on page19. In TV mode, press to return to control connected devices. You need to program the remote 29 / (skip forward) control to enter device and programming...
...previous channel. When programming the remote control, press to control connected devices. Press to open the Source List, then press or to select TV as the channel number, channel name (if available), or signal source. For more information, see "Programming your remote control" on page ... sources. For more information, see "Adjusting the sound" on page 33. For more information, see "Selecting a channel" on page19. In TV mode, press to return to control connected devices. You need to program the remote 29 / (skip forward) control to enter device and programming...
User Manual (English)
Page 12
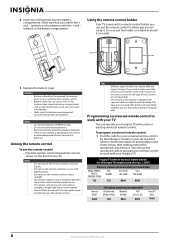
... the remote control to be exposed to wall mount the remote control holder, make sure that you use the numbered code to program your Insignia TV with a remote control holder you can put the remote control in an area with the + and - Make sure that batteries are not...8226; Make sure that you match the + and - Do not mix old and new batteries. Either move your TV. If the batteries leak, clean the battery compartment with all Insignia TVs manufactured after Jan. 1, 2007) Universal remote control manufacturers and models Philips PHDVD5, PH5DSS, PMDVR8, PDVR8 RCA RCU807 One...
... the remote control to be exposed to wall mount the remote control holder, make sure that you use the numbered code to program your Insignia TV with a remote control holder you can put the remote control in an area with the + and - Make sure that batteries are not...8226; Make sure that you match the + and - Do not mix old and new batteries. Either move your TV. If the batteries leak, clean the battery compartment with all Insignia TVs manufactured after Jan. 1, 2007) Universal remote control manufacturers and models Philips PHDVD5, PH5DSS, PMDVR8, PDVR8 RCA RCU807 One...
User Manual (English)
Page 13
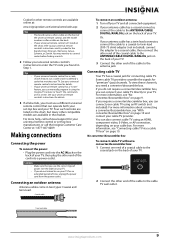
..." (pay) channels. For more information about connecting a converter/descrambler box, see "Connecting cable TV via a cable TV box" on the back of your cable box. For more help, call the Insignia Customer Care Center at 1-877-467-4289. Four such remotes are listed on the chart, but... instructions and try several codes before finding a match. 2 Follow your universal remote control's instructions to enter the TV code you can also connect cable TV using the Insignia TV remote to "teach" the commands one end of a coaxial cable to try codes for your universal remote control or...
..." (pay) channels. For more information about connecting a converter/descrambler box, see "Connecting cable TV via a cable TV box" on the back of your cable box. For more help, call the Insignia Customer Care Center at 1-877-467-4289. Four such remotes are listed on the chart, but... instructions and try several codes before finding a match. 2 Follow your universal remote control's instructions to enter the TV code you can also connect cable TV using the Insignia TV remote to "teach" the commands one end of a coaxial cable to try codes for your universal remote control or...
User Manual (English)
Page 14
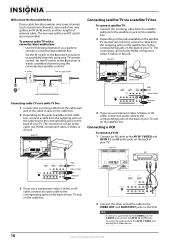
...descrambler controls. The connection can be to the cable-out, HDMI, component video, S-Video, or AV jack. Back of TV Cable box IANNTENONUAT Connecting satellite TV via a cable TV box 1 Connect the incoming cable from the cable wall jack to the cable-in jack on the satellite box. 2 ... and R jacks. To assign the audio jacks to the AV IN 1 VIDEO jack, unplug the S-Video device. 10 www.insigniaproducts.com To connect cable TV with a converter/descrambler box: • Use the following illustration as premium channels), you need a two-way splitter, an RF (A/B) switch, and four lengths...
...descrambler controls. The connection can be to the cable-out, HDMI, component video, S-Video, or AV jack. Back of TV Cable box IANNTENONUAT Connecting satellite TV via a cable TV box 1 Connect the incoming cable from the cable wall jack to the cable-in jack on the satellite box. 2 ... and R jacks. To assign the audio jacks to the AV IN 1 VIDEO jack, unplug the S-Video device. 10 www.insigniaproducts.com To connect cable TV with a converter/descrambler box: • Use the following illustration as premium channels), you need a two-way splitter, an RF (A/B) switch, and four lengths...
User Manual (English)
Page 15
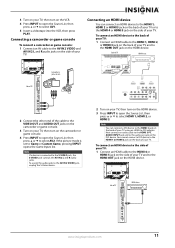
... the HDMI 4 or HDMI 5 jack on the HDMI device. Note You can connect an HDMI device to the audio out jack on the side of TV HDMI device www.insigniaproducts.com 11 Next connect an audio cable to the HDMI 3 PC AUDIO INPUT jack and to the HDMI 1, HDMI 2 or HDMI... 3 jack on the back of your TV. Connecting a camcorder or game console To connect a camcorder or game console: 1 Connect an AV cable to Game or Custom Game, pressing INPUT opens the Game...
... the HDMI 4 or HDMI 5 jack on the HDMI device. Note You can connect an HDMI device to the audio out jack on the side of TV HDMI device www.insigniaproducts.com 11 Next connect an audio cable to the HDMI 3 PC AUDIO INPUT jack and to the HDMI 1, HDMI 2 or HDMI... 3 jack on the back of your TV. Connecting a camcorder or game console To connect a camcorder or game console: 1 Connect an AV cable to Game or Custom Game, pressing INPUT opens the Game...
User Manual (English)
Page 16
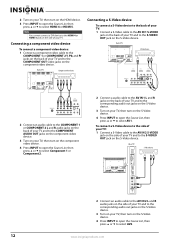
... video device To connect a component video device: 1 Connect a component video cable to the COMPONENT 1 or COMPONENT 2 Y, Pb, and Pr jacks on the back of your TV and to select AV1. Back of TV S-Video device 2 Connect an audio cable to the COMPONENT 1 or COMPONENT 2 L and R audio jacks on the back of your... select Component 1 or Component 2. 2 Connect a audio cable to the AV IN 1 L and R jacks on the back of your TV and to the corresponding audio out jacks on the S-Video device. 3 Turn on your TV, then turn on the S-Video device. 4 Press INPUT to open the Source List, then press or to the...
... video device To connect a component video device: 1 Connect a component video cable to the COMPONENT 1 or COMPONENT 2 Y, Pb, and Pr jacks on the back of your TV and to select AV1. Back of TV S-Video device 2 Connect an audio cable to the COMPONENT 1 or COMPONENT 2 L and R audio jacks on the back of your... select Component 1 or Component 2. 2 Connect a audio cable to the AV IN 1 L and R jacks on the back of your TV and to the corresponding audio out jacks on the S-Video device. 3 Turn on your TV, then turn on the S-Video device. 4 Press INPUT to open the Source List, then press or to the...

User Manual (English)
Page 17
... open the Source List, then press or to the SPDIF jack on the amplifier. Note When headphones are plugged in, the sound from your TV turns off. Connecting a digital audio amplifier To connect a digital audio amplifier: • Connect a digital audio cable to select VGA. Side of... TV Side of TV 2 Connect an audio cable to the AUDIO OUT jack on the computer. 3 Turn on your TV. To connect a computer: 1 Connect a VGA cable to the PC IN VGA jack on the side of...
... open the Source List, then press or to the SPDIF jack on the amplifier. Note When headphones are plugged in, the sound from your TV turns off. Connecting a digital audio amplifier To connect a digital audio amplifier: • Connect a digital audio cable to select VGA. Side of... TV Side of TV 2 Connect an audio cable to the AUDIO OUT jack on the computer. 3 Turn on your TV. To connect a computer: 1 Connect a VGA cable to the PC IN VGA jack on the side of...


