Firmware Installation Guide (English)
Page 1
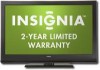
.... 2. Turn the TV on using the remote control or power button on the root directory. A screen similar to the one below do not help, call Insignia Customer Support at (877) 467‐4289 for TV Model: NS‐L46X‐10A System requirements: a computer with an open , save or cancel, click Save and save the...
.... 2. Turn the TV on using the remote control or power button on the root directory. A screen similar to the one below do not help, call Insignia Customer Support at (877) 467‐4289 for TV Model: NS‐L46X‐10A System requirements: a computer with an open , save or cancel, click Save and save the...

Firmware Installation Guide (English)
Page 2
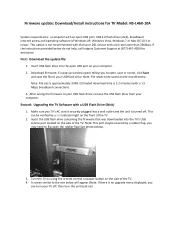
The software update will then begin Note: DO NOT TURN THE POWER OFF OR UNPLUG DURING THE UPDATE Note: During the software update, a progress bar will then restart. this update takes approximately one shown below will appear: 7. Press the Enter/OK key on the remote. Once the update has completed, a screen similar to the one (1) minute. 6. Remove the USB flash drive (stick) from the TV. 8. Using your remote control arrow keys, make sure the "Yes" button is highlighted and press enter/OK on the remote control, TV will appear displaying the progress of the update; 5.
The software update will then begin Note: DO NOT TURN THE POWER OFF OR UNPLUG DURING THE UPDATE Note: During the software update, a progress bar will then restart. this update takes approximately one shown below will appear: 7. Press the Enter/OK key on the remote. Once the update has completed, a screen similar to the one (1) minute. 6. Remove the USB flash drive (stick) from the TV. 8. Using your remote control arrow keys, make sure the "Yes" button is highlighted and press enter/OK on the remote control, TV will appear displaying the progress of the update; 5.

Warranty (English)
Page 1
... be purchased from the date you put the Product in the United States, Canada, and Mexico. Two-year limited warranty Insignia Products ("Insignia") warrants to Insignia television consumers residing in the United States. or (2) replace the Product at no charge with new or rebuilt parts; This...or parts are not returned to the store you received with a screen 30 inches or larger, call , an Insignia television (size and features to be determined by an authorized Insignia repair center or store personnel, Insignia will be free of defects in the original manufacture of this warranty ...
... be purchased from the date you put the Product in the United States, Canada, and Mexico. Two-year limited warranty Insignia Products ("Insignia") warrants to Insignia television consumers residing in the United States. or (2) replace the Product at no charge with new or rebuilt parts; This...or parts are not returned to the store you received with a screen 30 inches or larger, call , an Insignia television (size and features to be determined by an authorized Insignia repair center or store personnel, Insignia will be free of defects in the original manufacture of this warranty ...
User Manual (English)
Page 3
... your TV for the first time 14 Understanding the basics 15 Turning your TV on or off 15 Selecting the video input source 15 On-screen menu overview 15 Navigating the menus 16 Selecting a channel 16 Adjusting the volume 17 Displaying additional information 17 Adjusting the picture 17 Adjusting the TV...
... your TV for the first time 14 Understanding the basics 15 Turning your TV on or off 15 Selecting the video input source 15 On-screen menu overview 15 Navigating the menus 16 Selecting a channel 16 Adjusting the volume 17 Displaying additional information 17 Adjusting the picture 17 Adjusting the TV...
User Manual (English)
Page 4
...sleep timer 29 Adjusting menu settings 30 Selecting the menu language 30 Changing the menu transparency 30 Labeling an input source 31 Adjusting the INSIGNIA logo brightness 32 Turning Auto Input Sensing on or off 32 Resetting settings to the defaults 33 Programming your remote control 33 Troubleshooting ...remote control programming 37 Manufacturers' codes 37 Maintaining 49 Cleaning the TV cabinet 49 Cleaning the TV screen 49 Troubleshooting 49 Specifications 50 Legal notices 51 Two-year limited warranty 53 ii www.insigniaproducts.com
...sleep timer 29 Adjusting menu settings 30 Selecting the menu language 30 Changing the menu transparency 30 Labeling an input source 31 Adjusting the INSIGNIA logo brightness 32 Turning Auto Input Sensing on or off 32 Resetting settings to the defaults 33 Programming your remote control 33 Troubleshooting ...remote control programming 37 Manufacturers' codes 37 Maintaining 49 Cleaning the TV cabinet 49 Cleaning the TV screen 49 Troubleshooting 49 Specifications 50 Legal notices 51 Two-year limited warranty 53 ii www.insigniaproducts.com
User Manual (English)
Page 6
... property damage and personal injury from the power outlet and disconnect any way, such as the original part. Handling the LCD panel • Your TV's screen is used, use caution when moving the S3125A cart/apparatus combination to avoid injury from being walked on the back of your TV. Also, if... characteristics as power-supply cord or plug is damaged, liquid has been spilled or objects have fallen into such power lines or circuits. If the screen breaks, be grounded to qualified service technicians.
... property damage and personal injury from the power outlet and disconnect any way, such as the original part. Handling the LCD panel • Your TV's screen is used, use caution when moving the S3125A cart/apparatus combination to avoid injury from being walked on the back of your TV. Also, if... characteristics as power-supply cord or plug is damaged, liquid has been spilled or objects have fallen into such power lines or circuits. If the screen breaks, be grounded to qualified service technicians.
User Manual (English)
Page 8
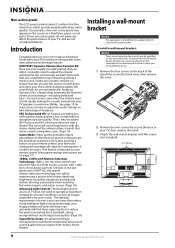
...speakers sound more lifelike. Installing a wall-mount bracket Warning This apparatus is held steady, making the sound coming from your Insignia Advanced Series television can automatically find these opportunities to reduce the power consumed by its backlight, saving energy without sacrificing picture... a fixed blue, green, or red point. The lighting requirements of your new Insignia Advanced Series television! To install a wall-mount bracket: Warning These servicing instructions are on the screen as exceptional picture quality. Occasionally, a few non-active pixels may appear on page...
...speakers sound more lifelike. Installing a wall-mount bracket Warning This apparatus is held steady, making the sound coming from your Insignia Advanced Series television can automatically find these opportunities to reduce the power consumed by its backlight, saving energy without sacrificing picture... a fixed blue, green, or red point. The lighting requirements of your new Insignia Advanced Series television! To install a wall-mount bracket: Warning These servicing instructions are on the screen as exceptional picture quality. Occasionally, a few non-active pixels may appear on page...
User Manual (English)
Page 9
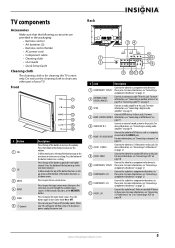
... or Off. Press to the next lower channel. To disconnect power, unplug the power cord. www.insigniaproducts.com 5 Connect the audio for cleaning the TV screen only. In Menu mode, press the top of the button to go to open the on or off , power still flows into it. Press the...
... or Off. Press to the next lower channel. To disconnect power, unplug the power cord. www.insigniaproducts.com 5 Connect the audio for cleaning the TV screen only. In Menu mode, press the top of the button to go to open the on or off , power still flows into it. Press the...
User Manual (English)
Page 10
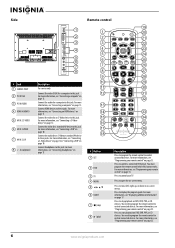
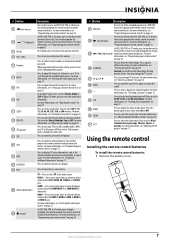
... 10 29 11 30 12 31 32 13 14 33 15 34 16 GAME 35 DYN VOL 17 36 18 NS-RC02U-10A 37 # Button 1 SET 2 DVD 3 TV 4 MENU 5 6 GUIDE 7 (stop playback on -screen menus. Press to stop ) 8 (play) Description Press to program the remote control to control a connected DVD player.... "Connecting a VCR" on page 33. For more information, see "Programming your TV. Connect the video for an S-Video device to start playback on -screen menu. Press to control connected devices. Press to this jack. Connect the video for a standard AV device to open the on DVD, DVR, PVR, or...
... 10 29 11 30 12 31 32 13 14 33 15 34 16 GAME 35 DYN VOL 17 36 18 NS-RC02U-10A 37 # Button 1 SET 2 DVD 3 TV 4 MENU 5 6 GUIDE 7 (stop playback on -screen menus. Press to stop ) 8 (play) Description Press to program the remote control to control a connected DVD player.... "Connecting a VCR" on page 33. For more information, see "Programming your TV. Connect the video for an S-Video device to start playback on -screen menu. Press to control connected devices. Press to this jack. Connect the video for a standard AV device to open the on DVD, DVR, PVR, or...
User Manual (English)
Page 11
... 19 (power) 20 STB 21 AUX 22 INFO 23 OK/ENTER 24 EXIT 25 Video input buttons 26 (record) Description Press to fast reverse on -screen menu. You need to program the remote 29 / (skip forward) control to freeze the video image. When programming the remote control, press to open the... need to program the remote control to select TV as the channel number, channel name (if available), or signal source. You may damage the TV screen. 31 CH /CH Press to control a connected set the sleep timer. Using the remote control Installing the remote control batteries To install the remote control...
... 19 (power) 20 STB 21 AUX 22 INFO 23 OK/ENTER 24 EXIT 25 Video input buttons 26 (record) Description Press to fast reverse on -screen menu. You need to program the remote 29 / (skip forward) control to freeze the video image. When programming the remote control, press to open the... need to program the remote control to select TV as the channel number, channel name (if available), or signal source. You may damage the TV screen. 31 CH /CH Press to control a connected set the sleep timer. Using the remote control Installing the remote control batteries To install the remote control...
User Manual (English)
Page 18
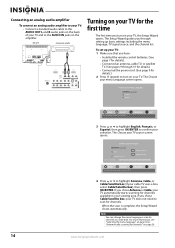
... MENU PREVIOUS EXIT EXIT 3 Press or to highlight English, Français, or Español, then press OK/ENTER to confirm your TV source screen opens. If you chose Cable/Satellite box, your TV does not need to scan for the first time The first time you chose Antenna or... Cable, your TV automatically starts scanning for channels at a later date. The Choose your menu Language screen opens. Note You can change the menu language or scan for channels available in your viewing area. If you turn on your TV. To set...
... MENU PREVIOUS EXIT EXIT 3 Press or to highlight English, Français, or Español, then press OK/ENTER to confirm your TV source screen opens. If you chose Cable/Satellite box, your TV does not need to scan for the first time The first time you chose Antenna or... Cable, your TV automatically starts scanning for channels at a later date. The Choose your menu Language screen opens. Note You can change the menu language or scan for channels available in your viewing area. If you turn on your TV. To set...
User Manual (English)
Page 19
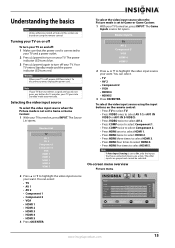
...; TV • AV 1 • AV 2 • Component 1 • Component 2 • VGA • HDMI 1 • HDMI 2 • HDMI 3 • HDMI 4 • HDMI 5 3 Press OK/ENTER. On-screen menu overview Picture menu Picture Mode Brightness Contrast Color Tint Sharpness PICTURE AUDIO CHANNELS SETTINGS Vivid 42 45 54 0 +5 MOVE OK ENTER SELECT Adjust settings...
...; TV • AV 1 • AV 2 • Component 1 • Component 2 • VGA • HDMI 1 • HDMI 2 • HDMI 3 • HDMI 4 • HDMI 5 3 Press OK/ENTER. On-screen menu overview Picture menu Picture Mode Brightness Contrast Color Tint Sharpness PICTURE AUDIO CHANNELS SETTINGS Vivid 42 45 54 0 +5 MOVE OK ENTER SELECT Adjust settings...
User Manual (English)
Page 20
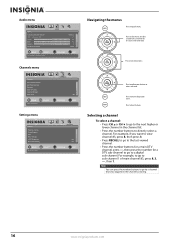
... in the channel scanning. 16 www.insigniaproducts.com Press to select menus, to adjust selected items, or to a digital sub-channel. Press to the previous screen. Press to return to close the menu. Selecting a channel To select a channel: • Press CH or CH to go to move the on...-screen cursor left or right. Note You can press the number buttons to go to sub-channel 1 of main channel 83, press 8, 3, -, then 1. Press to select ...
... in the channel scanning. 16 www.insigniaproducts.com Press to select menus, to adjust selected items, or to a digital sub-channel. Press to the previous screen. Press to return to close the menu. Selecting a channel To select a channel: • Press CH or CH to go to move the on...-screen cursor left or right. Note You can press the number buttons to go to sub-channel 1 of main channel 83, press 8, 3, -, then 1. Press to select ...
User Manual (English)
Page 21
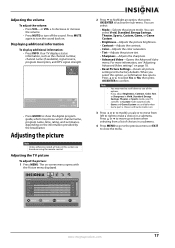
... press OK/ENTER to confirm. www.insigniaproducts.com 17 Adjusting the picture Note Unless otherwise noted, all picture settings to turn the sound back on -screen menu opens with the Picture menu displayed. Adjusting the volume To adjust the volume: • Press VOL - or VOL + to decrease or increase the volume...
... press OK/ENTER to confirm. www.insigniaproducts.com 17 Adjusting the picture Note Unless otherwise noted, all picture settings to turn the sound back on -screen menu opens with the Picture menu displayed. Adjusting the volume To adjust the volume: • Press VOL - or VOL + to decrease or increase the volume...
User Manual (English)
Page 22
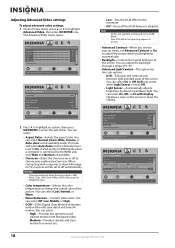
... Noise Reduction DCM Advanced Contrast PICTURE AUDIO CHANNELS SETTINGS Wide On Cool Middle Low On MOVE OK ENTER SELECT Adjust how the picture fills the screen MENU PREVIOUS EXIT EXIT 2 Press to highlight an option, then press OK/ENTER to adjust the picture detail and brightness automatically. • ...0~30. • Advanced Light Control-This option has two sub-options: • DCR-Enhances the contrast ratio between light and dark areas of the screen. You can select On, Off, or On with Display (displays a scale on TV, overscan will be set to off in case ghosting appears in...
... Noise Reduction DCM Advanced Contrast PICTURE AUDIO CHANNELS SETTINGS Wide On Cool Middle Low On MOVE OK ENTER SELECT Adjust how the picture fills the screen MENU PREVIOUS EXIT EXIT 2 Press to highlight an option, then press OK/ENTER to adjust the picture detail and brightness automatically. • ...0~30. • Advanced Light Control-This option has two sub-options: • DCR-Enhances the contrast ratio between light and dark areas of the screen. You can select On, Off, or On with Display (displays a scale on TV, overscan will be set to off in case ghosting appears in...
User Manual (English)
Page 23
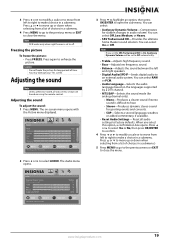
... 4 Press MENU to go to the previous menu or EXIT to close the menu. Note If you select this section are based on -screen menu opens with the Picture menu displayed. Note DCR works only when Light Sensor is difficult to hear. • Stereo-Produces dynamic stereo ...sound for sudden changes in audio volume. You may damage your TV's screen. You can select: • Audyssey Dynamic Volume-Compensates for sporting events and concerts. • SAP-Selects a second language, weather, or added commentary...
... 4 Press MENU to go to the previous menu or EXIT to close the menu. Note If you select this section are based on -screen menu opens with the Picture menu displayed. Note DCR works only when Light Sensor is difficult to hear. • Stereo-Produces dynamic stereo ...sound for sudden changes in audio volume. You may damage your TV's screen. You can select: • Audyssey Dynamic Volume-Compensates for sporting events and concerts. • SAP-Selects a second language, weather, or added commentary...
User Manual (English)
Page 24
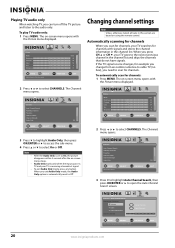
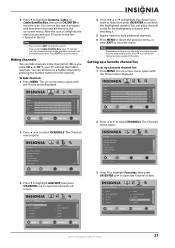
...for channels When you scan for channels, your TV searches for channels with signals and stores the channel information in this section are based on -screen menu closes. • Audio Only works only when the input source is TV and your TV goes to open the Auto Channel Search... Audio Only, then press OK/ENTER or to access the sub-menu. 4 Press or to select CHANNELS. The on -screen menu opens with the Picture menu displayed. The on -screen menu opens with the Picture menu displayed. Channels Auto Channel Search Add/Skip Channels Favorites Channel Labels Channel Strength Audio Only...
...for channels When you scan for channels, your TV searches for channels with signals and stores the channel information in this section are based on -screen menu closes. • Audio Only works only when the input source is TV and your TV goes to open the Auto Channel Search... Audio Only, then press OK/ENTER or to access the sub-menu. 4 Press or to select CHANNELS. The on -screen menu opens with the Picture menu displayed. The on -screen menu opens with the Picture menu displayed. Channels Auto Channel Search Add/Skip Channels Favorites Channel Labels Channel Strength Audio Only...
User Manual (English)
Page 25
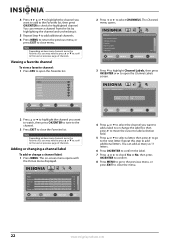
...to affect picture quality MENU PREVIOUS EXIT EXIT 2 Press or to close the menu. The Channels menu opens. 2 Press or to open the Channel Lists screen. Note You can add a channel to the list by highlighting a channel and checking it. 5 Repeat Step 4 to hide additional channels. 6 Press... DT Ch 60-1 Ch 60-3 Ch 60-7 MOVE OK ENTER SELECT Add channels to a hidden channel by the box. Note Depending on -screen menu. Channels Auto Channel Search Add/Skip Channels Favorites Channel Labels Channel Strength Audio Only PICTURE AUDIO CHANNELS SETTINGS Off MOVE OK ENTER SELECT Adjust...
...to affect picture quality MENU PREVIOUS EXIT EXIT 2 Press or to close the menu. The Channels menu opens. 2 Press or to open the Channel Lists screen. Note You can add a channel to the list by highlighting a channel and checking it. 5 Repeat Step 4 to hide additional channels. 6 Press... DT Ch 60-1 Ch 60-3 Ch 60-7 MOVE OK ENTER SELECT Add channels to a hidden channel by the box. Note Depending on -screen menu. Channels Auto Channel Search Add/Skip Channels Favorites Channel Labels Channel Strength Audio Only PICTURE AUDIO CHANNELS SETTINGS Off MOVE OK ENTER SELECT Adjust...
User Manual (English)
Page 26
... need to press or to scroll to add additional letters. Viewing a favorite channel To view a favorite channel: 1 Press FAV to open the Channel Labels screen. 4 Press or to highlight the channel you want to watch, then press OK/ENTER to tune to the channel. 3 Press EXIT to close the Favorites... unchecking it. 5 Repeat Step 4 to add additional channels. 6 Press MENU to return the previous menu, or press EXIT to select CHANNELS. Note Depending on -screen menu opens with the Picture menu displayed. Favorites Ch 5-0 Ch 10-0 Ch 60-3 Ch 60-8 Ch 60-11 Ch 60-12 MOVE OK ENTER SELECT...
... need to press or to scroll to add additional letters. Viewing a favorite channel To view a favorite channel: 1 Press FAV to open the Channel Labels screen. 4 Press or to highlight the channel you want to watch, then press OK/ENTER to tune to the channel. 3 Press EXIT to close the Favorites... unchecking it. 5 Repeat Step 4 to add additional channels. 6 Press MENU to return the previous menu, or press EXIT to select CHANNELS. Note Depending on -screen menu opens with the Picture menu displayed. Favorites Ch 5-0 Ch 10-0 Ch 60-3 Ch 60-8 Ch 60-11 Ch 60-12 MOVE OK ENTER SELECT...

User Manual (English)
Page 27
... EXIT to select SETTINGS. The on content and age). Note When you should set up a password: 1 Press MENU. The Enter Password screen opens. Picture Mode Brightness Contrast Color Tint Sharpness PICTURE AUDIO CHANNELS SETTINGS Vivid 42 45 54 0 +5 MOVE OK ENTER SELECT Adjust settings to.... Enter Password www.insigniaproducts.com 23 Parental controls include two ratings: MPAA (based on age) and TV Parental Guidelines (based on -screen menu opens with the Picture menu displayed. Setting parental controls Note Unless otherwise noted, all tasks in this section are tuned to a DTV...
... EXIT to select SETTINGS. The on content and age). Note When you should set up a password: 1 Press MENU. The Enter Password screen opens. Picture Mode Brightness Contrast Color Tint Sharpness PICTURE AUDIO CHANNELS SETTINGS Vivid 42 45 54 0 +5 MOVE OK ENTER SELECT Adjust settings to.... Enter Password www.insigniaproducts.com 23 Parental controls include two ratings: MPAA (based on age) and TV Parental Guidelines (based on -screen menu opens with the Picture menu displayed. Setting parental controls Note Unless otherwise noted, all tasks in this section are tuned to a DTV...


